


1. UIBezeierPath中的clockwise与CGContextAddArc中的clockwise相反?
以下两句代码效果相同:
UIBezierPath *path = [UIBezierPath bezierPathWithArcCenter:center radius:newDadius startAngle:startAngle endAngle:endAngle clockwise:YES];

CGContextAddArc(context, center.x, center.y, newDadius, startAngle, endAngle, 0);
虽然CGContextAddArc方法文档中写着1是顺时针,0为逆时针,而使用时效果却相反,0反而是顺时针:
clockwise
Specify 1 to create a clockwise arc or 0 to create a counterclockwise arc.
使用以上两种画弧度的方法画出的弧度,假设lineWidth为10,则都会以圆周为中心,在圆周外侧和内侧分别画5(画弧度时,尽量不要把线断点类型lineCap设置成Round,否则可能变成画出圆):
如果要都画在对应的圆周内,需要修改radius参数(newRadius = radius - lineWidth * 0.5)以达到效果:
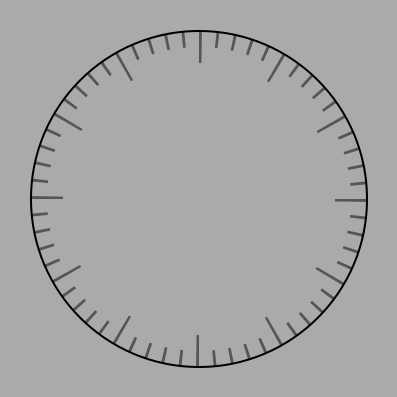
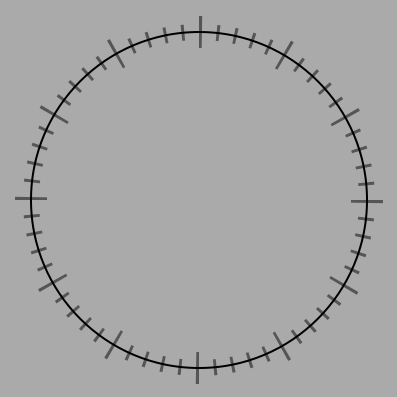
2.虚线的相位(phase)和样式patten
CGContextSetLineDash(<#CGContextRef _Nullable c#>, <#CGFloat phase#>, <#const CGFloat * _Nullable lengths#>, <#size_t count#>)patten是一组CGFloat数组,用来描述画线时 需要画线的长度和画空白的长度,如{10, 10} 说明画线时,先画10的线段,然后画10的空白,以此反复;如果是数组元素个数是单数,如{10, 5, 10}, 则先画10的线,再空白5,再画10,空白10,画5,再空白10,以此反复。
而相位phase则用来指明最开始要先跳过多少长度不画(包括pattern中画线与画空白的部分),如一条pattern为{10,10}的虚线,相位为0时,先画10,再画10 的空白,以此反复

相位为5时,会跳过5(原来要画线的10中的5),所以是先画5,然后画10的空白,再画10的线,空白10,反复:

相位为10时,先跳过10(原要先画的长度10中的10),所以先画10的空白,再按pattern反复

相位为15时,先跳过15(画线的10+画空白的5),所以先画5的空白,再按pattern反复

http://www.cnblogs.com/lzlsky/p/4011826.html
3.CAGradientLayer属性
colors 渐变色
/* The array of CGColorRef objects defining the color of each gradient
 * stop. Defaults to nil. Animatable. */

@property(nullable, copy) NSArray *colors; gradient.colors = @[
(id)[UIColor blackColor].CGColor,
(id)[UIColor orangeColor].CGColor,
(id)[UIColor redColor].CGColor
];locations 位置
/* An optional array of NSNumber objects defining the location of each
* gradient stop as a value in the range [0,1]. The values must be
* monotonically increasing. If a nil array is given, the stops are
* assumed to spread uniformly across the [0,1] range. When rendered,
* the colors are mapped to the output colorspace before being
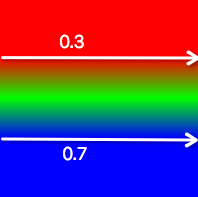
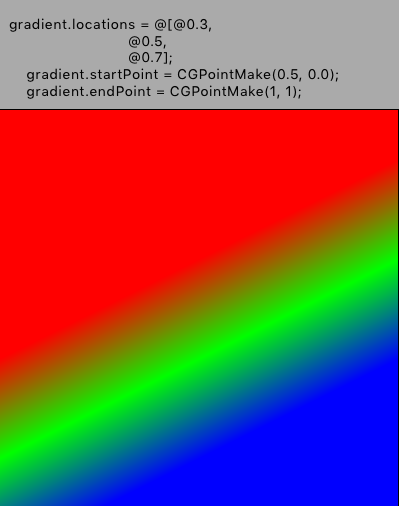
* interpolated. Defaults to nil. Animatable. */location数组元素必须和colors相同,值在 [ 0 , 1 ] 间且必须是单调递增的,locations表示颜色渐变的位置,如colors = @[red, green, blue],locations = @[@0.3, @0.5, @0.7],表示[ 0, 0.3] 为正红色, [0.5]为正绿色,[0.7, 1]为正蓝色,[0,3 , 0.5] 为红色到绿色的渐变,[0.5, 0.7] 为绿色到蓝色的渐变:
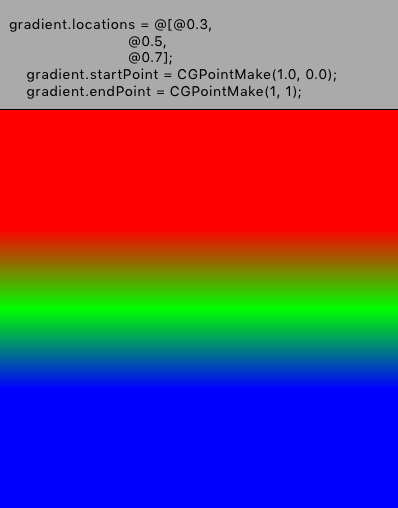
startPoint、endPoint
/* The start and end points of the gradient when drawn into the layer's
* coordinate space. The start point corresponds to the first gradient
* stop, the end point to the last gradient stop. Both points are
* defined in a unit coordinate space that is then mapped to the
* layer's bounds rectangle when drawn. (I.e. [0,0] is the bottom-left
* corner of the layer, [1,1] is the top-right corner.) The default values
* are [.5,0] and [.5,1] respectively. Both are animatable. */
@property CGPoint startPoint;
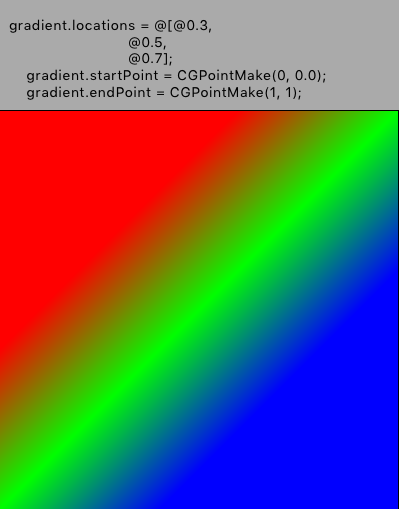
@property CGPoint endPoint;startPoint、endPoint表示颜色渐变的方向,{ x , y } 取值为[0 , 1],是相对于layer.bounds的([0 , 0]是左上角,[1 , 1]是右下角),设置后系统会帮你映射成layer内部的坐标系([0 , 0]是左下角,[1 , 1]是右上角)。startPoint默认是[0.5 , 0],endPoint默认是[0.5 , 1]:
4.CAReplicatorLayer
快速创建重复layer,可以改变重复layer的transform、RGBA。
Note: CAReplicatorLayer中的instanceTransform 是根据前一个自图层的状态,以CAReplicatorLayer的anchorPoint(而不是前一个layer的anchorPoint)来做变换的。一个图层如果翻转后,坐标系也会跟随着翻转,例如一个图层绕X轴旋转180°后,增加其Y坐标图层会往屏幕上方移动,与原坐标系中Y值的改变相反。
基础:
    CAReplicatorLayer *replicator = [CAReplicatorLayer layer];
    replicator.frame = self.containerView.bounds;
    [self.containerView.layer addSublayer:replicator];

    //configure the replicator
    replicator.instanceCount = 20;

    //apply a transform for each instance
    CATransform3D transform = CATransform3DIdentity;
    transform = CATransform3DRotate(transform, M_PI / 10.0, 0, 0, 1);
    replicator.instanceTransform = transform;

    //apply a color shift for each instance
    replicator.instanceBlueOffset = -0.1;
    replicator.instanceGreenOffset = -0.1;

    //create a sublayer and place it inside the replicator
    CALayer *layer = [CALayer layer];
    layer.frame = CGRectMake(137.5f, 25.0f, 25.0f, 25.0f);
    layer.backgroundColor = [UIColor whiteColor].CGColor;
    [replicator addSublayer:layer];
效果:
CAReplicatorLayer + CoreAnimation
Example1:
func animation1() {
        // create CAReplicatorLayer
        let replicator = CAReplicatorLayer()
        replicator.bounds = CGRect(x: 0.0, y: 0.0, width: 60.0, height: 60.0)
        replicator.position = view.center
        replicator.backgroundColor = UIColor.lightGrayColor().CGColor
        view.layer.addSublayer(replicator)

        // creat Sublayer
        let bar = CALayer()
        bar.bounds = CGRect(x: 0.0, y: 0.0, width: 8.0, height: 40.0)
        bar.position = CGPoint(x: 10.0, y: 75.0)
        bar.cornerRadius = 2.0;
        bar.backgroundColor = UIColor.redColor().CGColor

        replicator.addSublayer(bar)

        // create Animation for bar
        let move = CABasicAnimation(keyPath: "position.y")
        move.toValue = bar.position.y - 35.0
        move.duration = 0.5
        move.autoreverses = true
        move.repeatCount = Float.infinity
        bar .addAnimation(move, forKey: nil)

        // config replicator
        replicator.instanceCount = 3
        replicator.instanceTransform = CATransform3DMakeTranslation(20.0, 0, 0)
        replicator.instanceDelay = CFTimeInterval(0.33)
        replicator.masksToBounds = true
    }
效果:
Example 2:
// create the CAReplicatorLayer
let replicator = CAReplicatorLayer()
replicator.bounds = CGRect(x: 0, y: 0, width: 200, height: 200)
replicator.cornerRadius = 10.0
replicator.backgroundColor = UIColor(white: 0.0, alpha: 0.75).CGColor
replicator.position = view.center
view.layer .addSublayer(replicator)
// create a dot
let dot = CALayer()
dot.bounds = CGRect(x: 0, y: 0, width: 14, height: 14)
dot.position = CGPoint(x: 100, y: 40)
dot.backgroundColor = UIColor(white: 0.8, alpha: 1.0).CGColor
dot.borderColor = UIColor(white: 1.0, alpha: 1.0).CGColor
dot.borderWidth = 1.0
dot.cornerRadius = 2.0
// fix 第一次循环时所有点大小一样的不自然状态
dot.transform = CATransform3DMakeScale(0.01, 0.01, 0.01)
replicator.addSublayer(dot)
// create animation
let shrink = CABasicAnimation(keyPath: "transform.scale")
shrink.fromValue = 1.0
shrink.toValue = 0.1
shrink.duration = 1.5
// 不能开启autoReverse,一次循环后dot须正好在最大状态保证动画看起来正常
shrink.autoreverses = false
shrink.repeatCount = Float.infinity
dot.addAnimation(shrink, forKey: nil)
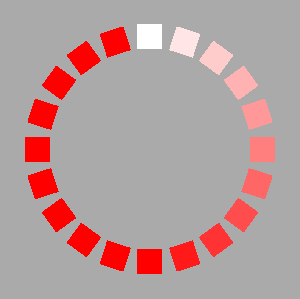
// config replicaotr
replicator.instanceCount = 15
replicator.instanceTransform = CATransform3DMakeRotation(CGFloat(M_PI * 2) / CGFloat(replicator.instanceCount), 0, 0, 1)
replicator.instanceDelay = shrink.duration / CFTimeInterval(replicator.instanceCount)效果:
Example 3:
func animation3() {
        // create the CAReplicatorLayer
        let replicator = CAReplicatorLayer()
        replicator.bounds = view.bounds
        replicator.backgroundColor = UIColor(white: 0, alpha: 0.75).CGColor
        replicator.position = view.center
        view.layer.addSublayer(replicator)

        // ceate a dot
        let dot = CALayer()
        dot.bounds = CGRect(x: 0, y: 0, width: 10, height: 10)
        dot.position = CGPointMake(31.5, 71.5)
        dot.backgroundColor = UIColor(white: 0.8, alpha: 1.0).CGColor
        dot.borderColor = UIColor(white: 1.0, alpha: 1.0).CGColor
        dot.borderWidth = 1
        dot.cornerRadius = 5.0
        dot.shouldRasterize = true
        dot.rasterizationScale = UIScreen.mainScreen().scale
        replicator.addSublayer(dot)

        // create an animation
        let move = CAKeyframeAnimation(keyPath: "position")
        move.path = getAPath()
        move.repeatCount = Float.infinity
        move.duration = 4.0
        dot.addAnimation(move, forKey: nil)

        // config replicator
        replicator.instanceCount = 20
        replicator.instanceDelay = 0.1
        replicator.instanceColor = UIColor(red: 0, green: 1, blue: 0, alpha: 1).CGColor
        replicator.instanceGreenOffset = -0.03
    }

    func getAPath() -> CGPath {
        let bezierPath = UIBezierPath()
        bezierPath.moveToPoint(CGPointMake(31.5, 71.5))
        bezierPath.addLineToPoint(CGPointMake(31.5, 23.5))

        bezierPath.addCurveToPoint(CGPointMake(58.5, 38.5),
            controlPoint1: CGPointMake(31.5, 23.5),
            controlPoint2: CGPointMake(62.46, 18.69))

        bezierPath.addCurveToPoint(CGPointMake(53.5, 45.5),
            controlPoint1: CGPointMake(57.5, 43.5),
            controlPoint2: CGPointMake(53.5, 45.5))

        bezierPath.addLineToPoint(CGPointMake(43.5, 48.5))
        bezierPath.addLineToPoint(CGPointMake(53.5, 66.5))
        bezierPath.addLineToPoint(CGPointMake(62.5, 51.5))
        bezierPath.addLineToPoint(CGPointMake(70.5, 66.5))
        bezierPath.addLineToPoint(CGPointMake(86.5, 23.5))
        bezierPath.addLineToPoint(CGPointMake(86.5, 78.5))
        bezierPath.addLineToPoint(CGPointMake(31.5, 78.5))
        bezierPath.addLineToPoint(CGPointMake(31.5, 71.5))
        bezierPath.closePath()

        var t = CGAffineTransformMakeScale(3.0, 3.0)
        return CGPathCreateCopyByTransformingPath(bezierPath.CGPath, &t)!
    }
效果:
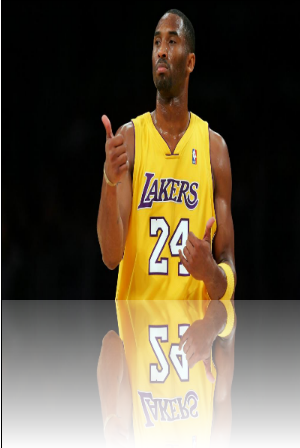
Example 4 使用CAReplicatorLayer制作倒影:
思路:
1. 创建一个instanceCount为2的CAReplicatorLayer,其sourceLayer为contentLayer,copy为reflectLayer;
2. 设置其CAReplicatorLayer的instanceTransform使reflectLayer绕X轴翻转180°后,正好在contentLayer底部。
3. 添加一个CAGradientLayer使reflectLayer看起来像一个倒影的样子。
4. 可以将CAReplicatorLayer放在一个containerLayer中,CAGradientLayer作为containerLayer的子图层,正好覆盖reflectLayer,使用0.25alpha的白色到白色的渐变。
5. 也可以将GradientLayer作为containerLayer的mask,使用任意颜色到透明色的渐变。
    CGSize layerSize = CGSizeMake(200, 200);
    UIImage *image = [UIImage imageNamed:@"kobe.jpg"];
    // 倒影为原图的一半
    CGFloat totalHeigh = layerSize.height * 1.5;

    // containerLayer
    CALayer *container = [CALayer layer];
    container.bounds = CGRectMake(0, 0, layerSize.width, totalHeigh);
    container.position = self.view.center;
    [self.view.layer addSublayer:container];
    container.borderWidth =0.5;
    container.borderColor = [UIColor blackColor].CGColor;
    container.backgroundColor = [UIColor darkGrayColor].CGColor;

    // replicator
    CAReplicatorLayer *replicator = [CAReplicatorLayer layer];
    replicator.anchorPoint = CGPointZero;
    replicator.frame = CGRectMake(0, 0, layerSize.width, totalHeigh);
    replicator.backgroundColor = [UIColor lightGrayColor].CGColor;
    [container addSublayer:replicator];

    // config
    replicator.instanceCount = 2;
    CATransform3D transform = CATransform3DIdentity;
    transform = CATransform3DRotate(transform, M_PI, 1, 0, 0);

    // 旋转后坐标系也跟随旋转了180°,图层向下移动要减小y值
    transform = CATransform3DTranslate(transform, 0 , -layerSize.height * 2, 0);
    replicator.instanceTransform = transform;
    replicator.masksToBounds = YES;

    // a layer
    CALayer *contentLayer = [CALayer layer];
    contentLayer.anchorPoint = CGPointZero;
    contentLayer.frame = CGRectMake(0, 0, layerSize.width, layerSize.height);
    contentLayer.contentsScale = [UIScreen mainScreen].scale;
    contentLayer.shouldRasterize = YES;
    contentLayer.rasterizationScale = [UIScreen mainScreen].scale;
    contentLayer.contents = (id)image.CGImage;
    [replicator addSublayer:contentLayer];

    // create gradient
    CAGradientLayer *gradient = [CAGradientLayer layer];
    gradient.colors = @[
                        (id)[[UIColor whiteColor] colorWithAlphaComponent:0.25].CGColor,
                        (id)[UIColor whiteColor].CGColor
                        ];
    gradient.contentsScale = [UIScreen mainScreen].scale;
    gradient.frame = CGRectMake(0, layerSize.height, layerSize.width, layerSize.height * 0.5);
    [container addSublayer:gradient];

    /* mask 方式
    gradient.frame = container.bounds;
     gradient.colors = @[
     (id)[UIColor whiteColor].CGColor,
     (id)[[UIColor whiteColor] colorWithAlphaComponent:0.6].CGColor,
     (id)[UIColor clearColor].CGColor
     ];
     gradient.locations = @[
     @(200. / 300.),
     @(200.1 / 300.),
     @1
     ];
     container.mask = gradient;
     */
效果:


 877
877

 被折叠的 条评论
为什么被折叠?
被折叠的 条评论
为什么被折叠?
 到【灌水乐园】发言


