


首先需要安装VS 2015或者VC (其实都可以反正都是一家)我建议安装VS 2015 因为功能更强大。
环境搭建好了之后,就进入今天的正题:
1、下载EasyX C++图形库,内置多种绘图函数接口,可以快速上手图形及游戏编程;
下载最新版本并安装完毕之后就正式开始编程实现功能:
2、因为GDI+是Wondows中自带的应用程序编程接口,它的主要作用是处理所有Windows程序的图形输出,这里我们除了添加常规的一些头文件之外还需要添加
GDI+、EasyX相关的头文件及链接库:
#include <iostream>
#include <fstream>
#include <string>
#include <windows.h>
#include<time.h>
#include<conio.h>
#include <gdiplus.h>
#include<graphics.h>
#pragma comment(lib, "gdiplus.lib")//链接库
#define SCREEN_WIDTH 1600
#define SCREEN_HEIGHT 900
#define MAXSTAR 400
gdiplus.h头文件中定义着GDI+API中的各种类、函数、常量、枚举及结构体;gdiplus.lib静态库作为连接器输入附加依赖项;
graphics.h中则定义了多种绘图函数接口,如像素、线形、多边形、曲线、填充、图像等。
3、因为在Gdiplus.h头文件中,所有的GDI+类、函数、常量等都定义在命名空间Gdiplus中,所以必须使用如下命名空间声明;
using namespace std;
using namespace Gdiplus;
4、定义一个绘制图像的类,包含公有的成员方法和私有的成员变量,Bitmap是用于处理像素数据定义的图像的对象,Color是预定义的颜色集合类,从R、G、B、通道角度描述一种颜色。GdiplusStartupinput结构中包含GdiplusStartup函数使用的一组参数,主要包括指定GDI+版本、用于调试的回调函数、以及是否压缩图片等操作,如果不设置将使用系统默认初始值。
class DrawImage {
public:
	DrawImage() {};
	~DrawImage() {};
	void Draw(int x, int y, Color &m_color);
	void Draw_Image();//绘制图片
	void Destroy();//释放
	void Picture_extraction();//初始化
private:
	int y, x;
	UINT height;
	UINT width;
	Bitmap* bmp;
	Color color;
	GdiplusStartupInput gdiplusstartupinput;
	ULONG_PTR gdiplustoken;
};
5、函数实现,大概过程是通过GDI+中的相关函数读取图片中的每个像素点的坐标值以及RGB值,然后可以写入txt文本中,通过EasyX中的putpixel函数在窗口中绘出图像,注意在定义Bitmap的对象之前必须先初始化GDI+,释放对象之后必须清理GDI+使用的资源。
void DrawImage::Draw(int x,int y, Color &m_color)
{
	putpixel(x, y, RGB((int)m_color.GetRed(),(int)m_color.GetGreen(),(int)m_color.GetBlue()));//画图
}
void DrawImage::Picture_extraction()
{
	initgraph(SCREEN_WIDTH, SCREEN_HEIGHT);//初始化图形环境
	GdiplusStartup(&gdiplustoken, &gdiplusstartupinput, nullptr);//初始化GDI+
	//读图片
	wstring infilename(L"6.jpg");
	string outfilename("Image.txt");
	bmp = new Bitmap(infilename.c_str());
	height = bmp->GetHeight();
	width = bmp->GetWidth();
	cout << "width " << width << ", height " << height << endl;
	ofstream fout(infilename.c_str());//是从内存读到硬盘
}

void DrawImage::Draw_Image()
{
	DrawImage* star = new DrawImage();
	for (y = 0; y < (int)height; y++)
		for (x = 0; x < (int)width; x++)
		{
			bmp->GetPixel(x, y, &color);
			/*fout << x << y <<
			(int)color.GetRed() <<
			(int)color.GetGreen()<<
			(int)color.GetBlue() << endl;*/
			star[x*y].Draw(x, y, color);//画图
		}
	Sleep(5000);
}
void DrawImage::Destroy()
{
	delete bmp;//释放GDI+对象
	GdiplusShutdown(gdiplustoken);//清理GDI+使用过的资源
}
6、实例化对象。
int main()
{
DrawImage star;
star.Picture_extraction();
star.Draw_Image();
star.Destroy();
return 0;
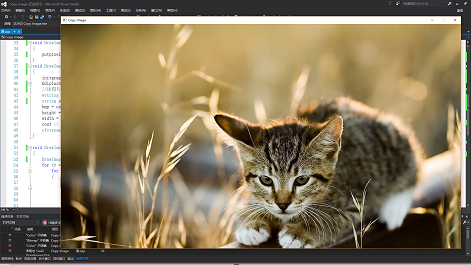
}7、可以看看效果,还不错基本上没有明显失真。


 1343
1343


 被折叠的 条评论
为什么被折叠?
被折叠的 条评论
为什么被折叠?
 到【灌水乐园】发言


