


Java分页框架千千万,唯有原生技术长相伴。话不多说,所有代码,即刻分享!
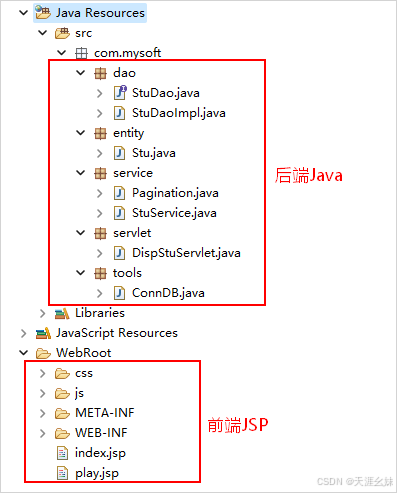
一、Java程序结构
以下通过Eclipse开发工具构建,由MVC设计模式实现的Java原生分页Web程序结构。
二、后端分页Java代码
实体类Stu:
public class Stu {
	private int sid;
	private String sname;
	private int score;
	//无参构造
    public Stu(){  }
    //有参构造
	public Stu(int sid, String sname, int score) {
		this.sid = sid;
		this.sname = sname;
		this.score = score;
	}

	public int getSid() {
		return sid;
	}

	public void setSid(int sid) {
		this.sid = sid;
	}

	public String getSname() {
		return sname;
	}

	public void setSname(String sname) {
		this.sname = sname;
	}

	public int getScore() {
		return score;
	}

	public void setScore(int score) {
		this.score = score;
	}
}
数操库操作接口StuDao:
import java.util.List;

import com.mysoft.entity.Stu;
/**
* 数据库操作接口
*/
public interface StuDao {
  public int getTotalRows();//获取总的记录条数
  public List<Stu> getList(int startRecord,int limitRows);//获取所有记录
}
数据库操作实现类StuDaoImpl:
/**
* 数据库操作实现类
*/
public class StuDaoImpl implements StuDao {
    //获取所有学生信息
	@Override
	public List<Stu> getList(int startRecord, int limitRows) {
		List<Stu> list = new ArrayList<Stu>();
		Stu stu = null;
		Connection conn = ConnDB.getConn();
		try {
			PreparedStatement pstm = conn
					.prepareStatement("select sid,sname,score from stu limit ?,?");
			pstm.setInt(1, startRecord);
			pstm.setInt(2, limitRows);
			ResultSet rs = pstm.executeQuery();
			rs.isBeforeFirst();
			while (rs.next()) {
				int sid = rs.getInt("sid");
				String sname = rs.getString("sname");
				int score = rs.getInt("score");
				stu = new Stu(sid, sname, score);
				list.add(stu);
			}// while
            //关闭所有资源
			rs.close();
			pstm.close();
			ConnDB.closeDB(conn);
		} catch (SQLException e) {
			e.printStackTrace();
		}
		return list;
	}

    //获取总的记录条数
	@Override
	public int getTotalRows() {
		Connection conn = ConnDB.getConn();
		int rows = 0;
		try {
			PreparedStatement pstm = conn
					.prepareStatement("select count(*) from stu");
			ResultSet rs = pstm.executeQuery();
			rs.next();
			rows = rs.getInt(1);
			rs.close();
			pstm.close();
			ConnDB.closeDB(conn);
		} catch (SQLException e) {
			e.printStackTrace();
		}
        //返回总的记录条数
		return rows;
	}
}
数据服务类StuService:
import java.util.List;

import com.mysoft.dao.StuDao;
import com.mysoft.dao.StuDaoImpl;
import com.mysoft.entity.Stu;
/**
* 服务类:实现数据库的CURD
*/
public class StuService {
	// /得到记录条数等
	public static int getTotalRows() {
		StuDao dao = new StuDaoImpl();
		return dao.getTotalRows();
	}

        //获取所有学生信息
	public static List<Stu> getList(int startRecord, int limitRows) {
		StuDao dao = new StuDaoImpl();
		return dao.getList(startRecord, limitRows);
	}
}
分页类Pagination<T>:
import java.util.List;

// 使用泛型是为了方便复用

public class Pagination<T> {

    // 当前页号

    private int currentPage;

    // 总页号或总页数

    private int totalPage;

    // 每页记录数或行数

    private int limitRows;

    // 总的记录数或行数

    private int totalRows;

    // 每页开始的记录号

    private int startRecord;

    // 存每页中的记录

    private List<T> list;

    // 初始化操作

    public void init() {

    // //1.求总页数,通过总记录数与每页行数来计算,有几种情况

    // (1)不够一页(2)有零头(3)刚好是整数页

    int tp = totalRows / limitRows;

    if (totalRows > limitRows) {

        totalPage = (totalRows % limitRows) == 0 ? tp : tp + 1;

        } else {

        totalPage = 1;

        }

        // //2.将当页保留在第一页或最后一页

        if (currentPage > totalPage) {

        currentPage = totalPage;

    } else if (currentPage < 1) {

        currentPage = 1;

    }

        // //3.初始化开始记录数,mysql应用的limit它不包括开始记录,所以不要加1;

        // 还有limit传入的是开始记录号与查询的条数,此处是每页可显示数limitRows,

        // 如果查到最后没有limitRows限制的行数,则显示剩余部分

        this.startRecord = (currentPage - 1) * limitRows;

    }

    // 无参构造,便于使用

    public Pagination() {  }

    // 当前页号,总记录数,每页行数;这些属性需要传入后初始化,其它的可以set设置

    public Pagination(int currentPage, int totalRows, int limitRows) {
        this.currentPage = currentPage;
        this.totalRows = totalRows;
        this.limitRows = limitRows;
    }

    // // 4.get与set方法

    public int getCurrentPage() {
        return currentPage;
    }

    public void setCurrentPage(int currentPage) {
        this.currentPage = currentPage;
        }

    public int getTotalPage() {
        return totalPage;
    }

    public void setTotalPage(int totalPage) {
        this.totalPage = totalPage;
    }

    public int getLimitRows() {
        return limitRows;
    }

    public void setLimitRows(int limitRows) {
        this.limitRows = limitRows;
    }

    public int getTotalRows() {
        return totalRows;
    }

    public void setTotalRows(int totalRows) {
        this.totalRows = totalRows;
    }

    public int getStartRecord() {
        return startRecord;
    }

    public void setStartRecord(int startRecord) {
        this.startRecord = startRecord;
    }

    public List<T> getList() {
        return list;
    }

    public void setList(List<T> list) {
        this.list = list;
     }
}
前后端交互类DispStuServlet:
public class DispStuServlet extends HttpServlet {
    //doget方法
	@Override
	protected void doGet(HttpServletRequest req, HttpServletResponse resp)
			throws ServletException, IOException {
		doPost(req, resp);
	}
    //dopost方法
	@Override
	protected void doPost(HttpServletRequest req, HttpServletResponse resp)
			throws ServletException, IOException {
        // 设置汉字编码
		req.setCharacterEncoding("UTF-8");
		resp.setContentType("text/html;charset=UTF-8");
		// 当前开始页号
		int currentPage = 0;
		// 获取页面传过来的页号
		String pageStr = req.getParameter("currentPage");
		if (pageStr != null) {
			currentPage = Integer.parseInt(pageStr);
		}
		// 获取总记录数,直接静态调用
		int totalRows = StuService.getTotalRows();
		Pagination<Stu> pg = new Pagination<Stu>(currentPage, totalRows, 6);
		// 得到当前页,总记录数后,再次初始化各属性
		pg.init();
		// 存入每页要显示的数据,开始记录也是通过传入当前页号计算得到的;
		List<Stu> list = StuService.getList(pg.getStartRecord(),
				pg.getLimitRows());
		pg.setList(list);
		// 再次通过请求对象执行分发跳转
		req.setAttribute("pg", pg);
		// 请求对象携带数据执行分发跳转
        req.getRequestDispatcher("index.jsp").forward(req, resp);
	}
}
数据库连接工具类ConnDB:
import java.sql.Connection;
import java.sql.DriverManager;
import java.sql.SQLException;

public class ConnDB {
        //连接mysql数据库
	public static Connection getConn() {
		String driver="com.mysql.jdbc.Driver";//数据库驱动
        //数据库文件完整地址
		String url="jdbc:mysql://127.0.0.1:3306/mydb?characterEncoding=utf8&useSSL=false";
		String user="root";//你的数据库用户名
		String pass="123456";//你的连接密码
		Connection conn=null;
		try {
			Class.forName(driver);
			conn=DriverManager.getConnection(url, user, pass);

		} catch (ClassNotFoundException e) {
			e.printStackTrace();
		} catch (SQLException e) {
			e.printStackTrace();
		}
               //返回数据库连接对象
		return conn;
	}
         //关闭数据库连接
	public static void closeDB(Connection conn){
		if(conn!=null){
			try {
				conn.close();
			} catch (SQLException e) {
				e.printStackTrace();
			}
		}
	}
}提示:mysql数据库与表请参考实体类Stu独自构建哦。
三、前端分页JSP页面
1. index.jsp内容显示页
index.jsp文件:
<%@ page language="java" contentType="text/html; charset=utf-8" pageEncoding="utf-8"%>
<%@ taglib prefix="c" uri="http://java.sun.com/jsp/jstl/core"%>
<!DOCTYPE html>
<html>
<head>
<meta http-equiv="Content-Type" content="text/html; charset=utf-8">
<title>信息管理系统</title>
<!--导入css文件-->
<link rel="stylesheet" type="text/css" href="css/index.css" rel="external nofollow">
</head>
<body>
<h2>信息分页查询</h2>
<!-- align="right" -->
<div class="wrap">
<table class="tab" border="2">
<tr>
<th>学号</th>
<th>姓名</th>
<th>成绩</th>
</tr>
<c:forEach items="${pg.list}" var="stu">
<tr>
<td><c:out value="${stu.sid}" /></td>
<td><c:out value="${stu.sname}" /></td>
<td><c:out value="${stu.score}" /></td>
</tr>
</c:forEach>
</table>
</div>
<!-- 按钮样式 -->
<div class="set">
第<span id="currentPage">${pg.currentPage}</span>页 
共<span id="totalPage"> ${pg.totalPage}</span>页 
<a href="index?currentPage=${0}">首页</a> 
<a href="index?currentPage=${pg.currentPage-1}">上一页</a> 
<a href="index?currentPage=${pg.currentPage+1}">下一页</a> 
<a href="index?currentPage=${pg.totalPage}">尾页</a>转到第:
<input id="jump" type="text" />页 <input id="go" type="button" value="GO"/>
</div>
</body>
<!--导入js文件-->
<script type="text/javascript" src="js/index.js"></script>
</html>index.js文件:
var go = document.getElementById("go");
var jump = document.getElementById("jump");
var j = 0;
// //通过按钮执行跳转并传参,网址串接方式传
go.onclick = function() {
	j = jump.value;
	if (!(/^\d+$/.test(j))) {
		j = 0;
	}
	location.href = "index?currentPage=" + j;
};
index.css文件:
* {
	margin: 0;
	padding: 0;
}
/*表格样式 */
.wrap {
	width: 400px;
	height: 240px;
	margin:0 auto;
}
.tab{
	width:400px;
	border-collapse: collapse;
}
tr,td{
  border:1px solid grey;
}
tr{
	height:33px;
}
.set {
	width: 500px;
	height: 50px;
	line-height: 50px;
	font-size: 16px;
	text-align: center;
	margin: 0 auto;
}

h2 {
	text-align: center;
	color: green;
}

#jump {
	width: 25px;
	height: 16px;
}

#go {
	height: 20px;
	font-size: 12px;
	width: 26px;
}
2. play.jsp启动页
<%@ page language="java" contentType="text/html; charset=utf-8" pageEncoding="utf-8"%>

<!DOCTYPE html>

<html>

<head>

<meta http-equiv="Content-Type" content="text/html; charset=utf-8">

<title>信息查询系统</title>

</head>

<body>

<jsp:forward page="index"></jsp:forward>

</body>

</html>
四、web.xml配置文件(在WEB-INF文件夹下)
<?xml version="1.0" encoding="UTF-8"?>
<web-app version="3.0" xmlns="http://java.sun.com/xml/ns/javaee"
	xmlns:xsi="http://www.w3.org/2001/XMLSchema-instance"
	xsi:schemaLocation="http://java.sun.com/xml/ns/javaee http://java.sun.com/xml/ns/javaee/web-app_3_0.xsd">
    <!--控制类别名设置-->
	<servlet>
		<servlet-name>Display</servlet-name>
		<servlet-class>com.mysoft.servlet.DispStuServlet</servlet-class>
	</servlet>
    <!--路径映射-->
	<servlet-mapping>
		<servlet-name>Display</servlet-name>
		<url-pattern>/index</url-pattern>
	</servlet-mapping>
</web-app>五、分页运行效果

更多精彩内容请关注本站其他分享!


 293
293

 被折叠的 条评论
为什么被折叠?
被折叠的 条评论
为什么被折叠?
 到【灌水乐园】发言


