


本文参考资源:eat_tensorflow_in_30_days
一,准备数据
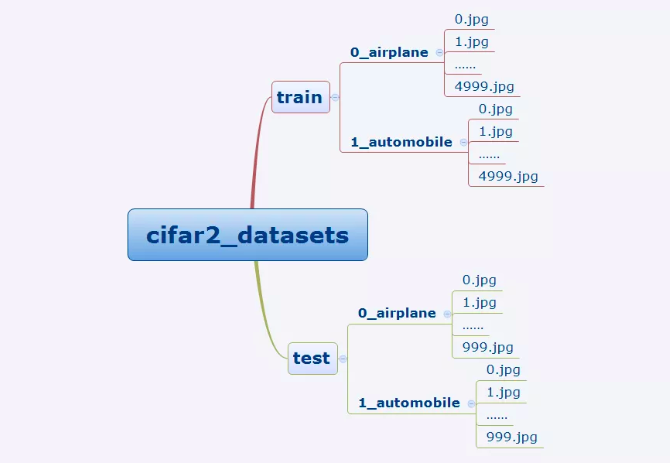
cifar2数据集为cifar10数据集的子集,只包括前两种类别airplane和automobile。
训练集有airplane和automobile图片各5000张,测试集有airplane和automobile图片各1000张。
cifar2任务的目标是训练一个模型来对飞机airplane和机动车automobile两种图片进行分类。
我们准备的Cifar2数据集的文件结构如下所示。
在tensorflow中准备图片数据的常用方案有两种,第一种是使用tf.keras中的ImageDataGenerator工具构建图片数据生成器。
第二种是使用tf.data.Dataset搭配tf.image中的一些图片处理方法构建数据管道。
第一种方法更为简单,其使用范例可以参考以下文章。
https://zhuanlan.zhihu.com/p/67466552
第二种方法是TensorFlow的原生方法,更加灵活,使用得当的话也可以获得更好的性能。
我们此处介绍第二种方法。
import tensorflow as tf
from tensorflow.keras import datasets, layers, models
from matplotlib import pyplot as plt

BATCH_SIZE = 100


# 读取图片,并生成相应的label
def load_image(img_path, size=(32, 32)):
    label = tf.constant(1, tf.int8) if tf.strings.regex_full_match(img_path, ".*automobile.*") \
        else tf.constant(0, tf.int8)
    img = tf.io.read_file(img_path)
    img = tf.image.decode_jpeg(img)  # 注意次此处为jpeg格式
    img = tf.image.resize(img, size) / 255.0
    return img, label


# 使用并行化预处理 num_parallel_calls 和预存数据 prefetch 来提升性能
ds_train = tf.data.Dataset.list_files("./data/cifar2/train/*/*.jpg") \
    .map(load_image, num_parallel_calls=tf.data.experimental.AUTOTUNE) \
    .shuffle(buffer_size=1000).batch(BATCH_SIZE) \
    .prefetch(tf.data.experimental.AUTOTUNE)

ds_test = tf.data.Dataset.list_files("./data/cifar2/test/*/*.jpg") \
    .map(load_image, num_parallel_calls=tf.data.experimental.AUTOTUNE) \
    .batch(BATCH_SIZE) \
    .prefetch(tf.data.experimental.AUTOTUNE)

# 查看部分样本
plt.figure(figsize=(8, 8))
for i, (img, label) in enumerate(ds_train.unbatch().take(9)):
    ax = plt.subplot(3, 3, i + 1)
    ax.imshow(img.numpy())
    ax.set_title("label = %d" % label)
    ax.set_xticks([])
    ax.set_yticks([])
plt.show()

for x, y in ds_train.take(1):
    print(x.shape, y.shape)
![]()
二、定义模型
使用Keras接口有以下3种方式构建模型:使用Sequential按层顺序构建模型,使用函数式API构建任意结构模型,继承Model基类构建自定义模型。
此处选择使用函数式API构建模型
# 二、定义模型
tf.keras.backend.clear_session() #清空会话

inputs = layers.Input(shape=(32, 32, 3))
x = layers.Conv2D(32, kernel_size=(3, 3))(inputs)
x = layers.MaxPool2D()(x)
x = layers.Conv2D(64, kernel_size=(5, 5))(x)
x = layers.MaxPool2D()(x)
x = layers.Dropout(rate=0.1)(x)
x = layers.Flatten()(x)
x = layers.Dense(32, activation='relu')(x)
outputs = layers.Dense(1, activation='sigmoid')(x)

model = models.Model(inputs=inputs, outputs=outputs)

model.summary()
注意:卷积后的输出有两种格式:
如果通道数在后面的话(Inputs中格式):(batch_size, new_rows, new_cols, filters)
如果通道数在前面的话(Inputs中格式):(batch_size, filters, new_rows, new_cols)
所以,在第一次卷积之后,数据输出shape为(none*30*30*32):
“none”:因为此处没有设置批处理大小
“30*30”:输出的数据尺寸
“32”:输出数据的通道数


 1610
1610


 被折叠的 条评论
为什么被折叠?
被折叠的 条评论
为什么被折叠?
 到【灌水乐园】发言


