


更新Ubuntu20.04下载源
cd /etc/apt/更新sources.list为如下下载源,并保存。
#添加阿里源
deb http://mirrors.aliyun.com/ubuntu/ focal main restricted universe multiverse
deb-src http://mirrors.aliyun.com/ubuntu/ focal main restricted universe multiverse
deb http://mirrors.aliyun.com/ubuntu/ focal-security main restricted universe multiverse
deb-src http://mirrors.aliyun.com/ubuntu/ focal-security main restricted universe multiverse
deb http://mirrors.aliyun.com/ubuntu/ focal-updates main restricted universe multiverse
deb-src http://mirrors.aliyun.com/ubuntu/ focal-updates main restricted universe multiverse
deb http://mirrors.aliyun.com/ubuntu/ focal-proposed main restricted universe multiverse
deb-src http://mirrors.aliyun.com/ubuntu/ focal-proposed main restricted universe multiverse
deb http://mirrors.aliyun.com/ubuntu/ focal-backports main restricted universe multiverse
deb-src http://mirrors.aliyun.com/ubuntu/ focal-backports main restricted universe multiverse
#添加清华源
deb https://mirrors.tuna.tsinghua.edu.cn/ubuntu/ focal main restricted universe multiverse
# deb-src https://mirrors.tuna.tsinghua.edu.cn/ubuntu/ focal main restricted universe multiverse
deb https://mirrors.tuna.tsinghua.edu.cn/ubuntu/ focal-updates main restricted universe multiverse
# deb-src https://mirrors.tuna.tsinghua.edu.cn/ubuntu/ focal-updates main restricted universe multiverse
deb https://mirrors.tuna.tsinghua.edu.cn/ubuntu/ focal-backports main restricted universe multiverse
# deb-src https://mirrors.tuna.tsinghua.edu.cn/ubuntu/ focal-backports main restricted universe multiverse
deb https://mirrors.tuna.tsinghua.edu.cn/ubuntu/ focal-security main restricted universe multiverse
# deb-src https://mirrors.tuna.tsinghua.edu.cn/ubuntu/ focal-security main restricted universe multiverse multiverse
更新系统软件
sudo apt-get update更新python3.8或以上版本
sudo apt-get install python3.8-full安装完毕请检查对应的版本信息,使用python3 -V查看版本信息为3.8版本。

如果是低于该版本的情况,请执行如下指令将其默认使用3.8或者以上版本也可以
sudo update-alternatives --install /usr/bin/python3 python3 /usr/bin/python3.8 1

sudo update-alternatives --install /usr/bin/python3 python3 /usr/bin/python3.5 2

sudo update-alternatives --config python3
更新esp-idf需要插件
更新如下插件,其中cmake版本至少要>=3.16才能满足其安装
sudo apt-get install git wget flex bison gperf cmake ninja-build ccache libffi-dev libssl-dev dfu-util libusb-1.0-0安装ESP-IDF V5.1
mkdir -p ~/esp

cd ~/esp

git clone -b v5.1 --recursive https://github.com/espressif/esp-idf.git
如果git拉取速度太慢可以直接到乐鑫官网拉取开源安装包即可,链接如下所示:
https://dl.espressif.com/github_assets/espressif/esp-idf/releases/download/v5.1/esp-idf-v5.1.zip
之后进行安装,步骤如下所示:
cd ~/esp/esp-idf

export IDF_GITHUB_ASSETS="dl.espressif.com/github_assets"

./install.sh
其中./install.sh esp32 esp32s3这样填写,后面不跟型号是表示将所有的型号全部配置安装。
之后就是耐心等待安装完毕即可。
安装完毕之后会提示执行如下指令表示配置idf相关环境变量:
. ./export.sh复制并粘贴以下命令到 shell 配置文件中(.profile、.bashrc、.zprofile 等)
alias get_idf='. $HOME/esp/esp-idf/export.sh'通过重启终端窗口或运行 source [path to profile],如 source ~/.bashrc 来刷新配置文件。
现在可以在任何终端窗口中运行 get_idf 来设置或刷新 ESP-IDF 环境。
不建议直接将 export.sh 添加到 shell 的配置文件。这样做会导致在每个终端会话中都激活 IDF 虚拟环境(包括无需使用 ESP-IDF 的会话)。这违背了使用虚拟环境的目的,还可能影响其他软件的使用。
Eg:
打开一个Terminal,运行get_idf即可。
$ get_idf
使用 ESP-IDF
现在已经具备了使用 ESP-IDF 的所有条件,接下来将介绍如何开始第一个工程。
本教程将介绍如何初步上手 ESP-IDF,包括如何使用 ESP32 创建第一个工程,并构建、烧录和监控设备输出。
如果还未安装 ESP-IDF,请参照 安装 中的步骤,获取使用本指南所需的所有软件。
开始创建工程
现在,可以准备开发 ESP32 应用程序了。可以从 ESP-IDF 中 examples 目录下的 get-started/hello_world 工程开始。
ESP-IDF 编译系统不支持 ESP-IDF 路径或其工程路径中带有空格。
将 get-started/hello_world 工程复制至本地的 ~/esp 目录下:
cd ~/esp

cp -r $IDF_PATH/examples/get-started/hello_world .
ESP-IDF 的 examples 目录下有一系列示例工程,可以按照上述方法复制并运行其中的任何示例,也可以直接编译示例,无需进行复制。
连接设备
现在,请将 ESP32 开发板连接到 PC,并查看开发板使用的串口。通常,串口在不同操作系统下显示的名称有所不同:
Linux 操作系统: 以 /dev/tty 开头
macOS 操作系统: 以 /dev/cu. 开头
有关如何查看串口名称的详细信息,请见 与 ESP32 创建串口连接。请记住串口名,以便后续使用。
配置工程
请进入 hello_world 目录,设置 ESP32 为目标芯片,然后运行工程配置工具 menuconfig。
cd ~/esp/hello_world

idf.py set-target esp32

idf.py menuconfig
打开一个新工程后,应首先使用 idf.py set-target esp32 设置“目标”芯片。注意,此操作将清除并初始化项目之前的编译和配置(如有)。也可以直接将“目标”配置为环境变量(此时可跳过该步骤)。更多信息,请见 选择目标芯片:set-target。
正确操作上述步骤后,系统将显示以下菜单:
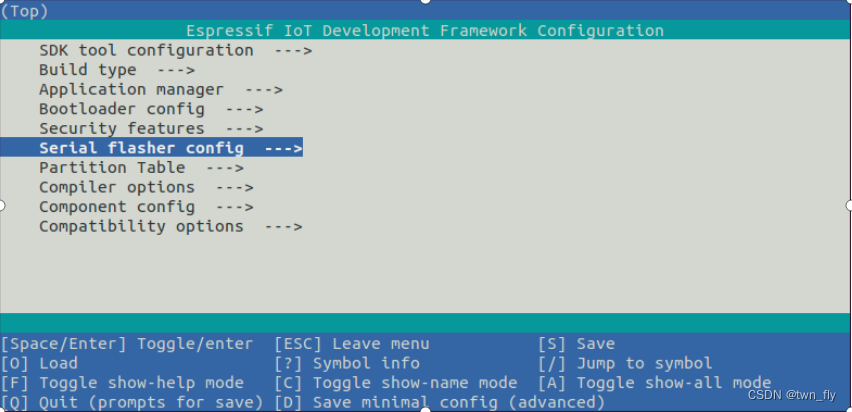
工程配置
可以通过此菜单设置项目的具体变量,包括 Wi-Fi 网络名称、密码和处理器速度等。hello_world 示例项目会以默认配置运行,因此在这一项目中,可以跳过使用 menuconfig 进行项目配置这一步骤。
注意
如果使用的是 ESP32-DevKitC(板载 ESP32-SOLO-1 模组)或 ESP32-DevKitM-1(板载 ESP32-MINI-1(1U) 模组),请在烧写示例程序前,前往 menuconfig 中使能单核模式(CONFIG_FREERTOS_UNICORE)。
备注
终端窗口中显示出的菜单颜色可能会与上图不同。可以通过选项 --style 来改变外观。请运行 idf.py menuconfig --help 命令,获取更多信息。
如果使用的是支持的开发板,可以通过板级支持包 (BSP) 来协助开发。更多信息,请见 其他提示。
编译工程
请使用以下命令,编译烧录工程:
idf.py build
运行以上命令可以编译应用程序和所有 ESP-IDF 组件,接着生成引导加载程序、分区表和应用程序二进制文件。
$ idf.py buildRunning cmake in directory /path/to/hello_world/build
Executing "cmake -G Ninja --warn-uninitialized /path/to/hello_world"...
Warn about uninitialized values.
-- Found Git: /usr/bin/git (found version "2.17.0")
-- Building empty aws_iot component due to configuration
-- Component names: ...
-- Component paths: ...
... (more lines of build system output)
[527/527] Generating hello_world.bin
esptool.py v2.3.1
Project build complete. To flash, run this command:
../../../components/esptool_py/esptool/esptool.py -p (PORT) -b 921600 write_flash --flash_mode dio --flash_size detect --flash_freq 40m 0x10000 build/hello_world.bin build 0x1000 build/bootloader/bootloader.bin 0x8000 build/partition_table/partition-table.bin
or run 'idf.py -p PORT flash'
如果一切正常,编译完成后将生成 .bin 文件。
烧录到设备
请运行以下命令,将刚刚生成的二进制文件烧录至 ESP32 开发板:
idf.py -p PORT flash请将 PORT 替换为 ESP32 开发板的串口名称。如果 PORT 未经定义,idf.py 将尝试使用可用的串口自动连接。
更多有关 idf.py 参数的详情,请见 idf.py。
备注
勾选 flash 选项将自动编译并烧录工程,因此无需再运行 idf.py build。
若在烧录过程中遇到问题,请前往 烧录故障排除 或 与 ESP32 创建串口连接 获取更多详细信息。
常规操作
在烧录过程中,会看到类似如下的输出日志:
...
esptool.py --chip esp32 -p /dev/ttyUSB0 -b 460800 --before=default_reset --after=hard_reset write_flash --flash_mode dio --flash_freq 40m --flash_size 2MB 0x8000 partition_table/partition-table.bin 0x1000 bootloader/bootloader.bin 0x10000 hello_world.bin
esptool.py v3.0-dev
Serial port /dev/ttyUSB0
Connecting........_
Chip is ESP32D0WDQ6 (revision 0)
Features: WiFi, BT, Dual Core, Coding Scheme None
Crystal is 40MHz
MAC: 24:0a:c4:05:b9:14
Uploading stub...
Running stub...
Stub running...
Changing baud rate to 460800
Changed.
Configuring flash size...
Compressed 3072 bytes to 103...
Writing at 0x00008000... (100 %)
Wrote 3072 bytes (103 compressed) at 0x00008000 in 0.0 seconds (effective 5962.8 kbit/s)...
Hash of data verified.
Compressed 26096 bytes to 15408...
Writing at 0x00001000... (100 %)
Wrote 26096 bytes (15408 compressed) at 0x00001000 in 0.4 seconds (effective 546.7 kbit/s)...
Hash of data verified.
Compressed 147104 bytes to 77364...
Writing at 0x00010000... (20 %)
Writing at 0x00014000... (40 %)
Writing at 0x00018000... (60 %)
Writing at 0x0001c000... (80 %)
Writing at 0x00020000... (100 %)
Wrote 147104 bytes (77364 compressed) at 0x00010000 in 1.9 seconds (effective 615.5 kbit/s)...
Hash of data verified.
Leaving...
Hard resetting via RTS pin...
Done
如果一切顺利,烧录完成后,开发板将会复位,应用程序 “hello_world” 开始运行。
如果希望使用 Eclipse 或是 VS Code IDE,而非 idf.py,请参考 Eclipse Plugin,以及 VSCode Extension。
监视输出
可以使用 idf.py -p <PORT> monitor 命令,监视 “hello_world” 工程的运行情况。注意,不要忘记将 PORT 替换为自己的串口名称。
运行该命令后,IDF 监视器 应用程序将启动:
$ idf.py -p <PORT> monitorRunning idf_monitor in directory [...]/esp/hello_world/build
Executing "python [...]/esp-idf/tools/idf_monitor.py -b 115200 [...]/esp/hello_world/build/hello_world.elf"...
--- idf_monitor on <PORT> 115200 ---
--- Quit: Ctrl+] | Menu: Ctrl+T | Help: Ctrl+T followed by Ctrl+H ---
ets Jun 8 2016 00:22:57
rst:0x1 (POWERON_RESET),boot:0x13 (SPI_FAST_FLASH_BOOT)
ets Jun 8 2016 00:22:57
...
此时,就可以在启动日志和诊断日志之后,看到打印的 “Hello world!” 了。
...
Hello world!
Restarting in 10 seconds...
This is esp32 chip with 2 CPU core(s), WiFi/BT/BLE, silicon revision 1, 2 MB external flash
Minimum free heap size: 298968 bytes
Restarting in 9 seconds...
Restarting in 8 seconds...
Restarting in 7 seconds...
使用快捷键 Ctrl+],可退出 ESP-IDF 监视器。
如果 ESP-IDF 监视器在烧录后很快发生错误,或打印信息全是乱码(如下),很有可能是因为开发板采用了 26 MHz 晶振,而 ESP-IDF 默认支持大多数开发板使用的 40 MHz 晶振。

此时,可以:
- 退出监视器。
- 返回 menuconfig。
- 进 Component config –> Hardware Settings –> Main XTAL Config–> Main XTAL frequency 进行配置,将 CONFIG_XTAL_FREQ_SEL 设置为 26 MHz。
- 重新 编译和烧录 应用程序。
在当前的 ESP-IDF 版本中,ESP32 支持的主晶振频率如下:
- 26 MHz
- 40 MHz
也可以运行以下命令,一次性执行构建、烧录和监视过程:
idf.py -p PORT flash monitor请前往 IDF 监视器,了解更多使用 ESP-IDF 监视器的快捷键和其他详情。
请前往 idf.py,查看更多 idf.py 命令和选项。
恭喜完成 ESP32 的入门学习!
现在,可以尝试一些其他 examples,或者直接开发自己的应用程序。
一些示例程序不支持 ESP32,因为 ESP32 中不包含所需的硬件。
在编译示例程序前请查看 README 文件中 Supported Targets 表格。如果表格中包含 ESP32, 或者不存在这个表格,那么即表示 ESP32 支持这个示例程序。
其他提示
权限问题 /dev/ttyUSBx
使用某些 Linux 版本向 ESP32 烧录固件时,可能会出现 Failed to open port /dev/ttyUSBx 错误消息。此时可以将用户添加至 Linux Dialout 组。
兼容的 Python 版本
ESP-IDF 支持 Python 3.8 及以上版本,建议升级操作系统到最新版本从而更新 Python。也可选择从 sources 安装最新版 Python,或使用 Python 管理系统如 pyenv 对版本进行升级管理。
上手板级支持包
可以使用 板级支持包 (BSP),协助在开发板上的原型开发。仅需要调用几个函数,便可以完成对特定开发板的初始化。
一般来说,BSP 支持开发板上所有硬件组件。除了管脚定义和初始化功能外,BSP 还附带如传感器、显示器、音频编解码器等外部元件的驱动程序。
BSP 通过 IDF 组件管理器 发布,可以前往 IDF 组件注册器 进行下载。
以下示例演示了如何将 ESP-WROVER-KIT BSP 添加到项目中:
idf.py add-dependency esp_wrover_kit
擦除 flash
ESP-IDF 支持擦除 flash。请运行以下命令,擦除整个 flash:
idf.py -p PORT erase-flash
若存在需要擦除的 OTA 数据,请运行以下命令:
idf.py -p PORT erase-otadata
擦除 flash 需要一段时间,在擦除过程中,请勿断开设备连接。
实际Components工程案例
目录层级
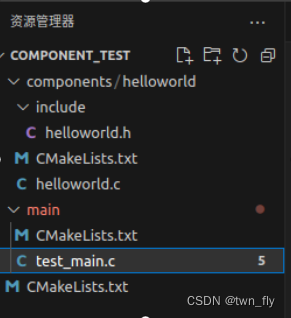
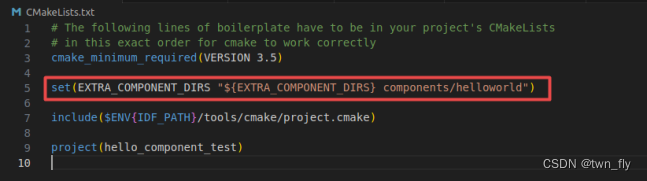
项目最外层CMakeLists.txt
main目录下的CMakeLists.txt

components/helloworld下的CMakelists.txt

源码示例
test_main.c如下所示:
#include "freertos/FreeRTOS.h"

#include "freertos/task.h"

#include "esp_log.h"

#include "driver/gpio.h"

#include <unistd.h>

#include "helloworld.h"


void app_main()

{

    int i = 0;

    while(1) {

        hello_world(i, i+1);

        sleep(1);

        i++;

    }

    return ;

}
helloworld.c如下所示:
#include "helloworld.h"


int hello_world(int a, int b)

{

    printf("a = %d -- b = %d\n", a, b);


    return 0;

}
include/helloworld.h如下所示:
#ifndef __HELLOWORLD_H

#define __HELLOWORLD_H


#include <stdio.h>

#include <string.h>


int hello_world(int a, int b);


#endif
选择目标型号
idf.py set-target esp32s3执行完成最终的日志如下图所示:

配置Menucofig
执行idf.py menuconfig
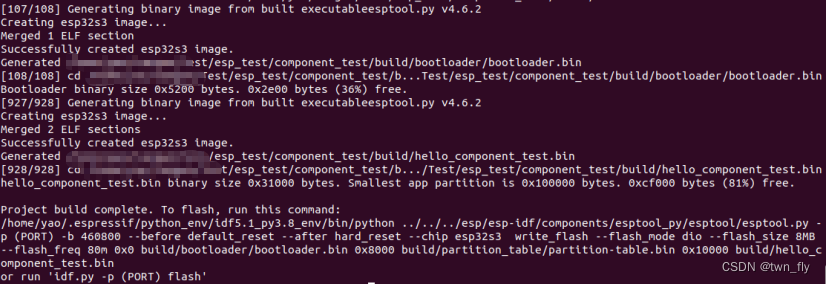
 Build项目
idf.py build后会多出build目录,sdkconfig和sdkconfig.old是idf.py meneuconfig出现的
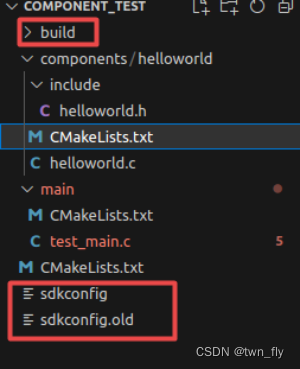
idf.py build完成没问题之后如下图所示:
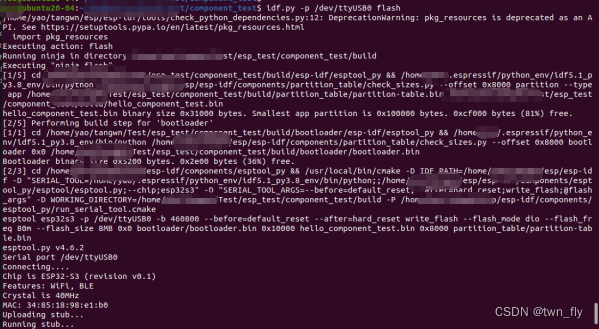
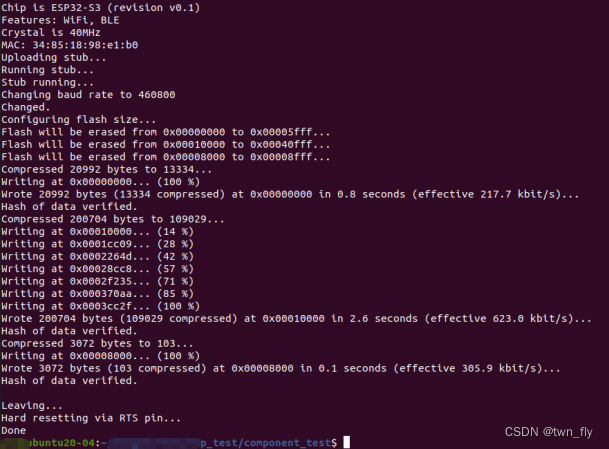
烧录文件
执行idf.py -p /dev/ttyUSB0 flash进行烧写,其中串口对应不同的虚拟机会有所不同,烧录情况如下所示:
检测设备运行日志
实际日志如下图所示:
idf.py -p /dev/ttyUSB0 monitor/home/uu/dd/esp/esp-idf/tools/check_python_dependencies.py:12: DeprecationWarning: pkg_resources is deprecated as an API. See https://setuptools.pypa.io/en/latest/pkg_resources.html
import pkg_resources
Executing action: monitor
Running idf_monitor in directory /home/uu/dd/Test/esp_test/component_test
Executing "/home/uu/.espressif/python_env/idf5.1_py3.8_env/bin/python /home/uu/dd/esp/esp-idf/tools/idf_monitor.py -p /dev/ttyUSB0 -b 115200 --toolchain-prefix xtensa-esp32s3-elf- --target esp32s3 /home/uu/dd/Test/esp_test/component_test/build/hello_component_test.elf -m '/home/uu/.espressif/python_env/idf5.1_py3.8_env/bin/python' '/home/uu/dd/esp/esp-idf/tools/idf.py' '-p' '/dev/ttyUSB0'"...
--- idf_monitor on /dev/ttyUSB0 115200 ---
--- Quit: Ctrl+] | Menu: Ctrl+T | Help: Ctrl+T followed by Ctrl+H ---
ESP-ROM:esp32s3-20210327
Build:Mar 27 2021
rst:0x1 (POWERON),boot:0x8 (SPI_FAST_FLASH_BOOT)
SPIWP:0xee
mode:DIO, clock div:1
load:0x3fce3818,len:0x16ec
load:0x403c9700,len:0x4
load:0x403c9704,len:0xc00
load:0x403cc700,len:0x2eb0
entry 0x403c9908
I (27) boot: ESP-IDF HEAD-HASH-NOTFOUND 2nd stage bootloader
I (27) boot: compile time Jul 19 2023 15:16:52
I (27) boot: Multicore bootloader
I (31) boot: chip revision: v0.1
I (35) boot.esp32s3: Boot SPI Speed : 80MHz
I (40) boot.esp32s3: SPI Mode : DIO
I (44) boot.esp32s3: SPI Flash Size : 8MB
I (49) boot: Enabling RNG early entropy source...
I (55) boot: Partition Table:
I (58) boot: ## Label Usage Type ST Offset Length
I (65) boot: 0 nvs WiFi data 01 02 00009000 00006000
I (73) boot: 1 phy_init RF data 01 01 0000f000 00001000
I (80) boot: 2 factory factory app 00 00 00010000 00100000
I (88) boot: End of partition table
I (92) esp_image: segment 0: paddr=00010020 vaddr=3c020020 size=09cb8h ( 40120) map
I (108) esp_image: segment 1: paddr=00019ce0 vaddr=3fc91400 size=027f8h ( 10232) load
I (111) esp_image: segment 2: paddr=0001c4e0 vaddr=40374000 size=03b38h ( 15160) load
I (121) esp_image: segment 3: paddr=00020020 vaddr=42000020 size=177ach ( 96172) map
I (143) esp_image: segment 4: paddr=000377d4 vaddr=40377b38 size=09808h ( 38920) load
I (157) boot: Loaded app from partition at offset 0x10000
I (158) boot: Disabling RNG early entropy source...
I (169) cpu_start: Multicore app
I (169) cpu_start: Pro cpu up.
I (169) cpu_start: Starting app cpu, entry point is 0x40375244
0x40375244: call_start_cpu1 at /home/yao/tangwn/esp/esp-idf/components/esp_system/port/cpu_start.c:154
I (0) cpu_start: App cpu up.
I (188) cpu_start: Pro cpu start user code
I (188) cpu_start: cpu freq: 160000000 Hz
I (188) cpu_start: Application information:
I (191) cpu_start: Project name: hello_component_test
I (197) cpu_start: App version: 1
I (201) cpu_start: Compile time: Jul 19 2023 15:16:45
I (207) cpu_start: ELF file SHA256: 70d4a8307ca3c2e2...
I (213) cpu_start: ESP-IDF: HEAD-HASH-NOTFOUND
I (219) cpu_start: Min chip rev: v0.0
I (224) cpu_start: Max chip rev: v0.99
I (229) cpu_start: Chip rev: v0.1
I (233) heap_init: Initializing. RAM available for dynamic allocation:
I (241) heap_init: At 3FC94440 len 000552D0 (340 KiB): DRAM
I (247) heap_init: At 3FCE9710 len 00005724 (21 KiB): STACK/DRAM
I (254) heap_init: At 3FCF0000 len 00008000 (32 KiB): DRAM
I (260) heap_init: At 600FE010 len 00001FF0 (7 KiB): RTCRAM
I (267) spi_flash: detected chip: generic
I (271) spi_flash: flash io: dio
I (275) sleep: Configure to isolate all GPIO pins in sleep state
I (281) sleep: Enable automatic switching of GPIO sleep configuration
I (289) app_start: Starting scheduler on CPU0
I (293) app_start: Starting scheduler on CPU1
I (293) main_task: Started on CPU0
I (303) main_task: Calling app_main()
a = 0 -- b = 1
a = 1 -- b = 2
a = 2 -- b = 3
a = 3 -- b = 4
a = 4 -- b = 5
a = 5 -- b = 6
......


 963
963


 被折叠的 条评论
为什么被折叠?
被折叠的 条评论
为什么被折叠?
 到【灌水乐园】发言


