


Spring Retry 是从 Spring batch 中独立出来的一个功能,主要实现了重试和熔断。对于那些重试后不会改变结果,毫无意义的操作,不建议使用重试,比如:对参数的合法性检查,那些重试后可能会改变结果的,最普通的比如:网络连接中断后的重试,调用远程服务超时,这类的就可以使用重试。
接下来引用一个例子来说明 。
第一步,引入maven依赖
<dependency>
    <groupId>org.springframework.retry</groupId>
    <artifactId>spring-retry</artifactId>
    <version>1.1.2.RELEASE</version>
</dependency>
<dependency>
    <groupId>org.aspectj</groupId>
    <artifactId>aspectjweaver</artifactId>
    <version>1.8.6</version>
</dependency>
第二步 ,添加@Retryable和@Recover注解
import org.springframework.remoting.RemoteAccessException;
import org.springframework.retry.annotation.Backoff;
import org.springframework.retry.annotation.Recover;
import org.springframework.retry.annotation.Retryable;
import org.springframework.stereotype.Service;

import java.text.SimpleDateFormat;
import java.util.Date;

@Service
public class RemoteService {

    int index = 1;
    @Retryable(value= {RemoteAccessException.class},maxAttempts = 3,backoff = @Backoff(delay = 5000l,multiplier = 1))
    public void call() throws Exception {
        SimpleDateFormat sf = new SimpleDateFormat("yyyy-mm-dd HH:mm:ss");
        System.out.println("我是第 " + index + " 次调用callServiceInNet 方法...." + sf.format(new Date()));
        index++;
        throw new RemoteAccessException("RPC调用异常");
    }

    @Recover
    public void recover(RemoteAccessException e){
        SimpleDateFormat sf = new SimpleDateFormat("yyyy-mm-dd HH:mm:ss");
        System.err.println(" 我是 recover 方法..." + sf.format(new Date()));
        System.err.println(e.getMessage());
    }
}
注解解析:
@Retryable :被注解的方法再发生异常时,会进行重试;
value:指定触发重试的异常,只有方法产生符合value指定的异常,才会进行重试,默认为空,表示所有;
include: 和上述的 value 一样;
exclude:指定出现某些异常后,不进行重试,也就是例外情况;
maxAttempts:指定重试的次数,默认为3;
backoff:重试补偿机制,默认没有;
@Backoff 注解:
delay:指定延迟后重试,单位毫秒,比如 delay=5000l 表示 五秒后,最后一位 l ,是 long 型,不是数值 1;
multiplier:指定延迟的倍数,比如 delay=5000l,multiplier=2时,第一次重试为5秒后,第二次为10秒,第三次为20秒
@Recover 注解:
当重试到达指定次数时,被注解的方法将被回调,可以在该方法中进行日志处理。需要注意的是发生的异常和入参类型一致时才会回调。
第三步,SpringBoot 启动容器测试
package com.demo;

import com.hewb.demo.service.RemoteService;
import org.springframework.boot.SpringApplication;
import org.springframework.boot.autoconfigure.SpringBootApplication;
import org.springframework.context.ApplicationContext;
import org.springframework.context.annotation.AnnotationConfigApplicationContext;
import org.springframework.retry.annotation.EnableRetry;

@SpringBootApplication
@EnableRetry
public class Application {

	public static void main(String[] args) throws Exception {
//		SpringApplication.run(Application.class, args);
          //"com.demo" 当前类和 RemoteService 所在的包路径,具体可以百度 ApplicationContext
		ApplicationContext annotationContext = new AnnotationConfigApplicationContext("com.demo");
		RemoteService remoteService = annotationContext.getBean("remoteService", RemoteService.class);
		remoteService.call();
	}
}
注意:
1. 在当前 Application 中需要添加 @EnableRetry 注解,启用 重试功能,这个注解是全局的。
2. AnnotationConfigApplicationContext("com.demo"); 中的 "com.demo" 为当前类和 RemoteService 所在的包路径,具体的可以百度 ApplicationContext
启动成功后控制台输出的结果:

上面是一个简单的 demo 例子,稍加修改就可以用在我们的实际开发中。
首先, RemoteService 保持不变,我们新建一个 RemoteController
import org.springframework.beans.factory.annotation.Autowired;
import org.springframework.boot.autoconfigure.EnableAutoConfiguration;
import org.springframework.retry.annotation.EnableRetry;
import org.springframework.web.bind.annotation.RequestMapping;
import org.springframework.web.bind.annotation.RestController;

@RestController
@EnableAutoConfiguration
@RequestMapping("/remote")
public class RemoteController {

    @Autowired
    private RemoteService remoteService;

    @RequestMapping("/remoteTest")
    public void remoteTest() throws Exception {
        System.out.println("===>>> 进入 remoteTest 方法");
         remoteService.call();
    }
}
更改 SpringBoot 的启动类 Application,将原先测试 RemoteService 的代码注释,用 run 方法执行。
import org.springframework.boot.SpringApplication;
import org.springframework.boot.autoconfigure.SpringBootApplication;
import org.springframework.context.ApplicationContext;
import org.springframework.context.annotation.AnnotationConfigApplicationContext;
import org.springframework.retry.annotation.EnableRetry;

@SpringBootApplication
@EnableRetry
public class Application {

	public static void main(String[] args) throws Exception {
		SpringApplication.run(Application.class, args);
		//"com.demo" 当前类和 RemoteService 所在的包路径,具体可以百度 ApplicationContext
//		ApplicationContext annotationContext = new AnnotationConfigApplicationContext("com.hewb");
//		RemoteService remoteService = annotationContext.getBean("remoteService", RemoteService.class);
//		remoteService.call();
	}
}
启动成功后,输入 http://localhost:8080/remote/remoteTest 访问 RemoteController 进行测试。
控制台输出结果:
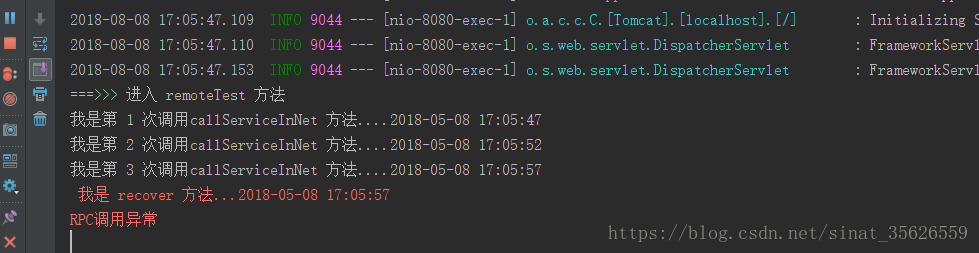
这样就表示正常执行了,若在我们正式开发过程中,在 RemoteService 中用 @Retryable 注解的方法里面写我们的逻辑代码,比如调用远程服务代码,在用 @Recover 注解的方法 中填写我们异常处理代码,比如 将当前调用超时信息写入日志中,或者是其他发生异常后的处理逻辑代码。需要注意的是:用 @Recover 注解的方法 ,只有发生的异常和入参类型一致时才会回调。
原文参考:https://blog.csdn.net/jiesa/article/details/76549381


 961
961


 被折叠的 条评论
为什么被折叠?
被折叠的 条评论
为什么被折叠?
 到【灌水乐园】发言


