


注:本文参考了http://blog.csdn.net/yihuiworld/article/details/46010545以及http://blog.csdn.net/u013254061/article/details/52512146两篇文章,其中例子仿照第二遍文章的实现。
(文章更新中··········)
一、 LinearLayout(线性布局)
1. 注意点:
它是将放入其中的View子控件按照水平或者垂直方向排列,说白了,就是横着放,或者竖着放。需要注意的事,如果是水平放置的话,每一列只能放一个控件,如果是竖着放置的话,每一行只能放一个控件,再注意的是,线性布局不会换行,剩下的不会显示出来(这也是和javaSE中的流式布局的区别)
2. 重要属性说明:
android:orientation:
/*当设置成 vertical 时表示布局容器内的控件纵向排列成1列
当设置成 horizontal 时表示布局容器内的所有控件横向排列成1行*/

android:layout_weight:
/*为容器内的组件设置权重,表示当所有控件全部排列完毕后,该被设置的组件占父容器剩余空白部分的多少比重*/

android:layout_gravity:
/*为容器内的控件设置该控件在父容器中的对齐方式:
    ①当父容器线性设置为   vertical 纵向时,则只有设置与左右相关的值才起作用,ex:left、right
    ②当父容器线性设置为 horizontal 横向时,则只有设置与上下相关的值才起作用,ex:top、bottom*/

android:gravity:
/*设置控件上面的文字 在 该组件里面的对齐方式
Eg.  android:gravity = “left|buttom”;
//将控件中的内容放置在控件的左下位置*/

android:visibility:
/*visibility显示;invisibility不显示,但是还是占据那个位置留一个空白区域;gone真正的完全隐藏*/- 代码实例:
实现效果图:
相应xml代码:
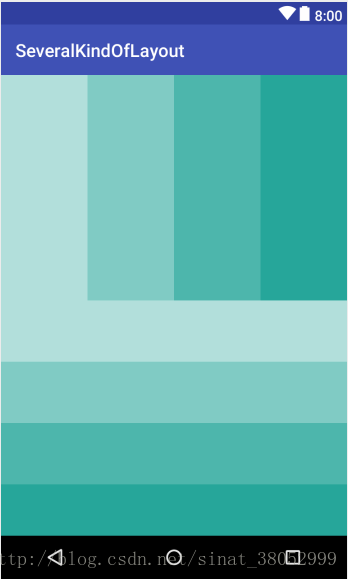
<?xml version="1.0" encoding="utf-8"?>
<LinearLayout
    xmlns:android="http://schemas.android.com/apk/res/android"
    android:layout_width="match_parent"
    android:layout_height="match_parent"
    android:orientation = "vertical">

    <LinearLayout
        android:layout_width="wrap_content"
        android:layout_height="250dp"
        android:orientation = "horizontal">

        <TextView
            android:layout_width="96dp"
            android:layout_height="match_parent"
            android:background="#b2dfdb"/>

        <TextView
            android:layout_width="96dp"
            android:layout_height="match_parent"
            android:background="#80cbc4"/>

        <TextView
            android:layout_width="96dp"
            android:layout_height="match_parent"
            android:background="#4db6ac"/>

        <TextView
            android:layout_width="96dp"
            android:layout_height="match_parent"
            android:background="#26a69a"/>

    </LinearLayout>


    <LinearLayout
        android:layout_width="match_parent"
        android:layout_height="match_parent"
        android:orientation = "vertical">

        <TextView
            android:layout_width="match_parent"
            android:layout_height="68dp"
            android:background="#b2dfdb"/>

        <TextView
            android:layout_width="match_parent"
            android:layout_height="68dp"
            android:background="#80cbc4"/>

        <TextView
            android:layout_width="match_parent"
            android:layout_height="68dp"
            android:background="#4db6ac"/>

        <TextView
            android:layout_width="match_parent"
            android:layout_height="68dp"
            android:background="#26a69a"/>

    </LinearLayout>

</LinearLayout>
二、 ConstraintLayout(约束布局)
1. 重要属性说明:
1.1 约束布局属性
layout_constraintLeft_toLeftOf:该控件的左边相对于某控件或父布局的左边对齐。
layout_constraintLeft_toRightOf:该控件的左边相对于某控件或父布局的右边对齐。
layout_constraintRight_toLeftOf:该控件的右边相对于某控件或父布局的左边对齐。
layout_constraintRight_toRightOf:该控件的右边相对于某控件或父布局的右边对齐。
layout_constraintTop_toTopOf:该控件的顶边相对于某控件或父布局的顶边对齐。
layout_constraintTop_toBottomOf:该控件的顶边相对于某控件或父布局的底边对齐。
layout_constraintBottom_toTopOf:该控件的底边相对于某控件或父布局的顶边对齐。
layout_constraintBottom_toBottomOf:该控件的底边相对于某控件或父布局的底边对齐。
layout_constraintBaseline_toBaselineOf:该控件的水平基准线相对于某控件或父布局的水平基准线对齐。
layout_constraintStart_toStartOf:该控件的开始部分相对于某控件或父布局的开始部分对齐。
layout_constraintStart_toEndOf:该控件的开始部分相对于某控件或父布局的结束部分对齐。
layout_constraintEnd_toStartOf:该控件的结束部分相对于某控件或父布局的开始部分对齐。
layout_constraintEnd_toEndOf:该控件的结束部分相对于某控件或父布局的结束部分对齐。
1.2 相对布局属性
android:layout_marginStart:设置控件距离开头view的边距。
android:layout_marginEnd:设置控件距离结尾view的边距。
android:layout_marginLeft:设置控件距离左边view的边距。
android:layout_marginRight:设置控件距离右边view的边距。
android:layout_marginTop:设置控件距离顶边view的边距。
android:layout_marginBottom:设置控件距离底边view的边距。
1.3 偏移
app:layout_constraintHorizontal_bias 和 app:layout_constraintVertical_bias 两个属性,分别表示水平方向的偏移和垂直方向的偏移,取值范围是 0.0~1.0,0.5 表示不偏移2. 代码实例:
实现效果图:
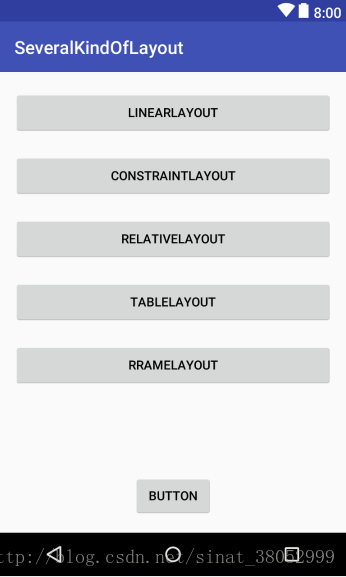
相应的xml代码:<?xml version="1.0" encoding="utf-8"?>
<android.support.constraint.ConstraintLayout
xmlns:android="http://schemas.android.com/apk/res/android"
xmlns:tools="http://schemas.android.com/tools"
android:layout_width="match_parent"
android:layout_height="match_parent"
xmlns:app="http://schemas.android.com/apk/res-auto"
tools:context="wjm.com.severalkindoflayout.MainActivity">
<Button
android:id="@+id/linear"
android:text="LinearLayout"
android:layout_width="0dp"
android:layout_height="50dp"
android:layout_marginTop="20dp"
android:layout_marginLeft = "15dp"
android:layout_marginRight = "15dp"
<!-- layout_marginTop/Left/Right/Bottom 表示的是当前这个控件的外框与其上、左、右、下相邻的控件(如果没有控件时,就是父容器)的距离。-->
<!-- 在本例中,所有的距离都是以父容器为基准,此外需要注意一点,在本例中设置当前控件到父容器的左右间距为15dp,要想这一设置生效,layout-width必须设为0dp.-- >
app:layout_constraintLeft_toLeftOf="parent"
app:layout_constraintRight_toRightOf="parent"
app:layout_constraintTop_toTopOf="parent"/>
< !-- 以上三条就是相应的约束条件。以 layout_constraintLeft_toLeftOf="parent" 为例,就是本空间的左边(layout_constraintLeft)与父容器的左边对齐(toLeftOf="parent"),其中等号后面可以填写任意控件的 id ,例如下面一个 button 的 上边界就是对齐的是 id为linear的button 控件的下边界-->
<Button
android:id="@+id/constraint"
android:layout_width="0dp"
android:layout_height="50dp"
android:layout_marginLeft="15dp",
android:layout_marginRight="15dp"
android:layout_marginTop="20dp"
android:text="ConstraintLayout"
app:layout_constraintLeft_toLeftOf="parent"
app:layout_constraintRight_toRightOf="parent"
app:layout_constraintTop_toBottomOf="@+id/linear"/>
<Button
android:id="@+id/table"
android:layout_width="0dp"
android:layout_height="50dp"
android:layout_marginLeft="15dp"
android:layout_marginRight="15dp"
android:layout_marginTop="20dp"
android:text="TableLayout"
app:layout_constraintLeft_toLeftOf="parent"
app:layout_constraintRight_toRightOf="parent"
app:layout_constraintTop_toBottomOf="@+id/relative"/>
<Button
android:id="@+id/Frame"
android:layout_width="0dp"
android:layout_height="50dp"
android:layout_marginLeft="15dp"
android:layout_marginRight="15dp"
android:layout_marginTop="20dp"
android:text="RrameLayout"
app:layout_constraintLeft_toLeftOf="parent"
app:layout_constraintRight_toRightOf="parent"
app:layout_constraintTop_toBottomOf="@+id/table"/>
<Button
android:id="@+id/relative"
android:layout_width="0dp"
android:layout_height="50dp"
android:layout_marginLeft="15dp"
android:layout_marginRight="15dp"
android:layout_marginTop="20dp"
android:text="RelativeLayout"
app:layout_constraintLeft_toLeftOf="parent"
app:layout_constraintRight_toRightOf="parent"
app:layout_constraintTop_toBottomOf="@+id/constraint"/>
<Button
android:id="@+id/button3"
android:layout_width="wrap_content"
android:layout_height="wrap_content"
android:layout_marginEnd="8dp"
android:layout_marginStart="8dp"
android:layout_marginTop="96dp"
android:text="Button"
app:layout_constraintEnd_toEndOf="parent"
app:layout_constraintStart_toStartOf="parent"
app:layout_constraintTop_toBottomOf="@+id/Frame"/>
<!-- 以上 三条 为 约束条件 -->
</android.support.constraint.ConstraintLayout>


 688
688

 被折叠的 条评论
为什么被折叠?
被折叠的 条评论
为什么被折叠?
 到【灌水乐园】发言


