


一、验证码生成
"""
验证码生成脚本(使用captcha包提供的ImageCaptcha方法)
"""

from captcha.image import ImageCaptcha

import sys
import random
import numpy as np

"""
使用四位数字验证码,当然也可以加入大小写字母。四位验证码有10000种可能(0000~9999)
但是由于生成过程具有随机性,难免出现重复情况,所以最终生成的验证码数量少于10000
"""
number = np.arange(0, 10)
number = [str(x) for x in number]

def random_captcha_text(char_set=number, captcha_size=4):
    # 验证码列表
    captcha_text = []
    for i in range(captcha_size):
        c = random.choice(char_set)     # 随机选中构成名称
        captcha_text.append(c)          # 加入列表
    return captcha_text

def gen_captcha_text_and_image():
    image = ImageCaptcha()
    # 获得随机生成的验证码
    captcha_text = random_captcha_text()
    # 把验证码列表转为字符串
    captcha_text = ''.join(captcha_text)
    # 生成验证码
    captcha = image.generate(captcha_text)
    image.write(captcha_text, 'captcha/images/' + captcha_text + '.jpg')


num = 10000
for i in range(num):
    gen_captcha_text_and_image()
    sys.stdout.write('\r>> Creating image %d/%d' % (i+1, num))
    sys.stdout.flush()
sys.stdout.write('\n')
sys.stdout.flush()
print('生成完毕')
验证码存放在 "./captcha/images/’ 目录下,如图:

验证码图片如下:
每张图片的label就是验证码数字,此图验证码数字为0695所以文件命名为0695.jpg
二、制作tfrecord文件
1、关于tfrecord文件:
TFRecords可以允许你讲任意的数据转换为TensorFlow所支持的格式, 这种方法可以使TensorFlow的数据集更容易与网络应用架构相匹配。这种建议的方法就是使用TFRecords文件,TFRecords文件包含了[tf.train.Example 协议内存块(protocol buffer)](协议内存块包含了字段[Features],你可以写一段代码获取你的数据, 将数据填入到Example协议内存块(protocol buffer),将协议内存块序列化为一个字符串, 并且通过[tf.python_io.TFRecordWriter class]写入到TFRecords文件。
TFRecords文件格式在图像识别中有很好的使用,其可以将二进制数据和标签数据(训练的类别标签)数据存储在同一个文件中,它可以在模型进行训练之前通过预处理步骤将图像转换为TFRecords格式,此格式最大的优点实践每幅输入图像和与之关联的标签放在同一个文件中.TFRecords文件是一种二进制文件,其不对数据进行压缩,所以可以被快速加载到内存中.格式不支持随机访问,因此它适合于大量的数据流,但不适用于快速分片或其他非连续存取。
TFrecord文件读写方式参考:https://zhuanlan.zhihu.com/p/31992460
2、代码
from PIL import Image
import tensorflow as tf
import numpy as np
import os
import random
import sys

_NUM_TEST = 500
_RANDOM_SEED = 0
DATASET_DIR = 'captcha/images'
TFRECORD_DIR = 'captcha/'


# 判断tfrecord文件是否存在
def _dataset_exists(dataset_dir):
    for split_name in ['train', 'test']:
        output_filename = os.path.join(dataset_dir, split_name + '.tfrecords')
        if not tf.gfile.Exists(output_filename):
            return False
    return True


def _get_filenames_and_classes(dataset_dir):
    photo_filenames = []
    for filename in os.listdir(dataset_dir):
        # 获取文件路径
        path = dataset_dir + '/' + filename
        photo_filenames.append(path)
    return photo_filenames


def bytes_feature(values):  # 格式转换(字符串)
    return tf.train.Feature(bytes_list=tf.train.BytesList(value=[values]))


def int64_feature(values):  # 格式转换(64位int)
    if not isinstance(values, (tuple, list)):
        values = [values]
    return tf.train.Feature(int64_list=tf.train.Int64List(value=values))


def image_to_tfexample(image_date, label0, label1, label2, label3):
    # Abstract base class for protocol message
    return tf.train.Example(features=tf.train.Features(feature={
        'image': bytes_feature(image_date),
        'label0': int64_feature(label0),
        'label1': int64_feature(label1),
        'label2': int64_feature(label2),
        'label3': int64_feature(label3)
    }))


# 把数据转换成tfrecord格式
def _convert_dataset(split_name, filenames, dataset_dir):
    assert split_name in ['train', 'test']

    with tf.Session() as sess:
        # 定义tfrecord文件的路径和名称
        output_filename = os.path.join(TFRECORD_DIR, split_name + '.tfrecords')
        with tf.python_io.TFRecordWriter(output_filename, options=tf.python_io.TFRecordOptions(1)) as tfrecord_writer:
            for i, filename in enumerate(filenames):
                try:
                    sys.stdout.write('\r>> Converting image %d/%d' % (i + 1, len(filenames)))
                    sys.stdout.flush()
                    # 读取图片
                    image_data = Image.open(filename)
                    # 根据模型的结构resize
                    image_data = image_data.resize((224, 224))
                    # 灰度转换
                    image_data = np.array(image_data.convert('L'))
                    # 将图片转换为二进制数据
                    image_data = image_data.tobytes()
                    # 获取label
                    labels = filename.split('/')[-1][0:4]
                    num_labels = []
                    for j in range(4):
                        num_labels.append(int(labels[j]))
                    # 生成protocol数据类型
                    example = image_to_tfexample(image_data, num_labels[0], num_labels[1],
                                                 num_labels[2], num_labels[3])
                    tfrecord_writer.write(example.SerializeToString())
                except IOError as e:
                    print('Could not read:', filenames[i])
                    print('Error:', e)
                    print('Skip it\n')
    sys.stdout.write('\n')
    sys.stdout.flush()


# 判断tfrecord文件是否存在
if _dataset_exists(TFRECORD_DIR):
    print('tfrecord文件已经存在')
else:
    # 获得所有图片
    photo_filenames = _get_filenames_and_classes(DATASET_DIR)
    # 把数据集分割为训练集和测试集并打乱
    random.seed(_RANDOM_SEED)
    random.shuffle(photo_filenames)
    training_filenames = photo_filenames[_NUM_TEST:]
    testing_filenames = photo_filenames[:_NUM_TEST]

    # 数据转换
    _convert_dataset('train', training_filenames, DATASET_DIR)
    _convert_dataset('test', training_filenames, DATASET_DIR)
    print('生成tfrecord文件')
说明:DATASET_DIR定义了数据集路径,TFRECORD_DIR定义了tfrecord文件存放路径,_NUM_TEST定义了test数据集数量,该程序将所有图片分为两部分,其中获得_NUM_TEST数量的图像作为测试数据集。在_convert_dataset()中我们对图像数据进行预处理包括灰度转换、图像大小转换已经二进制转换,这些操作方便了我们将数据写入文件以及训练时候对数据的使用。
最终生成的文件如下:

三、验证码识别模型训练
1、验证码识别思路
将验证码label拆分为4个
例如有一个验证码为0782,则拆分后的label如下(采用one-hot编码,对应位数值置1):
Label0:1000000000
Label1:0000000100
Label2:0000000010
Label3:0010000000
好处:可使用多任务学习
2、什么是多任务学习

其中X是输入,Shared Layer就是一些卷积与池化操作,Task1-4对应四个标签,产生四个loss,将四个loss求和得总的loss,用优化器优化总的loss,从而降低每个标签产生的loss。
3、获取谷歌提供的alexnet_v2网络
打开github,搜索 tensorflow/models,如下:

将models文件夹clone下来:

clone完成后,在路径 “/models/research/silm/” 下找到nets文件夹,将该文件夹拷贝到项目目录,我们在训练过程中会调用nets文件夹下提供的python代码(nets_factory.py)

4、修改alexnet.py代码
修改后代码如下:
# Copyright 2016 The TensorFlow Authors. All Rights Reserved.
#
# Licensed under the Apache License, Version 2.0 (the "License");
# you may not use this file except in compliance with the License.
# You may obtain a copy of the License at
#
# http://www.apache.org/licenses/LICENSE-2.0
#
# Unless required by applicable law or agreed to in writing, software
# distributed under the License is distributed on an "AS IS" BASIS,
# WITHOUT WARRANTIES OR CONDITIONS OF ANY KIND, either express or implied.
# See the License for the specific language governing permissions and
# limitations under the License.
# ==============================================================================
"""Contains a model definition for AlexNet.

This work was first described in:
  ImageNet Classification with Deep Convolutional Neural Networks
  Alex Krizhevsky, Ilya Sutskever and Geoffrey E. Hinton

and later refined in:
  One weird trick for parallelizing convolutional neural networks
  Alex Krizhevsky, 2014

Here we provide the implementation proposed in "One weird trick" and not
"ImageNet Classification", as per the paper, the LRN layers have been removed.

Usage:
  with slim.arg_scope(alexnet.alexnet_v2_arg_scope()):
    outputs, end_points = alexnet.alexnet_v2(inputs)

@@alexnet_v2
"""

from __future__ import absolute_import
from __future__ import division
from __future__ import print_function

import tensorflow as tf
from tensorflow.contrib import slim as contrib_slim

slim = contrib_slim

# pylint: disable=g-long-lambda
trunc_normal = lambda stddev: tf.compat.v1.truncated_normal_initializer(
    0.0, stddev)


def alexnet_v2_arg_scope(weight_decay=0.0005):
  with slim.arg_scope([slim.conv2d, slim.fully_connected],
                      activation_fn=tf.nn.relu,
                      biases_initializer=tf.compat.v1.constant_initializer(0.1),
                      weights_regularizer=slim.l2_regularizer(weight_decay)):
    with slim.arg_scope([slim.conv2d], padding='SAME'):
      with slim.arg_scope([slim.max_pool2d], padding='VALID') as arg_sc:
        return arg_sc


def alexnet_v2(inputs,
               num_classes=1000,
               is_training=True,
               dropout_keep_prob=0.5,
               spatial_squeeze=True,
               scope='alexnet_v2',
               global_pool=False):
  """AlexNet version 2.

  Described in: http://arxiv.org/pdf/1404.5997v2.pdf
  Parameters from:
  github.com/akrizhevsky/cuda-convnet2/blob/master/layers/
  layers-imagenet-1gpu.cfg

  Note: All the fully_connected layers have been transformed to conv2d layers.
        To use in classification mode, resize input to 224x224 or set
        global_pool=True. To use in fully convolutional mode, set
        spatial_squeeze to false.
        The LRN layers have been removed and change the initializers from
        random_normal_initializer to xavier_initializer.

  Args:
    inputs: a tensor of size [batch_size, height, width, channels].
    num_classes: the number of predicted classes. If 0 or None, the logits layer
    is omitted and the input features to the logits layer are returned instead.
    is_training: whether or not the model is being trained.
    dropout_keep_prob: the probability that activations are kept in the dropout
      layers during training.
    spatial_squeeze: whether or not should squeeze the spatial dimensions of the
      logits. Useful to remove unnecessary dimensions for classification.
    scope: Optional scope for the variables.
    global_pool: Optional boolean flag. If True, the input to the classification
      layer is avgpooled to size 1x1, for any input size. (This is not part
      of the original AlexNet.)

  Returns:
    net: the output of the logits layer (if num_classes is a non-zero integer),
      or the non-dropped-out input to the logits layer (if num_classes is 0
      or None).
    end_points: a dict of tensors with intermediate activations.
  """
  with tf.compat.v1.variable_scope(scope, 'alexnet_v2', [inputs]) as sc:
    end_points_collection = sc.original_name_scope + '_end_points'
    # Collect outputs for conv2d, fully_connected and max_pool2d.
    with slim.arg_scope([slim.conv2d, slim.fully_connected, slim.max_pool2d],
                        outputs_collections=[end_points_collection]):
      net = slim.conv2d(inputs, 64, [11, 11], 4, padding='VALID',
                        scope='conv1')
      net = slim.max_pool2d(net, [3, 3], 2, scope='pool1')
      net = slim.conv2d(net, 192, [5, 5], scope='conv2')
      net = slim.max_pool2d(net, [3, 3], 2, scope='pool2')
      net = slim.conv2d(net, 384, [3, 3], scope='conv3')
      net = slim.conv2d(net, 384, [3, 3], scope='conv4')
      net = slim.conv2d(net, 256, [3, 3], scope='conv5')
      net = slim.max_pool2d(net, [3, 3], 2, scope='pool5')

      # Use conv2d instead of fully_connected layers.
      with slim.arg_scope(
          [slim.conv2d],
          weights_initializer=trunc_normal(0.005),
          biases_initializer=tf.compat.v1.constant_initializer(0.1)):
        net = slim.conv2d(net, 4096, [5, 5], padding='VALID',
                          scope='fc6')
        net = slim.dropout(net, dropout_keep_prob, is_training=is_training,
                           scope='dropout6')
        net = slim.conv2d(net, 4096, [1, 1], scope='fc7')
        # Convert end_points_collection into a end_point dict.
        end_points = slim.utils.convert_collection_to_dict(
            end_points_collection)
        if global_pool:
          net = tf.reduce_mean(
              input_tensor=net, axis=[1, 2], keepdims=True, name='global_pool')
          end_points['global_pool'] = net
        if num_classes:
          net = slim.dropout(net, dropout_keep_prob, is_training=is_training,
                             scope='dropout7')
          net0 = slim.conv2d(
              net,
              num_classes, [1, 1],
              activation_fn=None,
              normalizer_fn=None,
              biases_initializer=tf.compat.v1.zeros_initializer(),
              scope='fc8_0')
          net1 = slim.conv2d(
              net,
              num_classes, [1, 1],
              activation_fn=None,
              normalizer_fn=None,
              biases_initializer=tf.compat.v1.zeros_initializer(),
              scope='fc8_1')
          net2 = slim.conv2d(
              net,
              num_classes, [1, 1],
              activation_fn=None,
              normalizer_fn=None,
              biases_initializer=tf.compat.v1.zeros_initializer(),
              scope='fc8_2')
          net3 = slim.conv2d(
              net,
              num_classes, [1, 1],
              activation_fn=None,
              normalizer_fn=None,
              biases_initializer=tf.compat.v1.zeros_initializer(),
              scope='fc8_3')

          if spatial_squeeze:
            net0 = tf.squeeze(net0, [1, 2], name='fc8_0/squeezed')
          end_points[sc.name + '/fc8_0'] = net0
          if spatial_squeeze:
            net1 = tf.squeeze(net1, [1, 2], name='fc8_1/squeezed')
          end_points[sc.name + '/fc8_1'] = net1
          if spatial_squeeze:
            net2 = tf.squeeze(net2, [1, 2], name='fc8_2/squeezed')
          end_points[sc.name + '/fc8_2'] = net2
          if spatial_squeeze:
            net3 = tf.squeeze(net3, [1, 2], name='fc8_3/squeezed')
          end_points[sc.name + '/fc8_3'] = net3
      return net0, net1, net2, net3, end_points
alexnet_v2.default_image_size = 224
说明:网络中的卷积层和池化层不发生变化,原网络只有一个net输出,由于我们的验证码识别项目将验证码拆分成四个标签,所以需要四个输出,因此在源代码基础上增加net1 ~ net3输出。
5、train代码
"""验证码识别
学习模式:多任务学习
网络模型:alexnet_v2
完成时间:2020-5-1
"""
import tensorflow as tf
from nets import nets_factory
CHAR_SET_LEN = 10 # 不同字符数量
IMAGE_HEIGHT = 60 # 图片高度
IMAGE_WIDTH = 160 # 图片宽度
BATCH_SIZE = 25
TFRECORD_FILE = 'D:/PycharmProject/StudyDemo/captcha/train.tfrecords'
# placeholder
x = tf.placeholder(tf.float32, [None, 224, 224])
y0 = tf.placeholder(tf.float32, [None])
y1 = tf.placeholder(tf.float32, [None])
y2 = tf.placeholder(tf.float32, [None])
y3 = tf.placeholder(tf.float32, [None])
_learn_rate = tf.Variable(0.003, dtype=tf.float32)
# 从tfrecord文件中读出数据
def read_and_decode(filename):
# 生成文件队列
filename_queue = tf.train.string_input_producer([filename])
reader = tf.TFRecordReader(options=tf.python_io.TFRecordOptions(1))
# 返回文件名和文件
_, serialized_example = reader.read(filename_queue)
features = tf.parse_single_example(serialized_example, features={
'image': tf.FixedLenFeature([], tf.string),
'label0': tf.FixedLenFeature([], tf.int64),
'label1': tf.FixedLenFeature([], tf.int64),
'label2': tf.FixedLenFeature([], tf.int64),
'label3': tf.FixedLenFeature([], tf.int64),
})
# 获取图片数据
image = tf.decode_raw(features['image'], tf.uint8)
# tf.train.shuffle_batch的使用必须确定shape
image = tf.reshape(image, [224, 224])
# 图片预处理
image = tf.cast(image, tf.float32) / 255.0
image = tf.subtract(image, 0.5)
image = tf.multiply(image, 2.0)
# 获取label
label0 = tf.cast(features['label0'], tf.int32)
label1 = tf.cast(features['label1'], tf.int32)
label2 = tf.cast(features['label2'], tf.int32)
label3 = tf.cast(features['label3'], tf.int32)
return image, label0, label1, label2, label3
# 获取图片数据与标签
image, label0, label1, label2, label3 = read_and_decode(TFRECORD_FILE)
# 使用shuffle_batch随机打乱张量顺序创建批次
image_batch, label_batch0, label_batch1, label_batch2, label_batch3 = tf.train.shuffle_batch(
[image, label0, label1, label2, label3], batch_size=BATCH_SIZE,
capacity=50000, min_after_dequeue=10000, num_threads=1
)
# 定义网络结构
train_network_fn = nets_factory.get_network_fn('alexnet_v2',
num_classes=CHAR_SET_LEN,
weight_decay=0.0005,
is_training=True)
with tf.Session() as sess:
# input参数要符合Alexnet_v2网络的要求,所以先做个格式转换
X = tf.reshape(x, [BATCH_SIZE, 224, 224, 1])
# 数据输入网络得到输出值
logits0, logits1, logits2, logits3, _ = train_network_fn(X)
# 把标签转换成one_hot形式
one_hot_labels0 = tf.one_hot(indices=tf.cast(y0, tf.int32), depth=CHAR_SET_LEN)
one_hot_labels1 = tf.one_hot(indices=tf.cast(y1, tf.int32), depth=CHAR_SET_LEN)
one_hot_labels2 = tf.one_hot(indices=tf.cast(y2, tf.int32), depth=CHAR_SET_LEN)
one_hot_labels3 = tf.one_hot(indices=tf.cast(y3, tf.int32), depth=CHAR_SET_LEN)
# 计算损失值
loss0 = tf.reduce_mean(tf.nn.softmax_cross_entropy_with_logits_v2(logits=logits0,
labels=one_hot_labels0))
loss1 = tf.reduce_mean(tf.nn.softmax_cross_entropy_with_logits_v2(logits=logits1,
labels=one_hot_labels1))
loss2 = tf.reduce_mean(tf.nn.softmax_cross_entropy_with_logits_v2(logits=logits2,
labels=one_hot_labels2))
loss3 = tf.reduce_mean(tf.nn.softmax_cross_entropy_with_logits_v2(logits=logits3,
labels=one_hot_labels3))
# 总和损失值
total_loss = (loss0 + loss1 + loss2 + loss3) / 4.0
# 优化器
optimizer = tf.train.AdamOptimizer(learning_rate=_learn_rate).minimize(total_loss)
# 计算准确率
correct_prediction0 = tf.equal(tf.argmax(one_hot_labels0, 1), tf.argmax(logits0, 1))
accuracy0 = tf.reduce_mean(tf.cast(correct_prediction0, tf.float32))
correct_prediction1 = tf.equal(tf.argmax(one_hot_labels1, 1), tf.argmax(logits1, 1))
accuracy1 = tf.reduce_mean(tf.cast(correct_prediction1, tf.float32))
correct_prediction2 = tf.equal(tf.argmax(one_hot_labels2, 1), tf.argmax(logits2, 1))
accuracy2 = tf.reduce_mean(tf.cast(correct_prediction2, tf.float32))
correct_prediction3 = tf.equal(tf.argmax(one_hot_labels3, 1), tf.argmax(logits3, 1))
accuracy3 = tf.reduce_mean(tf.cast(correct_prediction3, tf.float32))
# 保存模型
saver = tf.train.Saver()
# 初始化变量
sess.run(tf.global_variables_initializer())
sess.run(tf.local_variables_initializer())
# 创建一个协调器管理线程
coord = tf.train.Coordinator()
# 启动QueueRunner,此时文件名队列已经进队
threads = tf.train.start_queue_runners(sess=sess, coord=coord)
for i in range(6001):
# 获得一个批次的数据和标签
b_image, b_label0, b_label1, b_label2, b_label3 = sess.run([image_batch,
label_batch0,
label_batch1,
label_batch2,
label_batch3])
# 优化模型
sess.run(optimizer, feed_dict={
x: b_image,
y0: b_label0,
y1: b_label1,
y2: b_label2,
y3: b_label3
})
# 每迭代50次计算并打印一次损失值和准确率
if i % 50 == 0:
# 每2000次降低学习率
if i % 2000 == 0:
sess.run(tf.assign(_learn_rate, _learn_rate / 3))
acc0, acc1, acc2, acc3, loss_ = sess.run([accuracy0, accuracy1, accuracy2, accuracy3, total_loss],
feed_dict={
x: b_image,
y0: b_label0,
y1: b_label1,
y2: b_label2,
y3: b_label3
})
learing_rate = sess.run(_learn_rate)
print('Iter: %d loss: %.3f accuracy:%.2f,%.2f,%.2f,%.2f learing_rate:%.4f'
% (i, loss_, acc0, acc1, acc2, acc3, learing_rate))
# 停止训练 / 保存模型
if i == 6000: # global_step参数是把训练次数添加到模型名称中
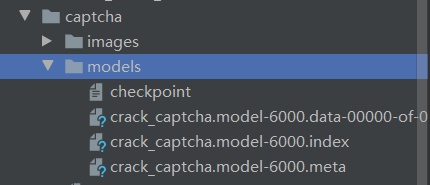
saver.save(sess, './captcha/models/crack_captcha.model', global_step=i)
break
coord.request_stop() # 通知其他线程关闭
coord.join(threads) # 其他线程关闭后该函数才可返回
代码概述:从train.tfrecord读出数据和标签,打乱,将数据送入alexnet网络得到输出值,将输出的标签转化为one_hot形式,计算loss,对loss求和得total_loss并用优化器优化,计算准确率,训练6000次,保存模型。
注意:tfrecords文件读写前后数据格式一定要对应,TFRecordWriter和TFRecordReader的options一定要相同,不然容易出现读写错误,需仔细检查。
保存的模型如下:
提示:训练过程较慢,笔者使用NVIDIA 940mx显卡跑满2G显存总共花费13个小时完成训练,最终准确率达到99%。
四、模型测试
代码与训练代码相似:
import tensorflow as tf
import matplotlib.pyplot as plt
from PIL import Image
from nets import nets_factory
# 不同字符数量
CHAR_SET_LEN = 10
# 图片高度和宽度
IMAGE_HEIGHT = 60
IMAGE_WIDTH = 160
# 批次
BATCH_SIZE = 1
# tfrecord文件存放路径
TFRECORD_FILE = 'captcha/test.tfrecords'
# placeholder
x = tf.placeholder(tf.float32, [None, 224, 224])
# 从tfrecord读出数据
def read_and_decode(filename):
# 生成文件队列
filename_queue = tf.train.string_input_producer([filename])
reader = tf.TFRecordReader(options=tf.python_io.TFRecordOptions(1))
# 返回文件名和文件
_, serialized_example = reader.read(filename_queue)
features = tf.parse_single_example(serialized_example, features={
'image': tf.FixedLenFeature([], tf.string),
'label0': tf.FixedLenFeature([], tf.int64),
'label1': tf.FixedLenFeature([], tf.int64),
'label2': tf.FixedLenFeature([], tf.int64),
'label3': tf.FixedLenFeature([], tf.int64),
})
# 获取图片数据
image = tf.decode_raw(features['image'], tf.uint8)
# 没有经过预处理的灰度图
image_raw = tf.reshape(image, [224, 224])
# tf.train.shuffle_batch的使用必须确定shape
image = tf.reshape(image, [224, 224])
# 图片预处理
image = tf.cast(image, tf.float32) / 255.0
image = tf.subtract(image, 0.5)
image = tf.multiply(image, 2.0)
# 获取label
label0 = tf.cast(features['label0'], tf.int32)
label1 = tf.cast(features['label1'], tf.int32)
label2 = tf.cast(features['label2'], tf.int32)
label3 = tf.cast(features['label3'], tf.int32)
return image, image_raw, label0, label1, label2, label3
# 获取图片数据与标签
image, image_raw, label0, label1, label2, label3 = read_and_decode(TFRECORD_FILE)
# 获得批次
image_batch, image_raw_batch, label_batch0, label_batch1, label_batch2, label_batch3 = tf.train.shuffle_batch(
[image, image_raw, label0, label1, label2, label3], batch_size=BATCH_SIZE,
capacity=50000, min_after_dequeue=10000, num_threads=1
)
# 定义网络结构
train_network_fn = nets_factory.get_network_fn('alexnet_v2',
num_classes=CHAR_SET_LEN,
weight_decay=0.0005,
is_training=False)
with tf.Session() as sess:
# inputs格式[batch_size, height, width, channels]
X = tf.reshape(x, [BATCH_SIZE, 224, 224, 1])
# 数据输入网络得到输出值
logits0, logits1, logits2, logits3, _ = train_network_fn(X)
# 预测值
predict0 = tf.reshape(logits0, [-1, CHAR_SET_LEN])
predict0 = tf.argmax(predict0, 1)
predict1 = tf.reshape(logits1, [-1, CHAR_SET_LEN])
predict1 = tf.argmax(predict1, 1)
predict2 = tf.reshape(logits2, [-1, CHAR_SET_LEN])
predict2 = tf.argmax(predict2, 1)
predict3 = tf.reshape(logits3, [-1, CHAR_SET_LEN])
predict3 = tf.argmax(predict3, 1)
# 初始化
sess.run(tf.global_variables_initializer())
sess.run(tf.local_variables_initializer())
# 载入模型
saver = tf.train.Saver()
saver.restore(sess, './captcha/models/crack_captcha.model-6000')
# 创建一个协调器管理线程
coord = tf.train.Coordinator()
# 启动QueueRunner,此时文件名队列已经进队
threads = tf.train.start_queue_runners(sess=sess, coord=coord)
for i in range(10):
# 获得一个批次的数据和标签
b_image, b_image_raw, b_label0, b_label1, b_label2, b_label3 = sess.run([image_batch,
image_raw_batch,
label_batch0,
label_batch1,
label_batch2,
label_batch3])
# 显示图片
img = Image.fromarray(b_image_raw[0], 'L')
plt.imshow(img)
plt.axis('off')
plt.show()
# 打印标签
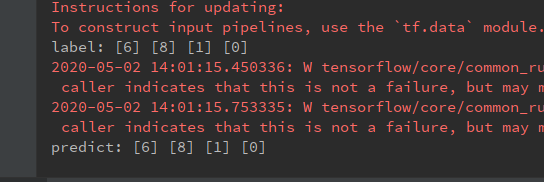
print('label:', b_label0, b_label1, b_label2, b_label3)
# 预测
label0, label1, label2, label3 = sess.run([predict0, predict1, predict2, predict3],
feed_dict={x: b_image})
# 打印预测值
print('predict:', label0, label1, label2, label3)
# 通知其他线程关闭
coord.request_stop()
coord.join(threads)
运行结果:

…


 398
398


 被折叠的 条评论
为什么被折叠?
被折叠的 条评论
为什么被折叠?
 到【灌水乐园】发言


