


Getting Started
Building Your First App
基本操作:准备开发环境、创建工程、执行、创建Activity、创建Layout、启动另一个Activity、运行
Supporting Different Devices
主要考虑3方面:语言、屏幕、系统版本
查看Google Play统计出来的Android系统版本分布情况:http://developer.android.com/about/dashboards/index.html
Supporting Different Languages // TODO
Supporting Different Screens //TODO
Supporting Different Platform Versions
可以通过 Build类 中定义的常量来判断API Level
private void setUpActionBar() {
    // Make sure we're running on Honeycomb or higher to use ActionBar APIs
    if (Build.VERSION.SDK_INT >= Build.VERSION_CODES.HONEYCOMB) {
        ActionBar actionBar = getActionBar();
        actionBar.setDisplayHomeAsUpEnabled(true);
    }
}
xml文件可以使用更高API Level中的属性,因为Android自动忽略它不能识别的属性。
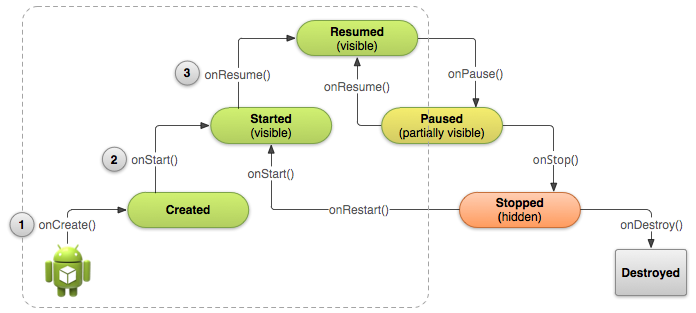
Managing the Activity Lifecycle
Activity的lifecycle回调函数,可以让你自定义进入时、退出时执行的操作。
合理编写callback,让程序的行为符合用户使用习惯,保证不会有浪费系统资源的现象。
Starting an Activity

可停留的状态:Resumed, Paused, Stopped
其余状态是很短暂的
将一个activity声明为launcher activity,在AndroidManifest.xml中定义如下:
<activity android:name=".MainActivity" android:label="@string/app_name">
    <intent-filter>
        <action android:name="android.intent.action.MAIN" />
        <category android:name="android.intent.category.LAUNCHER" />
    </intent-filter>
</activity>TextView mTextView; // Member variable for text view in the layout
@Override
public void onCreate(Bundle savedInstanceState) {
super.onCreate(savedInstanceState);
// Set the user interface layout for this Activity
// The layout file is defined in the project res/layout/main_activity.xml file
setContentView(R.layout.main_activity);
// Initialize member TextView so we can manipulate it later
mTextView = (TextView) findViewById(R.id.text_message);
// Make sure we're running on Honeycomb or higher to use ActionBar APIs
if (Build.VERSION.SDK_INT >= Build.VERSION_CODES.HONEYCOMB) {
// For the main activity, make sure the app icon in the action bar
// does not behave as a button
ActionBar actionBar = getActionBar();
actionBar.setHomeButtonEnabled(false);
}
}
资源清理工作一般放在onPause(), onStop()中执行。如果要关闭后台线程、其他可能导致资源泄露的东西,可以在onDestroy()中清理。
@Override
public void onDestroy() {
    super.onDestroy();  // Always call the superclass

    // Stop method tracing that the activity started during onCreate()
    android.os.Debug.stopMethodTracing();
}Pausing and Resuming an Activity
//TODO
Stopping and Restarting an Activity
//TODO
Recreating an Activity
//TODO
Adding the Action Bar
Action Bar 相当于以前的菜单

Setting Up the Action Bar
Action Bar 要求 activity 使用 Theme.Holo 主题(Android 3.0 的默认主题)
Android 2.1要想用Action Bar,用 support library—— v7 appcompat library
1. extends ActionBarActivity 2.让<application> 或 <activity> 使用 Theme.AppCompat主题
Adding Action Buttons
1.创建menu资源(示例) 图标 2. showAsAction属性(高低版本不同) 3. onCreateOptionsMenu() 4. onOptionsItemSelected() 5.Up button
@Override
public boolean onCreateOptionsMenu(Menu menu) {
    // Inflate the menu items for use in the action bar
    MenuInflater inflater = getMenuInflater();
    inflater.inflate(R.menu.main_activity_actions, menu);
    return super.onCreateOptionsMenu(menu);
}
@Override
public boolean onOptionsItemSelected(MenuItem item) {
// Handle presses on the action bar items
switch (item.getItemId()) {
case R.id.action_search:
openSearch();
return true;
case R.id.action_settings:
openSettings();
return true;
default:
return super.onOptionsItemSelected(item);
}
}怎么修改Action Bar外观,自定义style。 原文
Overlaying the Action Bar
ActionBar.hide() ActionBar.show() overlay mode
激活overlay mode: 在action bar的 theme中, j将 android:windowActionBarOverlay属性设为true
Building a Dynamic UI with Fragments
fragment 像一个nested activity,有自己的layout, life cycle
Creating a Fragment Class
1.继承 Fragment, 2.覆盖 onCreateView() -> 定义layout 3.override其他lifecycle callback(onCreate, onPause, onResume...与activity同名)
import android.os.Bundle;
import android.support.v4.app.Fragment;
import android.view.LayoutInflater;
import android.view.ViewGroup;

public class ArticleFragment extends Fragment {
    @Override
    public View onCreateView(LayoutInflater inflater, ViewGroup container,
        Bundle savedInstanceState) {
        // Inflate the layout for this fragment
        return inflater.inflate(R.layout.article_view, container, false);
    }
}fragment 必须与 FragmentActivity 关联,用XML layout file指定:<注:fragment类似一个view>
res/layout-large/news_articles.xml
<LinearLayout xmlns:android="http://schemas.android.com/apk/res/android"
    android:orientation="horizontal"
    android:layout_width="fill_parent"
    android:layout_height="fill_parent">

    <fragment android:name="com.example.android.fragments.HeadlinesFragment"
              android:id="@+id/headlines_fragment"
              android:layout_weight="1"
              android:layout_width="0dp"
              android:layout_height="match_parent" />

    <fragment android:name="com.example.android.fragments.ArticleFragment"
              android:id="@+id/article_fragment"
              android:layout_weight="2"
              android:layout_width="0dp"
              android:layout_height="match_parent" />

</LinearLayout>FragmentManager动态添加、替换、删除fragment
Add a Fragment to an Activity at Runtime
1.getSupportFragmentManager() 2.用FragmentManager创建FragmentTranscation --> beginTransaction()
3.用FragmentTransancation来remove,add,replace fragment, transanction.add(fragment)... transanction.commit()
import android.os.Bundle;
import android.support.v4.app.FragmentActivity;

public class MainActivity extends FragmentActivity {
    @Override
    public void onCreate(Bundle savedInstanceState) {
        super.onCreate(savedInstanceState);
        setContentView(R.layout.news_articles);

        // Check that the activity is using the layout version with
        // the fragment_container FrameLayout
        if (findViewById(R.id.fragment_container) != null) {

            // However, if we're being restored from a previous state,
            // then we don't need to do anything and should return or else
            // we could end up with overlapping fragments.
            if (savedInstanceState != null) {
                return;
            }

            // Create an instance of ExampleFragment
            HeadlinesFragment firstFragment = new HeadlinesFragment();

            // In case this activity was started with special instructions from an Intent,
            // pass the Intent's extras to the fragment as arguments
            firstFragment.setArguments(getIntent().getExtras());

            // Add the fragment to the 'fragment_container' FrameLayout
            getSupportFragmentManager().beginTransaction()
                    .add(R.id.fragment_container, firstFragment).commit();
        }
    }
}replace(), addToBackStack()
// Create fragment and give it an argument specifying the article it should show
ArticleFragment newFragment = new ArticleFragment();
Bundle args = new Bundle();
args.putInt(ArticleFragment.ARG_POSITION, position);
newFragment.setArguments(args);

FragmentTransaction transaction = getSupportFragmentManager().beginTransaction();

// Replace whatever is in the fragment_container view with this fragment,
// and add the transaction to the back stack so the user can navigate back
transaction.replace(R.id.fragment_container, newFragment);
transaction.addToBackStack(null);

// Commit the transaction
transaction.commit();fragment定义一个interface, 让activity实现,从而通知activity事件。
findFragmentById()
Saving Data
一般app需要保存: app state, user settings, file, database
1. Saving Key-value Sets
接口:SharedPreferences; getSharedPreferences() / getPreferences()
Context context = getActivity();
SharedPreferences sharedPref = context.getSharedPreferences(
        getString(R.string.preference_file_key), Context.MODE_PRIVATE);
SharedPreferences sharedPref = getActivity().getPreferences(Context.MODE_PRIVATE);写:SharedPreferences.Editor; edit(), put...() commit()
SharedPreferences sharedPref = getActivity().getPreferences(Context.MODE_PRIVATE);
SharedPreferences.Editor editor = sharedPref.edit();
editor.putInt(getString(R.string.saved_high_score), newHighScore);
editor.commit();SharedPreferences sharedPref = getActivity().getPreferences(Context.MODE_PRIVATE);
int defaultValue = getResources().getInteger(R.string.saved_high_score_default);
long highScore = sharedPref.getInt(getString(R.string.saved_high_score), defaultValue);File类, interal storage, external storage, interal 对比 external
指定android:installLocation属性,定义app的安装位置
1.权限(app默认有读取权限,今后可能变动):
<manifest ...>
    <uses-permission android:name="android.permission.WRITE_EXTERNAL_STORAGE" />  <!--写--> 隐含定义了读取权限
    <uses-permission android:name="android.permission.READ_EXTERNAL_STORAGE" /> <!--读-->
     ...
</manifest>
interal storage 无需权限
Save a File on Internal Storage
1.获取目录(类File代表), getFilesDir() / getCacheDir() 临时文件
2.创建file或 temp file
File file = new File(context.getFilesDir(), filename);String filename = "myfile";
String string = "Hello world!";
FileOutputStream outputStream;
try {
outputStream = openFileOutput(filename, Context.MODE_PRIVATE);
outputStream.write(string.getBytes());
outputStream.close();
} catch (Exception e) {
e.printStackTrace();
}public File getTempFile(Context context, String url) {
File file;
try {
String fileName = Uri.parse(url).getLastPathSegment();
file = File.createTempFile(fileName, null, context.getCacheDir());
catch (IOException e) {
// Error while creating file
}
return file;
}1. 检查 getExternalStorageState(), MEDIA_MOUNTED
/* Checks if external storage is available for read and write */
public boolean isExternalStorageWritable() {
    String state = Environment.getExternalStorageState();
    if (Environment.MEDIA_MOUNTED.equals(state)) {
        return true;
    }
    return false;
}

/* Checks if external storage is available to at least read */
public boolean isExternalStorageReadable() {
    String state = Environment.getExternalStorageState();
    if (Environment.MEDIA_MOUNTED.equals(state) ||
        Environment.MEDIA_MOUNTED_READ_ONLY.equals(state)) {
        return true;
    }
    return false;
}
2. 获取目录(有public files, private files。。。private files 随 app 一起删除) 3、创建file
public files: getExternalStoragePublicDirectory() 得到一个目录(File类) 参数指定文件类型:DIRECTORY_MUSIC, DIRECTORY_PICTURES
private files: getExternalFilesDir() 参数为null,返回private目录的根目录。
public File getAlbumStorageDir(String albumName) {
    // Get the directory for the user's public pictures directory.
    File file = new File(Environment.getExternalStoragePublicDirectory(
            Environment.DIRECTORY_PICTURES), albumName);
    if (!file.mkdirs()) {
        Log.e(LOG_TAG, "Directory not created");
    }
    return file;
}
public File getAlbumStorageDir(Context context, String albumName) {
// Get the directory for the app's private pictures directory.
File file = new File(context.getExternalFilesDir(
Environment.DIRECTORY_PICTURES), albumName);
if (!file.mkdirs()) {
Log.e(LOG_TAG, "Directory not created");
}
return file;
}Query Free Space
File类: getFreeSpace() getTotalSpace()
Delete a File
myFile.delete();myContext.deleteFile(fileName);3. Saving Data in SQL Databases
1. 定义contract class,声明一些常量
2. 继承SQLiteOpenHelper,override onCreate(), onUpgrade()。之后开始使用
3. new SQLiteOpenHelper子类, getReadableDatabase() / getWritableDatabase(), 返回 SQLiteDatabase
4. 通过SQLiteDatabase对象,调用 query(), execSQL(), update(), delete().... 操作表格.
涉及: Cursor, ContentValues
通过adb shell + sqlite3,调试数据库:
1、执行 adb shell 2、执行 sqlite3 /data/data/<package_name>/databases/
adb shell
# sqlite3 /data/data/com.example.google.rss.rssexample/databases/rssitems.db
SQLite version 3.3.12
Enter ".help" for instructions
.... enter commands, then quit...
sqlite> .exitIntent有implicit, explicit
Sending the User to Another App
Build an Implicit Intent
action + data(用Uri定位) -> implicit intent. 有的implicit intent需要 extra
// 1、拨号
Uri number = Uri.parse("tel:5551234");
Intent callIntent = new Intent(Intent.ACTION_DIAL, number);
// 2、查看地图
// Map point based on address
Uri location = Uri.parse("geo:0,0?q=1600+Amphitheatre+Parkway,+Mountain+View,+California");
// Or map point based on latitude/longitude
// Uri location = Uri.parse("geo:37.422219,-122.08364?z=14"); // z param is zoom level
Intent mapIntent = new Intent(Intent.ACTION_VIEW, location);// 3、打开网页
Uri webpage = Uri.parse("http://www.android.com");
Intent webIntent = new Intent(Intent.ACTION_VIEW, webpage);若进一步指定MIME type,则可以指定哪个activity被调用。
//1、发送邮件(含附件)
Intent emailIntent = new Intent(Intent.ACTION_SEND);
// The intent does not have a URI, so declare the "text/plain" MIME type
emailIntent.setType(HTTP.PLAIN_TEXT_TYPE);
emailIntent.putExtra(Intent.EXTRA_EMAIL, new String[] {"jon@example.com"}); // recipients
emailIntent.putExtra(Intent.EXTRA_SUBJECT, "Email subject");
emailIntent.putExtra(Intent.EXTRA_TEXT, "Email message text");
emailIntent.putExtra(Intent.EXTRA_STREAM, Uri.parse("content://path/to/email/attachment"));
// You can also attach multiple items by passing an ArrayList of UrisIntent calendarIntent = new Intent(Intent.ACTION_INSERT, Events.CONTENT_URI);
Calendar beginTime = Calendar.getInstance().set(2012, 0, 19, 7, 30);
Calendar endTime = Calendar.getInstance().set(2012, 0, 19, 10, 30);
calendarIntent.putExtra(CalendarContract.EXTRA_EVENT_BEGIN_TIME, beginTime.getTimeInMillis());
calendarIntent.putExtra(CalendarContract.EXTRA_EVENT_END_TIME, endTime.getTimeInMillis());
calendarIntent.putExtra(Events.TITLE, "Ninja class");
calendarIntent.putExtra(Events.EVENT_LOCATION, "Secret dojo");Verify There is an App to Receive the Intent
PackageManager packageManager = getPackageManager();
List<ResolveInfo> activities = packageManager.queryIntentActivities(intent, 0);
boolean isIntentSafe = activities.size() > 0;Start an Activity with the Intent
Showing an App Chooser
不再用用户指定的默认选项,每次都跳出选择框。
Intent intent = new Intent(Intent.ACTION_SEND);
...

// Always use string resources for UI text.
// This says something like "Share this photo with"
String title = getResources().getString(R.string.chooser_title);
// Create and start the chooser
Intent chooser = Intent.createChooser(intent, title);
startActivity(chooser);Start the Activity
startActivityForResult() 第二个参数request code 是自己定义的
static final int PICK_CONTACT_REQUEST = 1;  // The request code
...
private void pickContact() {
    Intent pickContactIntent = new Intent(Intent.ACTION_PICK, Uri.parse("content://contacts"));
    pickContactIntent.setType(Phone.CONTENT_TYPE); // Show user only contacts w/ phone numbers
    startActivityForResult(pickContactIntent, PICK_CONTACT_REQUEST);
}
Receive the Result
Override onActivityResult(int requestCode,int resultCode,Intent data);
resultCode 可以是 RESULT_OK, RESULT_CANCELED
@Override
protected void onActivityResult(int requestCode, int resultCode, Intent data) {
    // Check which request we're responding to
    if (requestCode == PICK_CONTACT_REQUEST) {
        // Make sure the request was successful
        if (resultCode == RESULT_OK) {
            // The user picked a contact.
            // The Intent's data Uri identifies which contact was selected.

            // Do something with the contact here (bigger example below)
        }
    }
}Allowing Other Apps to Start Your Activity
AndroidManifest.xml: <intent-filter>
getIntent(), setResult(int resultCode, Intent data), setResult(int resultCode)
Sharing Content
API: Inent 和 ActionProvider
Sending Content to Other Apps
发送数据:1、创建implicit intent 2、setAction() + ACTION_SEND,3、将要发送的数据通过 putExtras() 放入该Intent, mime type "text/plain", 4、 startActivity() 。
Intent sendIntent = new Intent();
sendIntent.setAction(Intent.ACTION_SEND);
sendIntent.putExtra(Intent.EXTRA_TEXT, "This is my text to send.");
sendIntent.setType("text/plain");
startActivity(sendIntent);
如果发送text,则用 EXTRAS_TEXT; 如果发送binary,则用 EXTRAS_STREAM, mime type。注意其他app可能没有读到这个数据的权限,应处理之。
一次性发送多份数据:原文链接
Receiving Content from Other Apps
接收数据:1、修改AndroidManifest.xml,增加<intent-filter>(属于<activity>,示例) 2、写代码处理intent(代码示例)
Adding an Easy Share Action
Android 4.0(API level 14)起, ActionProvider类,ActionBar类, ShareActionProvider类。
(ShareActionProvider类除了功能之外,连UI都帮你设计好了,你只需要提供一个intent就可以了)
1、修改菜单资源xml文件 2、提供intent(获取MenuItem, getActionProvider(), setShareIntent()) 示例代码
Android Support Library Setup
1.不含资源的, 把jar考入 libs/ , 再 add to build path 即可
2.含资源的, import这个library project, 对其中的每个jar文件,逐个add to build path,右键library project,Build Path->Configure Build Path -> 勾选jar文件
(勾选要用的,可以全部勾选,再利用ProGuard,编译时自动去除不用的代码),取消勾选 Android Dependencies
使用:选自己的工程,属性,库pane,添加,选中那个library project, OK。
.


 599
599

 被折叠的 条评论
为什么被折叠?
被折叠的 条评论
为什么被折叠?
 到【灌水乐园】发言


