


1. opencv
a. 读取:
img = cv2.imread(path)
读入的类型
默认是一个BGR模式的彩色图
转换类型
使用cv2.cvtColor(img, cv.COLOR_BGR2RGB)将颜色模式转化成RGB。
opencv转Tensor
torch.from_numpy(img)将图像转成tensor。
b. 保存:
cv2.imwrite(path, img)
c. 展示:
cv2.imshow(name, img)
cv2.waitKey(0)
cv2.destroyAllWindows()
d.读取gif格式的图像:
gif = cv2.VideoCapture(path)得到一个opencv的视频对象,然后使用
ret,frame = gif.read()读取该视频对象的一帧。
2. PIL
a. 读取图像:
img = PIL.Image.open(path)
读入类型
PIL.xxxImageFile类型
PIL转为array
np.asarray(img)
array转PIL
Image.fromarray(array)
颜色模式转换
img.convert(model)
model包括:‘1’:二值图,‘L’:灰度图,‘P’:
8位彩色图像,‘RGB’:
24位彩色图像(每个通道8位),‘RGBA’:alpha通道(不透明度)
b. 保存图像:
img.save(path)
c. 展示图像:
img.show()
3. matplotlib
a. 读取图像:
img = plt.imread()
读入的图像类型
numpy.array,且读取图像时直接进行了归一化操作
b. 保存图像:
plt.imsave(path,img)
img.imsave(path)不带坐标轴
plt.savefig(path)带坐标轴
c. 绘制图像:
plt.imshow(img)
plt.show()
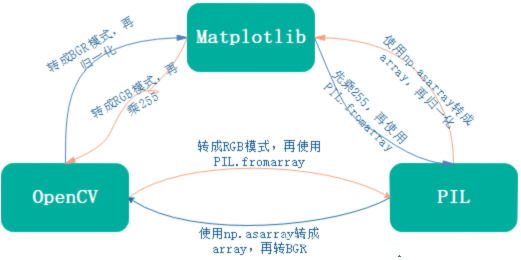
4.OpenCV、Matplotlib、PIL互转:
5. pytorch如何处理数据集
1.opecv读取并处理,
2.使用matplotlib绘制图像并保存为PIL.Image,
3.torchvision.transforms.ToTensor()(img)转化为tensor


 4万+
4万+


 被折叠的 条评论
为什么被折叠?
被折叠的 条评论
为什么被折叠?
 到【灌水乐园】发言


