


 本文介绍了如何使用GitHub上的RobustVideoMatting项目进行人物抠像,包括从预训练模型加载到视频和摄像头测试的过程。通过测试,展示了模型在不同场景下的效果,证明其在实时性和效果上都有不错的表现。
一、准备工作
Code地址:GitHub - PeterL1n/RobustVideoMatting: Robust Video Matting in PyTorch, TensorFlow, TensorFlow.js, ONNX, CoreML!
models地址:Google Drive 或者 Baidu Pan (code: gym7)
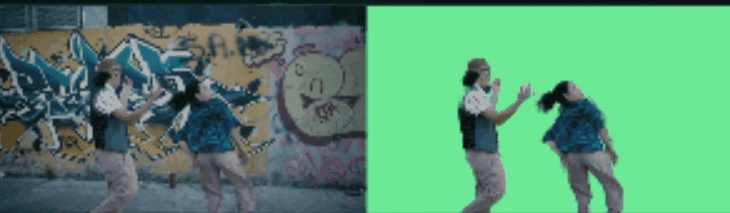
官方提供的视频效果如下:
https://raw.githubusercontent.com/PeterL1n/RobustVideoMatting/master/documentation/image/teaser.gif

字节跳动最新 AI 人物抠像论文效果展示_哔哩哔哩_bilibili
想测试下这个模型的效果,本地竟然没有合适的视频,在知乎里找了几个提供免费视频下载的网站:
收藏 | 5个高质量视频下载网站,无版权,无水印,新手必备放心使用 - 知乎
| 网站 | 下载是否免费 | 是否可商用 |
| 是 | 否 | |
| 是 | 是 | |
| 是 | 是 | |
| 是 | 是 |
我测试的视频来源于这个网站:Free Stock Videos, Download Royalty Free Videos | Mixkit
二、测试本地视频
根据README提示,可以新建一个测试文件如下:
from inference import convert_video

import torch
from model import MattingNetwork

model1 = MattingNetwork('mobilenetv3').eval().cuda()  # 可以选择mobilenetv3或者resnet50
model1.load_state_dict(torch.load('Models/rvm_mobilenetv3.pth'))  # 根据选择的模型选择对应的权重
convert_video(
    model1,                           # The model, can be on any device (cpu or cuda).
    input_source='myvideos/demo1.mp4',        # 视频文件路径或者图片的文件夹
    output_type='video',              # 可选"video" 或 "png_sequence"
    output_composition='output/demo1_com.mp4',    # 输出视频的路径或者输出图片的文件夹路径.
    output_alpha="output/demo1_pha.mp4",          # [Optional] Output the raw alpha prediction.
    output_foreground="output/demo1_fgr.mp4",     # [Optional] Output the raw foreground prediction.
    output_video_mbps=4,             # Output video mbps. Not needed for png sequence.
    downsample_ratio=None,           # 下采样的倍数可选(0-1)之间或者为None
    seq_chunk=12,                    # 一次性处理多少帧
)
视频测试效果一:
(人物背景简单,效果较好)

视频测试效果二:
(人物的背景图比较复杂,大部分效果比较好)
三、测试摄像头
在inference.py的基础上进行修改,调用本地摄像头进行测试
import cv2
import time
from torchvision import transforms
from typing import Optional, Tuple
import torch
from model import MattingNetwork


def auto_downsample_ratio(h, w):
    """
    Automatically find a downsample ratio so that the largest side of the resolution be 512px.
    """
    return min(512 / max(h, w), 1)


def get_frame(num):
    cap = cv2.VideoCapture(num)
    while True:
        ret, frame = cap.read()
        fps= cap.get(cv2.CAP_PROP_FPS)
        print("摄像头帧速:", fps)
        yield frame


def convert_video(model,
                  input_resize: Optional[Tuple[int, int]] = None,
                  downsample_ratio: Optional[float] = None,
                  device: Optional[str] = None,
                  dtype: Optional[torch.dtype] = None):
    """
    Args:
        input_resize: If provided, the input are first resized to (w, h).
        downsample_ratio: The model's downsample_ratio hyperparameter. If not provided, model automatically set one.
        device: Only need to manually provide if model is a TorchScript freezed model.
        dtype: Only need to manually provide if model is a TorchScript freezed model.
    """
    assert downsample_ratio is None or (
                downsample_ratio > 0 and downsample_ratio <= 1), 'Downsample ratio must be between 0 (exclusive) and 1 (inclusive).'


    # Initialize transform
    if input_resize is not None:
        transform = transforms.Compose([
            transforms.Resize(input_resize[::-1]),
            transforms.ToTensor()
        ])
    else:
        transform = transforms.ToTensor()

    # Inference
    print("------------------------------------------------------------>")
    model = model.eval()
    if device is None or dtype is None:
        param = next(model.parameters())
        dtype = param.dtype
        device = param.device

    bgr = torch.tensor([120, 255, 155], device=device, dtype=dtype).div(255).view(1, 1, 3, 1, 1)

    with torch.no_grad():
        rec = [None] * 4
        for src in get_frame(0):
            src = transform(src)
            src = src.unsqueeze(0)

            if downsample_ratio is None:
                downsample_ratio = auto_downsample_ratio(*src.shape[2:])

            src = src.to(device, dtype, non_blocking=True).unsqueeze(0)  # [B, T, C, H, W]
            t1 = time.time()
            fgr, pha, *rec = model(src, *rec, downsample_ratio)
            print("frame_cost:", (time.time() - t1) / src.shape[1])
            print("推理帧率:{:.2f}".format(1/((time.time() - t1) / src.shape[1])))

            com = fgr * pha + bgr * (1 - pha)
            frames = com[0]
            if frames.size(1) == 1:
                frames = frames.repeat(1, 3, 1, 1)  # convert grayscale to RGB
            frames = frames.mul(255).byte().cpu().permute(0, 2, 3, 1).numpy()  # [1, 480, 640, 3]

            yield frames[0]


def show_frame(frames):
    for frame in frames:
        cv2.imshow("capture", frame)
        if cv2.waitKey(1) & 0xFF == ord('q'):
            exit()

if __name__ == '__main__':

    # #-------测试摄像头是否可用------------#
    # for frame in get_frame(0):
    #     cv2.imshow("capture", frame)
    #     if cv2.waitKey(1) & 0xFF == ord('q'):
    #         break
    # #----------------------------------#


    #加载模型
    # model1 = MattingNetwork('mobilenetv3').eval().cuda()  # or "resnet50"
    # model1.load_state_dict(torch.load('Models/rvm_mobilenetv3.pth'))


    model1 = MattingNetwork('resnet50').eval().cuda()  # or "resnet50"
    model1.load_state_dict(torch.load('Models/rvm_resnet50.pth'))

    # 返回测试结果
    frames = convert_video(model1)

    # 展示推理结果
    show_frame(frames)
摄像头测试效果:
请自己测试^--^,这里就不放了!
小结:
通过测试对比,这个模型的效果还是不错的,完全能够满足实时性的要求。
参考资料:


 2025
2025

 被折叠的 条评论
为什么被折叠?
被折叠的 条评论
为什么被折叠?
 到【灌水乐园】发言


