


前言
这次项目算是对openmmlab AI实战营第二期的一个实验证明,虽然这几天学习的比较粗糙,但也算是入门了mmdetection。
这个工具就像python一样,openmmlab已经将入门门槛做的很低了,但如果想精进、熟练甚至做真正的调参侠,还是有很多内容需要细细琢磨学习的。
本项目默认已经安装好了mmdetection所需的各种环境,如果没有请移步官方按教程安装,这里不再赘述。
数据集
数据格式
本项目数据来源于国网比赛设备数据集,官方链接没找到,本次项目目的为学习实验性质,非商业用途。
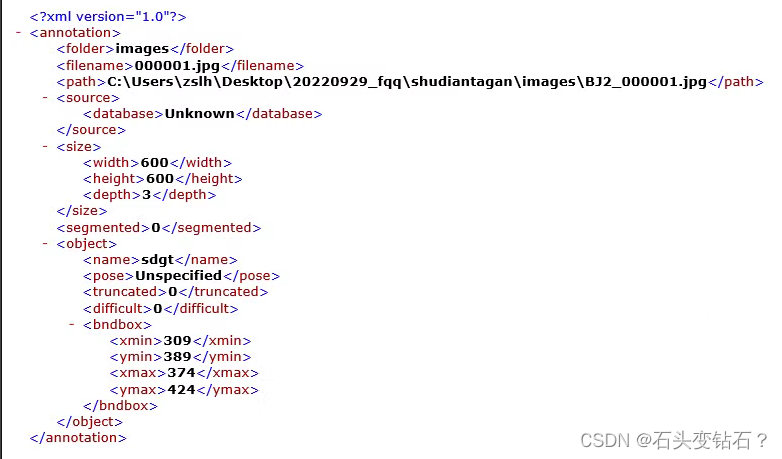
数据集一共包含400张图像,每张大小为600x600,数据集格式如下:
Dataset
├── 输电杆塔目标
│   ├── Annotation
│   │   ├── 000001.xml
│   │   。。。
│   │   ├── 000400.xml
│   ├── JPEGImage
│   │   ├── 000001.jpg
│   │   。。。
│   │   ├── 000400.jpg
每张图像的标注文件具体内容如下:
数据处理
为了方便后续处理,这里先把原数据转为COCO格式,转换代码参考官方给的,这里附上我些的转换代码。
import os
import os.path as osp
from xml.dom.minidom import parse
import mmcv
from mmengine.fileio import dump
import random
import pycocotools.coco

def convert_img_to_coco(ann_path, file_list, out_file, image_prefix):
    annotations = []
    images = []
    obj_count = 0
    for idx, file in enumerate(file_list):
        annfile_path = osp.join(ann_path, file)
        DOMtree = parse(annfile_path)
        collection = DOMtree.documentElement

        filename = collection.getElementsByTagName('filename')[0].childNodes[0].data
        img_path = osp.join(image_prefix, filename)
        height, width = mmcv.imread(img_path).shape[:2]

        images.append(dict(
            id=idx,
            file_name=filename,
            height=height,
            width=width))

        object_bbox = collection.getElementsByTagName('object')
        for obj in object_bbox:
            x_min = int(obj.getElementsByTagName('xmin')[0].childNodes[0].data)
            y_min = int(obj.getElementsByTagName('ymin')[0].childNodes[0].data)
            x_max = int(obj.getElementsByTagName('xmax')[0].childNodes[0].data)
            y_max = int(obj.getElementsByTagName('ymax')[0].childNodes[0].data)

            data_ann = dict(
                image_id=idx,
                id=obj_count,
                category_id=0,
                bbox=[x_min, y_min, x_max - x_min, y_max - y_min],
                area=(x_max - x_min) * (y_max - y_min),
                segmentation=[],
                iscrowd=0
            )
            annotations.append(data_ann)
            obj_count += 1

    train_coco_format_json = dict(
        images=images,
        annotations=annotations,
        categories=[{'id': 0, 'name': 'tower'}])
    dump(train_coco_format_json, out_file)

if __name__ == '__main__':
    ann_path = r"F:\DataSource\ElectricTower\Dataset\Dataset\输电杆塔目标\Annotation"
    img_path = r"F:\DataSource\ElectricTower\Dataset\Dataset\输电杆塔目标\JPEGImage"
    train_out = r"F:\DataSource\ElectricTower\Dataset\Dataset\输电杆塔目标\train_annotation_coco.json"

    ann_filelist = os.listdir(ann_path)
    random.shuffle(ann_filelist)
    train_list = ann_filelist[:int(len(ann_filelist)*0.8)]
    val_list = ann_filelist[int(len(ann_filelist)*0.8):]

    convert_img_to_coco(ann_path, train_list, train_out, img_path)
    val_out = r"F:\DataSource\ElectricTower\Dataset\Dataset\输电杆塔目标\val_annotation_coco.json"
    convert_img_to_coco(ann_path, val_list, val_out, img_path)
然后可视化图片看看预处理的结果对不对,可视化代码:
from pycocotools.coco import COCO
import numpy as np
import os.path as osp
from matplotlib.collections import PatchCollection
from matplotlib.patches import Polygon
import os
import matplotlib.pyplot as plt
from PIL import Image

image_paths = [filename for filename in os.listdir(r'F:\DataSource\ElectricTower\Dataset\Dataset\输电杆塔目标\JPEGImage')][:8]
def apply_exif_orientation(image):
    _EXIF_ORIENT = 274
    if not hasattr(image, 'getexif'):
        return image
    try:
        exif = image.getexif()
    except Exception:
        exif = None

    if exif is None:
        return image

    orientation = exif.get(_EXIF_ORIENT)

    method = {
        2: Image.FLIP_LEFT_RIGHT,
        3: Image.ROTATE_180,
        4: Image.FLIP_TOP_BOTTOM,
        5: Image.TRANSPOSE,
        6: Image.ROTATE_270,
        7: Image.TRANSVERSE,
        8: Image.ROTATE_90,
    }.get(orientation)
    if method is not None:
        return image.transpose(method)
    return image


def show_bbox_only(coco, anns, show_label_bbox=True, is_filling=True):
    """Show bounding box of annotations Only."""
    if len(anns) == 0:
        return

    ax = plt.gca()
    ax.set_autoscale_on(False)

    image2color = dict()
    for cat in coco.getCatIds():
        image2color[cat] = (np.random.random((1, 3)) * 0.7 + 0.3).tolist()[0]

    polygons = []
    colors = []

    for ann in anns:
        color = image2color[ann['category_id']]
        bbox_x, bbox_y, bbox_w, bbox_h = ann['bbox']
        poly = [[bbox_x, bbox_y], [bbox_x, bbox_y + bbox_h],
                [bbox_x + bbox_w, bbox_y + bbox_h], [bbox_x + bbox_w, bbox_y]]
        polygons.append(Polygon(np.array(poly).reshape((4, 2))))
        colors.append(color)

        if show_label_bbox:
            label_bbox = dict(facecolor=color)
        else:
            label_bbox = None

        ax.text(
            bbox_x,
            bbox_y,
            '%s' % (coco.loadCats(ann['category_id'])[0]['name']),
            color='white',
            bbox=label_bbox)

    if is_filling:
        p = PatchCollection(
            polygons, facecolor=colors, linewidths=0, alpha=0.4)
        ax.add_collection(p)
    p = PatchCollection(
        polygons, facecolor='none', edgecolors=colors, linewidths=2)
    ax.add_collection(p)


coco = COCO(r'F:\DataSource\ElectricTower\Dataset\Dataset\输电杆塔目标\annotation_coco.json')
image_ids = coco.getImgIds()
np.random.shuffle(image_ids)

plt.figure(figsize=(16, 5))

# 只可视化 8 张图片
for i in range(8):
    image_data = coco.loadImgs(image_ids[i])[0]
    image_path = osp.join(r'F:\DataSource\ElectricTower\Dataset\Dataset\输电杆塔目标\JPEGImage/', image_data['file_name'])
    annotation_ids = coco.getAnnIds(
        imgIds=image_data['id'], catIds=[], iscrowd=0)
    annotations = coco.loadAnns(annotation_ids)

    ax = plt.subplot(2, 4, i + 1)
    image = Image.open(image_path).convert("RGB")

    # 这行代码很关键,否则可能图片和标签对不上
    image = apply_exif_orientation(image)

    ax.imshow(image)

    show_bbox_only(coco, annotations)

    plt.title(f"{image_paths[i]}")
    plt.xticks([])
    plt.yticks([])

plt.tight_layout()
configs文件配置
数据处理没问题,开始写配置文件。
这里建议新建一个py文件,然后基于_base_直接继承官方配置文件,然后在此基础上再修改。我这里使用的是rtmdet模型,继承的是rtmdet_tiny_8xb32-300e_coco.py。
这里选用这个模型有两个原因,大家训练自己数据集时也参考:
- 我的显卡是1660ti,只有6GB,使用
RTMDet-l的话batchsize=4都会爆显存,这是主要原因。 - 数据集本身很小,只有400张图片,大模型很容易过拟合;这个可以使用一些扩充数据的方法来缓解,是次要原因。
config配置主要基于官方配置文件,大部分模型参数不需要修改,主要修改bbox_head中num_classes=1。
数据部分我修改的内容较多,data_root、metainfo自不必说,官方config中图像大小设置的是640x640,这里为适应自己的数据集改为576x576,为了扩充数据,使用了albu对数据进行随机旋转,亮度变换等操作,这部分内容见albu_train_transforms,因为数据本身没有mask,也不做语义分割,因此设置train_pipeline中with_mask=False。在train_dataloader和val_dataloader中修改自己的数据路径,train_batch_size_per_gpu=12为batchsize设置,根据自己需要调整。
学习率官方已经使用了warmup,这里将warmup设置为100个epoch。为了保存最有权重,在checkpoints中添加设置 max_keep_ckpts=5, save_best='auto'。为了实时查看训练动态,添加tensorboardz,添加设置vis_backends = [dict(type='TensorboardVisBackend')]即可。
到这里config基本配置完成。
这里附上我的config文件。
_base_ = [
    'F:/research/ElectricTower/mmdetection/configs/_base_/default_runtime.py', 'F:/research/ElectricTower/mmdetection/configs/_base_/schedules/schedule_1x.py',
    'F:/research/ElectricTower/mmdetection/configs/_base_/datasets/coco_detection.py', 'F:/research/ElectricTower/mmdetection/configs/rtmdet/rtmdet_tta.py'
]

data_root = 'F:/DataSource/ElectricTower/Dataset/tower/'
metainfo = {
    'classes': ('tower',),
    'palette': [
        (220, 20, 60),
    ]
}
model = dict(
    type='RTMDet',
    data_preprocessor=dict(
        type='DetDataPreprocessor',
        mean=[103.53, 116.28, 123.675],
        std=[57.375, 57.12, 58.395],
        bgr_to_rgb=False,
        batch_augments=None),
    backbone=dict(
        type='CSPNeXt',
        arch='P5',
        expand_ratio=0.5,
        deepen_factor=0.167,
        widen_factor=0.375,
        channel_attention=True,
        norm_cfg=dict(type='BN'),
        act_cfg=dict(type='SiLU', inplace=True),
        init_cfg=dict(
            type='Pretrained',
            prefix='backbone.',
            checkpoint=
            'https://download.openmmlab.com/mmdetection/v3.0/rtmdet/cspnext_rsb_pretrain/cspnext-tiny_imagenet_600e.pth'
        )),
    neck=dict(
        type='CSPNeXtPAFPN',
        in_channels=[96, 192, 384],
        out_channels=96,
        num_csp_blocks=1,
        expand_ratio=0.5,
        norm_cfg=dict(type='BN'),
        act_cfg=dict(type='SiLU', inplace=True)),
    bbox_head=dict(
        type='RTMDetSepBNHead',
        num_classes=1,
        in_channels=96,
        stacked_convs=2,
        feat_channels=96,
        anchor_generator=dict(
            type='MlvlPointGenerator', offset=0, strides=[8, 16, 32]),
        bbox_coder=dict(type='DistancePointBBoxCoder'),
        loss_cls=dict(
            type='QualityFocalLoss',
            use_sigmoid=True,
            beta=2.0,
            loss_weight=1.0),
        loss_bbox=dict(type='GIoULoss', loss_weight=2.0),
        with_objectness=False,
        exp_on_reg=True,
        share_conv=True,
        pred_kernel_size=1,
        norm_cfg=dict(type='BN'),
        act_cfg=dict(type='SiLU', inplace=True)),
    train_cfg=dict(
        assigner=dict(type='DynamicSoftLabelAssigner', topk=13),
        allowed_border=-1,
        pos_weight=-1,
        debug=False),
    test_cfg=dict(
        nms_pre=30000,
        min_bbox_size=0,
        score_thr=0.001,
        nms=dict(type='nms', iou_threshold=0.65),
        max_per_img=300),
)

albu_train_transforms = [
    dict(
        type='ShiftScaleRotate',
        shift_limit=0.0625,
        scale_limit=0.0,
        rotate_limit=0,
        interpolation=1,
        p=0.5),
    dict(
        type='RandomBrightnessContrast',
        brightness_limit=[0.1, 0.3],
        contrast_limit=[0.1, 0.3],
        p=0.2),
    dict(
        type='OneOf',
        transforms=[
            dict(
                type='RGBShift',
                r_shift_limit=10,
                g_shift_limit=10,
                b_shift_limit=10,
                p=1.0),
            dict(
                type='HueSaturationValue',
                hue_shift_limit=20,
                sat_shift_limit=30,
                val_shift_limit=20,
                p=1.0)
        ],
        p=0.1),
    dict(type='JpegCompression', quality_lower=85, quality_upper=95, p=0.2),
    dict(type='ChannelShuffle', p=0.1),
    dict(
        type='OneOf',
        transforms=[
            dict(type='Blur', blur_limit=3, p=1.0),
            dict(type='MedianBlur', blur_limit=3, p=1.0)
        ],
        p=0.1),
]
crop_size=(576, 576)
train_pipeline = [
    dict(type='LoadImageFromFile', backend_args={{_base_.backend_args}}),
    dict(type='LoadAnnotations', with_bbox=True, with_mask=False),
    dict(
        type='Albu',
        transforms=albu_train_transforms,
        bbox_params=dict(
            type='BboxParams',
            format='pascal_voc',
            label_fields=['gt_bboxes_labels', 'gt_ignore_flags'],
            min_visibility=0.0,
            filter_lost_elements=True),
        keymap={
            'img': 'image',
            'gt_bboxes': 'bboxes'
        },
        skip_img_without_anno=True),
    dict(type='RandomFlip', prob=0.5),
    dict(type='CachedMosaic', img_scale=crop_size, pad_val=114.0),
    dict(
        type='RandomResize',
        scale=(1280, 1280),
        ratio_range=(0.1, 2.0),
        keep_ratio=True),
    dict(type='RandomCrop', crop_size=crop_size),
    dict(type='YOLOXHSVRandomAug'),
    dict(type='Pad', size=crop_size, pad_val=dict(img=(114, 114, 114))),
    dict(
        type='CachedMixUp',
        img_scale=crop_size,
        ratio_range=(1.0, 1.0),
        max_cached_images=20,
        pad_val=(114, 114, 114)),
    dict(type='PackDetInputs')
]

train_pipeline_stage2 = [
    dict(type='LoadImageFromFile', backend_args={{_base_.backend_args}}),
    dict(type='LoadAnnotations', with_bbox=True),
    dict(
        type='RandomResize',
        scale=crop_size,
        ratio_range=(0.1, 2.0),
        keep_ratio=True),
    dict(type='RandomCrop', crop_size=crop_size),
    dict(type='YOLOXHSVRandomAug'),
    dict(type='RandomFlip', prob=0.5),
    dict(type='Pad', size=crop_size, pad_val=dict(img=(114, 114, 114))),
    dict(type='PackDetInputs')
]

test_pipeline = [
    dict(type='LoadImageFromFile', backend_args={{_base_.backend_args}}),
    dict(type='Resize', scale=crop_size, keep_ratio=True),
    dict(type='Pad', size=crop_size, pad_val=dict(img=(114, 114, 114))),
    dict(
        type='PackDetInputs',
        meta_keys=('img_id', 'img_path', 'ori_shape', 'img_shape',
                   'scale_factor'))
]
train_batch_size_per_gpu=12
train_num_workers=2
val_batch_size_per_gpu=4
val_num_workers=2
train_dataloader = dict(
    batch_size=train_batch_size_per_gpu,
    num_workers=train_num_workers,
    pin_memory=False,
    dataset=dict(
        data_root=data_root,
        pipeline=train_pipeline,
        metainfo=metainfo,
        ann_file='train_annotation_coco.json',
        data_prefix=dict(img='JPEGImage/')))

val_dataloader = dict(
    batch_size=val_batch_size_per_gpu,
    num_workers=val_num_workers,
    dataset=dict(
        metainfo=metainfo,
        data_root=data_root,
        ann_file='val_annotation_coco.json',
        data_prefix=dict(img='JPEGImage/')))
test_dataloader = val_dataloader

max_epochs = 500
stage2_num_epochs = 20
base_lr = 0.004
interval = 10

train_cfg = dict(
    max_epochs=max_epochs,
    val_interval=interval,
    dynamic_intervals=[(max_epochs - stage2_num_epochs, 1)])

val_evaluator = dict(proposal_nums=(100, 1, 10), ann_file=data_root + 'val_annotation_coco.json')
test_evaluator = val_evaluator

# optimizer
optim_wrapper = dict(
    _delete_=True,
    type='OptimWrapper',
    optimizer=dict(type='AdamW', lr=base_lr, weight_decay=0.05),
    paramwise_cfg=dict(
        norm_decay_mult=0, bias_decay_mult=0, bypass_duplicate=True))

# learning rate
param_scheduler = [
    dict(
        type='LinearLR',
        start_factor=1.0e-5,
        by_epoch=False,
        begin=0,
        end=100),
    dict(
        # use cosine lr from 150 to 300 epoch
        type='CosineAnnealingLR',
        eta_min=base_lr * 0.05,
        begin=max_epochs // 2,
        end=max_epochs,
        T_max=max_epochs // 2,
        by_epoch=True,
        convert_to_iter_based=True),
]

# hooks
default_hooks = dict(
    checkpoint=dict(
        interval=interval,
        max_keep_ckpts=3  # only keep latest 3 checkpoints
    ))
custom_hooks = [
    dict(
        type='EMAHook',
        ema_type='ExpMomentumEMA',
        momentum=0.0002,
        update_buffers=True,
        priority=49),
    dict(
        type='PipelineSwitchHook',
        switch_epoch=max_epochs - stage2_num_epochs,
        switch_pipeline=train_pipeline_stage2)
]

default_scope = 'mmdet'

default_hooks = dict(
    timer=dict(type='IterTimerHook'),
    logger=dict(type='LoggerHook', interval=50),
    param_scheduler=dict(type='ParamSchedulerHook'),
    checkpoint=dict(type='CheckpointHook', by_epoch=True, interval=10, max_keep_ckpts=5, save_best='auto'),
    sampler_seed=dict(type='DistSamplerSeedHook'),
    visualization=dict(type='DetVisualizationHook'))

env_cfg = dict(
    cudnn_benchmark=False,
    mp_cfg=dict(mp_start_method='fork', opencv_num_threads=0),
    dist_cfg=dict(backend='nccl'),
)

vis_backends = [dict(type='LocalVisBackend'),
                dict(type='TensorboardVisBackend')]
visualizer = dict(
    type='DetLocalVisualizer', vis_backends=vis_backends, name='visualizer')
log_processor = dict(type='LogProcessor', window_size=50, by_epoch=True)

log_level = 'INFO'
load_from = None
resume = False
模型训练与可视化
配置文件准备好后,在命令行进入mmdetection环境和这个文件夹下,输入python tools/train.py config_file --work-dir work_path即可训练,这里config_file为你的config文件存放地址,work_path是指定训练结果保存的路径,不设置会默认在mmdetection中workdirs下。
训练过程的可视化这里使用tensorboard,在命令行中进入模型运行环境下,输入以下命令,其中–logdir替换为自己vis_data路径。
tensorboard --logdir=..\work_dirs\rtmdet_tiny_1xb12-500e_electirctower_576x576\20230619_224137\vis_data
然后在浏览器中输入http://localhost:6006/即可查看训练过程。
到这里模型就开始训练了,等着训练结果把。
模型测试与推理
模型训练完后,在workdir目录下与config同名的文件夹中存在如下结果:
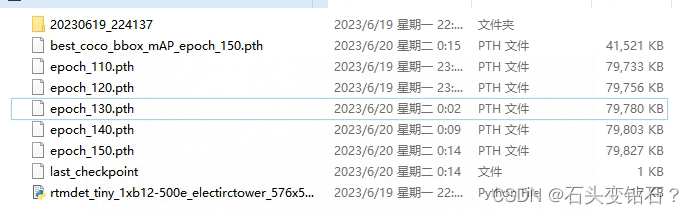
这时候我们可以使用best_coco_bbox_mAP模型来测试和推理。
测试
测试和训练基本一样。
在命令行中输入python tools/test.py config_file checkpoint_file,这里的config_file还是自己编写好的config文件,checkpoint为best_coco_bbox_mAP_epoch_150.pth文件路径。这里还可以保存测试结果和显示测试结果,具体参数设置在test.py中可以看到。
推理
单张图像的推理可以使用mmdetection目录下demo文件夹下的image_demo.py。
使用方法也很简单,在命令行下输入python demo/image_demo.py imagefile configfile --weights=checkpoint --out-dir=result
imagefile就是自己要推理图片的路径,configfile是config文件路径,–weights是权重文件路径,–out-dir是输出结果路径。具体参数释义见image_demo.py文件。

如果想做批量图片推理,建议使用官方推荐的,这里附上链接。
此外还有推理结果可视化、网络层可视化等,这些在官方教程文档中均已经很明确,这里就不再赘述。至此整个项目算是完成,剩下的就是调参了。


 1409
1409


 被折叠的 条评论
为什么被折叠?
被折叠的 条评论
为什么被折叠?
 到【灌水乐园】发言


