文章目录
- 前言
- 代码:
- 一. CIRS-UserModel-kuaishou.py
- 二. CIRS-RL-kuaishou
前言
论文介绍:
CIRS: Bursting Filter Bubbles by Counterfactual Interactive Recommender System是一篇TOIS 2022在投的以解决交互式推荐中的filter bubble为目的的论文,用到的技术包括强化学习、因果推断等… 代码已发布在github。
论文简介:目前几乎所有的推荐的策略都面临着“越推越窄”和信息茧房(filter bubble)问题,这对于商业公司与用户来说是双输的局面。本文在快手App的交互式推荐数据中证实了信息茧房中过曝光效应带来的负影响,并首次将因果推断技术用于动态的交互式推荐中,最终学习一个能够避免信息茧房产生的推荐策略。
代码介绍:
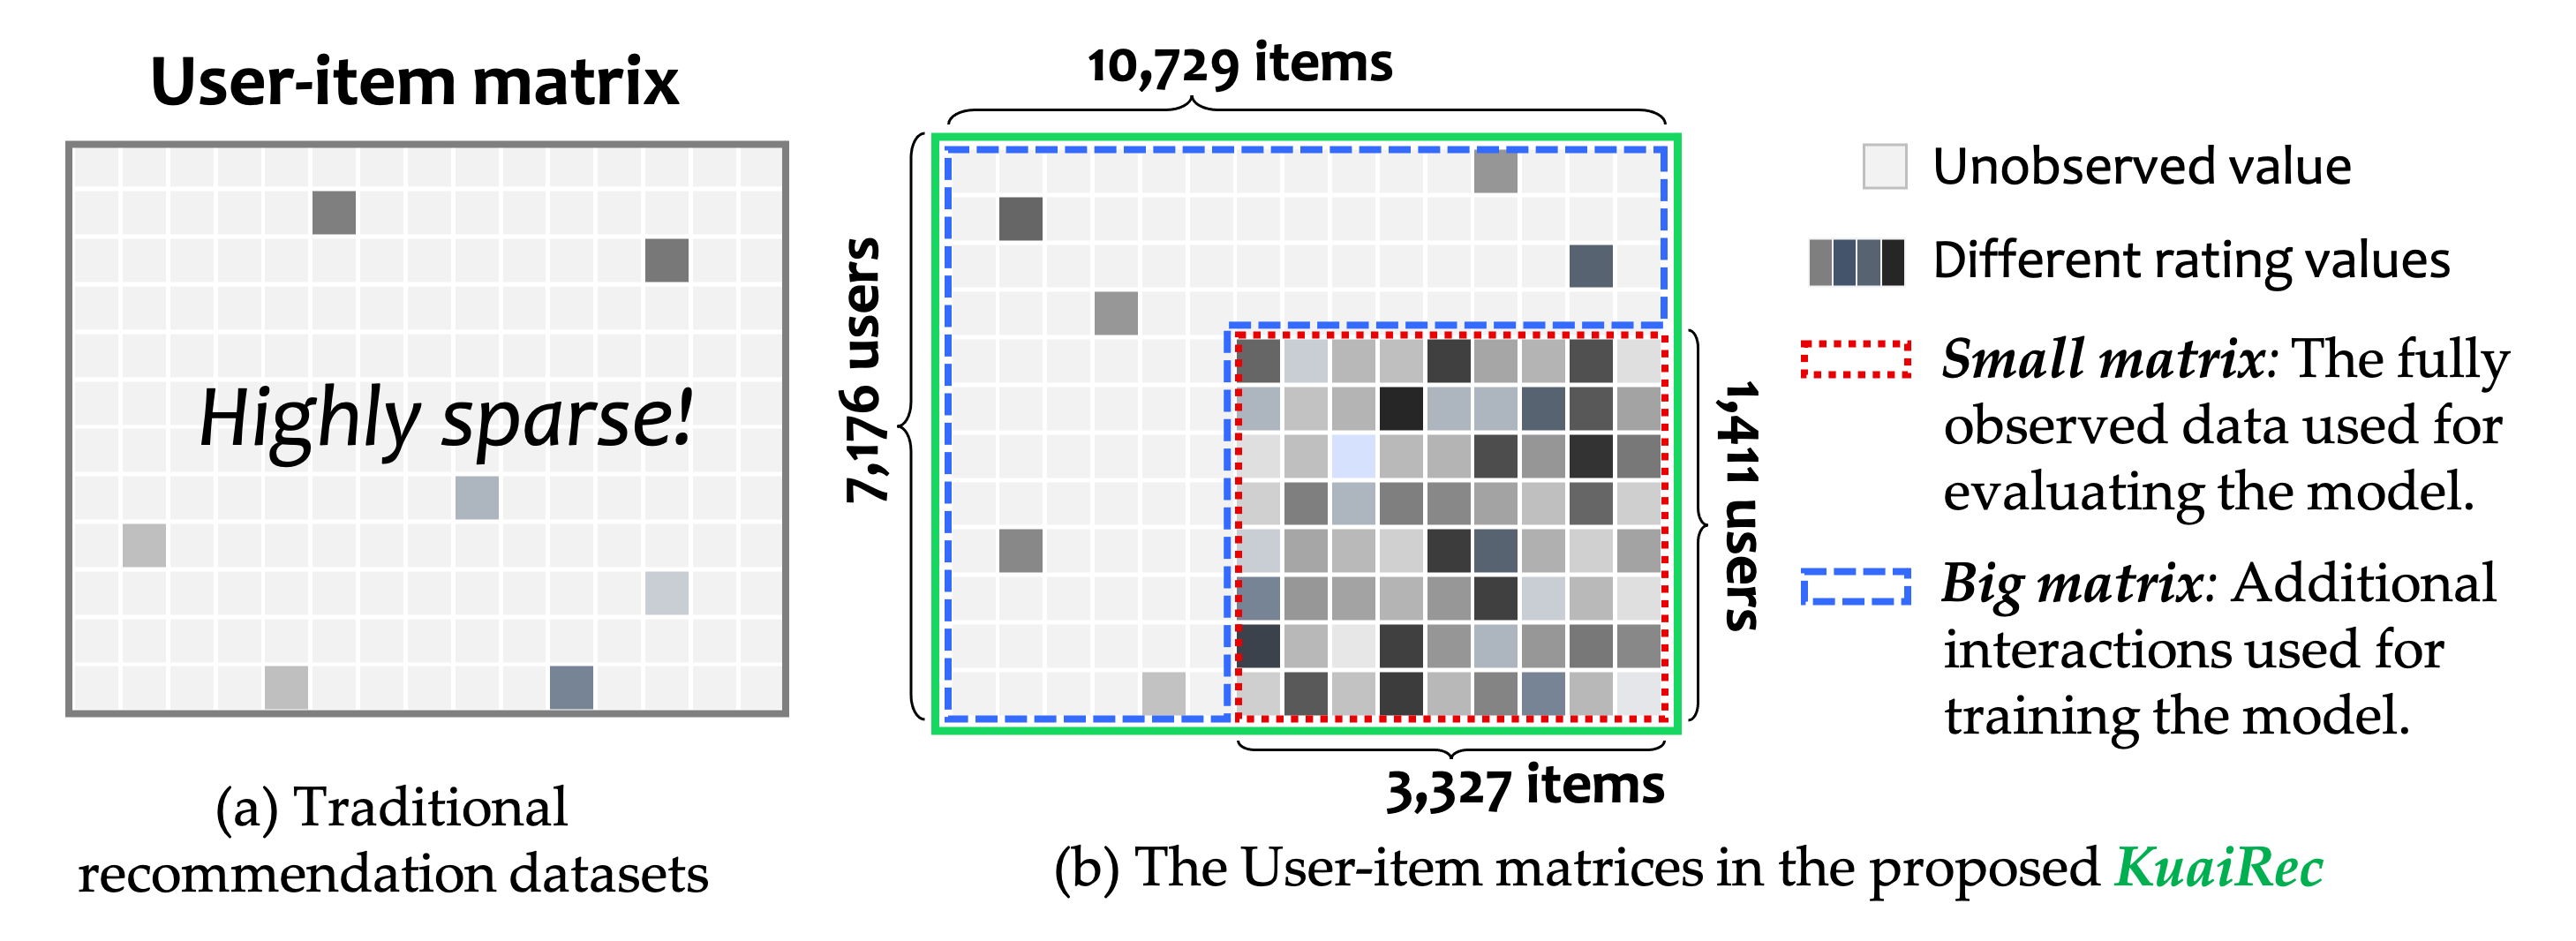
整体代码主要继承了两个库(DeepCTR库、Tianshou库),数据集是该作者与快手团队合作发布的一个稠密度几乎为100%的KuaiRec。由于整体框架比较大,对于初学者而言比较复杂,因此我在学习该代码时详细记录了运行流程,希望能够帮助到大家~
大家对代码还有什么问题也可以在评论区留言~ 还请多多批评指正(〃‘▽’〃)
CIRS相关链接:
论文:http://arxiv.org/abs/2204.01266
代码:https://github.com/chongminggao/CIRS-codes
论文笔记:https://blog.csdn.net/strawberry47/article/details/123504549
KuaiRec数据集相关链接:
使用教程:https://blog.csdn.net/strawberry47/article/details/123562337
论文:https://arxiv.org/abs/2202.10842
数据:https://rec.ustc.edu.cn/share/598635c0-9585-11ec-8259-414ede1f8d4f
代码:https://chongminggao.github.io/KuaiRec/
Example:http://m6z.cn/5U6xyQ
运行流程:
- 按照
readme文件中的Installation创建环境安装包(不要直接在自己的环境下下载包、运行代码,亲测麻烦) - 以kuaishouenv为例(virtualtaobao也是同样的操作):先运行
CIRS-UserModel-kuaishou.py训练好user model,再运行CIRS-RL-kuaishou.py进行强化学习。(其中user model对应的环境是simulated_env.py,训练阶段的环境是KuaishouEnv.py和virtualTB.py)
相关知识:
DeepFM模型
Transformer模型
PPO算法
DeepCTR库
Tianshou库
代码:
一. CIRS-UserModel-kuaishou.py
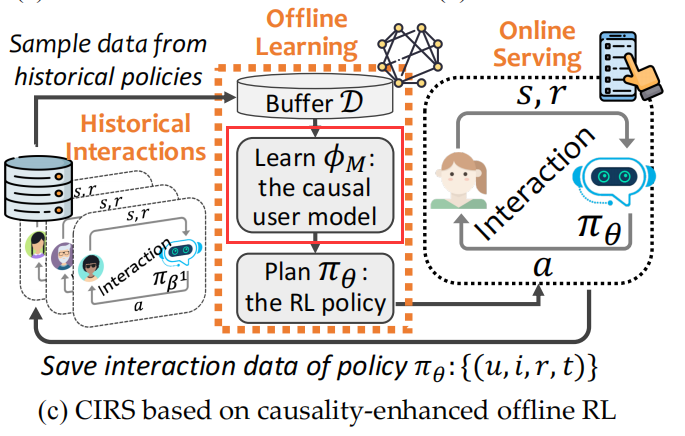
目的:
- 对应着图中的 Learn the causal user model;
- 用大矩阵训练
causal user model(DeepFM+PPO); - 用小矩阵测试
deepfm;为什么不测试causal user model呢,因为静态场景下考虑曝光效应肯定是效果不好的呀。
0. get_args() 解析参数
- 使用
get_args()获取参数;action:命令行遇到参数时的动作,默认值是 store;dest:解析后的参数名称,默认情况下,对于可选参数选取最长的名称,中划线转换为下划线; 用action参数是因为不能设置type=bool对吧 args = parser.parse_known_args():在接受到多余的命令行参数时不报错
import argparse
parser = argparse.ArgumentParser()
parser.add_argument(
    '--flag_int',
    type=float,
    default=0.01,
    help='flag_int.'
)
FLAGS, unparsed = parser.parse_known_args()
print(FLAGS)
print(unparsed)
$ python prog.py --flag_int 0.02 --double 0.03 a 1
Namespace(flag_int=0.02)
['--double', '0.03', 'a', '1']
1. create_dir()
调用utils.py中的create_dir(create_dirs)函数创建需要的目录,包括:模型要存储的位置MODEL_SAVE_PATH;输出日志存储位置logger_path。
函数总结:
- format 格式化函数,format后面的值替换{}
print("[{}],{}".format('i','like'))
# [i],like
logger.info("info")logzero库:logzero.logfile(logger_path)把日志也输入到logger_path文件里(一般只输出到屏幕),方便后续查询。json.dumps(vars(args), indent=2)把args的东西格式化,不然直接输出,乱糟糟的os.path.join(DATAPATH, "small_matrix.csv")将目录和文件名合成一个路径。
CODEPATH = os.path.dirname(__file__) # 当前路径
ROOTPATH = os.path.dirname(CODEPATH) # 回溯一步
2. Prepare Envs
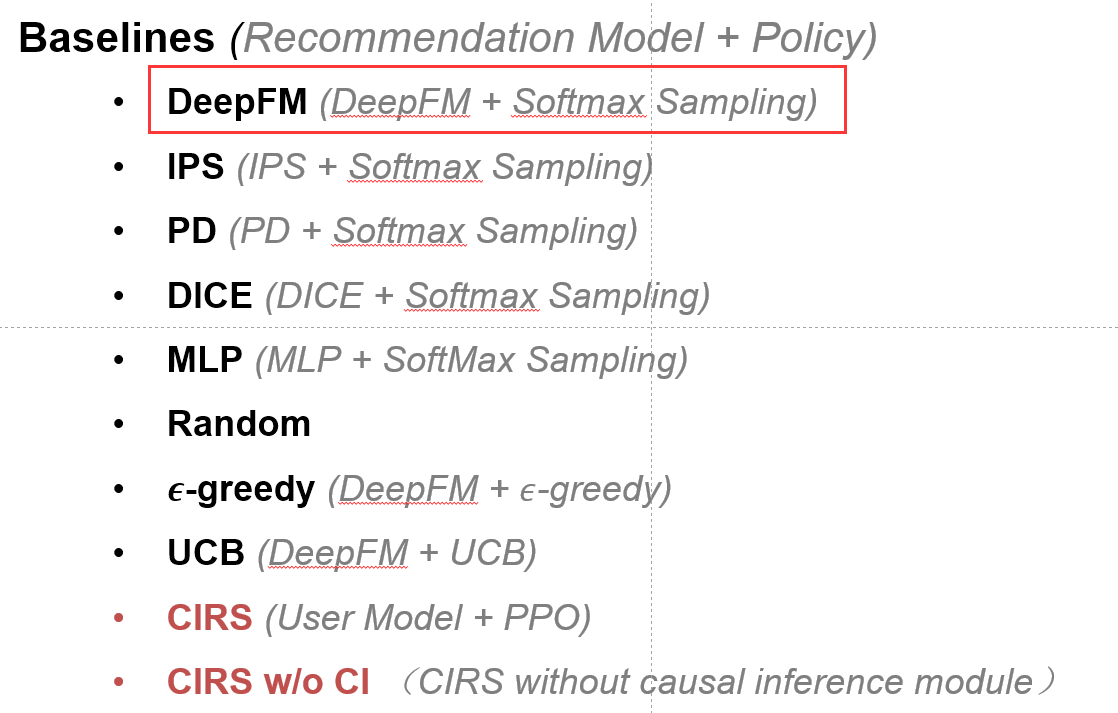
这部分目的是创建evaluation的环境,之后会用于测试deepfm (model.compile_RL_test)。
相当于图中的第一个baseline:
2.1 load_mat()加载矩阵
调用KuaishouEnv.py中的load_mat()函数处理小矩阵(因为测试的时候是用小矩阵啦):
- 处理
watch_ratio值:
df_small.loc[df_small['watch_ratio'] > 5, 'watch_ratio'] = 5
DataFrame结构,iloc代表index locate使用索引定位,loc是使用label定位。
data = DataFrame([[1,2,3],[4,5,6]],index=['first','second'],columns=['one','two','three'])
print(data)
print(data.iloc[1:,:]) # 使用索引定位
#         one  two  three
# second    4    5      6
print(data.loc['second','three']) # 使用索引定位
# 6
print(data['three']>4) # 返回bool值
# first     False
# second     True
- 编码
user_id和photo_id
		lbe_photo = LabelEncoder()
        lbe_photo.fit(df_small['photo_id'].unique())

        lbe_user = LabelEncoder()
        lbe_user.fit(df_small['user_id'].unique())
- 利用
csr_matrix把csv数据转换成矩阵形式(u,i,r)结构(1411*3327)
mat = csr_matrix(
            (df_small['watch_ratio'],
             (lbe_user.transform(df_small['user_id']), lbe_photo.transform(df_small['photo_id']))),
            shape=(df_small['user_id'].nunique(), df_small['photo_id'].nunique())).toarray()
# csr类型一般会toarray()哦

- 加载item标签
list_feat,因为DeepFM需要哦~
代码是从json文件读取dict格式数据,再转换为list数据;一个item最多有4个标签,构建dataframe:
df_feat = pd.DataFrame(list_feat, columns=['feat0', 'feat1', 'feat2', 'feat3'], dtype=int)
- 加载
photo_mean_duration视频总时长(数据给的photo_duration不太统一,同一个视频,有时候5秒有时候6秒,于是作者统一算了一下均值),把它合并到item categories
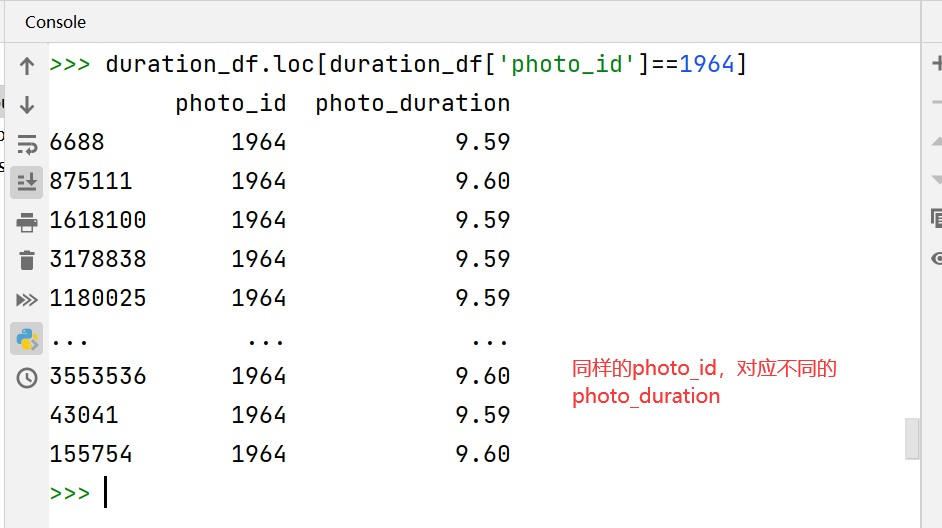
df_photo_env['photo_duration'] = np.array(
            list(map(lambda x: photo_mean_duration[x], df_photo_env.index)))
- 调用
utils.py中的get_distance_mat(),计算item_feature的相似度(jaccard相似度),构造similarity矩阵,再取倒(因为代表distance嘛,距离为inf代表不相似)。
因为环境(模拟用户)后面需要计算系统推的东西和之前推的东西的相似度,如果是很相似,或者是同一个,环境就很腻烦。但是每次计算,太费时间了。我们就这么多item,于是我们一开始就算好,存着,之后就可以用了~
df_dist_small = get_distance_mat(list_feat, lbe_photo.classes_, DATAPATH=DATAPATH)
返回值:mat (u,i,r)稀疏矩阵;lbe_user:user LabelEncoder;lbe_photo:item LabelEncoder;list_feat:每个item对应的feature;df_photo_env:加上了photo_duration以及四个feature; df_dist_small:distance mat (between item pairs)。
2.2 gym.make( )
- 调用
register(),这一步是注册自己的环境;自定义环境一定要有这一步哦,KuaishouEnv环境中定义了state(),step(),reset(),render()等等函数哦~~
    register( # gym引入的
        id=args.env,  # 'KuaishouEnv-v0',
        entry_point='environments.KuaishouRec.env.kuaishouEnv:KuaishouEnv',
        # 自定义的一些参数
        kwargs={"mat": mat,
                "lbe_user": lbe_user,
                "lbe_photo": lbe_photo,
                "num_leave_compute": args.num_leave_compute,
                "leave_threshold": args.leave_threshold,
                "list_feat": list_feat,
                "df_photo_env": df_photo_env,
                "df_dist_small": df_dist_small}
    )
self.observation_space = spaces.Box(low=0, high=len(self.mat) - 1, shape=(1,), dtype=np.int32) # user数量
self.action_space = spaces.Box(low=0, high=self.mat.shape[1] - 1, shape=(1,), dtype=np.int32) # item数量
self.reset()
reset()类中将reward等value全部置零,生成了当前用户
    def reset(self):
        self.cum_reward = 0
        self.total_turn = 0
        self.cur_user = self.__user_generator()

        self.action = None  # Add by Chongming
        self._reset_history()

        return self.state
3. Prepare dataset
主要是加载dataset,分成load_dataset_kuaishou()和load_static_validate_data_kuaishou(),前者是训练集,包含了负采样、计算exposure等;后者是测试集。
3.1 load_dataset_kuaishou() 加载数据集
调用主函数中的load_dataset_kuaishou() 方法,处理大矩阵
- 前面是读取各种数据,注意
df_feat这部分,先把nan设为-1,再把所有值+1;是因为feature本身就有0值,所有不能将nan直接设置为0.
    df_feat = pd.DataFrame(list_feat, columns=['feat0', 'feat1', 'feat2', 'feat3'], dtype=int)
    df_feat.index.name = "photo_id"
    # 本身就有feature=0的值,所以设置为-1,再整体加一
    df_feat[df_feat.isna()] = -1
    df_feat = df_feat + 1
    df_feat = df_feat.astype(int)
- 把大矩阵
['user_id', 'photo_id', 'timestamp', 'watch_ratio', 'photo_duration']和特征矩阵['feat0', 'feat1', 'feat2', 'feat3']拼起来。 - 构建输入
df_x: user_id, photo_id, feat 0~3, photo_duration; 输出df_y: watch_ratio - 构造x_columns, ab_columns, y_columns(3.1.1),构造dataset需要哦
- 从大矩阵进行负采样(3.1.2)
3.1.1 构造SparseFeatP
- 构建
x_columns和y_columns; SparseFeatP继承于DeepCTR库中的SparseFeat方法。有name, vocabulary_size, embedding_dim等属性哦~
提供一个结构化的类~ 不然每次带着一长串参数,就很烦
- 为什么要继承:原来的SparseFeat会给每一个维度看成一个取值,比如{男,女},于是初始化embedding的时候,男是一个embedding,女是一个embedding。但是,如果数据有问题,有空缺值,比如{男,女,nan},就不能给nan一个embedding,
padding_idx就是pytorch初始化embedding的参数(全为0),把这个位置看成nan。
	x_columns = [SparseFeatP("user_id", df_big['user_id'].max() + 1, embedding_dim=entity_dim)] + \
                [SparseFeatP("photo_id", df_big['photo_id'].max() + 1, embedding_dim=entity_dim)] + \
                [SparseFeatP("feat{}".format(i),
                             df_feat.max().max() + 1,
                             embedding_dim=feature_dim,
                             embedding_name="feat",  # Share the same feature!
                             padding_idx=0  # using padding_idx in embedding!
                             ) for i in range(4)] + \
                [DenseFeat("photo_duration", 1)]

    ab_columns = [SparseFeatP("alpha_u", df_big['user_id'].max() + 1, embedding_dim=1)] + \
                 [SparseFeatP("beta_i", df_big['photo_id'].max() + 1, embedding_dim=1)]

    y_columns = [DenseFeat("y", 1)]
一些小知识:
- 具名元组:
collections.namedtuple(typename, field_names, verbose=False, rename=False),namedtuple和dict很像,但namedtuple是个类,可以控制比较复杂的逻辑~
import collections

# 两种方法来给 namedtuple 定义方法名
User = collections.namedtuple('User', ['name', 'age', 'id'])
# User = collections.namedtuple('User', 'name age id')
user = User('tester', '22', '464643123')

print(user)
# User(name='tester', age='22', id='464643123')
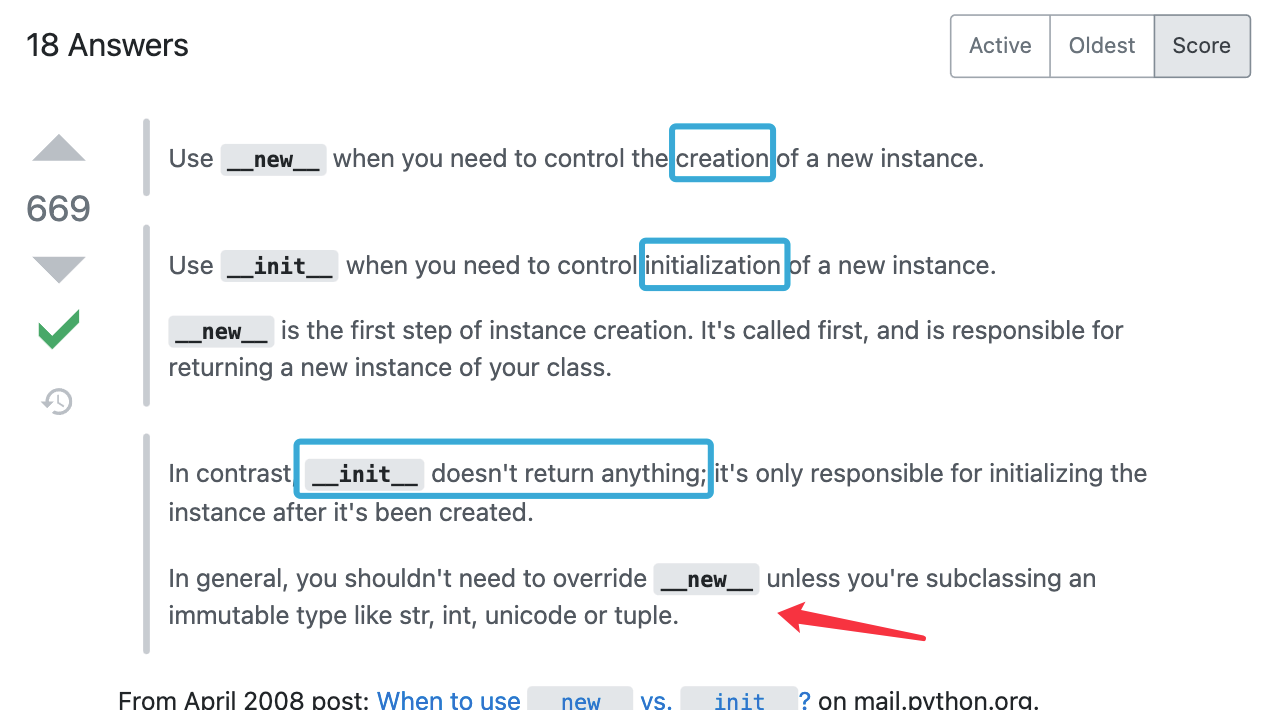
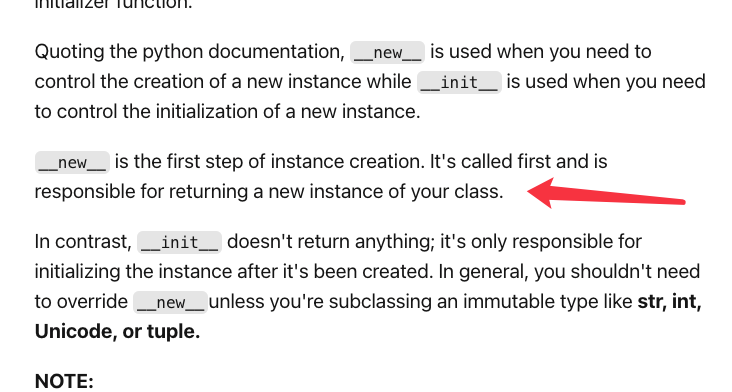
- python中的cls到底指的是什么,与self有什么区别?
__new__和__initial__前者给你返回了一个对象,分配好了内存空间,但没有初始化变量,后者就给你初始化~
3.1.2 负采样
调用utils.py中的negative_sampling()函数进行负采样
- 将小矩阵和大矩阵构建为bool矩阵
mat_small和mat_big(他们的shape都和大矩阵一样哦),传入find_negative(),会返回一个变了的df_negative(涉及到浅拷贝深拷贝的知识点,后面会讲)
df_negative = np.zeros([len(df_big), 2])
find_negative(df_big['user_id'].to_numpy(), df_big['photo_id'].to_numpy(), mat_small, mat_big, df_negative,
                  df_big['photo_id'].max())
find_negative()函数前面加了一个@njit,是调用了 Numba库中的 @njit装饰器 ,可以对numpy类型的数据(矩阵运算…)进行加速;
这里采集的负样本,是小矩阵和大矩阵中都是负样本才行哦!而且是把用户的所有负样本都采出来了呢!长度与len(user_ids)一致,因此存在很多重复值~ (可以用df_negative.drop_duplicates(inplace=True)验证一下哦)
@njit
def find_negative(user_ids, photo_ids, mat_small, mat_big, df_negative, max_item):
    for i in range(len(user_ids)):
        user, item = user_ids[i], photo_ids[i]

        neg = item + 1
        while neg <= max_item:
            if neg == 1225:  # 1225 is an absent photo_id
                neg = 1226
            if mat_small[user, neg] or mat_big[user, neg]: # True # 在大矩阵或小矩阵都是有评分的
                neg += 1
            else: # 找到了负样本
                df_negative[i, 0] = user
                df_negative[i, 1] = neg
                break
        else: # neg超出范围了
            neg = item - 1
            while neg >= 0:
                if neg == 1225:  # 1225 is an absent photo_id
                    neg = 1224
                if mat_small[user, neg] or mat_big[user, neg]:
                    neg -= 1
                else:
                    df_negative[i, 0] = user
                    df_negative[i, 1] = neg
                    break
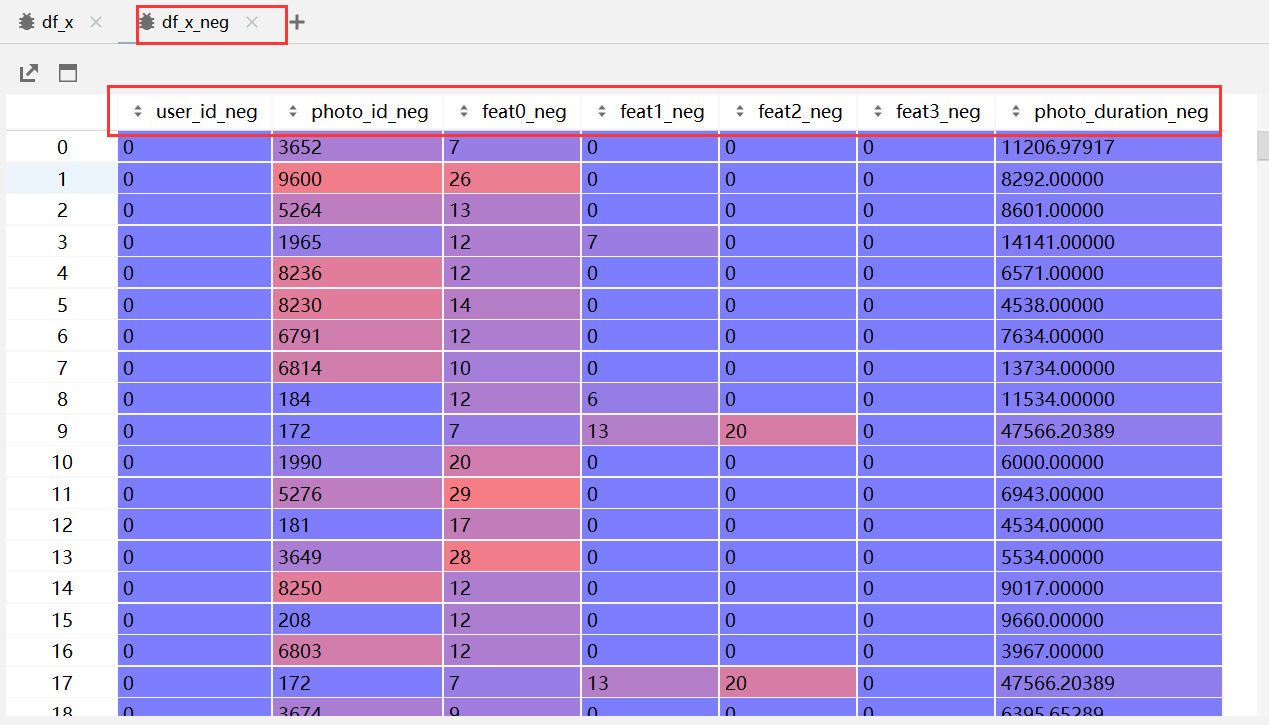
采集到负样本后,会和df_feat, photo_duration合并,watch_ratio列设为0
- 改一下列名(加了_neg):
小知识:
- 浅拷贝深拷贝,直接
=赋值的话,会指向同一个内存空间。若想要得到的是ndarray切片的一份副本,应该用.copy()
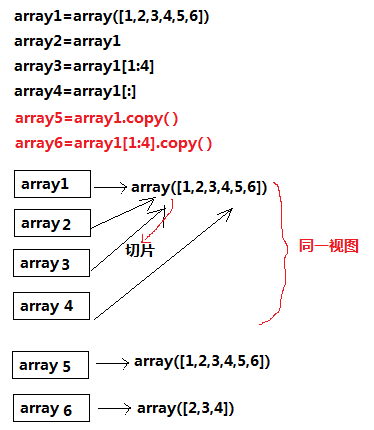
def A(a):
    a[0][0]=1

a = np.zeros([2,2])
A(a)
print(a)
#[[1. 0.]
# [0. 0.]]
- Python的可变类型与不可变类型,数字、字符串、元组是不可变的,列表、字典是可变的。
3.1.3 计算exposure effect
计算论文中提到的过曝光效应:
用户每次交互,都要计算exposure effect,即当前时间看的视频与看过的视频间的exposure:

调用utils.py中的函数compute_exposure_effect_kuaishouRec(),根据论文中的公式计算exposure effect,并保存为csv文件。
具体来说,计算的是用户u交互过的所有item间的over exposure effect,传入了当前用户在df_x中的序号,距离矩阵,时间戳,len为所有交互长度的array,当前用户所有interaction对应的index,用户交互的物品,用到了距离矩阵,如果没有相同特征,距离就为inf:
    for user in tqdm(user_list, desc="Computing exposure effect of historical data"):
        df_user = df_x[df_x['user_id'] == user] # 用户u的所有交易记录
        start_index = df_user.index[0]
        index_u = df_user.index.to_numpy()
        photo_u = df_user['photo_id'].to_numpy()
        compute_exposure_each_user(start_index, distance_mat, timestamp, exposure_pos,
                                   index_u, photo_u, tau)
小知识:
- 获取
dataframe指定行:df_user = df_x[df_x['user_id'] == user]
3.1.4 构建dataset类
调用usermodel.py中的StaticDataset(x_columns, y_columns, num_workers=4)构建dataset类。是大矩阵数据哦~
StaticDataset()是在初始化一些参数compile_dataset()是将dataframe转成numpy
	dataset = StaticDataset(x_columns, y_columns, num_workers=4) # 构建dataset类了
	dataset.compile_dataset(df_x_all, df_y, exposure_pos)
返回dataset, x_columns, y_columns, ab_columns(alpha_u,beta_i)
3.2 构建测试集 load_static_validate_data_kuaishou()
和构造训练集的dataset几乎一样,区别就是没有计算exposure effect,没有负采样。因为这里的测试对象并不是user model,而是deepfm!
- 构建
df_small,将小矩阵的特征 & item_feature全部拼起来
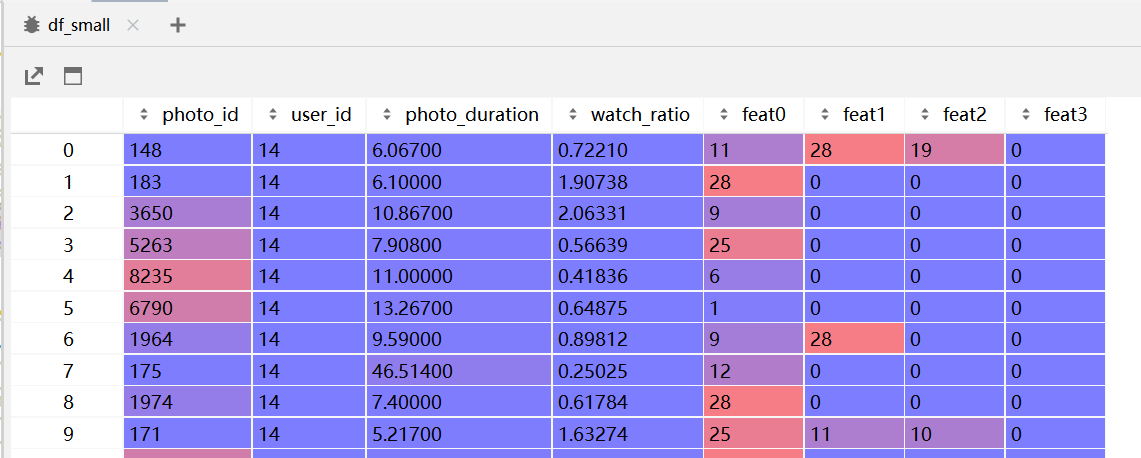
- 同3.1.4,构建
dataset_val类,不过没有exposure 相关参数哦~
    user_features = ["user_id"]
    item_features = ["photo_id"] + ["feat" + str(i) for i in range(4)] + ["photo_duration"]
    reward_features = ["watch_ratio"]
    df_x, df_y = df_small[user_features + item_features], df_small[reward_features]

    x_columns = [SparseFeatP("user_id", df_small['user_id'].max() + 1, embedding_dim=entity_dim)] + \
                [SparseFeatP("photo_id", df_small['photo_id'].max() + 1, embedding_dim=entity_dim)] + \
                [SparseFeatP("feat{}".format(i),
                             df_feat.max().max() + 1,
                             embedding_dim=feature_dim,
                             embedding_name="feat",  # Share the same feature!
                             padding_idx=0  # using padding_idx in embedding!
                             ) for i in range(4)] + \
                [DenseFeat("photo_duration", 1)]

    y_columns = [DenseFeat("y", 1)]
    dataset_val = StaticDataset(x_columns, y_columns, user_features, item_features, num_workers=4)
    dataset_val.compile_dataset(df_x, df_y)
4. Setup model
主要是构建user model(DNN,FM,exposure effect)
4.1 UserModel_Pairwise()
构建model:
model = UserModel_Pairwise(x_columns, y_columns, task, task_logit_dim,
                           dnn_hidden_units=args.dnn, seed=SEED, l2_reg_dnn=args.l2_reg_dnn,
                           device=device, ab_columns=ab_columns)
4.1.1 UserModel(nn.Module)初始化
UserModel_Pairwise类继承user_model.py中的UserModel(nn.Module)类初始化:
- 调用了
deepctr_torch.inputs中的build_input_features,处理SpareFeatP,DenseFeat。 - 构建
embedding_dict。
self.embedding_dict = create_embedding_matrix(dnn_feature_columns, init_std, sparse=False, device=device)
- 调用
core.layer.py中的Linear(nn.Module),构建Linear模型(后面用不到):
self.linear_model = Linear(
            linear_feature_columns, self.feature_index, device=device)
- 调用
add_regularization_weight()修改regularization_weight
self.add_regularization_weight(self.embedding_dict.parameters(), l2=l2_reg_embedding)
self.add_regularization_weight(self.linear_model.parameters(), l2=l2_reg_linear)
4.1.2 DNN layer
运行完user model的初始化函数后,要开始构建几层layer了~
- DNN(调用
deepctr_torch.layers库):
self.dnn = DNN(compute_input_dim(self.feature_columns), dnn_hidden_units,
                            activation=dnn_activation, l2_reg=l2_reg_dnn, dropout_rate=dnn_dropout, use_bn=dnn_use_bn,
                            init_std=init_std, device=device)
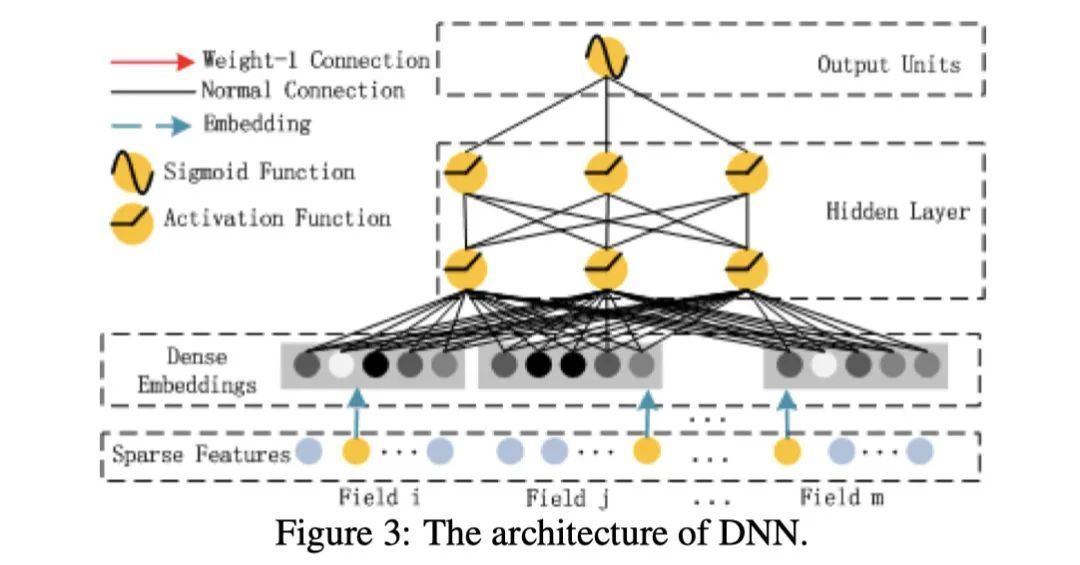
2. 其他网络层
self.last = nn.Linear(dnn_hidden_units[-1], 1, bias=False)
self.out = PredictionLayer(task, 1)# 调用deepctr_torch.layers
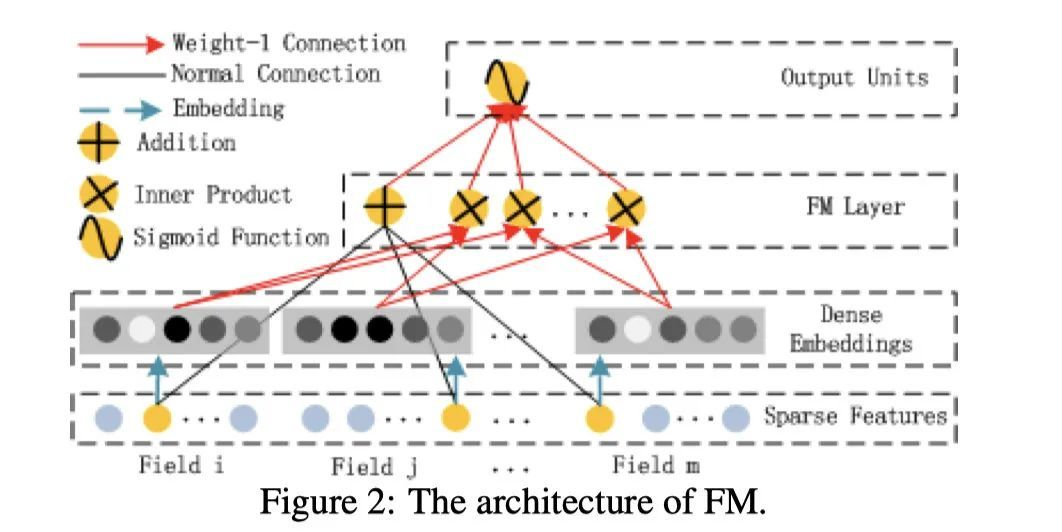
4.1.3 FM Layer
y
F
M
=
<
w
,
x
>
+
∑
i
=
1
d
∑
j
=
i
+
1
d
<
V
i
,
V
j
>
x
i
⋅
x
j
y_{F M}=<w, x>+\sum_{i=1}^{d} \sum_{j=i+1}^{d}<V_{i}, V_{j}>x_{i} \cdot x_{j}
yFM=<w,x>+∑i=1d∑j=i+1d<Vi,Vj>xi⋅xj
调用deepctr_torch.layers中的FM():
use_fm = True if task_logit_dim == 1 else False
self.use_fm = use_fm
self.fm_task = FM() if use_fm else None
self.linear = Linear(self.feature_columns, self.feature_index, device=device)
4.1.4 Exposure Effect
- 调用
user_model中的create_embedding_matrix,构造embedding字典:
ab_embedding_dict = create_embedding_matrix(ab_columns, init_std, sparse=False, device=device)
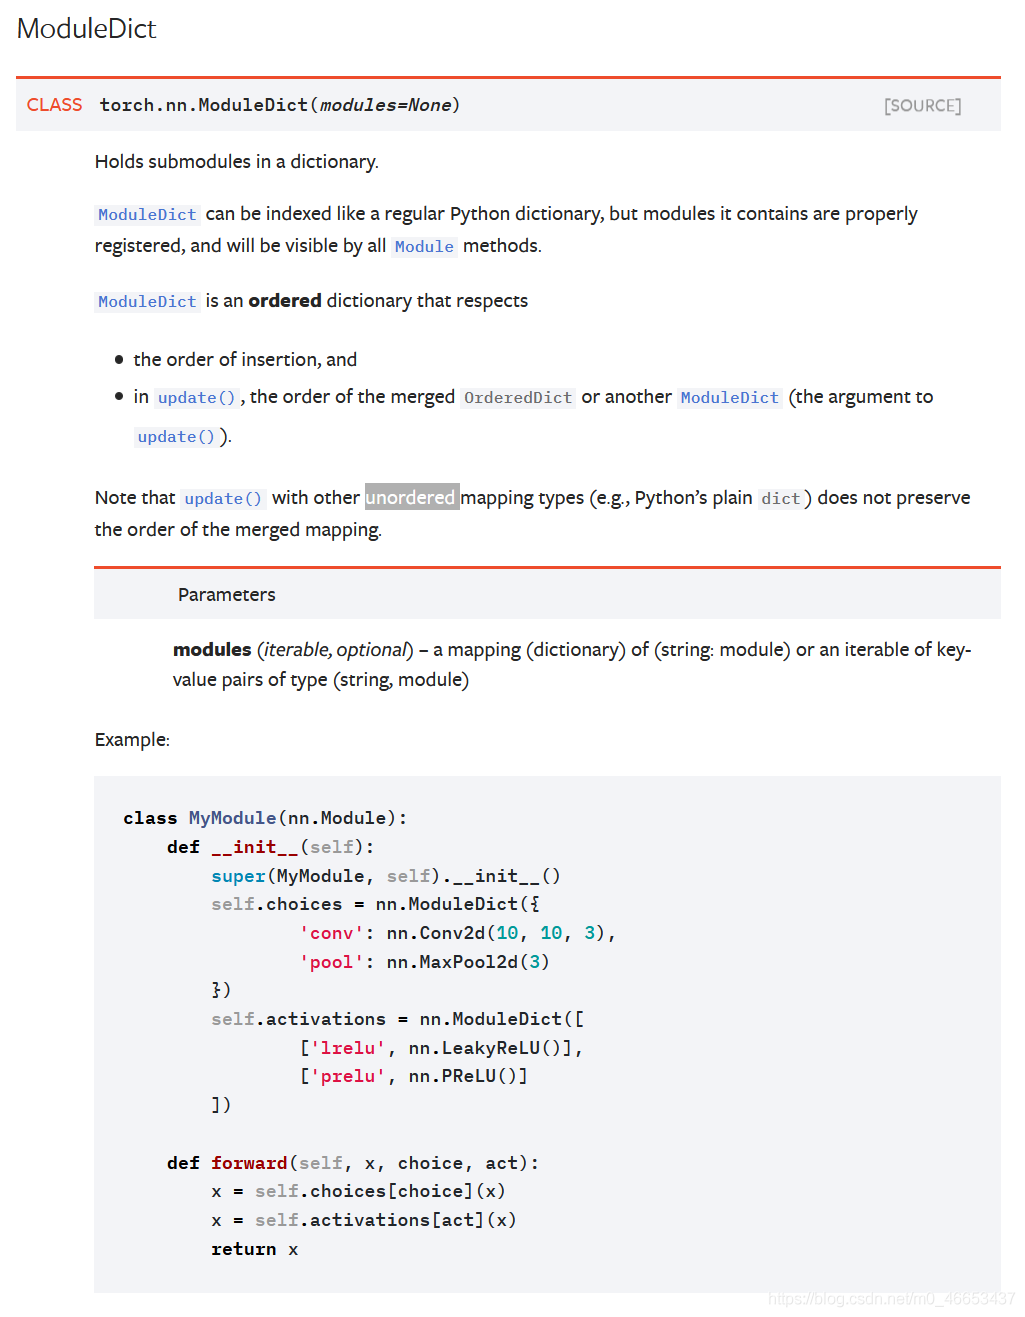
user_model.py中的 create_embedding_matrix,就是使用nn.embedding构建嵌入词典的:
def create_embedding_matrix(feature_columns, init_std=0.0001, linear=False, sparse=False, device='cpu'):
    # Return nn.ModuleDict: for sparse features, {embedding_name: nn.Embedding}
    # for varlen sparse features, {embedding_name: nn.EmbeddingBag}
    sparse_feature_columns = list(
        filter(lambda x: isinstance(x, SparseFeatP), feature_columns)) if len(feature_columns) else []

    varlen_sparse_feature_columns = list(
        filter(lambda x: isinstance(x, VarLenSparseFeat), feature_columns)) if len(feature_columns) else []

    embedding_dict = nn.ModuleDict(
        {feat.embedding_name: nn.Embedding(feat.vocabulary_size, feat.embedding_dim if not linear else 1, sparse=sparse,
                                           padding_idx=feat.padding_idx)
         for feat in sparse_feature_columns + varlen_sparse_feature_columns}
    )

    for tensor in embedding_dict.values():
        nn.init.normal_(tensor.weight, mean=0, std=init_std)

    return embedding_dict.to(device)
filter(function, iterable) 函数用于过滤序列,过滤掉不符合条件的元素,返回由符合条件元素组成的新列表。
python 内置函数isinstance(),hasattr(),getattr(),setattr()的介绍
返回的是ModuleDict 类型,和nn.ModuleList()很像
4.1.5 初始化参数
- 调用
add_regularization_weight():
    def add_regularization_weight(self, weight_list, l1=0.0, l2=0.0):
        # For a Parameter, put it in a list to keep Compatible with get_regularization_loss()
        if isinstance(weight_list, torch.nn.parameter.Parameter):
            weight_list = [weight_list]
        # For generators, filters and ParameterLists, convert them to a list of tensors to avoid bugs.
        # e.g., we can't pickle generator objects when we save the model.
        else:
            weight_list = list(weight_list)
        self.regularization_weight.append((weight_list, l1, l2))
- 放到GPU上
4.2 model.compile()
- 传了optimizer, loss(BPR)函数,评价指标,调用
user_model.py中的compile():
    model.compile(optimizer="adam",
                  # loss_dict=task_loss_dict,
                  loss_func=loss_kuaishou_pairwise,
                  metric_fun={"mae": lambda y, y_predict: nn.functional.l1_loss(torch.from_numpy(y),
                                                                                torch.from_numpy(y_predict)).numpy(),
                              "mse": lambda y, y_predict: nn.functional.mse_loss(torch.from_numpy(y),
                                                                                 torch.from_numpy(y_predict)).numpy()},
                  metrics=None)
- 其中的loss function是
CIRS-UserModel-kuaishou.py写的,在train中调用:

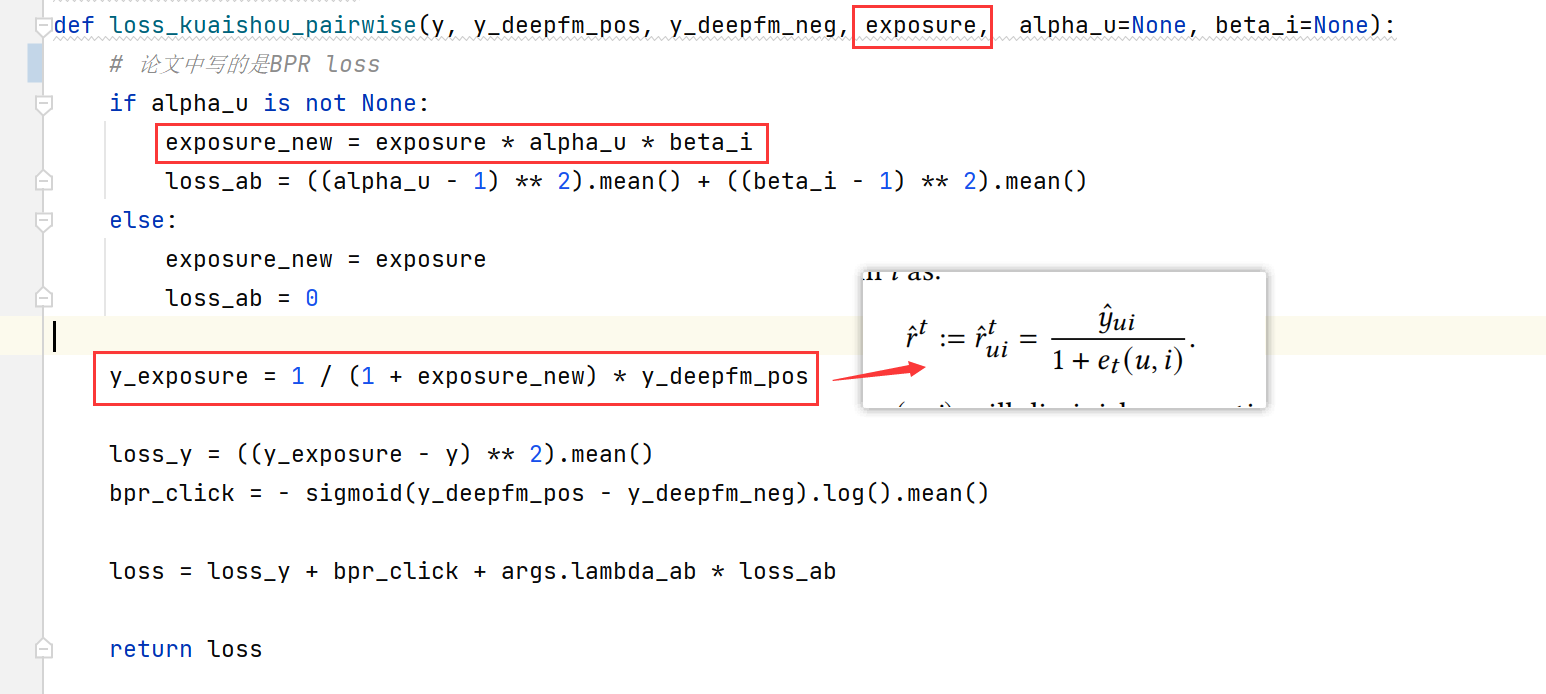
def loss_kuaishou_pairwise(y, y_deepfm_pos, y_deepfm_neg, exposure,  alpha_u=None, beta_i=None):
    # 论文中写的是BPR loss
    if alpha_u is not None:
        exposure_new = exposure * alpha_u * beta_i
        loss_ab = ((alpha_u - 1) ** 2).mean() + ((beta_i - 1) ** 2).mean()
    else:
        exposure_new = exposure
        loss_ab = 0

    y_exposure = 1 / (1 + exposure_new) * y_deepfm_pos

    loss_y = ((y_exposure - y) ** 2).mean()
    bpr_click = - sigmoid(y_deepfm_pos - y_deepfm_neg).log().mean()

    loss = loss_y + bpr_click + args.lambda_ab * loss_ab

    return loss
compile函数就是在赋值:
    def compile(self, optimizer, loss_dict=None, metrics=None, metric_fun=None, loss_func=None):
        # metric_fun is a function!

        self.metrics_names = ["loss"]
        self.optim = self._get_optim(optimizer) # 怎么使用optimizer写的这么复杂啊
        self.metrics = self._get_metrics(metrics)

        self.metric_fun = metric_fun

        self.loss_dict = None if loss_dict is None else {x: self._get_loss_func(loss) if isinstance(loss, str) else loss
                                                         for x, loss in loss_dict.items()}  # deprecated!
        self.loss_func = loss_func
4.3 model.compile_RL_test()
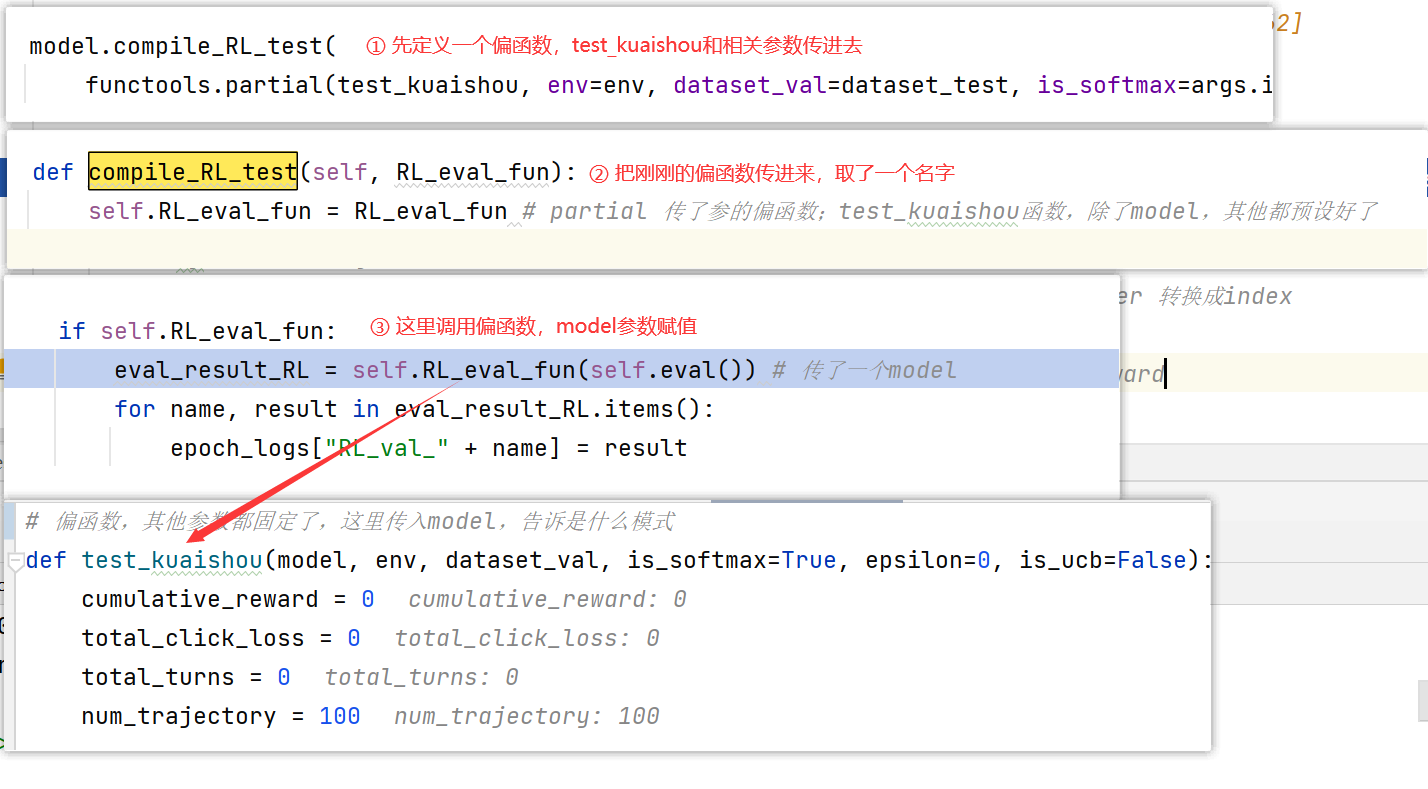
其中的test_kuaishou是evaluation.py中的函数,用于评估deepfm在小矩阵上的表现
    model.compile_RL_test(
        functools.partial(test_kuaishou, env=env, dataset_val=dataset_val, is_softmax=args.is_softmax, epsilon=args.epsilon, is_ucb=args.is_ucb))
这个地方用到了偏函数,彻底明白 Python partial()。目的是预设好要传的参数,再传出去。(当然也可以把env等参数一股脑传到fit_data中,再在RL_eval_fun中调用test_kuaishou,但是这样传的参数就太多啦!)
5. Learn model
这部分就是在训练模型啦~
history = model.fit_data(static_dataset, dataset_val,
                             batch_size=args.batch_size, epochs=args.epoch,
                             callbacks=[[LoggerCallback_Update(logger_path)]])
5.1 创建LoggerCallback_Update类
回调函数:回调函数是指一段以参数的形式传递给其它代码的可执行代码。
也就是 在特定地方调用 另一个东西给的函数
回调函数(callback)是什么?、回调函数使用、回调(callbacks)函数的使用方法
CIRS中的回调函数只是为了输出log:
- 首先创建一个回调函数类
callbacks=[[LoggerCallback_Update(logger_path)]] callbacks类中还定义了一些方法:①on_epoch_end,用logger记录日志 ②upload_logger:上传到nas:- 训练数据的时候,
callbacks是刚刚自己定义的callback加上deepctr库中的callback,两个凑一起变成了CallbackList - 执行
callbacks.set_model(),设置model - 训练前:
callbacks.on_train_begin() - 训练过程中:
callbacks.on_epoch_begin(epoch)和callbacks.on_epoch_end(epoch, epoch_logs) - 训练结束:
callbacks.on_train_end()
5.2 调用fit_data()
调用user_model中的fit_data()训练模型
- 指定训练模式
model = self.train() - 建立
DataLoader,这里dataset参数不太一样哦~ 调用了TensorDataset
train_loader = DataLoader(
            dataset=dataset_train.get_dataset_train(), shuffle=shuffle, batch_size=batch_size,
            num_workers=dataset_train.num_workers)
- 循环开始:
callbacks.on_epoch_begin(epoch)循环末尾:callbacks.on_epoch_end(epoch, epoch_logs)循环结束:callbacks.on_train_end()
# configure callbacks
        callbacks = (callbacks or []) + [self.history]  # add history callback
        callbacks = CallbackList(callbacks)
        callbacks.set_model(self)
        callbacks.on_train_begin() #  在训练开始时调用
        callbacks.set_model(self)
        if not hasattr(callbacks, 'model'):  # for tf1.4
            callbacks.__setattr__('model', self)
        callbacks.model.stop_training = False
5.2.1 train
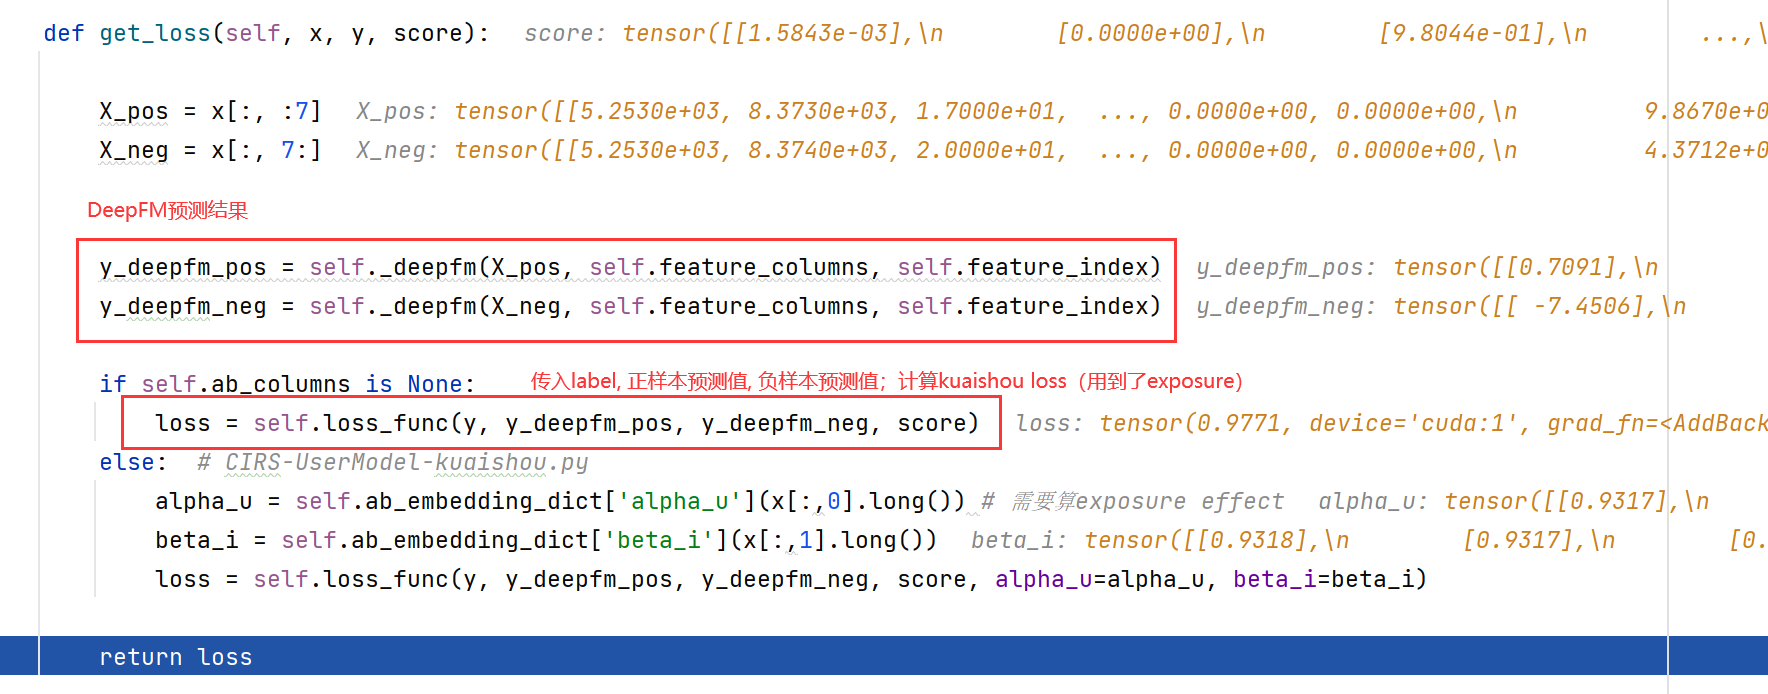
传入(x,y,score),先过一遍deepfm算出预测值,再传到loss_kuaishou_pairwise计算考虑了曝光效应的分数、loss。

get_loss函数:
loss_kuaishou_pairwise对应上论文中的公式:
5.2.1 evaluate_data()
测试阶段都是在小矩阵上进行的哦!dataset_val就是前面3.2节构建的dataset哈。
注意一下,这个地方并没有评估user model,是在测试deepfm!即没有考虑曝光效应的user model,因为静态模型中考虑曝光效应效果并不好~ 要在交互式场景下,考虑exit mechanism,效果才会出来噢
    def evaluate_data(self, dataset_val, batch_size=256):

        y_predict = self.predict_data(dataset_val, batch_size)
        y = dataset_val.get_y()

        eval_result = {}
        for name, metric_fun in self.metric_fun.items():
            eval_result[name] = metric_fun(y, y_predict)
        return eval_result
predict_data使用刚刚训练了的deepfm模型在小矩阵上进行预测(没有考虑exposure哦~)- 利用传入的
metric_fun,计算评估结果:输出结果{'mae': array(0.42009424), 'mse': array(0.41015303)};
这里的ground-truth是watch-ratio哈~
5.2.3 RL_eval_fun()
evaluate_data()测的是mae那些传统的东西,是继承的代码。然而这些不能用于RL,所以还得用RL的方式测一下l~
调用RL_eval_fun(),这里涉及到4.3节提到的偏函数啦,其实就是调用test_kuaishou()函数哦
- 通过DeepFM给出推荐item和预测值reward_pred:
recommendation, reward_pred = model.recommend_k_item(real_user_id[0], dataset_val, k=1, is_softmax=is_softmax, epsilon=epsilon, is_ucb=is_ucb) - 通过
step()传入推荐的item,返回state,reward,done,info。
①state就是action:
@property
    def state(self):
        if self.action is None:
            res = self.cur_user
        else:
            res = self.action
        return np.array([res])
② reward是小矩阵里的数值(watch_ratio);
③ done涉及到了_determine_whether_to_leave机制(当前推荐和上一个item重复属性>1),done就代表需要leave了哦。
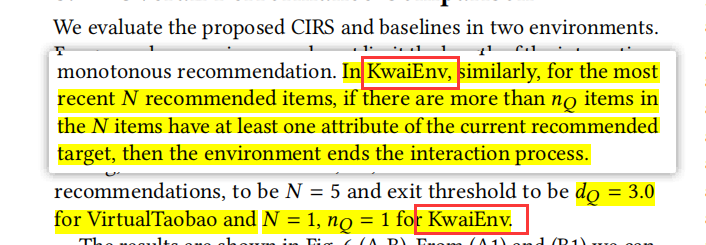
3. 记录下各个指标的值
            # metric 1
            cumulative_reward += reward

            # metric 2
            click_loss = np.absolute(reward_pred - reward)
            total_click_loss += click_loss
最后返回{'CTR': 2.4778145868427703, 'click_loss': 32.44419154070575, 'trajectory_len': 8.27, 'trajectory_reward': 20.49152663318971}
5.3 存储模型
这里就是存储设定的一系列超参数model_parameters 和归一化的reward矩阵(即论文中提到的,user model为agent提供reward)
    model_parameters = {"feature_columns": x_columns, "y_columns": y_columns, "task": task,
                        "task_logit_dim": task_logit_dim, "dnn_hidden_units": args.dnn, "seed": SEED, "device": device,
                        "ab_columns": ab_columns}

    model_parameter_path = os.path.join(MODEL_SAVE_PATH,
                                        "{}_params_{}.pickle".format(args.user_model_name, args.message))
    # 存储参数
    with open(model_parameter_path, "wb") as output_file:
        pickle.dump(model_parameters, output_file)
   # 计算归一化reward矩阵
    normed_mat = KuaishouEnv.compute_normed_reward(model, lbe_user, lbe_photo, df_photo_env)
    mat_save_path = os.path.join(MODEL_SAVE_PATH, "normed_mat-{}.pickle".format(args.message))
    with open(mat_save_path, "wb") as f:
        pickle.dump(normed_mat, f)
compute_normed_reward是计算小矩阵中所有用户对所有物品的评分(评分矩阵),其中的评分被视为reward,最后进行归一化。会在后面创建SimulatedEnv-v0环境时传入哦~
        for i, user in tqdm(enumerate(lbe_user.classes_), total=n_user, desc="predict all users' rewards on all items"):
            ui = torch.tensor(np.concatenate((np.ones((n_item, 1)) * user, item_np), axis=1), # item属性和用户id拼起来
                              dtype=torch.float, device=user_model.device, requires_grad=False)
            reward_u = user_model.forward(ui).detach().squeeze().cpu().numpy()
            predict_mat[i] = reward_u

        minn = predict_mat.min()
        maxx = predict_mat.max()


        normed_mat = (predict_mat - minn) / (maxx - minn)
6. To CPU
    user_model = model.cpu()
    user_model.linear_model.device = "cpu"
    user_model.linear.device = "cpu"
    # for linear_model in user_model.linear_model_task:
    #     linear_model.device = "cpu"

    model_save_path = os.path.join(MODEL_SAVE_PATH, "{}_{}.pt".format(args.user_model_name, args.message))
    torch.save(user_model.state_dict(), model_save_path)

    REMOTE_ROOT = "/root/Counterfactual_IRS"
    LOCAL_PATH = logger_path
    REMOTE_PATH = os.path.join(REMOTE_ROOT, os.path.dirname(LOCAL_PATH))
二. CIRS-RL-kuaishou
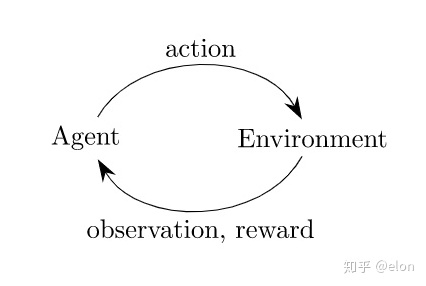
前面的代码只是在训练user model(Pre-learning阶段),没有涉及到强化学习(5.2.3只是简单地用RL的方式测试了一下deepfm);这部分要涉及到RL Planning和RL Evaluation了~
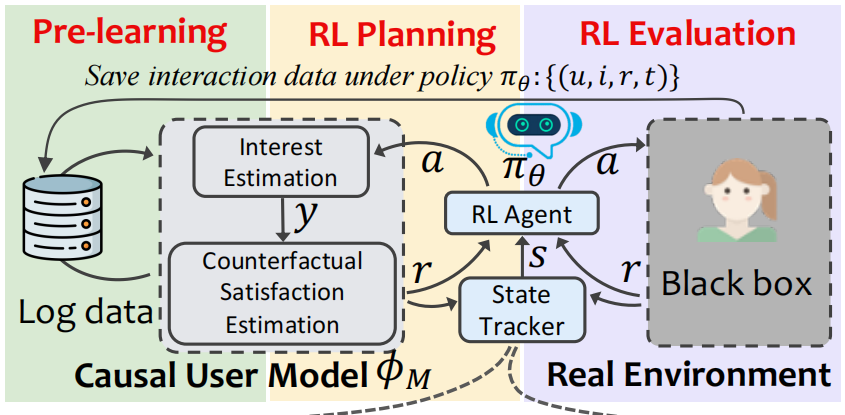
具体来说:
- 我们使用上一步获得的
user model创造一个SimulatedEnv-v0环境,在训练的时候与RL交互(提供reward)。 - 再使用快手小数据集环境
KuaishouEnv-v0构建Real Environment,用于线上测试。
0. get_args()解析参数
和第一部分一样哦~
这部分的参数也都是继承于tianshou库,没有自己调过呢~
parser = argparse.ArgumentParser()
parser.add_argument("--env", type=str, default="KuaishouEnv-v0")
parser.add_argument("--user_model_name", type=str, default="DeepFM")
........
1. create_dir()
和第一部分一样,创建所需要的目录
2. prepare user model
Pytorch 保存模型与加载模型
加载DeepFM模型参数model_params,实例化user_model(就是传入一系列参数);就是把上一段中训练好的user model拿出来:
user_model = UserModel_Pairwise(**model_params)
# 将预训练的参数权重加载到新的模型之中
user_model.load_state_dict(torch.load(model_save_path))
3. prepare envs
- 这里需要注册两个环境
KuaishouEnv-v0和SimulatedEnv-v0,都是小数据集环境哦。 - 前者用于测试,后者用于训练RL agent(需要传入读取的
user_model和normed_mat)。
-
KuaishouEnv.load_mat()加载数据集,注册快手环境。同第一部分的2.1, 2.2,就是在初始化KuaishouEnv类,以及resethistory_action,history_exposure,max_history。 -
注册模拟环境(即user model构建的simulator):初始化
simulated_env.py中的SimulatedEnv(gym.Env)类。注意一下,创建两个env传入的参数是不一样的哦:
① kuaishouenv主要是传入小矩阵的各种参数(mat,lbe_user,lbe_photo,list_feat…)
② SimulatedEnv是传入user model(user_model,tau,alpha_u,normed_mat…)
③ 不过simulatedEnv中又创建了一个kuaihsouenv~ 还保存了action_space等参数 -
调用
tianshou.env中的DummyVectorEnv初始化train和test(相当于很多个环境的集合),后面构建Collector会用到:
    train_envs = DummyVectorEnv(
        [lambda: gym.make("SimulatedEnv-v0", ) for _ in range(args.training_num)])
    # test_envs = gym.make(args.task)
    test_envs = DummyVectorEnv(
        [lambda: gym.make(args.env) for _ in range(args.test_num)])
其中train对应的是SimulatedEnv,test对应的是KuaishouEnv
DummyVectorEnv
4. Setup model
4.1 构建StateTracker输入
使用input中的get_dataset_columns()构建StateTracker输入;如图所示,我们需要三部分输入:
① 用户初始化向量
e
u
e_u
eu(来源于user model中的create_embedding_matrix)
② action向量(来源于user model中的create_embedding_matrix)
③ reward(小矩阵的值)
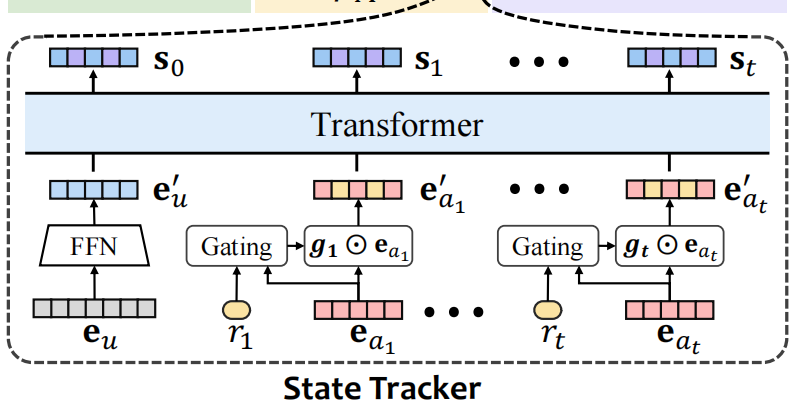
get_dataset_columns()就是构建了user_columns,feedback_columns,feedback_columns列表。用到了SparseFeatP类哦~
has_embedding是指有没有自带embedding(TaobaoEnv就是有自带embedding的哦):
	user_columns = [SparseFeatP("feat_user", env.mat.shape[0], embedding_dim=dim_model)]
    action_columns = [SparseFeatP("feat_item", env.mat.shape[1], embedding_dim=dim_model)]
    feedback_columns = [DenseFeat("feat_feedback", 1)]
    has_user_embedding = False
    has_action_embedding = False
    has_feedback_embedding = True
assert:Python assert(断言)用于判断一个表达式,在表达式条件为 false 的时候触发异常。
assert expression [, arguments]等价于:
if not expression:
    raise AssertionError(arguments)
4.2 StateTrackerTransformer()
这部分就是Transformer结构啦!Transformer讲解:
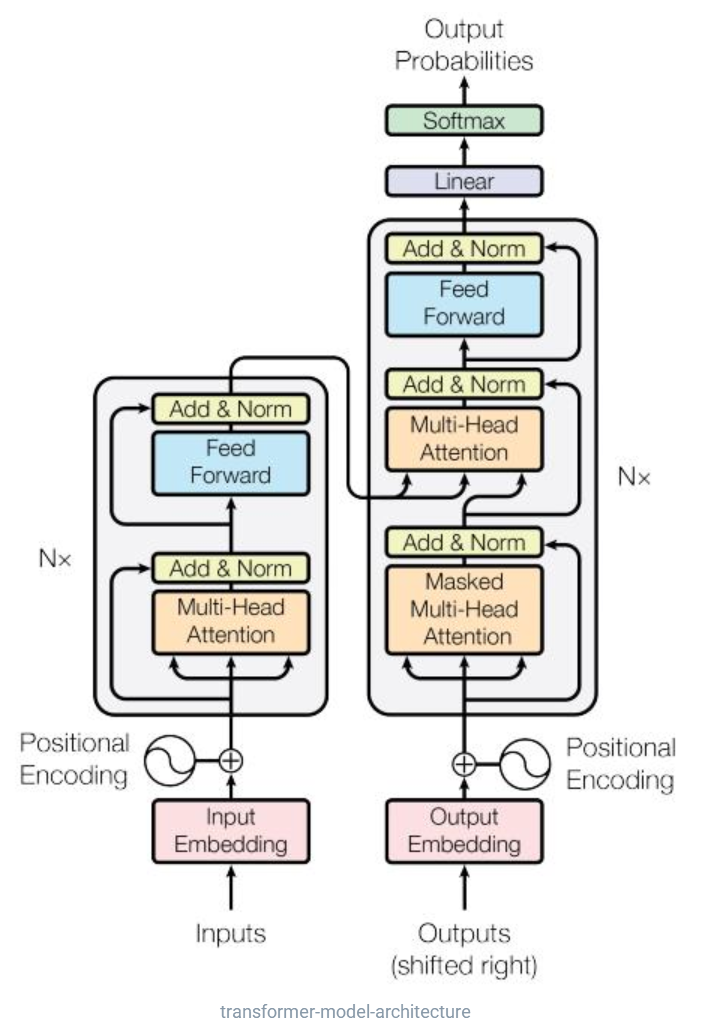
- 基类
StateTrackerBase初始化函数:
① 构造self.user_index,action_index,feedback_index,格式是:OrderedDict: {feature_name:(start, start+dimension)}。后面获取u/i的embedding会用到~

② 调用user model中的create_embedding_matrix构建feat_user和feat_item的嵌入字典embedding_dict。 StateTrackerTransformer()构造StateTracker;这部分代码实现了transformer结构,以及论文中设计的gate门控机制~
transformer:代码中首先写了一个PositionalEncoding(),接着调用torch.nn中的TransformerEncoderLayer(),叠了两层encoder,最后使用一个线性层充当decoder,将输出转为state维度(20维)
作者在这部分还留下了GRU和LSTM的接口,方便大家更改StateTracker结构
构建state的具体步骤:
4.3 Actor-Critic 结构
4.3.1 Net()
调用tianshou.utils.net.common中的Net,net = Net(args.dim_state, hidden_sizes=args.hidden_sizes, device=device),传入state维度和隐藏层维度。
Net()也是继承的nn.module(),关键代码是MLP(也是tianshou中写的,有点复杂)
self.model = MLP(input_dim, output_dim, hidden_sizes, norm_layer, activation, device)
4.3.2 Actor()
actor = Actor(net, env.mat.shape[1], device=device).to(device)
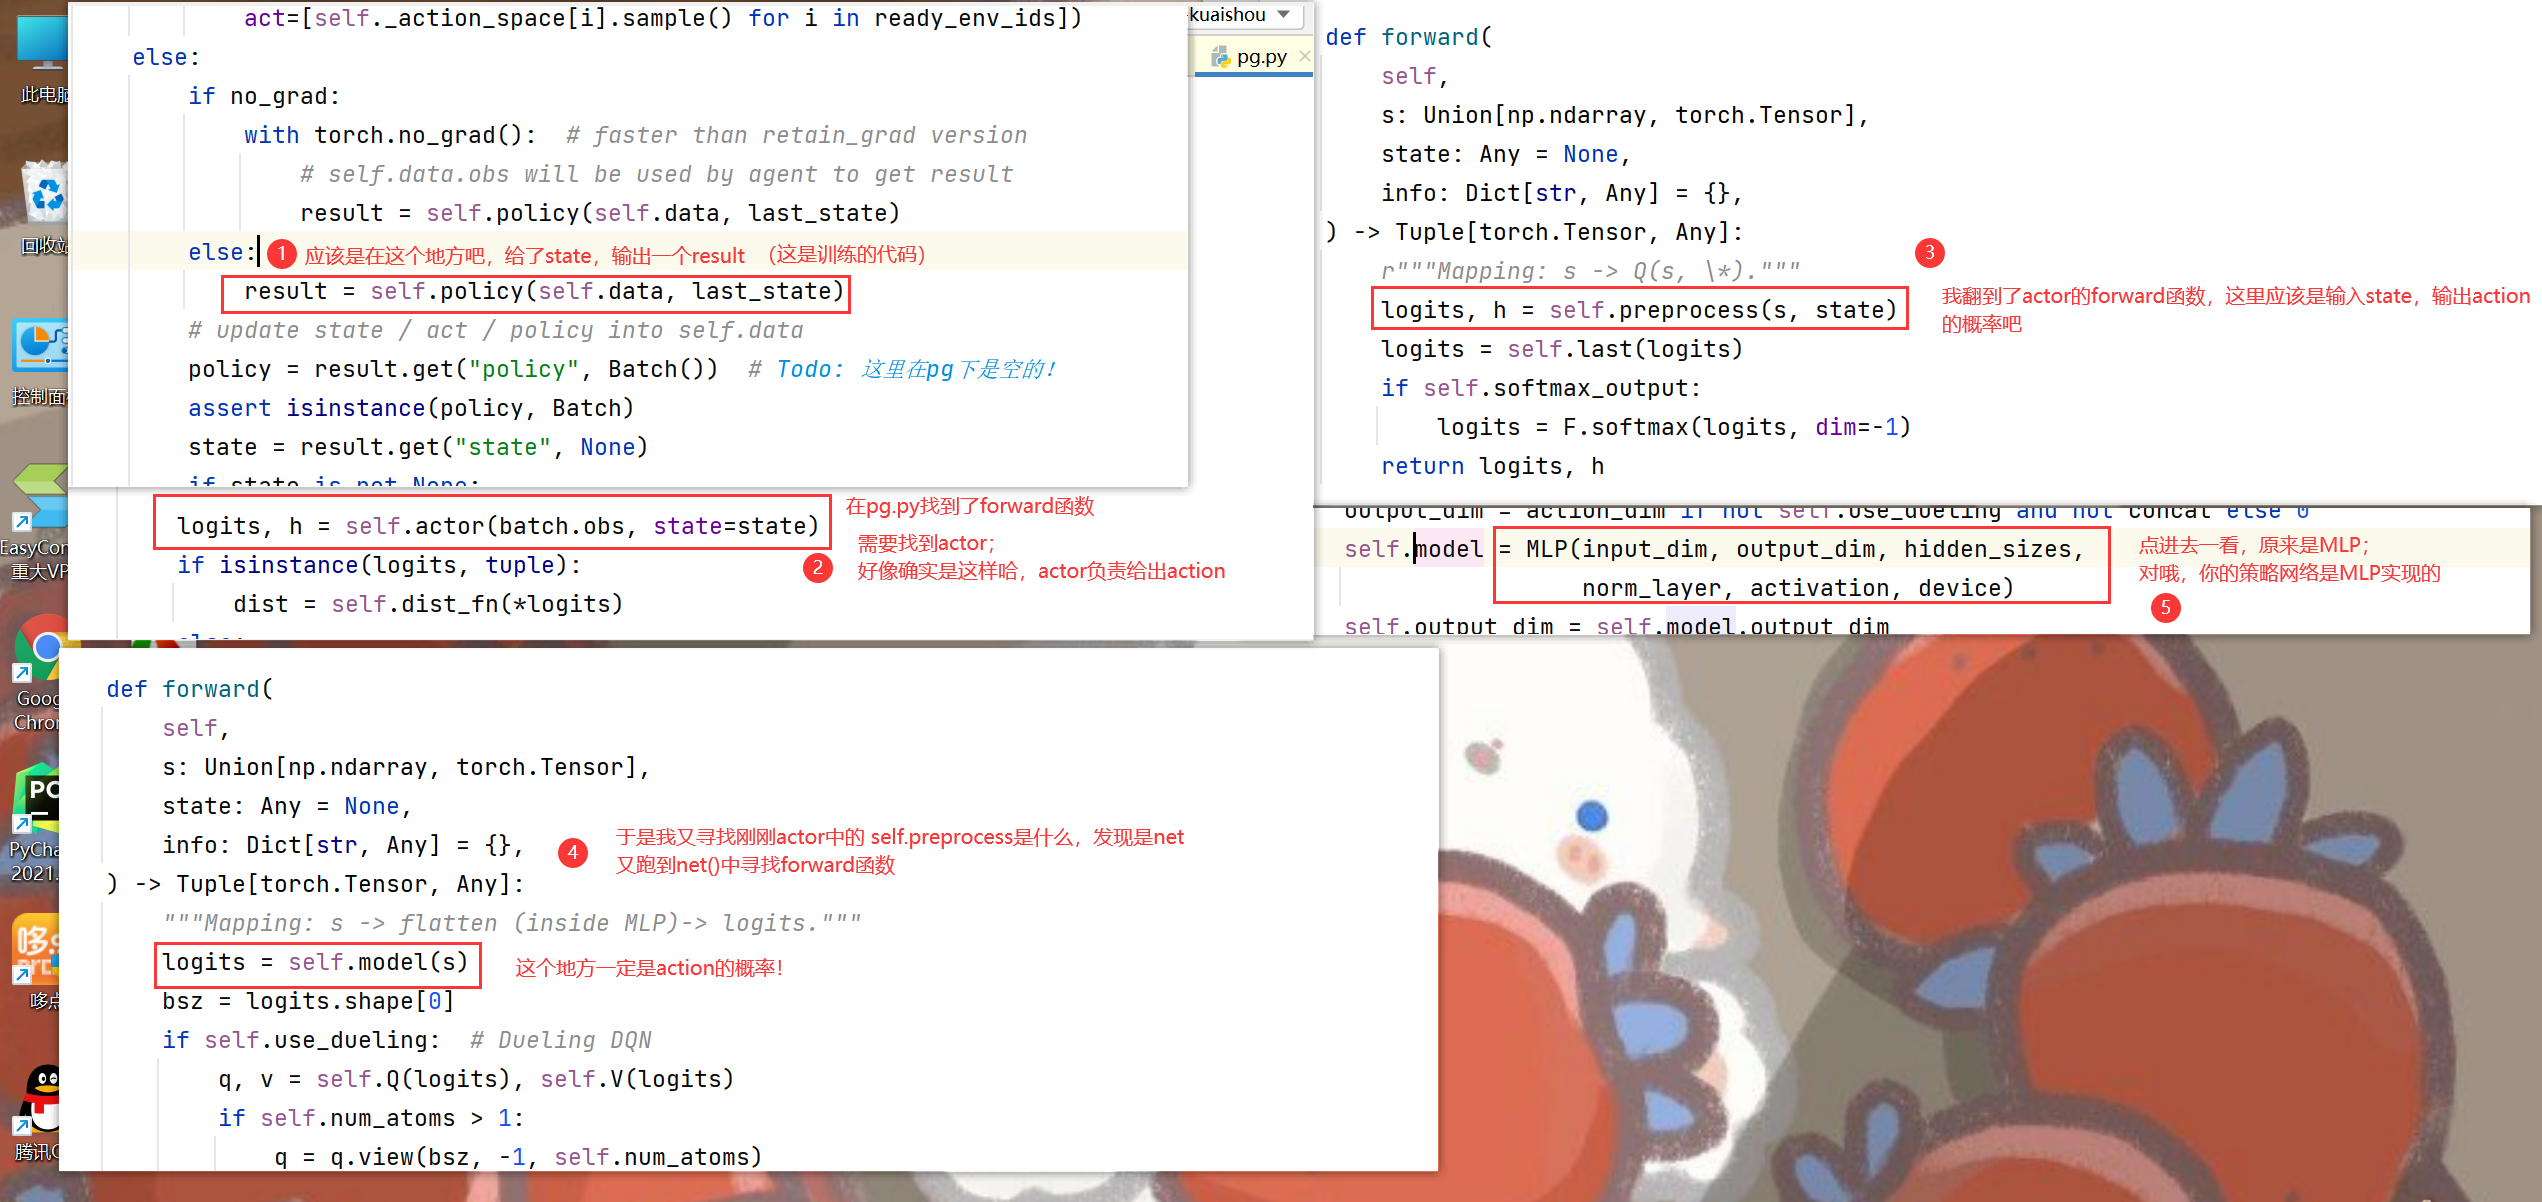
from tianshou.utils.net.discrete import Actor, Critic,这部分也是调用了tianshou中的包。首先经过net进行preprocess,接着加上一层全连接
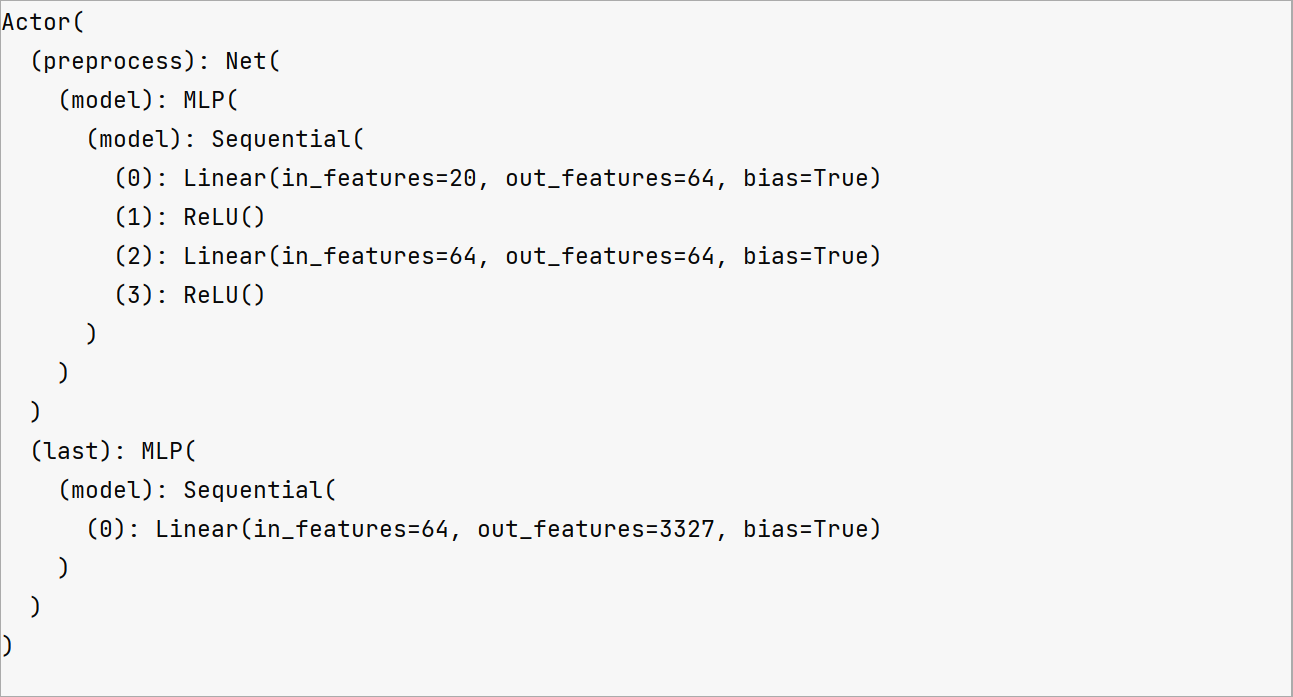
- 注意啦,注意啦!Actor的作用是给出action哦!即 MLP接收state,输出action概率
4.3.3 Critic()
这部分操作跟actor类似的~ (不过Actor有一层softmax,critic的output_dim只是一维,因为只需要输出一个值嘛)
critic = Critic(net, device=device).to(device)
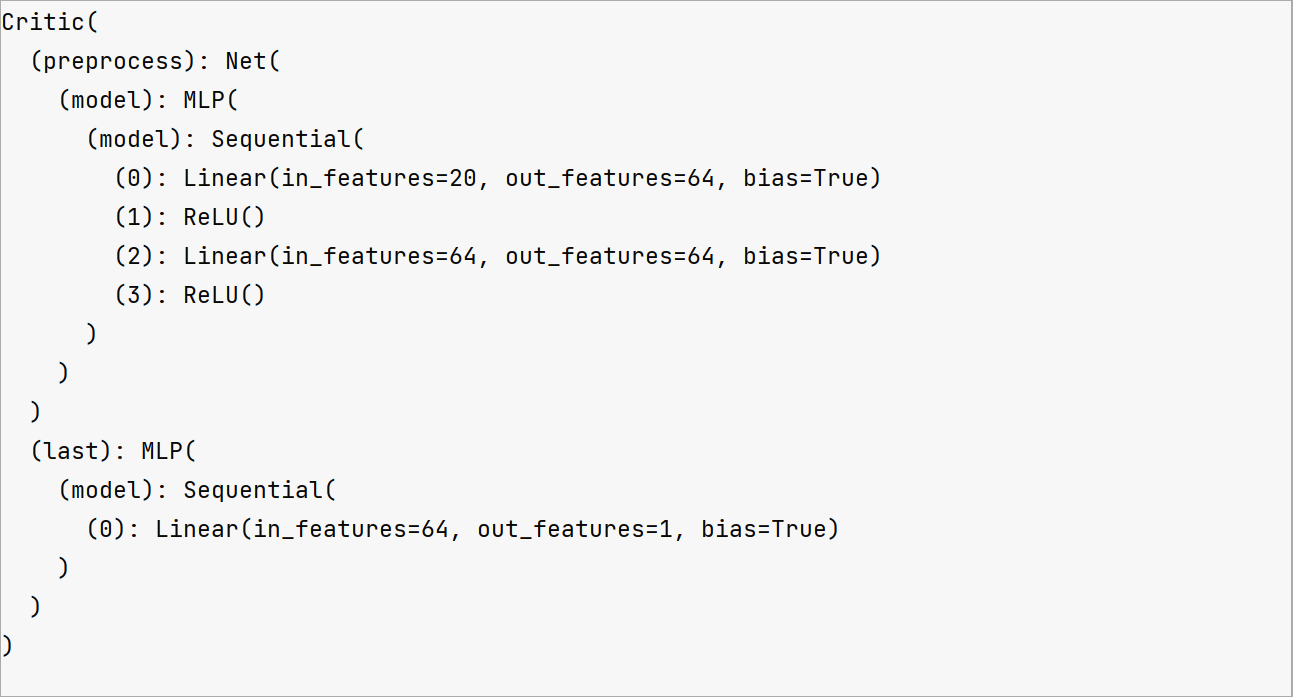
- 注意啦注意啦!critic的作用是为action评分,在损失函数中会用到哦;即更新的时候会用到啦
4.3.4 初始化参数,指定optimizer
-
使用
orthogonal initialization初始化actor和critic中module的参数(有论文支撑的哦) -
指定优化器时,
actor-critic需要,state_tracker也需要哦~ learn的时候会派上用场
# orthogonal initialization
    for m in list(actor.modules()) + list(critic.modules()):
        if isinstance(m, torch.nn.Linear):
            torch.nn.init.orthogonal_(m.weight)
            torch.nn.init.zeros_(m.bias)
    # 指定优化器
    optim_RL = torch.optim.Adam(
        list(actor.parameters()) +
        list(critic.parameters()), lr=args.lr)
    optim_state = torch.optim.Adam(state_tracker.parameters(), lr=args.lr)
    optim = [optim_RL, optim_state]
4.4 调用PPO
调用的代码:
policy = PPOPolicy(
        actor, critic, optim, dist,
        discount_factor=args.gamma,
        max_grad_norm=args.max_grad_norm,
        eps_clip=args.eps_clip,
        vf_coef=args.vf_coef,
        ent_coef=args.ent_coef,
        reward_normalization=args.rew_norm,
        advantage_normalization=args.norm_adv,
        recompute_advantage=args.recompute_adv,
        # dual_clip=args.dual_clip,
        # dual clip cause monotonically increasing log_std :)
        value_clip=args.value_clip,
        gae_lambda=args.gae_lambda,
        action_space=simulatedEnv.action_space,
        action_bound_method="" if args.env == "KuaishouEnv-v0" else "clip",
        action_scaling=False if args.env == "KuaishouEnv-v0" else True
    )
网络结构如下,可以看到PPOPolicy是由一个Actor和一个Critic组成的
PPOPolicy(
  (actor): Actor(
    (preprocess): Net(
      (model): MLP(
        (model): Sequential(
          (0): Linear(in_features=20, out_features=64, bias=True)
          (1): ReLU()
          (2): Linear(in_features=64, out_features=64, bias=True)
          (3): ReLU()
        )
      )
    )
    (last): MLP(
      (model): Sequential(
        (0): Linear(in_features=64, out_features=3327, bias=True)
      )
    )
  )
  (critic): Critic(
    (preprocess): Net(
      (model): MLP(
        (model): Sequential(
          (0): Linear(in_features=20, out_features=64, bias=True)
          (1): ReLU()
          (2): Linear(in_features=64, out_features=64, bias=True)
          (3): ReLU()
        )
      )
    )
    (last): MLP(
      (model): Sequential(
        (0): Linear(in_features=64, out_features=1, bias=True)
      )
    )
  )
)
走进PPOPolicy,会发现他上面有好多好多祖宗:
祖孙四代:PPOPolicy -> A2CPolicy -> PGPolicy -> BasePolicy -> nn.Module
我们一个一个剖析:
4.4.1 BasePolicy
BasePolicy是老大中的老大!所有RL policy都要继承它!
输入为observation(state),输出为logits(action的概率)(不过代码里forward()是pass)
        self.observation_space = observation_space
        self.action_space = action_space
        self.action_type = ""
        if isinstance(action_space, (Discrete, MultiDiscrete, MultiBinary)):
            self.action_type = "discrete"
        elif isinstance(action_space, Box):
            self.action_type = "continuous"
        self.agent_id = 0
        self.updating = False
        self.action_scaling = action_scaling
        # can be one of ("clip", "tanh", ""), empty string means no bounding
        assert action_bound_method in ("", "clip", "tanh")
        self.action_bound_method = action_bound_method
        self._compile()
4.4.2 PGPolicy
策略梯度策略,on-policy更新,需要玩完一整个回合才更新
代码部分,指定了actor(self.actor = model),优化器等变量啦~
我们输入state,得到action的步骤就是这里actor的工作~
        self.actor = model
        self.optim = optim
        self.lr_scheduler = lr_scheduler
        self.dist_fn = dist_fn
        assert 0.0 <= discount_factor <= 1.0, "discount factor should be in [0, 1]"
        self._gamma = discount_factor
        self._rew_norm = reward_normalization
        self.ret_rms = RunningMeanStd()
        self._eps = 1e-8
        self._deterministic_eval = deterministic_eval
forward()部分,为actor传入obs,输出distribution,根据分布选择action,最终返回Batch(logits=logits, act=act, state=h, dist=dist)
4.4.1 A2CPolicy
演员-评论家模型,Actor-Critic算法小结
Actor-Critic相当于PG的改进,相当于把损失函数中的
r
t
r_t
rt换成以下三种:
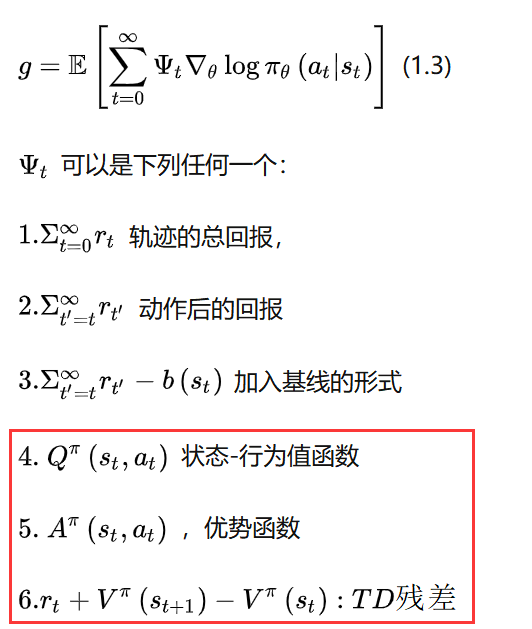
代码上和PG相比,A2C主要是多了一个critic网络,以及GAE(Generalized Advantage Estimation)等参数…
forward()函数并没有重写,还是用的PG的forward哦!因为他俩都是给actor输入state,然后输出action~
learn()函数,计算actor,critic,regularization,all 四个损失
4.4.1 PPOPolicy

PPO模型;相对于PG,加了重要性采样
这部分代码是作者基于tianshou中的PPO重写的~ 主要改动在加入了transformer更新。
optim: Union[torch.optim.Optimizer, List[torch.optim.Optimizer]]
(optim_RL 和 optim_state 两个优化器)
5. Prepare the collectors and logs
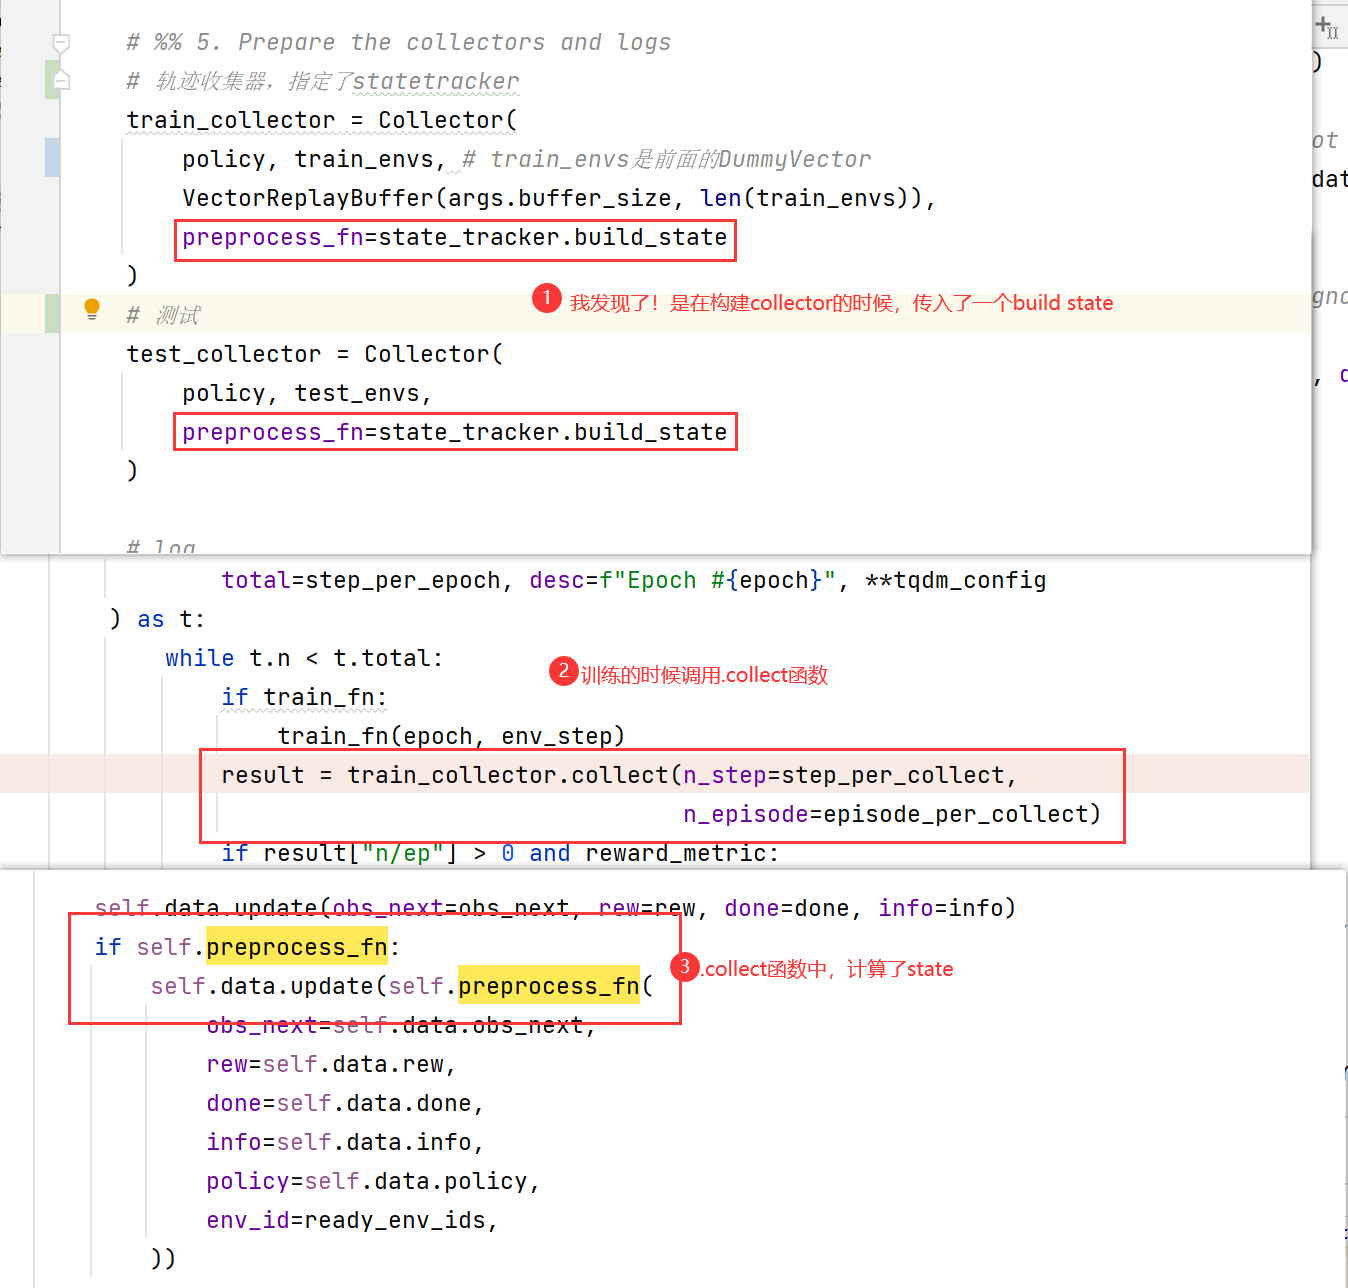
5.1 Collector
collector相当于强化学习轨迹episode的收集器:
    train_collector = Collector(
        policy, train_envs,
        VectorReplayBuffer(args.buffer_size, len(train_envs)),
        preprocess_fn=state_tracker.build_state
    )
    test_collector = Collector(
        policy, test_envs,
        preprocess_fn=state_tracker.build_state
    )
Collector()也是基于tianshou库修改的,传入的参数多是tianshou库中带的,要完全搞明白挺难的,只需要知道每个参数的含义就好啦;比如VectorReplayBuffer肯定就是存储数据的嘛~
- 其中的
preprocess_fn是StateTrackerTransformer构建state的过程:
<bound method StateTrackerTransformer.build_state of StateTrackerTransformer(
  (embedding_dict): ModuleDict(
    (feat_user): Embedding(1411, 32)
    (feat_item): Embedding(3327, 32)
  )
  (ffn_user): Linear(in_features=32, out_features=32, bias=True)
  (fnn_gate): Linear(in_features=33, out_features=32, bias=True)
  (sigmoid): Sigmoid()
  (pos_encoder): PositionalEncoding(
    (dropout): Dropout(p=0.1, inplace=False)
  )
  (transformer_encoder): TransformerEncoder(
    (layers): ModuleList(
      (0): TransformerEncoderLayer(
        (self_attn): MultiheadAttention(
          (out_proj): NonDynamicallyQuantizableLinear(in_features=32, out_features=32, bias=True)
        )
        (linear1): Linear(in_features=32, out_features=128, bias=True)
        (dropout): Dropout(p=0.1, inplace=False)
        (linear2): Linear(in_features=128, out_features=32, bias=True)
        (norm1): LayerNorm((32,), eps=1e-05, elementwise_affine=True)
        (norm2): LayerNorm((32,), eps=1e-05, elementwise_affine=True)
        (dropout1): Dropout(p=0.1, inplace=False)
        (dropout2): Dropout(p=0.1, inplace=False)
      )
      (1): TransformerEncoderLayer(
        (self_attn): MultiheadAttention(
          (out_proj): NonDynamicallyQuantizableLinear(in_features=32, out_features=32, bias=True)
        )
        (linear1): Linear(in_features=32, out_features=128, bias=True)
        (dropout): Dropout(p=0.1, inplace=False)
        (linear2): Linear(in_features=128, out_features=32, bias=True)
        (norm1): LayerNorm((32,), eps=1e-05, elementwise_affine=True)
        (norm2): LayerNorm((32,), eps=1e-05, elementwise_affine=True)
        (dropout1): Dropout(p=0.1, inplace=False)
        (dropout2): Dropout(p=0.1, inplace=False)
      )
    )
  )
  (decoder): Linear(in_features=32, out_features=20, bias=True)
)>
collector初始化函数中,还有一个reset():
    def reset(self) -> None:
        """Reset all related variables in the collector."""
        # use empty Batch for "state" so that self.data supports slicing
        # convert empty Batch to None when passing data to policy
        self.data = Batch(obs={}, act={}, rew={}, done={},
                          obs_next={}, info={}, policy={})
        self.reset_env() # 调用collector中的reset,构造initial state;修改了self.data.obs
        self.reset_buffer() #调用collector中的函数,初始化一定大小的buffer
        self.reset_stat() # step, episode, collect_time置为0
reset_env()构建初始化状态:
① 初始化了state tracker中的self.data和self.len_data参数;
②obs = self.env.reset()返回了初始用户(100个,因为设置了100个环境)
③ 调用build_state(返回obs,obs_next)构建state,赋值给self.data.obs
5.1 logs & callback
- 使用Tensorboard 中的SummaryWriter,以及tianshou库中的
BasicLogger。
    log_path = os.path.join(MODEL_SAVE_PATH)
    writer = SummaryWriter(log_path)
    logger1 = BasicLogger(writer, save_interval=args.save_interval)
    policy.callbacks = [History()] + [LoggerCallback_RL(logger_path)]
policy.callbacks = [History()] + [LoggerCallback_RL(logger_path)]
把所有事件都记录到 History 对象的回调函数;LoggerCallback_RL是作者自己写的函数,还没看懂
6. Learn the model
前面只是在构建模型(PPO,StateTracker…),接下来就是训练过程啦!
- 调用
onpolicy_trainer训练模型,要传入刚刚构建的train_collector和test_collector:
    result = onpolicy_trainer(policy, train_collector, test_collector, state_tracker,
                              args.epoch, args.step_per_epoch,
                              args.repeat_per_collect, args.test_num, args.batch_size,
                              episode_per_collect=args.episode_per_collect,
                              # stop_fn=stop_fn,
                              # save_fn=save_fn,
                              logger=logger1,
                              resume_from_log=args.resume,
                              # save_checkpoint_fn=save_checkpoint_fn,
                              save_model_fn=functools.partial(save_model_fn,
                                                              model_save_path=model_save_path,
                                                              state_tracker=state_tracker,
                                                              optim=optim,
                                                              is_save=args.is_save)
                              )
这里又遇见了我们的老朋友func = functools.partial(func, *args, **keywords),这次是为save_model_fn构建的偏函数,传入了save_model_fn的参数,epoch和policy还没有传。这个函数就是输出各种信息的~
彻底明白 Python partial()
- 进行各种初始化,调用
collector的reset_stat()等 - 训练前先测试一遍
test_episode(6.1) - 回调函数
callbacks - 开始训练(6.2),训练过程中也会测试哦
6.1 test_episode
这部分就是论文中的第三步哦~ 与真实环境交互,reward来源于小矩阵的值~
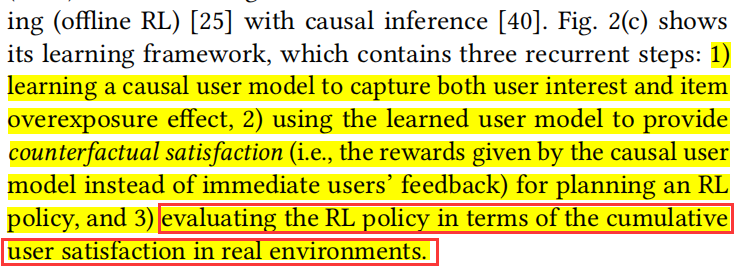
test_result = test_episode(policy, test_collector, test_fn, start_epoch,
                               episode_per_test, logger, env_step, reward_metric)
test_episode是调用tianshou.trainer中的函数,主要执行代码:
    collector.reset_env()
    collector.reset_buffer()
    result = collector.collect(n_episode=n_episode)
6.1.1 collector.reset_env()
运行中会调用collector中的reset_env():
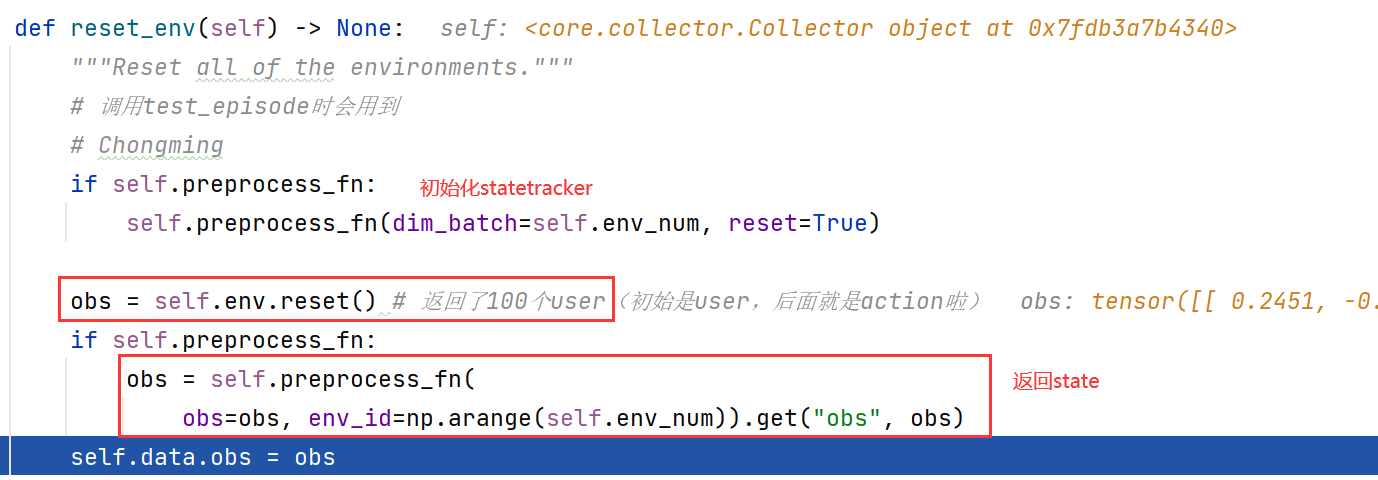
① StateTracker中的build_state初始化;初始化了state tracker中的self.data和self.len_data参数;

② KuaishouEnv中的reset();obs = self.env.reset()返回了初始用户(100个,因为设置了100个环境)
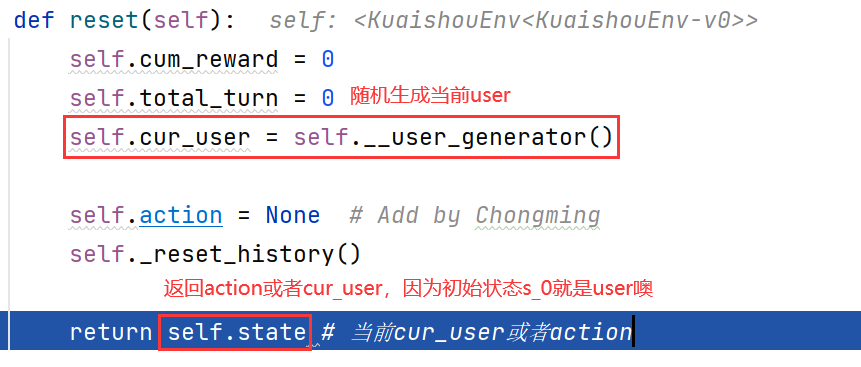
③ 调用StateTracker中的build_state(返回obs, obs_next)构建state,赋值给self.data.obs

6.1.2 collector.reset_buffer()
这部分就是设置了VectorReplayBuffer:
    def reset_buffer(self, keep_statistics: bool = False) -> None:
        """Reset the data buffer."""

        ## Chongming
        maxsize = self.buffer.maxsize
        buffer_num = self.buffer.buffer_num
        buffer = VectorReplayBuffer(maxsize, buffer_num)
        self._assign_buffer(buffer)
        # self.buffer.reset(keep_statistics=keep_statistics)
6.1.3 collector.collect
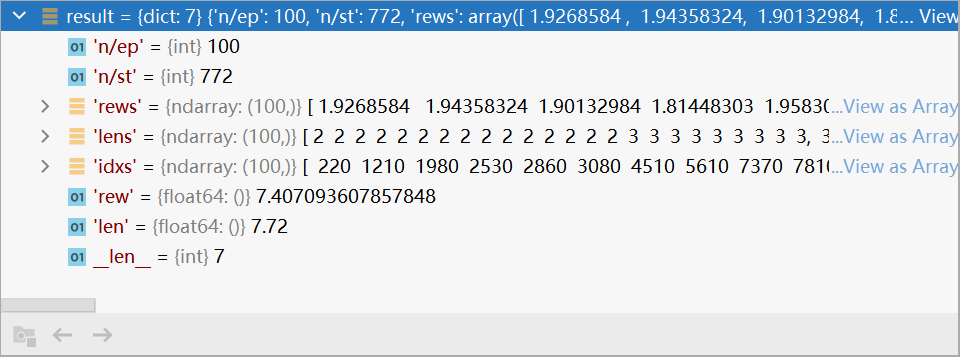
这部分就是测试的精髓啦!最终会返回一个字典,存储了reward,lens等结果。
test的时候是不会更新参数的,因此只传入了n_episode一个参数。
self.reset() # Instead of using the last obs, we generate new obs using updated parameters.注意一下这一句,这里是调用collector中的.reset()函数,初始化了 s 0 s_0 s0(self.data.obs);
从注释我们可以知道,因为StateTracker会不断更新,所以我们需要用新的参数来初始化state。(其实前面rest那么多次,都没用上)self.policy输入state(是self.data.obs哦!last_state是个空值哦),输出action:

- 进入快手环境,
self.env.step传入action,得到下一步的状态等信息;注意,这里的obs_next并不是最终的state,还要经过StateTracker才行:
# 调用kuaishouEnv中的env函数,传入action和env的序号;这里返回的obs_next就是action
obs_next, rew, done, info = self.env.step(action_remap, ready_env_ids)
① 判断是否结束,是论文中提到的exit mechanism:
done = self._determine_whether_to_leave(t, action)
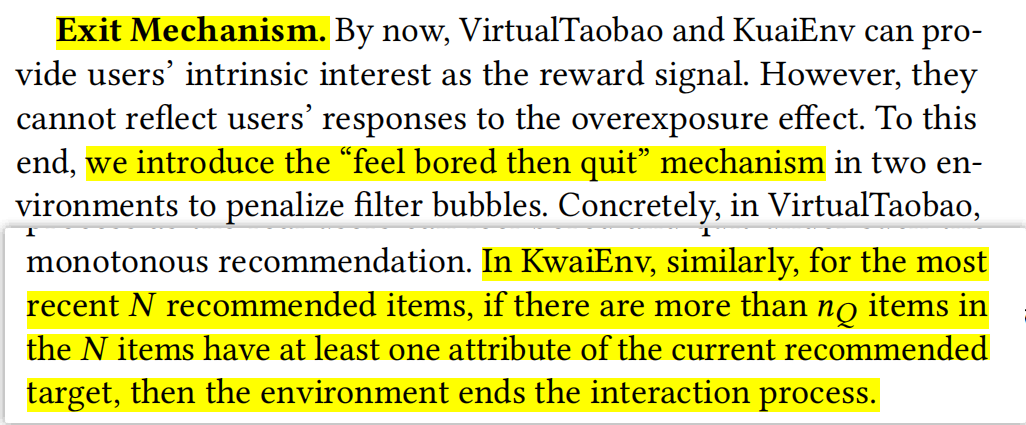
② _add_action_to_history 保存数据:
    def _add_action_to_history(self, t, action):

        self.sequence_action.append(action)
        self.history_action[t] = action

        assert self.max_history == t
        self.max_history += 1
③ reward来自于小矩阵的值:
reward = self.mat[self.cur_user, action]
④ 更新各种值:
self.cum_reward += reward
self.total_turn += 1
⑤ 如果done,就换一个user
- 调用
statetracker的build_state得到state(obs),和前面reset不一样,这里并不是初始化 s 0 s_0 s0了,要用到门控机制了哦!
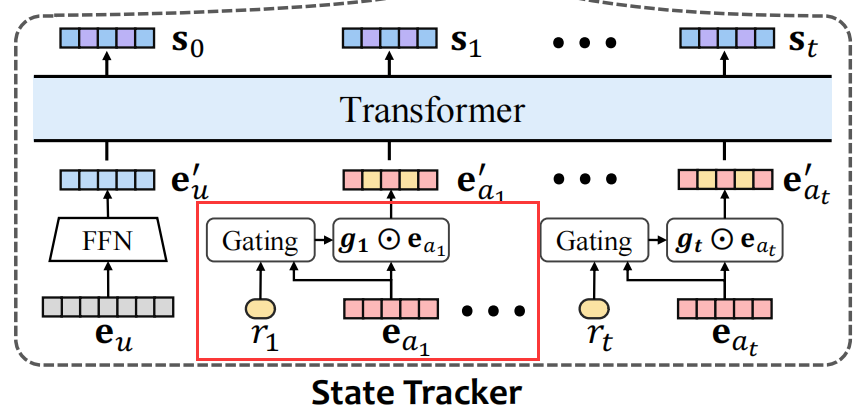
- 存储到
buffer;这里是VectorReplayBuffer类型,add()是tianshou中的方法,目的就是把这一堆结果存到buffer中。
ptr, ep_rew, ep_len, ep_idx = self.buffer.add(self.data, buffer_ids=ready_env_ids)
- 判断一下有没有结束的(一共生成了100个环境嘛,肯定不是一起done呢),有的话,就需要记录下
episode_lens,episode_rews,episode_start_indices等数据,还要从ready_env_ids中删除多余的env id。 - 当前state要变咯:
self.data.obs = self.data.obs_next。 - 进行了
n_episode轮后,就break啦 - 记录一下数据:
        # generate statistics
        self.collect_step += step_count
        self.collect_episode += episode_count
        self.collect_time += max(time.time() - start_time, 1e-9)
- 返回结果啦:
        res = {
            "n/ep": episode_count,
            "n/st": step_count,
            "rews": rews,
            "lens": lens,
            "idxs": idxs,
        }
test_result(logger.log_test_data(result, global_step)算了rew_std):

6.2 callbacks
回调函数,目的是记录下各种日志:
	callbacks = CallbackList(policy.callbacks)
    callbacks.set_model(policy)
    callbacks.on_train_begin()
    if not hasattr(callbacks, 'model'):  # for tf1.40
        callbacks.__setattr__('model', policy)
    callbacks.model.stop_training = False
6.3 train
刚刚是测试的部分,现在要开始训练了~ 二者都调用了collector.collect。
tqdm用法
大致步骤:
① train_collector.collect收集轨迹,查看结果
② 存储结果至data
③ 计算loss
④ 记录下loss
⑤ 测试一下,看看结果如何
⑥ 调用gather_info查看结果
6.3.1 train_collector.collect
和 6.1.3 类似,不过这里的.step()是simulatedEnv(user model构建的哦)。
step():
① 从小矩阵得到ground-truth,后面需要done判断是否结束
② 计算exposure effect
e
t
∗
(
u
,
i
)
e^*_t(u, i)
et∗(u,i),exposure_effect = self._compute_exposure_effect(t, action)
③ _add_action_to_history,保存一下结果
④ 把exposure算进来计算一下reward,clip0(pred_reward) / (1.0 + exposure_effect)
返回result:
6.3.2 计算loss
losses = policy.update(0, train_collector.buffer,
                    batch_size=batch_size, repeat=repeat_per_collect)
update是调用base中的函数,需要传入buffer哈,关键代码如下:
        batch, indice = buffer.sample(sample_size)
        self.updating = True
        batch = self.process_fn(batch, buffer, indice)
        result = self.learn(batch, **kwargs)
        self.post_process_fn(batch, buffer, indice)
        self.updating = False
        return result
下面我们一个一个看:
- 计算
buffer.sample()
这里就是在采样啦!过程有点点复杂~
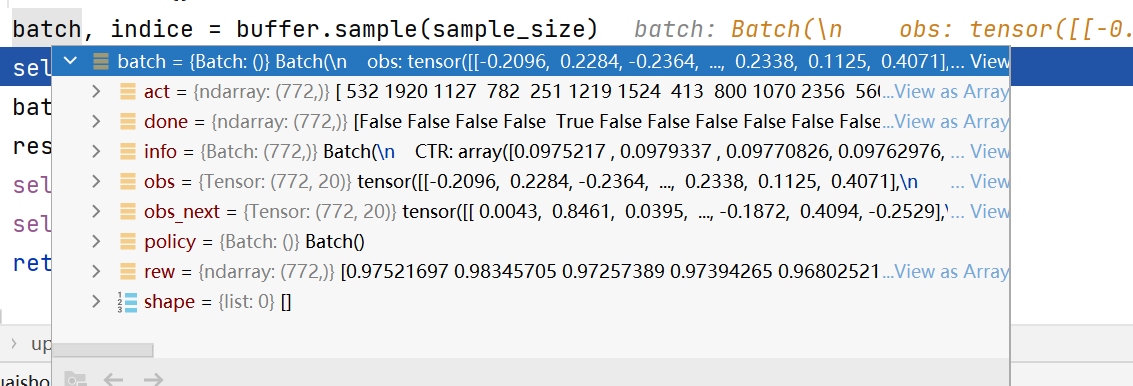

- 调用PPO的
process_fn():
算了一下_compute_returns,后面我也不知道在干嘛了,反正就是处理了一下batch嘛~ - 调用PPO中的
learn():
这里就是参数更新啦!这部分代码主要还是沿用tianshou的,但是加入了更新StateTracker的步骤~
① RL和StateTracker的优化器:optim_RL, optim_state = self.optim
② 按照PPO算法,依次计算actor loss,critic loss。更新optim_RL
③ 最后一次,更新statetracker。
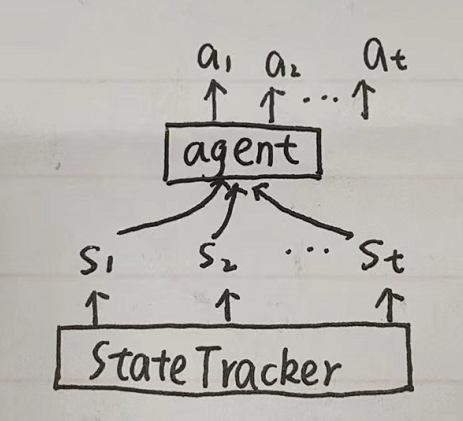
注意,不能同时更新agent和state,会报错的:one of the variables needed for gradient computation has been modified by an inplace operation
因为PPO是分批更新参数的,假设先更新
t
1
t_1
t1,
t
2
t_2
t2时刻的agent和statetracker(反向传播),等到更新
t
3
t_3
t3,
t
4
t_4
t4时刻时,StateTracker就变了,同样的输入,输出不一样了。所以会报错!
因此,在更新agent的时候应该固定住StateTracker,最后再更新statetracker。
最终输出loss:

4. post_process_fn():这部分目的是更新采样权重,不过在CIRS中并没有派上用场呢。
6.3.3 测试
- 调用
test_episode进行测试(同6.1),记录下最好的结果
        if best_epoch < 0 or best_reward < rew: # 记录下best
            best_epoch, best_reward, best_reward_std = epoch, rew, rew_std
- 调用前面传入的偏函数
save_model_fn
7. save info
就是存储模型参数啦!
torch.save({
        'policy': policy.cpu().state_dict(),
        'optim_RL': optim[0].state_dict(),
        'optim_state': optim[1].state_dict(),
        'state_tracker': state_tracker.cpu().state_dict(),
    }, model_save_path)

    REMOTE_ROOT = "/root/Counterfactual_IRS"
    LOCAL_PATH = logger_path
    REMOTE_PATH = os.path.join(REMOTE_ROOT, os.path.dirname(LOCAL_PATH))
终于看完啦!!!耶(^-^)V
完结!✿✿ヽ(°▽°)ノ✿撒花✿✿ヽ(°▽°)ノ✿
大家有问题可以在评论区留言哦\\\٩(‘ω’)و////


 1742
1742


 被折叠的 条评论
为什么被折叠?


