


前言
自2018-05-01提交第一个commit以来,在不影响正常测试工作release版本情况下,断断续续的持续了1年8个月的自动化开发在今天(2019-12-31)收尾了,总测试用例数为1310个,一路走来深有感慨。。。。。。
虽然收尾了,但后期版本功能发生变化,或者用例开发过程中有一些bug未考虑到导致用例执行失败的,还是需要对用例进行修改、优化,总之,一个产品自动化的完善,需要一个循序渐进的过程,持之以恒,总会渐变渐好!
本文记录了在开发产品自动化期间(Base on Ubuntu12.04),所需要的一些条件、碰到的问题、注意事项等,如果想了解Nose framework的具体使用,请参考Nose官网吧,官网有详细的guide。
必要的安装/升级/修改
说明:
-
在线安装,所以存储节点要配置 dns server;
-
本章节的如下操作,无需手动安装,只需要执行 run.py,自动完成本章节的所有安装动作。本章节仅为了记录要安装哪些模块、插件、修改等信息。
1、非产品OS 作为客户端需要安装的软件
本章节以 ubuntu 为例,其他类型的 OS,不做考虑,且 OS 并不是我们的产品。
需要安装 multipath-tools, fio,openssh-server(支持 ssh 指令), open-iscsi(支持 iscsiadm指令), NFS 和 CIFS。 上述软件安装指令如下:
shell
apt-get install open-iscsi
apt-get install openssh-server apt-get install multipath-tools apt-get install fio
apt-get install cifs-utils
apt-get install nfs-kernel-server
如果客户端是官方的Ubuntu,那肯定是没有安装 NFS 和 CIFS 的,mount NFS/CIFS 会出问题:
shell
root@nose-ubuntu:/mnt# mount -t nfs 10.16.172.246:/vol/nose_nas /mnt/test mount: wrong fs type, bad option, bad superblock on 10.16.172.246:/vol/nose_nas,
missing codepage or helper program, or other error (for several filesystems (e.g. nfs, cifs) you might need a /sbin/mount.<type> helper program)

In some cases useful info is found in syslog - try dmesg | tail or so.


root@nose-ubuntu:/mnt# mount -t cifs //10.16.172.246/nose_nas_src /mnt/test/ mount: wrong fs type, bad option, bad superblock on //10.16.172.246/nose_nas_src,
missing codepage or helper program, or other error (for several filesystems (e.g. nfs, cifs) you might
need a /sbin/mount.<type> helper program)

In some cases useful info is found in syslog - try dmesg | tail or so.

root@nose-ubuntu:/mnt# dmesg | tail
[  141.523611] device-mapper: multipath: Failing path 65:0. [ 141.638465] device-mapper: multipath: Failing path 65:32. [ 141.638545] device-mapper: multipath: Failing path 65:112. [ 141.687588] device-mapper: multipath: Failing path 65:112.
[846862.989111] FS-Cache: Loaded
[846862.997304] RPC: Registered named UNIX socket transport module. [846862.997307] RPC: Registered udp transport module. [846862.997308] RPC: Registered tcp transport module.
[846862.997309] RPC: Registered tcp NFSv4.1 backchannel transport module.
[846863.007999] FS-Cache: Netfs 'nfs' registered for caching
所以需要进行安装,成功安装后,内容如下:
shell
root@nose:~# dpkg -l | grep nfs
ii  libnfs4:amd64                        1.10.0-7.0+854+6b837f908                   amd64        NFS client library (shared library)
ii  libnfsidmap2:amd64                   0.25-5                                     amd64        NFS idmapping library
ii  nfs-common                           1:1.2.8-6ubuntu1.2                         amd64        NFS support files common to client and server
ii  nfs-kernel-server                    1:1.2.8-6ubuntu1.2                         amd64        support for NFS kernel server
说明:
-
目前 run.py 有做检查,但不进行安装,具体安装操作,尚需手动执行。
2、安装python-pip
shell
apt-get install python-pip
3、升级requests模块
shell
pip install --upgrade --ignore-installed requests --index-url=https://pypi.python.org/simple

root@44:/var/cache/apt/archives# pip install --upgrade --ignore-installed requests --index-url=https://pypi.python.org/simple
Downloading/unpacking requests
  Downloading requests-2.18.4.tar.gz (126Kb): 126Kb downloaded
  Running setup.py egg_info for package requests

    warning: no files found matching 'NOTICE'
Downloading/unpacking chardet>=3.0.2,<3.1.0 (from requests)
  Downloading chardet-3.0.4.tar.gz (1.9Mb): 1.9Mb downloaded
  Running setup.py egg_info for package chardet

    warning: no files found matching 'requirements.txt'
Downloading/unpacking idna>=2.5,<2.7 (from requests)
  Downloading idna-2.6.tar.gz (135Kb): 135Kb downloaded
  Running setup.py egg_info for package idna

    warning: no previously-included files matching '*.pyc' found under directory 'tools'
    warning: no previously-included files matching '*.pyc' found under directory 'tests'
Downloading/unpacking urllib3>=1.21.1,<1.23 (from requests)
  Downloading urllib3-1.22.tar.gz (226Kb): 226Kb downloaded
  Running setup.py egg_info for package urllib3

    warning: no previously-included files matching '*' found under directory 'docs/_build'
Downloading/unpacking certifi>=2017.4.17 (from requests)
  Downloading certifi-2018.4.16.tar.gz (149Kb): 149Kb downloaded
  Running setup.py egg_info for package certifi

Installing collected packages: requests, chardet, idna, urllib3, certifi
  Found existing installation: requests 1.2.3
    Uninstalling requests:
      Successfully uninstalled requests
  Running setup.py install for requests

    warning: no files found matching 'NOTICE'
  Found existing installation: chardet 2.0.1
    Uninstalling chardet:
      Successfully uninstalled chardet
  Running setup.py install for chardet

    warning: no files found matching 'requirements.txt'
    Installing chardetect script to /usr/local/bin
  Running setup.py install for idna

    warning: no previously-included files matching '*.pyc' found under directory 'tools'
    warning: no previously-included files matching '*.pyc' found under directory 'tests'
  Found existing installation: urllib3 1.6
    Uninstalling urllib3:
      Successfully uninstalled urllib3
  Running setup.py install for urllib3

    warning: no previously-included files matching '*' found under directory 'docs/_build'
  Running setup.py install for certifi

Successfully installed requests chardet idna urllib3 certifi
Cleaning up...
说明:
-
request模块,目前仅有wechat告警有使用到,升级不会对存储节点中python lib带来额外影响。
4、安装configobj模块
shell
pip install configobj
5、使用html 报告
参考资料: https://pypi.org/project/nose-html-reporting/
安装命令:
shell
pip install nose-html-reporting
6、安装nose
存储节点系统安装好后自带nose,无需安装、升级。
7、修改nose_html_reporting/init.py
如果不修改,会报如下错误:
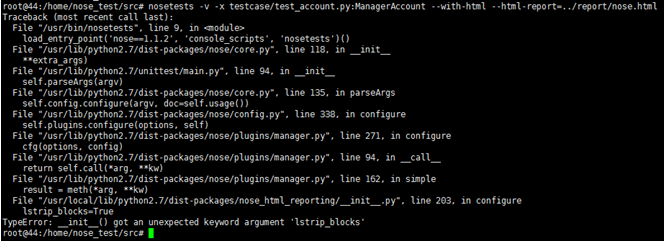
解决方法:
vi /usr/local/lib/python2.7/dist-packages/nose_html_reporting-0.2.3-py2.7.egg/nose_html_reporting/__init__.py
修改 /usr/local/lib/python2.7/dist-packages/nose_html_reporting-0.2.3-py2.7.egg/nose_html_reporting目录下__init__.py,
将203行 lstrip_blocks=True 注释掉,并删除掉产生的pyc文件。
shell
root@44:/home/nose_test/src# cd /usr/local/lib/python2.7/dist-packages/nose_html_reporting/
root@44:/usr/local/lib/python2.7/dist-packages/nose_html_reporting# rm __init__.pyc
说明:
-
修过__init__.py操作无需人工干预,run.py脚本中已经有修过动作。
8、安装nose-testconfig
shell
pip install nose-testconfig --index-url=https://pypi.python.org/simple
这个模块是nose的插件,用户用例执行时,接受用户指定的自定义循环执行用例的次数,必须安装。
9、安装关键字高亮plugin
参考资料
shell
https://gitee.com/walkingnine/colorunit
https://pypi.org/project/colorama/#files
需要安装如下这个包:
shell
colorama-0.3.9.tar.gz
walkingnine-colorunit.gz
说明:
-
安装上面安装包后,源码有问题,需要修改一些东西,这里是修改好了后,重新打了安装包。
特别说明:
-
测试用例中不需要添加下列步骤中内容,只要在nosetests执行用例的时候,使用–with-colorunit参数即可。
shell
import nose;
from colorunit import ColorUnit
  和:
if __name__ == '__main__':
    nose.main(addplugins = [ColorUnit()])
10、用例进度
参考资料
shell
https://github.com/erikrose/blessings
https://github.com/erikrose/nose-progressive
源码要求依赖nose 1.2.x,目前产品Ubuntu 14.04自带nose 版本是1.1.2,所以更改了源码版本要求,并重新打包,无需再次修过,直接安装python_3rd_lib目录下对应安装包即可。
11、pylint执行报错
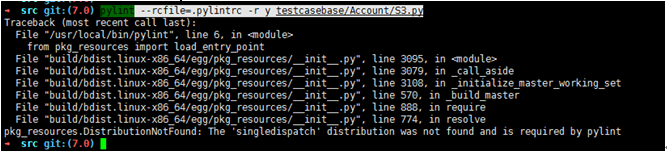
原因:
未安装pylint, 解决方法:
进入nose_framework/python_3rd_lib/,解压pylint-1.7.6.tar.gz,进入解压缩目录,重新进行pylint的安装:
shell
cd pylint-1.7.6
python setup.py install
nose的日常使用
1、常用参数介绍
shell
-v : debug模式,看到具体执行情况,推荐大家执行时用这个选项。
-s : nose会捕获标准输出,调试的print代码默认不会打印。
   nosetest -s 可打开output输出,否则全部通过时不打印stdout。

-x : 一旦case失败立即停止,不执行后续case
-w : 指定一个目录运行测试。目录可以是相对路径或绝对路径.
--tests : 默认情况下,nosetests会执行所有的测试用例,若想单独只执行一个case,
       执行nosetest --tests 后跟要测试的文件(nosetests后面直接跟文件名,其实也可以
       直接运行该case。
--collect-only :  nosetests --collect-only -v,不运行程序,只是搜集并输出各个case的名称。
--processes : 需要安装插件,--processes=20, 并发执行用例,解决用例总体执行时间
--with-progressive: 需要安装插件,实时展示用例执行进度
--with-colorunit : 需要安装插件,用例执行结果展示的stdout,以颜色高亮展示
--with-html : 需要安装插件,且需要和--html-report结合起来使用。这个插件,生成HTML
             格式的测试报告,该测试报告,是以report2.jinja2作为模板。 如果要指定自
             定义模板,可以使用--html-report-template参数,示例如下:
--with-colorunit --with-html --html-report=../report/sds.html --html-report-template=/usr/local/lib/python2.7/dist-packages/nose_html_reporting/templates/report2.jinja2

--tc : 需要安装插件,指定用例运行次数,目前参数名称写死:runs,示例:--tc=runs:20
2、工具nose.tools的使用
打标签
打标签的好处是,可以执行带有某些特定tag的用例,这里用tag,是借用了RF的概念,示例如下:
shell
from nose.plugins.attrib import attr
@attr('slow')
def test_big_download():
    pass

@attr(speed='slow')
def test_big_download():
    pass
执行的时候,带上 -a参数:
nosetests -a '!slow'
是否测试
测试脚本中引入:from nose.tools import nottest,istest
1)不测试的方法:方法名上加修饰器@nottest;
2)指定为测试方法:方法名上加修饰器@istest(方法名无需符合命名规则)
断言
shell
>>> from nose import tools
>>> dir(tools)
['TimeExpired', '__all__', '__builtins__', '__doc__', '__file__', '__name__', '__package__', '__path__', 'assert_almost_equal', 'assert_almost_equals', 'assert_dict_contains_subset', 'assert_dict_equal', 'assert_equal', 'assert_equals', 'assert_false', 'assert_greater', 'assert_greater_equal', 'assert_in', 'assert_is', 'assert_is_instance', 'assert_is_none', 'assert_is_not', 'assert_is_not_none', 'assert_items_equal', 'assert_less', 'assert_less_equal', 'assert_list_equal', 'assert_multi_line_equal', 'assert_not_almost_equal', 'assert_not_almost_equals', 'assert_not_equal', 'assert_not_equals', 'assert_not_in', 'assert_not_is_instance', 'assert_not_regexp_matches', 'assert_raises', 'assert_raises_regexp', 'assert_regexp_matches', 'assert_sequence_equal', 'assert_set_equal', 'assert_true', 'assert_tuple_equal', 'eq_', 'istest', 'make_decorator', 'nontrivial', 'nontrivial_all', 'nottest', 'ok_', 'raises', 'set_trace', 'timed', 'trivial', 'trivial_all', 'with_setup']
>>>
nose setUP/tearDown 介绍
nose里面有多种可用的setup和teardown
1、Package级别的
写在init.py文件里包装
python
def setup_package():
    pass

def teardown_package():
    pass
2、Module级别的
python
def setup_module():
    pass

def teardown_module():
    pass
3、Class级别的
包装class,所以只执行一次
python
root@Scaler03:~# cat class_method.py
class TestClass():
    @classmethod
    def setup_class(cls):
        print "class method setup"

    @classmethod
    def teardown_class(cls):
        print "class method teardown"


    def test1(self):
        print "
最低0.47元/天 解锁文章


 795
795

 被折叠的 条评论
为什么被折叠?
被折叠的 条评论
为什么被折叠?
 到【灌水乐园】发言


