


自定义button的作用
有时候写项目会需要有label和imageView等等很多控件加在一起使用,我之前用很多个UI控件拼接使用,但是总感觉有点low,不够专业,就开始学习自定义button
再啰嗦一句:UIButton默认的布局是左侧image,右侧title,如果想要改变image与title的frame,直接设置是不会有效果的。可以通过titleEdgeInsets、imageEdgeInsets分别修改image与title的位置。也可以通过自定义button
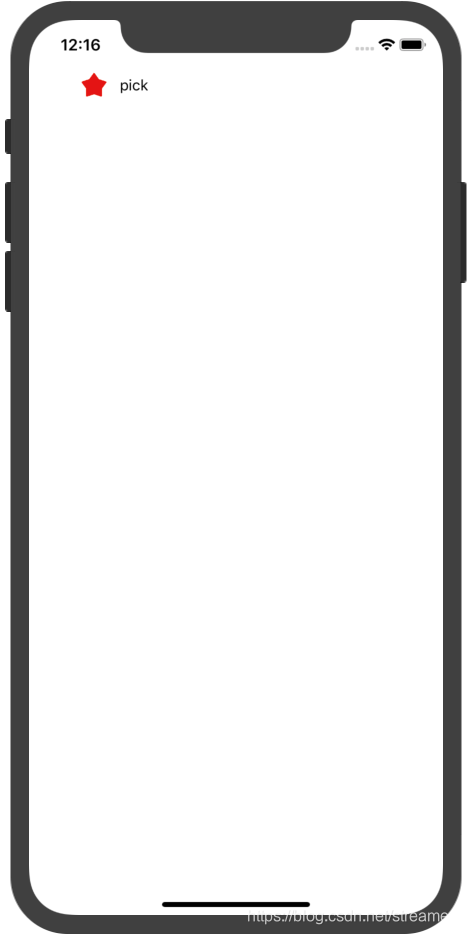
效果图
此处我只放了一个button,若在cell或是多个button相同的情况下使用会很方便
代码实现
首先自定义button
@implementation TAYButton

- (instancetype)initWithFrame:(CGRect)frame
{
    self = [super initWithFrame:frame];
    if (self) {
        self.titleLabel.font = [UIFont systemFontOfSize:15];
        self.titleLabel.textAlignment = NSTextAlignmentCenter;

        [self setTitleColor:[UIColor blackColor] forState:UIControlStateNormal];
    }
    return self;
}

- (CGRect)imageRectForContentRect:(CGRect)contentRect {
    CGFloat imageX = 0;
    CGFloat imageY = 0;
    CGFloat imageW = 30;
    CGFloat imageH = 30;
    return CGRectMake(imageX, imageY, imageW, imageH);
}

- (CGRect)titleRectForContentRect:(CGRect)contentRect {
    CGFloat titleX = 30;
    CGFloat titleY = 0;
    CGFloat titleW = 50;
    CGFloat titleH = 30;
    return CGRectMake(titleX, titleY, titleW, titleH);
}
然后在项目中使用:
- (void)viewDidLoad {
    [super viewDidLoad];
    // Do any additional setup after loading the view.
    TAYButton *tayButton = [[TAYButton alloc] initWithFrame:CGRectMake(50, 50, 100, 150)];
    [tayButton setTitle:@"pick" forState:UIControlStateNormal];
    [tayButton setImage:[UIImage imageNamed:@"pick.png"] forState:UIControlStateNormal];
    [self.view addSubview:tayButton];

}
使用函数
苹果给我们提供了4个API
- (CGRect)backgroundRectForBounds:(CGRect)bounds;
- (CGRect)contentRectForBounds:(CGRect)bounds;
- (CGRect)titleRectForContentRect:(CGRect)contentRect;
- (CGRect)imageRectForContentRect:(CGRect)contentRect;
重写button的title
- (CGRect)titleRectForContentRect:(CGRect)contentRect;
重写button的image
- (CGRect)imageRectForContentRect:(CGRect)contentRect;
这里的contentRect就是你当前在使用自定义Button的控件的width和height。重写这个方法,可以让button的控件变换位置和改变大小。
其他两个我不经常用到,也就不班门弄斧了,见谅。


 400
400

 被折叠的 条评论
为什么被折叠?
被折叠的 条评论
为什么被折叠?
 到【灌水乐园】发言


