


 本文详细介绍了在Android自定义View中实现文字精确垂直与水平居中的方法,包括如何利用Paint.FontMetricsInt来获取文字基线,并通过计算使文字在View内居中显示。
本博客只要没有注明“转”,那么均为原创,转贴请注明本博客链接链接
我们在自定义View中有的时候会想自己绘制文字,自己绘制文字的时候,我们通常希望把文字精确定位,文字居中(水平、垂直)是普遍的需求,所以这里就以文字居中为例,看一下android中的文字应该如何绘制,它与Java又有什么区别。
先来看看我们的目标,见下图
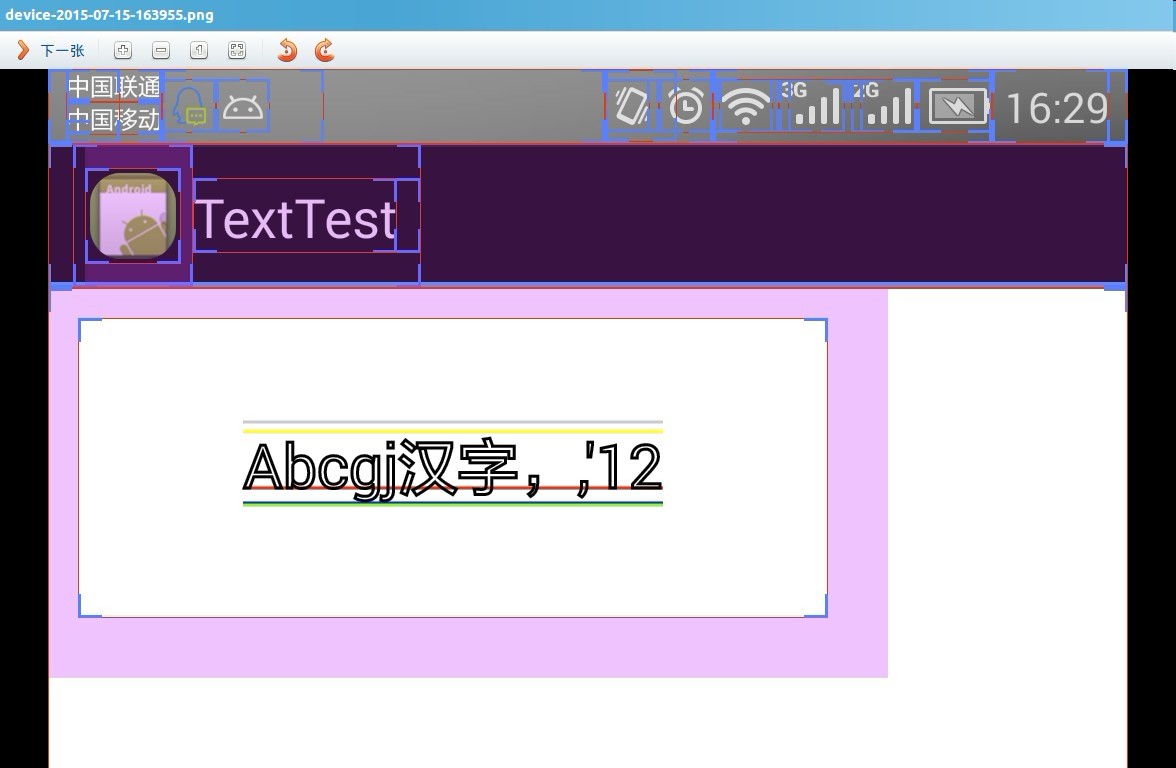
上图是我打开了“显示布局边界”后截的图,所有会有好多框框。
仔细观察上图文字区域,我们会发现文字区域中有5条颜色不同的线。按着从上到下的顺序,他们的名字分别是:
top:浅灰色
ascent:黄色
baseline:红色
descent:蓝色
bottom:绿色
这5条线到底是什么?android开发文档中已经进行了解释。
| top | The maximum distance above the baseline for the tallest glyph in the font at a given text size. |
| ascent | The recommended distance above the baseline for singled spaced text. |
| leading | The recommended additional space to add between lines of text. |
| descent | The recommended distance below the baseline for singled spaced text. |
| bottom | The maximum distance below the baseline for the lowest glyph in the font at a given text size. |
我们先稍微跑一下题
如果你尝试过将两个TextView上下排列,没有margin和padding,那么你一定会发现,两个TextView文字之间依然是有空隙的。首先我们需要设置includeFontPadding为false!但是依然有空隙,这时的空隙就是由top与ascent之间的空隙和bottom与descent直接的空隙造成的了。
那5条线的位置是由使用的字体和字号决定的。Paint提供了获取上面5条线位置的方法。
一般情况下,我们使用的字符是在ascent与descent之间的,所以我们让ascent与descent之间的部分相对我们的View居中即可。
以baseline为基准,向上为负,向下为正。ascent为负数,descent为正数。
Canvas中的drawText中的总坐标是baseline,所以我们这里要先算出baseline的位置才行。
baseline = (mHeight - (mFontMetricsInt.descent - mFontMetricsInt.ascent)) / 2 - mFontMetricsInt.ascent
使得ascent到View的是上边距与descent到View下边距距离一致即可,此段距离加上ascent的绝对值(-ascent)即为baseline的位置
private void init() {
    mPaint = new Paint(Paint.ANTI_ALIAS_FLAG);
    mPaint.setStrokeWidth(3);
    mPaint.setTextSize(60);
    mPaint.setTextAlign(Paint.Align.CENTER);
    mPaint.setStyle(Paint.Style.STROKE);
    mFontMetricsInt = mPaint.getFontMetricsInt();
}

@Override
public void onDraw(Canvas canvas) {
    int x;
    if (mPaint.getTextAlign() == Paint.Align.LEFT) { //左
        x = mWidth / 2 - (int) (mStringWidth / 2);
    } else if (mPaint.getTextAlign() == Paint.Align.CENTER) { //中
        x = mWidth / 2;
    } else { //右
        x = mWidth / 2 + (int) (mStringWidth / 2);
    }

    int xFrom = mWidth / 2 - (int) (mStringWidth / 2);
    int xTo = mWidth / 2 + (int) (mStringWidth / 2);

    // baseline = (mHeight - (mFontMetricsInt.descent - mFontMetricsInt.ascent)) / 2 - mFontMetricsInt.ascent
    // baseline = (mHeight - mFontMetricsInt.ascent - mFontMetricsInt.descent) / 2
    int y = (mHeight - mFontMetricsInt.ascent - mFontMetricsInt.descent) / 2;
    Log.d(TAG, "ascent: " + mFontMetricsInt.ascent);
    Log.d(TAG, "descent: " + mFontMetricsInt.descent);
    Log.d(TAG, "top: " + mFontMetricsInt.top);
    Log.d(TAG, "bottom: " + mFontMetricsInt.bottom);
    Log.d(TAG, "baseline: " + y);

    // baseline
    mPaint.setColor(Color.RED);
    canvas.drawLine(xFrom, y, xTo, y, mPaint);
    // ascent
    mPaint.setColor(Color.YELLOW);
    canvas.drawLine(xFrom, y + mFontMetricsInt.ascent, xTo, y + mFontMetricsInt.ascent, mPaint);
    // descent
    mPaint.setColor(Color.BLUE);
    canvas.drawLine(xFrom, y + mFontMetricsInt.descent, xTo, y + mFontMetricsInt.descent, mPaint);
    // top
    mPaint.setColor(Color.LTGRAY);
    canvas.drawLine(xFrom, y + mFontMetricsInt.top, xTo, y + mFontMetricsInt.top, mPaint);
    // bottom
    mPaint.setColor(Color.GREEN);
    canvas.drawLine(xFrom, y + mFontMetricsInt.bottom, xTo, y + mFontMetricsInt.bottom, mPaint);

    mPaint.setColor(Color.BLACK);
    canvas.drawText(TEST_STRING, x, y, mPaint);
}

@Override
protected void onSizeChanged(int w, int h, int oldw, int oldh) {
    super.onSizeChanged(w, h, oldw, oldh);
    mWidth = w;
    mHeight = h;
}

private int mWidth;
private int mHeight;
private float mStringWidth;

private float measureText() {
    mStringWidth = mPaint.measureText(TEST_STRING);
    return mStringWidth;
}注意:上面的那几条线的位置和字体是有关的,比如,当你使用“方正姚体”的时候,会发现top和ascent重合了
private void init() {
    mTf = Typeface.createFromAsset(mContext.getAssets(), "fzyt.ttf");
    mPaint = new Paint(Paint.ANTI_ALIAS_FLAG);
    mPaint.setTypeface(mTf);
    mPaint.setStrokeWidth(3);
    mPaint.setTextSize(60);
    mPaint.setTextAlign(Paint.Align.CENTER);
    mPaint.setStyle(Paint.Style.STROKE);  // 画空心矩形
    mFontMetricsInt = mPaint.getFontMetricsInt();
    Log.d(TAG, "measureText: " + measureText());
}
垂直居中解决了,水平居中就容易了。因为……可以在Paint中直接设置。
mPaint.setTextAlign(Paint.Align.CENTER);当然,这里的对其方式只有左中右,即使这里没有设置居中,我们也是可以手动居中文字的。
int x;
if (mPaint.getTextAlign() == Paint.Align.LEFT) { //左
    x = mWidth / 2 - (int) (mStringWidth / 2);
} else if (mPaint.getTextAlign() == Paint.Align.CENTER) { //中
    x = mWidth / 2;
} else { //右
    x = mWidth / 2 + (int) (mStringWidth / 2);
}
横纵坐标计算好了之后,我们就可以drawText了。
canvas.drawText(TEST_STRING, x, y, mPaint);至此,问题全部解决,我们知道文字上面的那几条线的位置,就能随意放置我们的文字了。
绘制数字的时候,1明显比4瘦,但是我们可能会得到他们宽度相同的结果,也就没有办法“真正的居中”了。
附上layout文件,如果你设置了padding,记得把padding也计算进去。
<?xml version="1.0" encoding="utf-8"?>
<LinearLayout xmlns:android="http://schemas.android.com/apk/res/android"
              android:orientation="vertical"
              android:layout_width="fill_parent"
              android:layout_height="fill_parent"
        android:background="#FFFFFF">
    <com.example.TextTest.TextView
            android:layout_width="250dip"
            android:layout_height="100dip"
            android:layout_marginTop="10dip"
            android:layout_marginBottom="20dip"
            android:layout_marginLeft="10dip"
            android:layout_marginRight="20dip"/>
</LinearLayout>
最后我们来看看Java中的字体和Android的区别。
Java中字体的概念在这里:Font Concepts。可以看到,这里并没有Android中的top和bottom的概念。
在维基百科中也有baseline相关解释。这里也是没有提到Android中的top与bottom的概念
转贴请保留以下链接
本人blog地址


 2万+
2万+

 被折叠的 条评论
为什么被折叠?
被折叠的 条评论
为什么被折叠?
 到【灌水乐园】发言


