案例一:实现点击按钮 矩形宽度*2的功能
// 实现点击按钮 矩形宽度*2的功能
import QtQuick 2.12
import QtQuick.Window 2.12

Window {
    visible: true
    width: 640
    height: 480
    title: qsTr("Hello World")
    color: "white"

    Rectangle {
        id: myRectangle
        width: 100
        height: 100
        color: "blue"
        // 创建一个槽函数
        function handleClicked() {
            myRectangle.width *= 2
        }
    }

    // 信号连接
    MouseArea {
        anchors.fill: parent
        onClicked: {
            myRectangle.handleClicked()
        }
    }


}
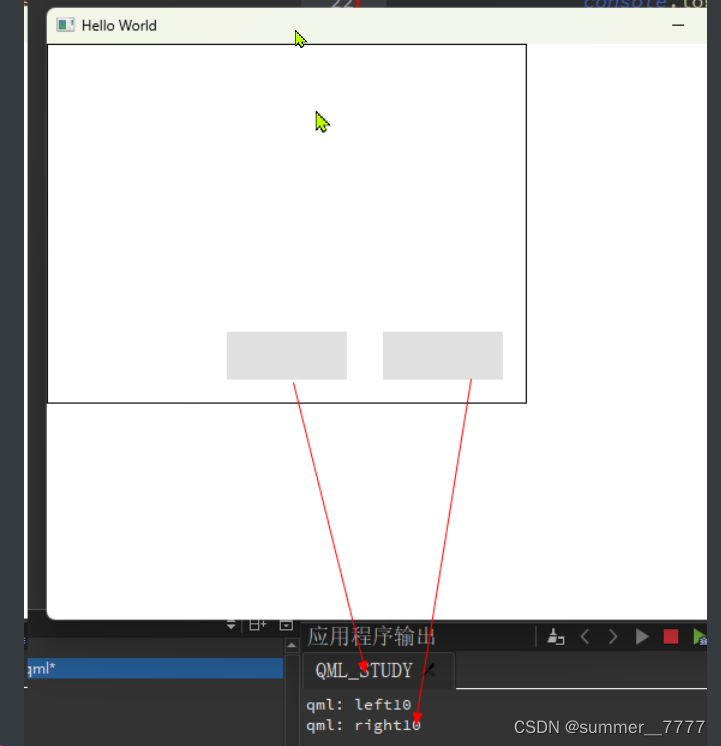
案例二:左按钮触发left 10 信号,右按钮触发right 10 信号
// main.qml
import QtQuick 2.12
import QtQuick.Window 2.12
import QtQuick.Controls 2.12

Window {
    visible: true
    width: 640
    height: 480
    title: qsTr("Hello World")
    color: "white"

    // 写一个组件
    Component{
        id: com
        Button{
            // 定义一个信号
            signal btnSig(int value)
            // 点击事件
            onClicked: {
                // console.log("123")
                // 将信号发送出去
                btnSig(10)

            }
        }
    }

    MyComponent{
        com1: com
        com2: com
    }
}
// MyComponent.qml
import QtQuick 2.0
import QtQuick.Controls 2.12

Rectangle {
    width: 400
    height: 300
    property Component com1
    property Component com2
    border.color: "black"

    Loader{
        id: loader1
        sourceComponent: com1
        anchors.bottom: parent.bottom
        anchors.bottomMargin: 20
        anchors.right: parent.right
        anchors.rightMargin: 20
        // 处理signal btnSig(int value)信号
        Connections{
            target: loader1.item
            function onBtnSig(value){
                console.log("right:"+value)
            }
        }
    }

    Loader{
        id: loader2
        sourceComponent: com2
        anchors.bottom: parent.bottom
        anchors.bottomMargin: 20
        anchors.right: parent.right
        anchors.rightMargin: 150
        // 处理signal btnSig(int value)信号
        Connections{
            target: loader2.item
            function onBtnSig(value){
                console.log("left:"+value)
            }
        }
    }

}
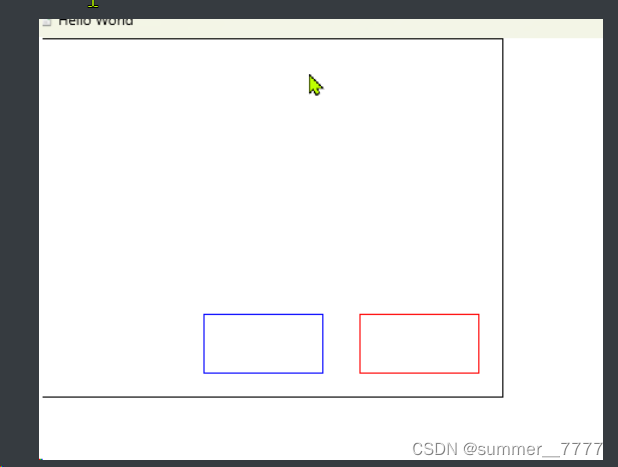
案例三:键盘操作焦点
// main.qml
import QtQuick 2.12
import QtQuick.Window 2.12
import QtQuick.Controls 2.12

Window {
    visible: true
    width: 640
    height: 480
    title: qsTr("Hello World")
    color: "white"

    // 写一个组件
    Component{
        id: com
        // ***********案例三
        Button{
            id: btn
            width: 100
            height: 50
            background: Rectangle{
                anchors.fill: parent
                border.color: btn.activeFocus?"red":"blue"
            }

            // *****发送一个信号
           signal leftBtnPressed()
            // ******点击键盘左键
           Keys.onLeftPressed: {
                leftBtnPressed()
           }
        }
    }

    MyComponent{
        com1: com
        com2: com
    }
}
// MyComponent.qml
import QtQuick 2.0
import QtQuick.Controls 2.12

Rectangle {
    width: 400
    height: 300
    property Component com1
    property Component com2
    border.color: "black"

    Loader{
        id: loaderRight
        sourceComponent: com1
        anchors.bottom: parent.bottom
        anchors.bottomMargin: 20
        anchors.right: parent.right
        anchors.rightMargin: 20
        // 处理signal leftBtnPressed()信号
        Connections{
            target: loaderRight.item
            function onLeftBtnPressed(){
                loaderLeft.item.focus = ture
                loaderLeft.item.forceActiveFocus()
            }
        }
        // 默认焦点
        Component.onCompleted: {
            loaderRight.item.focus = ture
            loaderRight.item.forceActiveFocus()
        }
    }

    Loader{
        id: loaderLeft
        sourceComponent: com2
        anchors.bottom: parent.bottom
        anchors.bottomMargin: 20
        anchors.right: parent.right
        anchors.rightMargin: 150
    }

}
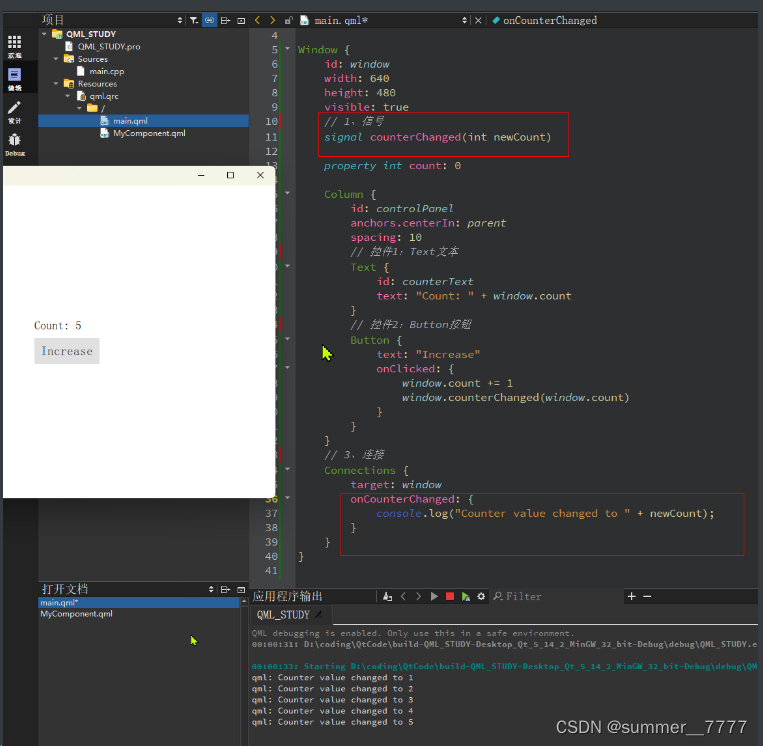
案例4:
import QtQuick 2.12
import QtQuick.Window 2.12
import QtQuick.Controls 2.12

Window {
    id: window
    width: 640
    height: 480
    visible: true
    // 1、信号
    signal counterChanged(int newCount)

    property int count: 0

    Column {
        id: controlPanel
        anchors.centerIn: parent
        spacing: 10
        // 控件1:Text文本
        Text {
            id: counterText
            text: "Count: " + window.count
        }
        // 控件2:Button按钮
        Button {
            text: "Increase"
            onClicked: {
                window.count += 1
                window.counterChanged(window.count)
            }
        }
    }
    // 3、连接
    Connections {
        target: window
        onCounterChanged: {
            console.log("Counter value changed to " + newCount);
        }
    }
}


 581
581


 被折叠的 条评论
为什么被折叠?
被折叠的 条评论
为什么被折叠?
 到【灌水乐园】发言


