最近在看进程间通信方面的东西,在这里粗略的的记录一下自己看到的东西。
在android中实现进程间通信用的都是Binder机制,Binder:粘贴剂,个人感觉很形象,将各个进程粘贴起来,实现进程之间数据的交互,拒绝了进程间的老死不相往来。本来进程就是互斥的,为的就是保持进程的纯净和安全,避免被其它进程恶意篡改数据。但是又不能不做进程间的交互,因此,Binder就来起作用了。
我暂时对Binder的底层实现没有去看,从其它地方盗了一张图,说明了Server、Client、ServiceManager、Binder之间的关系
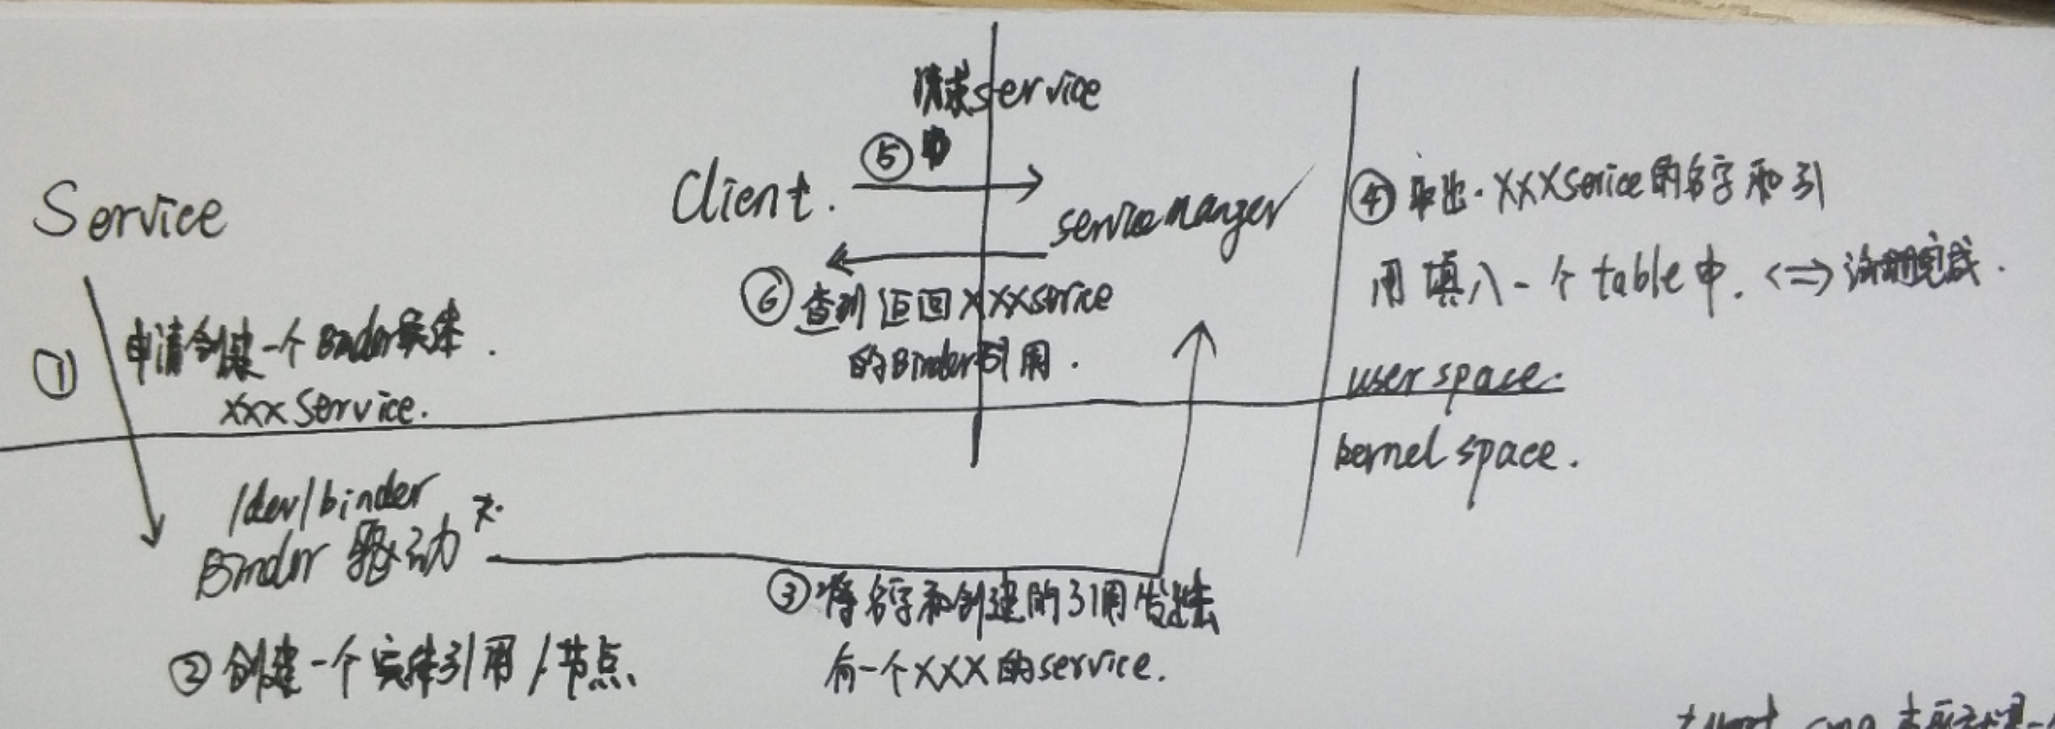
下面是我自己画的一张他们之间的关系图(写的字贼丑,请不要在意这些细节 )
)
流程分析:
1、Service生成时(可能用词不太恰当),Service在new的时候,需要重写onBind方法,在这里需要返回一个IBinder对象
2、根据源码ServiceManager.addService(String name, IBinder service),最后会在/dev/binder,Binder驱动(内核)中创建一个Binder的引用
3、将这个Binder引用(包含一些其他的数据)发给ServiceManager
4、SMGR接到之后,从数据中读取到Service的名字和引用,并添加到一张表中
------------------Service在这里就算创建成功了,接下来就是Client来使用Service
5、Client来bindService,其实就是给SMGR发送消息,我要绑定哪个哪个Service
6,SMGR从table中进行查询,查到了Client请求的Service,将Binder的引用(注意是Binder的引用)返回给Client。
这样Client就持有了Service的Binder的引用,这样,Client这边对Binder的引用的操作,就会转嫁到实际Binder实体中。
----结束。
仅仅从这里来看,并不是很明白,我们来通过代码来see一下这个过程是怎么做的。(底子有限,我只能从上层来分析这块的内容,底层怎么做的,暂时还看不明白)
根据android的设定,我们需要一个AIDL文件来串联起来 Server 和 Client
ITest.aidl // 我在这里把包名也写出来了,包名在后面会用到的,在这里先mark一下
package com.example.lenovo.testbinder;

import com.example.lenovo.bean.Student;

interface ITest {

    int getAge(int num);

    String getName();

    Student getStudent();
}TestBinder.java
public class TestBinder extends ITest.Stub {
    @Override
    public int getAge(int num) throws RemoteException {
        return 3 + 10;
    }

    @Override
    public String getName() throws RemoteException {
        return "test string";
    }

    @Override
    public Student getStudent() throws RemoteException {
        return new Student("zhangsan", 8);
    }

    public static IBinder instance() {
        return new TestBinder();
    }
}
接下来就是Service的内容了,(Service的注册,manifest文件什么的我就不写了)
MainService.java
public class MainService extends Service {

    private static final String TAG = "MainService";

    public IBinder onBind(Intent intent) {
        Log.e(TAG, "onBind");
        return TestBinder.instance();
    }
}
-------------------底层Kernel中怎么做的,我暂时不清楚,就简单的这样理解:在/dev/binder驱动中,有了一个TestBinder的应用,该引用指向了具体的TestBinder实体类,对这个引用做的操作(getName(),getAge(),getStudent())都会操作到实体类中。
Client端:------------------在这里就是另外一个应用了,它使用的是另外一个进程,
MainActivity.java
public class MainActivity extends AppCompatActivity {
    private static final String TAG = "MainActivity";
    ITest mTestBinder;

    @Override
    protected void onCreate(Bundle savedInstanceState) {
        super.onCreate(savedInstanceState);
        setContentView(R.layout.activity_main);
        initService();
    }

    private void initService() {
        Intent intent = new Intent("com.example.lenovo.TEST");
        intent.setPackage("com.example.lenovo.testbinder");
        Context appContext = getApplicationContext();
        appContext.startService(intent);
        bindService(intent, mServiceConnection, 0);
    }

    ServiceConnection mServiceConnection = new ServiceConnection() {
        @Override
        public void onServiceConnected(ComponentName name, IBinder service) {
            // 借助AIDL文件可以直接调用aidl中的方法,aidl中生成的内容其实和下面的内容一样
            mTestBinder = ITest.Stub.asInterface(service);
            try {
                Log.e(TAG, "" + mTestBinder.getName());
                Log.e(TAG, "" + mTestBinder.getAge(3));
                Log.e(TAG, "" + mTestBinder.getStudent());
            } catch (RemoteException e) {
                e.printStackTrace();
            }
        }

        @Override
        public void onServiceDisconnected(ComponentName name) {

        }
    };
}这样,在Client端就可以使用服务端的TestBinder了,并且得到返回值。
以上就是android提供的aidl的使用,简化了很多的步骤,只需要:服务端,继承ITest.Stub,并实现ITest.aidl中的方法。客户端,绑定服务,使用ITest.Stub.asInteterface(sevice)就可以得到ITest的binder对象,接下来就是数据传递操作。
下一篇文章,我们来看看aidl文件,在android studio中到底是怎么搞的,怎么就可以直接使用,连上了Server和Client。


 4402
4402

 被折叠的 条评论
为什么被折叠?


