


前言
UIBezierPath是UIKit中的一个关于图形绘制的类,是通过Quartz 2D也就是CG(Core Graphics)CGPathRef的封装得到的,从高级特性支持来看不及CG。
UIBezierPath类可以绘制矩形、圆形、直线、曲线以及它们的组合图形。
UIBezierPath对象
对象创建方法
// 创建基本路径
+ (instancetype)bezierPath;
// 创建矩形路径
+ (instancetype)bezierPathWithRect:(CGRect)rect;
// 创建椭圆路径
+ (instancetype)bezierPathWithOvalInRect:(CGRect)rect;
// 创建圆角矩形
+ (instancetype)bezierPathWithRoundedRect:(CGRect)rect cornerRadius:(CGFloat)cornerRadius; // rounds all corners with the same horizontal and vertical radius
// 创建指定位置圆角的矩形路径
+ (instancetype)bezierPathWithRoundedRect:(CGRect)rect byRoundingCorners:(UIRectCorner)corners cornerRadii:(CGSize)cornerRadii;
// 创建弧线路径
+ (instancetype)bezierPathWithArcCenter:(CGPoint)center radius:(CGFloat)radius startAngle:(CGFloat)startAngle endAngle:(CGFloat)endAngle clockwise:(BOOL)clockwise;
// 通过CGPath创建
+ (instancetype)bezierPathWithCGPath:(CGPathRef)CGPath;
相关属性和方法
- 属性
// 与之对应的CGPath
@property(nonatomic) CGPathRef CGPath;
- (CGPathRef)CGPath NS_RETURNS_INNER_POINTER CF_RETURNS_NOT_RETAINED;
// 是否为空
@property(readonly,getter=isEmpty) BOOL empty;
// 整个路径相对于原点的位置及宽高
@property(nonatomic,readonly) CGRect bounds;
// 当前画笔位置
@property(nonatomic,readonly) CGPoint currentPoint;// 线宽
@property(nonatomic) CGFloat lineWidth;
// 终点类型
@property(nonatomic) CGLineCap lineCapStyle;
typedef CF_ENUM(int32_t, CGLineCap) {
kCGLineCapButt,
kCGLineCapRound,
kCGLineCapSquare
};
// 交叉点的类型
@property(nonatomic) CGLineJoin lineJoinStyle;
typedef CF_ENUM(int32_t, CGLineJoin) {
kCGLineJoinMiter,
kCGLineJoinRound,
kCGLineJoinBevel
};
// 两条线交汇处内角和外角之间的最大距离,需要交叉点类型为kCGLineJoinMiter是生效,最大限制为10
@property(nonatomic) CGFloat miterLimit;
// 个人理解为绘线的精细程度,默认为0.6,数值越大,需要处理的时间越长
@property(nonatomic) CGFloat flatness;
// 决定使用even-odd或者non-zero规则
@property(nonatomic) BOOL usesEvenOddFillRule;- 方法
// 反方向绘制path
- (UIBezierPath *)bezierPathByReversingPath;// 设置画笔起始点
- (void)moveToPoint:(CGPoint)point;// 从当前点到指定点绘制直线
- (void)addLineToPoint:(CGPoint)point;// 添加弧线
- (void)addArcWithCenter:(CGPoint)center radius:(CGFloat)radius startAngle:(CGFloat)startAngle endAngle:(CGFloat)endAngle clockwise:(BOOL)clockwise NS_AVAILABLE_IOS(4_0);
// center弧线圆心坐标 radius弧线半径 startAngle弧线起始角度 endAngle弧线结束角度 clockwise是否顺时针绘制
// 添加贝塞尔曲线
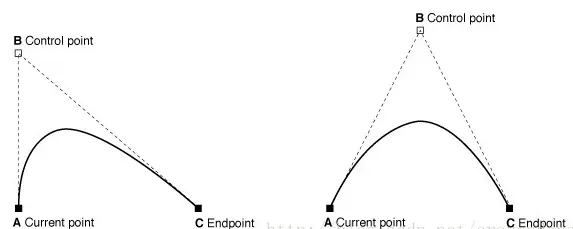
- (void)addQuadCurveToPoint:(CGPoint)endPoint controlPoint:(CGPoint)controlPoint;
// endPoint终点 controlPoint控制点
- (void)addCurveToPoint:(CGPoint)endPoint controlPoint1:(CGPoint)controlPoint1 controlPoint2:(CGPoint)controlPoint2;
// endPoint终点 controlPoint1、controlPoint2控制点
// 移除所有的点,删除所有的subPath
- (void)removeAllPoints;// 将bezierPath添加到当前path
- (void)appendPath:(UIBezierPath *)bezierPath;// 填充
- (void)fill;// 路径绘制
- (void)stroke;// 在这以后的图形绘制超出当前路径范围则不可见
- (void)addClip;直线
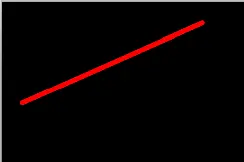
- (void)drawRect:(CGRect)rect{

    [[UIColor redColor] set];

    UIBezierPath* path = [UIBezierPath bezierPath];

    path.lineWidth     = 5.f;
    path.lineCapStyle  = kCGLineCapRound;
    path.lineJoinStyle = kCGLineCapRound;

    // 起点
    [path moveToPoint:CGPointMake(20, 100)];

    // 绘制线条
    [path addLineToPoint:CGPointMake(200, 20)];

    [path stroke];
}
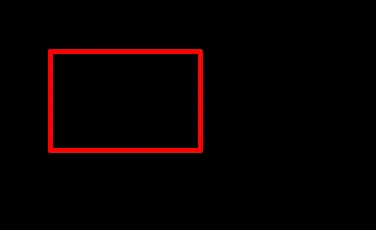
矩形
- 直角矩形
- (void)drawRect:(CGRect)rect{

    [[UIColor redColor] set];
    // 创建矩形路径对象
    UIBezierPath * path = [UIBezierPath bezierPathWithRect:CGRectMake(50, 50, 150, 100)];

    path.lineWidth     = 5.f;
    path.lineCapStyle  = kCGLineCapRound;
    path.lineJoinStyle = kCGLineCapRound;

    [path stroke];
}
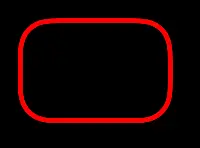
- 圆角矩形
- (void)drawRect:(CGRect)rect{

    [[UIColor redColor] set];
    // 创建圆角矩形路径对象
    UIBezierPath* path = [UIBezierPath bezierPathWithRoundedRect:CGRectMake(20, 20, 150, 100) cornerRadius:30]; // 圆角半径为30

    path.lineWidth     = 5.f;
    path.lineCapStyle  = kCGLineCapRound;
    path.lineJoinStyle = kCGLineCapRound;

    [path stroke];
}
- 指定位置圆角矩形
- (void)drawRect:(CGRect)rect{

    [[UIColor redColor] set];

    UIBezierPath* path = [UIBezierPath bezierPathWithRoundedRect:CGRectMake(20, 20, 150, 100) byRoundingCorners:UIRectCornerTopLeft cornerRadii:CGSizeMake(30, 30)];

    path.lineWidth     = 5.f;
    path.lineCapStyle  = kCGLineCapRound;
    path.lineJoinStyle = kCGLineCapRound;

    [path stroke];
}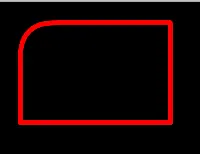
corners:圆角位置 cornerRadii:圆角大小
typedef NS_OPTIONS(NSUInteger, UIRectCorner) {
    UIRectCornerTopLeft     = 1 << 0,
    UIRectCornerTopRight    = 1 << 1,
    UIRectCornerBottomLeft  = 1 << 2,
    UIRectCornerBottomRight = 1 << 3,
    UIRectCornerAllCorners  = ~0UL
};
圆形和椭圆形
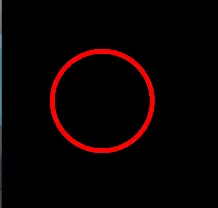
- 圆形
- (void)drawRect:(CGRect)rect{

    [[UIColor redColor] set];
    // 创建圆形路径对象
    UIBezierPath * path = [UIBezierPath bezierPathWithOvalInRect:CGRectMake(50, 50, 100, 100)];

    path.lineWidth     = 5.f;
    path.lineCapStyle  = kCGLineCapRound;
    path.lineJoinStyle = kCGLineCapRound;

    [path stroke];
}
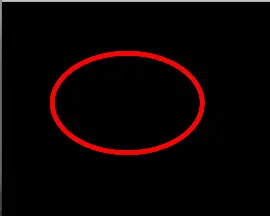
- 椭圆形
- (void)drawRect:(CGRect)rect{

    [[UIColor redColor] set];
    // 创建椭圆形路径对象
    UIBezierPath * path = [UIBezierPath bezierPathWithOvalInRect:CGRectMake(50, 50, 100, 100)];

    path.lineWidth     = 5.f;
    path.lineCapStyle  = kCGLineCapRound;
    path.lineJoinStyle = kCGLineCapRound;

    [path stroke];
}
曲线
- 弧线
- (void)drawRect:(CGRect)rect{

    [[UIColor redColor] set];
    // 创建弧线路径对象
    UIBezierPath* path = [UIBezierPath bezierPathWithArcCenter:CGPointMake(100, 100)
                                                         radius:70
                                                     startAngle:3.1415926
                                                       endAngle:3.1415926 *3/2
                                                      clockwise:YES];

    path.lineWidth     = 5.f;
    path.lineCapStyle  = kCGLineCapRound;
    path.lineJoinStyle = kCGLineCapRound;

    [path stroke];
}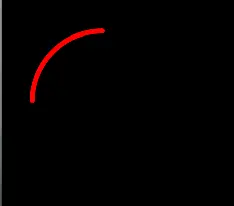
center:弧线圆心坐标
radius:弧线半径
startAngle:弧线起始角度
endAngle:弧线结束角度
clockwise:是否顺时针绘制
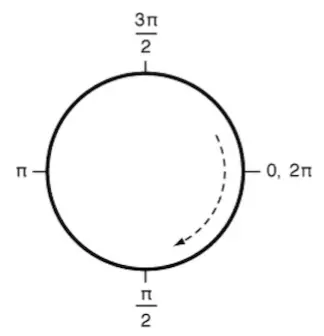
默认坐标系统中的角度值
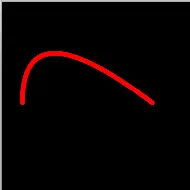
- 贝塞尔曲线1
- (void)drawRect:(CGRect)rect{

    [[UIColor redColor] set];

    UIBezierPath* path = [UIBezierPath bezierPath];

    path.lineWidth     = 5.f;
    path.lineCapStyle  = kCGLineCapRound;
    path.lineJoinStyle = kCGLineCapRound;

    [path moveToPoint:CGPointMake(20, 100)];
    // 给定终点和控制点绘制贝塞尔曲线
    [path addQuadCurveToPoint:CGPointMake(150, 100) controlPoint:CGPointMake(20, 0)];

    [path stroke];
}
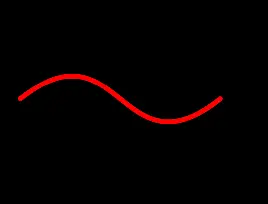
- 贝塞尔曲线2
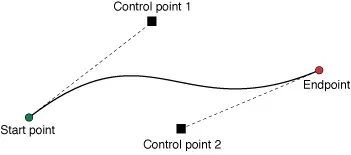
- (void)drawRect:(CGRect)rect{

    [[UIColor redColor] set];

    UIBezierPath* path = [UIBezierPath bezierPath];

    path.lineWidth     = 5.f;
    path.lineCapStyle  = kCGLineCapRound;
    path.lineJoinStyle = kCGLineCapRound;

    [path moveToPoint:CGPointMake(20, 100)];
    // 给定终点和两个控制点绘制贝塞尔曲线
    [path addCurveToPoint:CGPointMake(220, 100) controlPoint1:CGPointMake(120, 20) controlPoint2:CGPointMake(120, 180)];

    [path stroke];
}
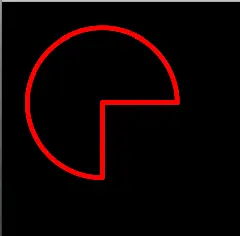
扇形
- (void)drawRect:(CGRect)rect{
    [[UIColor redColor] set]; // 画笔颜色设置

    UIBezierPath * path = [UIBezierPath bezierPath]; // 创建路径

    [path moveToPoint:CGPointMake(100, 100)]; // 设置起始点

    [path addArcWithCenter:CGPointMake(100, 100) radius:75 startAngle:0 endAngle:3.14159/2 clockwise:NO]; // 绘制一个圆弧

    path.lineWidth     = 5.0;
    path.lineCapStyle  = kCGLineCapRound; //线条拐角
    path.lineJoinStyle = kCGLineCapRound; //终点处理

    [path closePath]; // 封闭未形成闭环的路径

    [path stroke]; // 绘制
}
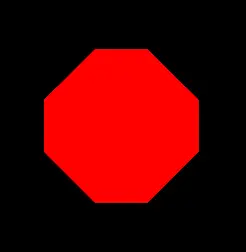
多边形
- (void)drawRect:(CGRect)rect{

    [[UIColor redColor] set];

    UIBezierPath* path = [UIBezierPath bezierPath];

    path.lineWidth     = 5.f;
    path.lineCapStyle  = kCGLineCapRound;
    path.lineJoinStyle = kCGLineCapRound;

    // 起点
    [path moveToPoint:CGPointMake(100, 50)];

    // 添加直线
    [path addLineToPoint:CGPointMake(150, 50)];
    [path addLineToPoint:CGPointMake(200, 100)];
    [path addLineToPoint:CGPointMake(200, 150)];
    [path addLineToPoint:CGPointMake(150, 200)];
    [path addLineToPoint:CGPointMake(100, 200)];
    [path addLineToPoint:CGPointMake(50, 150)];
    [path addLineToPoint:CGPointMake(50, 100)];
    [path closePath];

    //根据坐标点连线
    [path stroke];
    [path fill];
}
参考:
http://www.jianshu.com/p/60aad4957923
http://www.jianshu.com/p/bbb2cc485a45
版权声明:出自MajorLMJ技术博客 http://www.jianshu.com/p/6c9aa9c5dd68 的原创作品 ,转载时必须注明出处及相应链接!


 1万+
1万+

 被折叠的 条评论
为什么被折叠?
被折叠的 条评论
为什么被折叠?
 到【灌水乐园】发言


