


1、中介者模式
介绍
在面向对象程序设计时,对象之间的交互和通信是常见的情况,当系统比较小时,对象之间的交互比较少,可以直接将对象之间的交互硬编码到对象中,可是当系统比较大时,对象的通信变得复杂,需要一个专门处理对象交互和通信的类,中介者模式就是将colleague对象之间的通信封装到一个中介者类中单独处理。
何时使用:多个类相互耦合,形成了网状结构,需要将上述网状结构分离为星型结构的时候。
中介者承担了较多的责任,一旦中介者出现问题,整个系统都会收到影响。
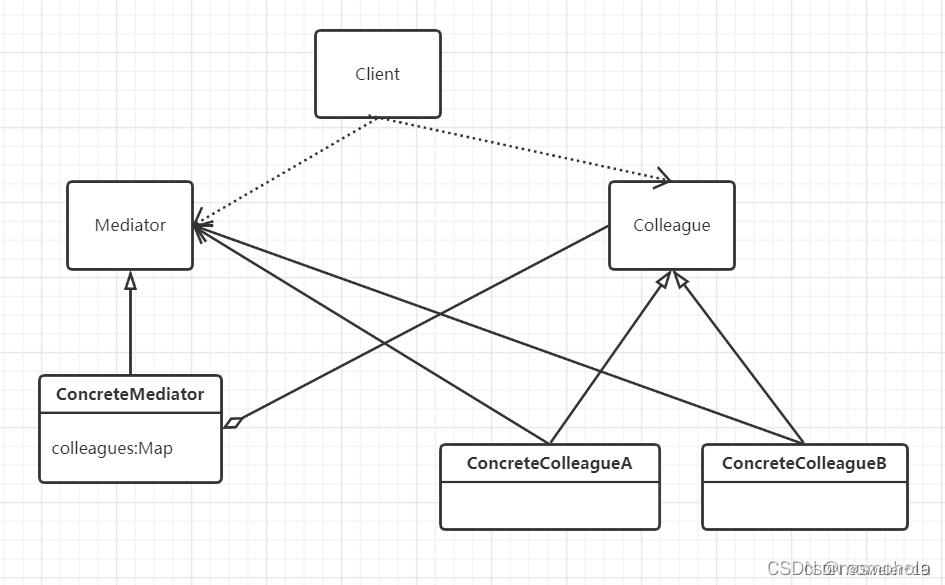
角色
- 一个抽象的同事类,拥有一个中介者类的指针,提供对这个指针的设置操作, 提供一个被通知的操作
- 一个抽象的中介者类,定义了同事对象到中介者对象的接口。
- 若干个具体的同事类,重写其父类中的函数,每个同事只知道自己的行为,而不了解其他同事的行为,它们都依赖中介者对象。
- 一个具体的中介者类,重写其父类中的函数,他需要知道所有的具体的同事类,用一个集合来管理它们,并接收某个同事的消息,完成相应的任务。
代码实现
#include<string>
#include<iostream>
#include<vector>
using namespace std;
class Mediator;
class Colleague{
public:
	Mediator* getMediator();
	void setMediator(Mediator* const mediator);
	Colleague(Mediator* mediator);
	virtual void Notify(string message)=0;
private:
	Mediator* m_mediator;
};

class Mediator{
public:
	virtual void send(string message,Colleague* colleague)=0;
	virtual void add(Colleague* colleague)=0;
};

Mediator* Colleague::getMediator(){
	return m_mediator;
}
void Colleague::setMediator(Mediator* mediator){
	m_mediator = mediator;
}
Colleague::Colleague(Mediator* mediator):m_mediator(mediator){

}


class ConcreteColleague1:public Colleague{
public:
	ConcreteColleague1(Mediator* mediator):Colleague(mediator){

	}
	void send(string message){
		getMediator()->send(message,this);
	}
	void Notify(string message){
		cout<<"colleague1 received :"<<message<<endl;
	}
};
class ConcreteColleague2:public Colleague{
public:
	ConcreteColleague2(Mediator* mediator):Colleague(mediator){

	}
	void send(string message){
		getMediator()->send(message,this);
	}
	void Notify(string message){
		cout<<"colleague2 received :"<<message<<endl;
	}
};

class ConcreteMediator:public Mediator{
public:
	void add(Colleague* colleague){
		colleagueList.push_back(colleague);
	}
	void send(string message,Colleague* colleague){
		for(auto val:colleagueList){
			val->Notify(message);
		}
	}
private:
	vector<Colleague*> colleagueList;
};


int main(){
	Mediator* m=new ConcreteMediator();
	ConcreteColleague1* colleague1=new ConcreteColleague1(m);
	ConcreteColleague2* colleague2=new ConcreteColleague2(m);
	m->add(colleague1);
	m->add(colleague2);
	colleague1->send("good morning!");
	colleague2->send("good night");
	return 0;
}
2、命令模式
介绍
命令模式将请求以命令的形式封装如一个对象中,并传递给调用对象,使得可以用不同的请求来对调用客户参数化。
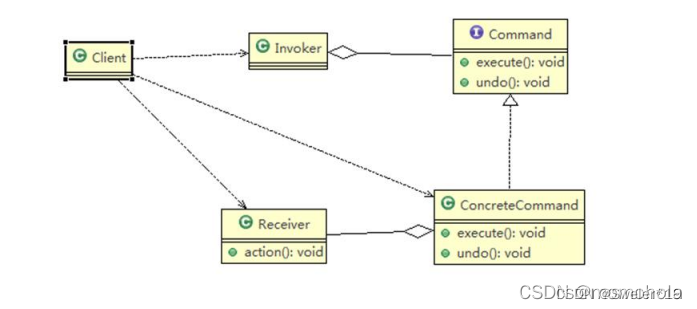
角色
- 一个客户端协议类,其中定义了不同命令的具体实现方式。
- 一个抽象的命令类,声明了一个命令启动函数
- 若干个具体的命令类,拥有一个协议类的指针,根据自己的类型,在各自的命令启动函数中调用协议类中相应的函数
- 一个服务者对象,拥有一个存储命令的容器,和一个添加命令的接口,一个处理命令的接口。
代码实现
模拟一个游戏商店的功能,商店可以有加钱、加钻石、加装备等功能,于是定义一个商店里的协议,有这三种功能的具体实现。然后定义这三种命令的类,分别根据自己的类型去调用协议中规定的功能。商店(server)可以接收命令,再去一个个处理。
#include<iostream>
#include<queue>
#include<windows.h>
using namespace std;

class HandleClientProtocal{
public:
	void AddMoney(){
		cout<<"AddMoney()"<<endl;
	}
	void AddDiamond(){
		cout<<"addDiamond()"<<endl;
	}
	void AddEquipment(){
		cout<<"AddEquipment()"<<endl;
	}
};

class AbstructCommand{
public:
	virtual void handle()=0;
};


class AddMoneyCommand:public AbstructCommand{
public:
	AddMoneyCommand(HandleClientProtocal* protocal){
		this->pProtocal=protocal;
	}
	virtual void handle(){
		this->pProtocal->AddMoney();
	}
private:
	HandleClientProtocal* pProtocal;
};

class AddDiamondCommand:public AbstructCommand{
public:
	AddDiamondCommand(HandleClientProtocal* protocal){
		this->pProtocal=protocal;
	}
	virtual void handle(){
		this->pProtocal->AddDiamond();
	}
private:
	HandleClientProtocal* pProtocal;
};

class AddEquipmentCommand:public AbstructCommand{
public:
	AddEquipmentCommand(HandleClientProtocal* protocal){
		this->pProtocal=protocal;
	}
	virtual void handle(){
		this->pProtocal->AddEquipment();
	}
private:
	HandleClientProtocal* pProtocal;
};

class Server{
public:
	void addRequest(AbstructCommand* command){
		m_commands.push(command);
	}
	void startHandle(){
		while(!m_commands.empty()){
			Sleep(2000);
			AbstructCommand* command=m_commands.front();
			command->handle();
			m_commands.pop();
		}
	}
private:
	queue<AbstructCommand*> m_commands;
};

int main(){
	HandleClientProtocal* protocal=new HandleClientProtocal;
	AbstructCommand* addmoney=new AddMoneyCommand(protocal);
	AbstructCommand* adddiamond=new AddDiamondCommand(protocal);
	AbstructCommand* addequipment=new AddEquipmentCommand(protocal);

	Server* server=new Server;
	server->addRequest(addmoney);
	server->addRequest(adddiamond);
	server->addRequest(addequipment);

	server->startHandle();
	return 0;
}
3、访问者模式
简介
访问者模式封装一些对于某些数据结构各元素的操作,在不改变数据结构元素的前提下定义作用于这些元素的新操作,将操作与数据结构分离。原理是在被访问的类中添加一个对外提供接待访问者的接口。
应用于当需要对某些数据结构元素进行一些操作,同时避免这些操作污染这些元素的场景。
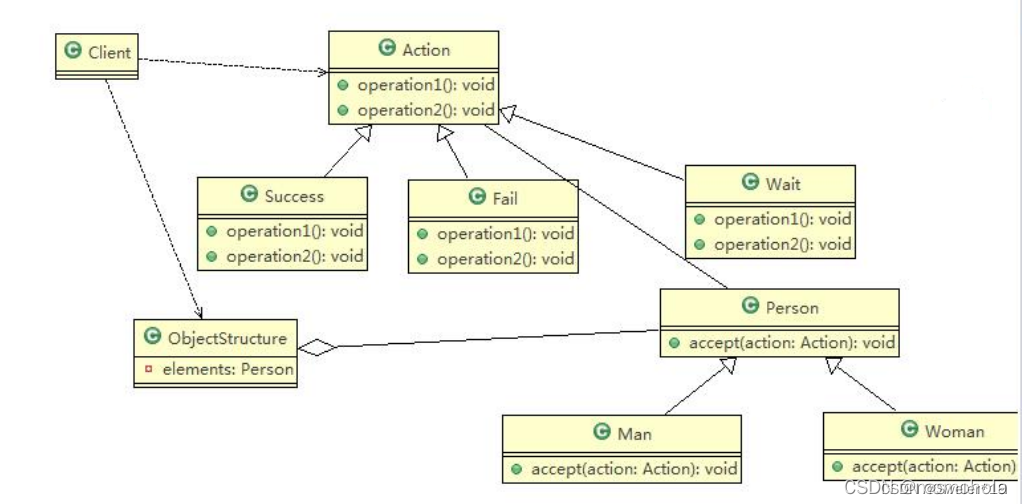
角色
- 一个抽象的行动类,提供对数据结构中元素的非污染的操作。
- 若干个具体的行动类
- 一个抽象的封装被访问数据结构元素的类,提供一个参数为抽象行动类指针的接口
- 若干个具体的封装被访问数据结构元素的类,实现父类中提供的接口
- 一个封装被访问数据结构的类,提供对数据结构中元素的修改接口,提供一个参数为抽象的行动类指针的接口。
代码实现
模拟观众对一组歌手的评价(歌手有男人和女人)。先定义评价操作的抽象类,再实现具体的评价(成功或失败)。定义人的抽象类,再定义男人女人的具体类,提供接收评价的接口。定义一个歌手的集合类,提供对歌手的添加操作,和一个批量对歌手进行评价的接口,其中遍历集合中的歌手并传递此评价。
#include<iostream>
#include<list>
using namespace std;

class Man;
class Woman;

class Action{
public:
	virtual void getManResult(Man* man)=0;
	virtual void getWomanResult(Woman* woman)=0;


};

class Success:public Action{
public:
	void getManResult(Man* man) ;
	void getWomanResult(Woman* woman);
};

class Fail:public Action{
public:
	void getManResult(Man* man) ;
	void getWomanResult(Woman* woman);
};

class Person{
public:
	Person(string name):name(name){}
	virtual void accept(Action* action)=0;
	string name;
};

class Man:public Person{
public:
	Man(string name):Person(name){}
	void accept(Action* action){
		action->getManResult(this);
	}
};

class Woman:public Person{
public:
	Woman(string name):Person(name){}
	void accept(Action* action){
		action->getWomanResult(this);
	}
};

void Success:: getManResult(Man* man) {
	cout<<"A man "<<man->name<<" said success!"<<endl;
}
void Success::getWomanResult(Woman* woman){
	cout<<"A woman "<<woman->name<<" said success"<<endl;
}
void Fail::getManResult(Man* man) {
	cout<<"A man "<<man->name<<" said fail"<<endl;
}
void Fail::getWomanResult(Woman* woman){
	cout<<"A woman"<<woman->name<<" said fail"<<endl;
}
class Singer{
public:
	void attach(Person* p){
		persons.push_back(p);
	}
	void detach(Person* p){
		persons.remove(p);
		delete p;
	}

	void display(Action* action){
		for(auto val:persons){
			val->accept(action);
		}
	}
private:
	list<Person*> persons;
};

int main(){
	Singer* obj=new Singer;
	obj->attach(new Man("jack"));
	obj->attach(new Woman("ammy"));
	Success* success=new Success;
	obj->display(success);
	Fail* fail=new Fail;
	obj->display(fail);
	return 0;
}
- 后记:2023农历新年快乐,学习不能停止,变得更强。


 367
367


 被折叠的 条评论
为什么被折叠?
被折叠的 条评论
为什么被折叠?
 到【灌水乐园】发言


