


1. 环境配置
![]()
![]()


![]()
![]()
![]()
![]()
![]()
![]()

![]()

![]()


![]()
- 下载并安装JDK1.7以上版本 (推荐JDK1.7)
- 配置Java环境变量
- 下载并安装Eclipse 4.2 以上版本 (博主用的是4.5.2)
- 下载testng-6.9.10的jar包 http://download.csdn.net/detail/sxl0727/9574607
- 下载selenium-server-standalone-2.53.0的jar包 http://download.csdn.net/detail/sxl0727/9574746
- 下载selenium-firefox-driver-2.52.0的jar包(此处用firefox浏览器)http://download.csdn.net/detail/sxl0727/9574740
- 下载testng-xslt-1.1.2的zip包 http://download.csdn.net/detail/sxl0727/9574736
2. 新建项目
Eclipse : File -> New -> Java Project
3. 新建项目下所需要的文件夹,并将需要用到文件copy过去,并在Eclipse中导入相关的包
Eclipse: 右键项目,选择 New -> Folder
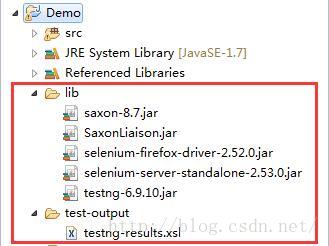
[1] 根目录下新建 - [ lib ]
解压缩testng-xslt-1.1.2.zip 并将
testng-xslt/lib 下的saxon-8.7.jar和SaxonLiaison.jar拷贝到项目的lib目录下
将下载的testng-6.9.10.jar 和 selenium-server-standalone-2.52.0.jar包拷贝到项目的lib目录下
[2] 根目录下新建 - [ test-output ]
解压缩testng-xslt-1.1.2.zip 并将
testng-xslt/src/main/resources下的testng-results.xsl拷贝到项目的test-output目录下
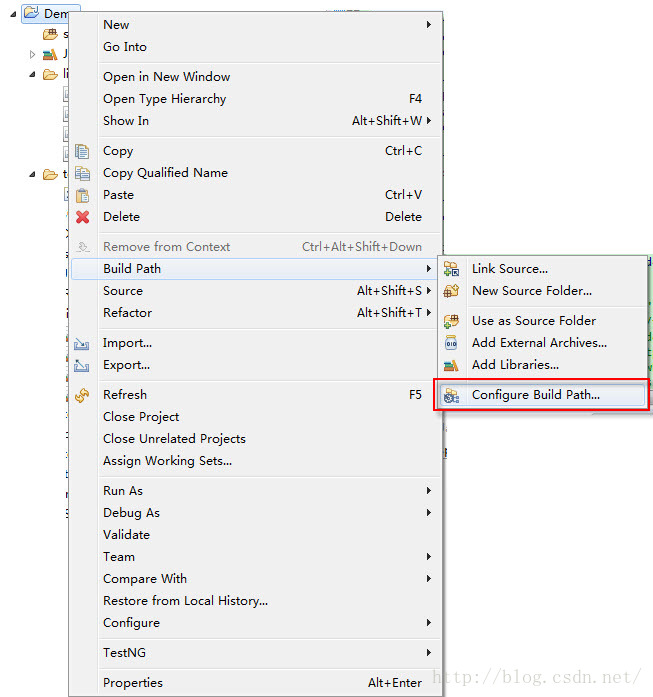
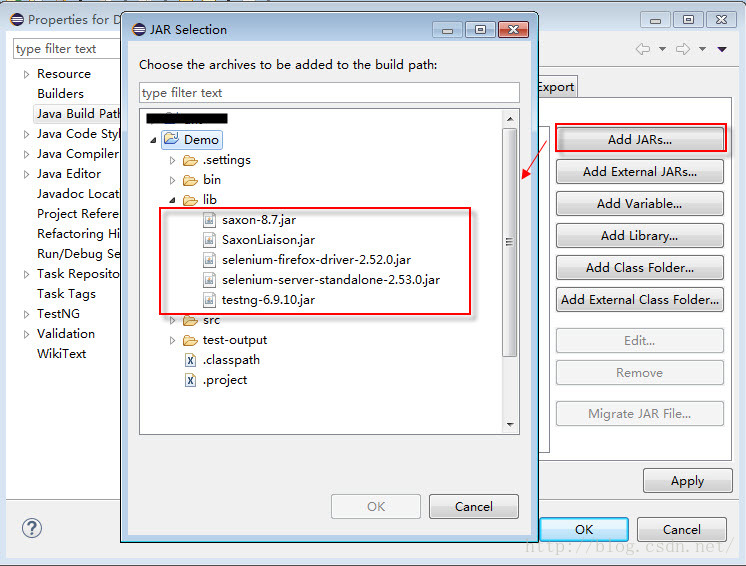
[3] 将包导入到项目中
Eclipse: 右键项目,选择 Build Path
-> Configure Build Path...
点击
Add JARs... ,选择项目lib目录下的jar包并确定
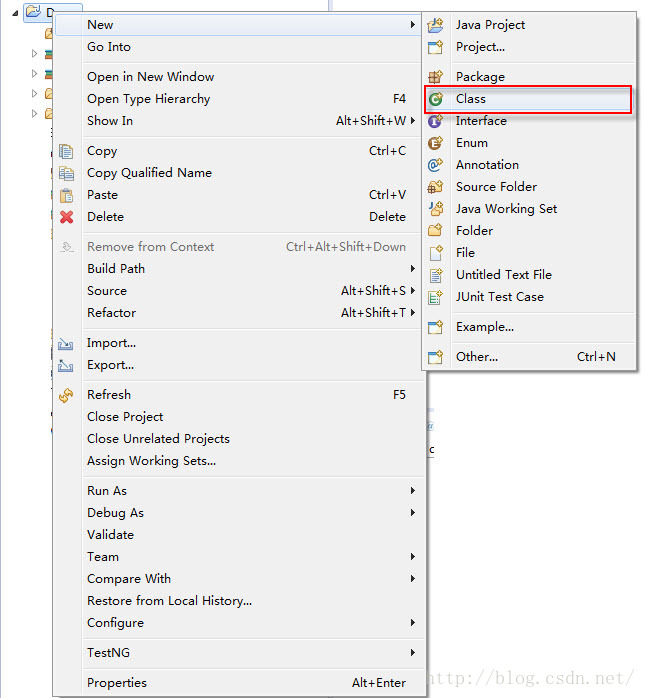
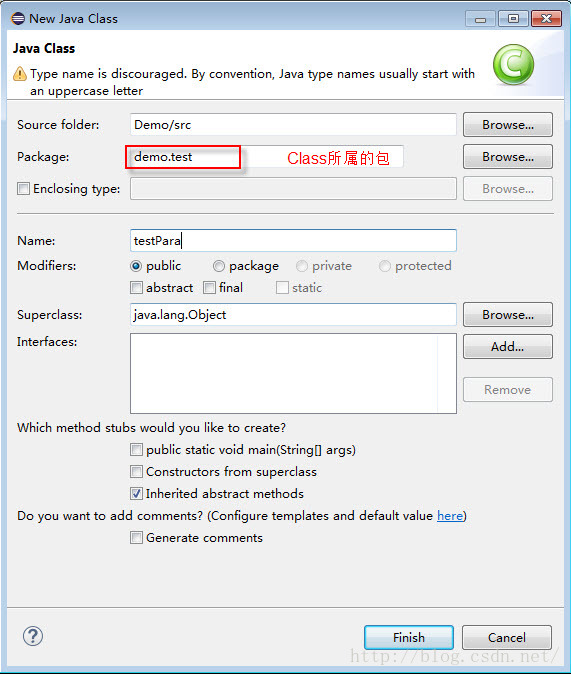
4. 新建测试类
Eclipse: 右键项目,选择
New
-> Class
![]()
填入相关参数后点击完成
5. 编写测试类
       package demo.test;


       import org.openqa.selenium.WebDriver;


       import org.openqa.selenium.firefox.FirefoxDriver;


       import org.testng.annotations.AfterClass;


       import org.testng.annotations.BeforeClass;


       import org.testng.annotations.Parameters;


       import org.testng.annotations.Test;


       import com.beust.jcommander.Parameter;


       public class testPara {


       	private WebDriver dirver;


       	@BeforeClass


       	public void BeforeClass(){


       		dirver = new FirefoxDriver();


       	}


       	@Parameters({"url"})


       	@Test


       	public void GoToLink(String url){


       		dirver.get(url);


       	}


       	@AfterClass


       	public void AfterClass(){


       		dirver.close();


       	}


       }
6. 在根目录下新建testng.xml 并进行编写
       <?xml version="1.0" encoding="UTF-8"?>


       <!DOCTYPE suite SYSTEM "http://testng.org/testng-1.0.dtd">


       <suite name="DemoTest1" verbose='1'>


           <test name="testPara">


           	<parameter name="url" value="http://www.baidu.com"/>


               <classes>


                   <class name="demo.test.testPara"/>


               </classes>


           </test>


       </suite>
截止此处,已经可以直接运行testng.xml
Eclipse: 右键testng.xml,选择 Run As
-> TestNG Suite
7. 在根目录下新建build.xml 并进行编写
将项目整合到ANT中,使得项目不受平台和IDE的限制而更快的被部署, 一般Eclipse都自带ANT,无需另外安装。
       <?xml version="1.0" encoding="UTF-8"?>


       <project name="TestNG" default="testoutput" basedir=".">


       	<property name="srcdir" location="${basedir}/src" />


       	<property name="libdir" location="${basedir}/lib" />


       	<property name="testng.output.dir" location="${basedir}/test-output" />


       	<property name="testng.file" value="testng.xml" />


       	<path id="classpath">


               <fileset dir="${libdir}" includes="*jar" />


               <fileset dir="${libdir}" includes="*zip" />


               <pathelement location="${basedir}/bin" />


           </path>


       	<!-- Define <testng> task -->


           <taskdef name="testng" classname="org.testng.TestNGAntTask">


           	<classpath>


             		<pathelement location="./lib/testng-6.9.10.jar"/>


           	</classpath>


           </taskdef>


       	<!-- Before compile,delete the previous folder -->


       	<target name="clean">


               <delete dir="${basedir}/bin" />


           </target>


          <!-- Compile file in 'srcdir' to 'destdir' -->


        	<target name="compile" depends="clean">


               <mkdir dir="${basedir}/bin" />


               <javac srcdir="${srcdir}" encoding="UTF-8" destdir="${basedir}/bin" classpathref="classpath" includeantruntime="off" debug="on" debuglevel="lines,vars,source" />


           </target>


       	<!-- use testng.xml to run the test -->


       	<target name="runtest" depends="compile">


       	   <testng outputdir="${testng.output.dir}" classpathref="classpath">


       	        <xmlfileset dir="${basedir}" includes="${testng.file}"/>


       	   	</testng>


       	</target>


           <!-- Use xslt to modify the report  -->


           <target name= "testoutput" depends="runtest" >


               <xslt in= "${testng.output.dir}/testng-results.xml" style= "${testng.output.dir}/testng-results.xsl"


                 out= "${testng.output.dir}/index1.html " >


                   <param name= "testNgXslt.outputDir" expression= "${basedir}/test-output/" />


                   <param name="testNgXslt.showRuntimeTotals" expression="true" />


                   <classpath refid= "classpath" />


               </xslt>


           </target>


       </project>
8. 利用ANT执行build.xml
Eclipse: 右键testng.xml,选择 Run As
-> Ant Build
9. 执行结果
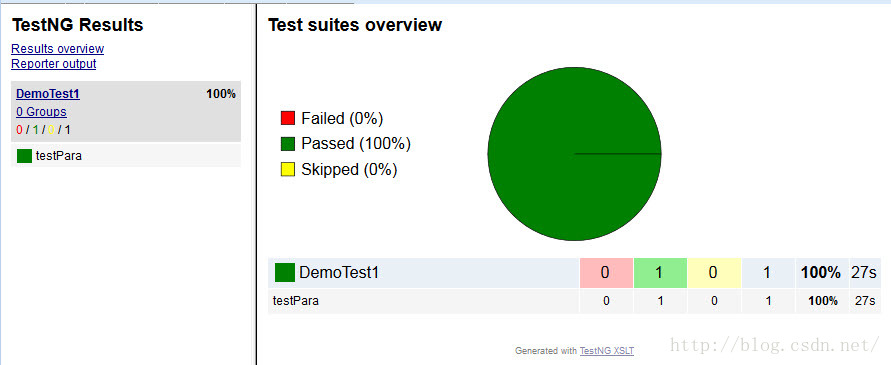
10. TestNG报告
美化前:
美化后:


 393
393

 被折叠的 条评论
为什么被折叠?
被折叠的 条评论
为什么被折叠?
 到【灌水乐园】发言


