


点击获取基于CNN的验证码识别源代码(GitHub)
程序中生成的验证码图片示例:
(程序边运行边生成图片,可以无限生成,不用担心样本不够的问题,也可以选择性保存在本地)


以下几个版本的代码有所差别,但核心功能一样。
一,CNN验证码识别原始版
二,CNN验证码识别-改进版
2.1 代码
改动了里面的部分代码,添加了注释和断点续训功能,由于添加大小写字母比较耗时,没有添加字母,但是代码已经写在里面了。
import captcha
from captcha.image import ImageCaptcha  # pip install captcha
import numpy as np
import matplotlib.pyplot as plt
from PIL import Image
import random
import os
import time

import tensorflow as tf
import numpy as np
import matplotlib.pyplot as plt

MODEL_SAVE_PATH = r"./model/" # 模型保存路径
MODEL_NAME = "CNN_Captcha"    # 保存模型名称
IMAGE_HEIGHT = 60             # 图像高
IMAGE_WIDTH = 160             # 图像宽
training_iters = 3000         # 训练次数
number = ['0', '1', '2', '3', '4', '5', '6', '7', '8', '9']
alphabet = ['a', 'b', 'c', 'd', 'e', 'f', 'g', 'h', 'i', 'j', 'k', 'l', 'm', 'n', 'o', 'p', 'q', 'r', 's', 't', 'u',
            'v', 'w', 'x', 'y', 'z']
ALPHABET = ['A', 'B', 'C', 'D', 'E', 'F', 'G', 'H', 'I', 'J', 'K', 'L', 'M', 'N', 'O', 'P', 'Q', 'R', 'S', 'T', 'U',
            'V', 'W', 'X', 'Y', 'Z']

# 随机生成4个数字的数组
#def random_captcha_text(char_set=number+ alphabet + ALPHABET, captcha_size=4): #数字+大小写字母
def random_captcha_text(char_set=number, captcha_size=4):  #数字
    captcha_text = []  # 初始化一个空列表
    for i in range(captcha_size):  # 产生字符的个数
        c = random.choice(char_set)  # 随机产生数字
        captcha_text.append(c)  # 加入列表
    return captcha_text  # 返回生成的字符

# 随机生成4个数字的图片
def gen_captcha_text_and_image():
    image = ImageCaptcha()  # 生成验证码图片,使用之前先实例化
    captcha_text = random_captcha_text()  # 随机生成4个数字的数组
    captcha_text = ''.join(captcha_text)  # 将数组转成字符串
    captcha = image.generate(captcha_text)  # 根据随机产生的字符串生成验证码图片
    # image.write(captcha_text, captcha_text + '.jpg')  # 写到文件

    captcha_image = Image.open(captcha)  # 打开图像
    captcha_image = np.array(captcha_image)  # 转化成array数组
    return captcha_text, captcha_image

text, image = gen_captcha_text_and_image()  # 随机生成4个数字的图片
print("验证码图像channel:", image.shape)  # (60, 160, 3)
MAX_CAPTCHA = len(text)  # 验证码长度
#char_set = number+ alphabet + ALPHABET + ['_'] #数字+大小写字母
char_set = number+ ['_'] #数字
CHAR_SET_LEN = len(char_set)

# 转换成灰度图
def convert2gray(img):
    if len(img.shape) > 2:
        gray = np.mean(img, -1)
        # 上面的转法较快,正规转法如下
        # r, g, b = img[:,:,0], img[:,:,1], img[:,:,2]
        # gray = 0.2989 * r + 0.5870 * g + 0.1140 * b
        return gray
    else:
        return img

# 字符串转换成0000100的数组
def text2vec(text):
    text_len = len(text)
    if text_len > MAX_CAPTCHA:
        raise ValueError('验证码最长4个字符')

    vector = np.zeros(MAX_CAPTCHA * CHAR_SET_LEN)

    def char2pos(c):
        if c == '_':
            k = 62
            return k
        k = ord(c) - 48
        if k > 9:
            k = ord(c) - 55
            if k > 35:
                k = ord(c) - 61
                if k > 61:
                    raise ValueError('No Map')
        return k

    for i, c in enumerate(text):
        idx = i * CHAR_SET_LEN + char2pos(c)
        vector[idx] = 1
    return vector

# 0000100的数组转换成字符串
def vec2text(vec):
    char_pos = vec.nonzero()[0]
    text = []
    for i, c in enumerate(char_pos):
        char_at_pos = i  # c/63
        char_idx = c % CHAR_SET_LEN
        if char_idx < 10:
            char_code = char_idx + ord('0')
        elif char_idx < 36:
            char_code = char_idx - 10 + ord('A')
        elif char_idx < 62:
            char_code = char_idx - 36 + ord('a')
        elif char_idx == 62:
            char_code = ord('_')
        else:
            raise ValueError('error')
        text.append(chr(char_code))
    return "".join(text)

# 产生用于训练的bacth_size大小的数据集
def get_next_batch(batch_size=128):
    batch_x = np.zeros([batch_size, IMAGE_HEIGHT * IMAGE_WIDTH])
    batch_y = np.zeros([batch_size, MAX_CAPTCHA * CHAR_SET_LEN])

    # 内部定义一个用于产生图片和标签的函数
    def wrap_gen_captcha_text_and_image():
        while True:
            text, image = gen_captcha_text_and_image()
            if image.shape == (60, 160, 3):
                return text, image

    for i in range(batch_size):  # 按batch_size大小循环产生图片
        text, image = wrap_gen_captcha_text_and_image()  # 产生图片
        image = convert2gray(image)  # 转化成灰度图

        batch_x[i, :] = image.flatten() / 255  # image.flatten()是转化为一行,除以255是归一化
        batch_y[i, :] = text2vec(text)  # 转换为标签

    return batch_x, batch_y

# 定义卷积神经网络
def crack_captcha_cnn(X, Y, keep_prob, w_alpha=0.01, b_alpha=0.1):
    x = tf.reshape(X, shape=[-1, IMAGE_HEIGHT, IMAGE_WIDTH, 1])  # 恢复成图像的宽高

    # 3层卷积网络
    # 第一层卷积 转化为30*80*32维数据
    w_c1 = tf.Variable(w_alpha * tf.random_normal([3, 3, 1, 32]))  # 权重 #3*3的采样窗口,32个卷积核从1个平面抽取特征
    b_c1 = tf.Variable(b_alpha * tf.random_normal([32]))  # 偏置
    conv1 = tf.nn.bias_add(tf.nn.conv2d(x, w_c1, strides=[1, 1, 1, 1], padding='SAME'), b_c1)
    conv1 = tf.nn.max_pool(conv1, ksize=[1, 2, 2, 1], strides=[1, 2, 2, 1], padding='SAME')
    conv1 = tf.nn.dropout(conv1, keep_prob)

    # 第二层卷积 转化为15*40*64维数据
    w_c2 = tf.Variable(w_alpha * tf.random_normal([3, 3, 32, 64]))
    b_c2 = tf.Variable(b_alpha * tf.random_normal([64]))
    conv2 = tf.nn.bias_add(tf.nn.conv2d(conv1, w_c2, strides=[1, 1, 1, 1], padding='SAME'), b_c2)
    conv2 = tf.nn.max_pool(conv2, ksize=[1, 2, 2, 1], strides=[1, 2, 2, 1], padding='SAME')
    conv2 = tf.nn.dropout(conv2, keep_prob)

    # 第三层卷积 转化为8*20*64维数据
    w_c3 = tf.Variable(w_alpha * tf.random_normal([3, 3, 64, 64]))
    b_c3 = tf.Variable(b_alpha * tf.random_normal([64]))
    conv3 = tf.nn.bias_add(tf.nn.conv2d(conv2, w_c3, strides=[1, 1, 1, 1], padding='SAME'), b_c3)
    conv3 = tf.nn.max_pool(conv3, ksize=[1, 2, 2, 1], strides=[1, 2, 2, 1], padding='SAME')
    conv3 = tf.nn.dropout(conv3, keep_prob)

    # 全连接层
    w_d = tf.Variable(w_alpha * tf.random_normal([8 * 20 * 64, 1024]))
    b_d = tf.Variable(b_alpha * tf.random_normal([1024]))
    dense = tf.reshape(conv3, [-1, w_d.get_shape().as_list()[0]])
    dense = tf.nn.relu(tf.add(tf.matmul(dense, w_d), b_d))
    dense = tf.nn.dropout(dense, keep_prob)

    w_out = tf.Variable(w_alpha * tf.random_normal([1024, MAX_CAPTCHA * CHAR_SET_LEN]))
    b_out = tf.Variable(b_alpha * tf.random_normal([MAX_CAPTCHA * CHAR_SET_LEN]))
    out = tf.add(tf.matmul(dense, w_out), b_out)
    return out

# 训练
def train_crack_captcha_cnn():

    # 变量占位
    X = tf.placeholder(tf.float32, [None, IMAGE_HEIGHT * IMAGE_WIDTH])
    Y = tf.placeholder(tf.float32, [None, MAX_CAPTCHA * CHAR_SET_LEN])
    keep_prob = tf.placeholder(tf.float32)  # dropout防止过拟合

    # 运行了几轮batch_size的计数器,初值给0,设为不被训练
    global_step = tf.Variable(0, trainable=False)

    # 定义卷积神经网络
    output = crack_captcha_cnn(X, Y, keep_prob)

    # 定义损失函数
    loss = tf.reduce_mean(tf.nn.sigmoid_cross_entropy_with_logits(logits=output, labels=Y))
    optimizer = tf.train.AdamOptimizer(learning_rate=0.001).minimize(loss,global_step=global_step)  # 断点续训这里不加global_step=global_step会出错

    predict = tf.reshape(output, [-1, MAX_CAPTCHA, CHAR_SET_LEN])            #预测结果
    max_idx_p = tf.argmax(predict, 2)                                        #求预测的最大值下标
    max_idx_l = tf.argmax(tf.reshape(Y, [-1, MAX_CAPTCHA, CHAR_SET_LEN]), 2) #求标签的下标
    correct_pred = tf.equal(max_idx_p, max_idx_l)                            #求正确率
    accuracy = tf.reduce_mean(tf.cast(correct_pred, tf.float32))             #求准确率均值

    saver = tf.train.Saver(max_to_keep=1)
    with tf.Session() as sess:
        print("启动执行...")
        time_start = time.time()  # 计时
        sess.run(tf.global_variables_initializer())  # 初始化全局变量
        sess.run(tf.local_variables_initializer())   # 初始化局部变量

        # ----------断点续训--------------------------
        ckpt = tf.train.get_checkpoint_state(MODEL_SAVE_PATH)
        if ckpt and ckpt.model_checkpoint_path: #如果已有模型,则加载
            saver.restore(sess, ckpt.model_checkpoint_path)
        # ----------断点续训--------------------------
        step = 0
        while step < training_iters:  # training_iters 训练次数

            batch_x, batch_y = get_next_batch(64)  # 产生一组数据
            _, loss_, step= sess.run([optimizer, loss, global_step],feed_dict={X: batch_x, Y: batch_y, keep_prob: 0.75})
            step += 1  # 执行轮数
            if step % 100 == 0:
                print("当前轮数%s,loss:%s"%(step, loss_))  # 打印损失函数值
                # ----------断点续训--------------------------
                saver.save(sess, os.path.join(MODEL_SAVE_PATH, MODEL_NAME), global_step=global_step)
                # ----------断点续训--------------------------

                batch_x_test, batch_y_test = get_next_batch(100)  # 产生一组测试数据
                acc = sess.run(accuracy, feed_dict={X: batch_x_test, Y: batch_y_test, keep_prob: 1.})
                print("准确率=", acc)
                if acc > 0.95:
                    saver.save(sess, "model/AccAbove9_capcha.model", global_step=step)
        time_end = time.time()
        time_h = (time_end - time_start) / 3600
        print('训练用时:%.2f 小时' % time_h)

        #==========测试------------------------------
        count = 0
        all_count = 100
        for i in range(all_count):
            text, image = gen_captcha_text_and_image()  # 随机生成4个数字的图片
            gray_image = convert2gray(image)  # 转化成灰度图
            captcha_image = gray_image.flatten() / 255  # image.flatten()是转化为一行,除以255是归一化

            text_list = sess.run(predict, feed_dict={X: [captcha_image], keep_prob: 1})  # 预测
            prediction_labels = np.argmax(text_list, axis=2)  # 转化成数字标签
            predict_text = prediction_labels[0].tolist()  # 转化成列表
            predict_text = str(predict_text)  # 转化成字符串
            predict_text = predict_text.replace("[", "").replace("]", "").replace(",", "").replace(" ", "")
            if text == predict_text:  # 如果预测结果和标签相等,表明预测正确
                count += 1
                check_result = ",预测结果正确"
            else:  # 不正确
                #                 f = plt.figure() #产生一张图
                #                 ax = f.add_subplot(111)
                #                 ax.text(0.1, 0.9, text, ha='center', va='center', transform=ax.transAxes)
                #                 plt.imshow(image) #显示图像
                #                 plt.show()
                check_result = ",预测结果错误"
                print("正确: {}  预测: {}".format(text, predict_text) + check_result)
        print("正确率:", count, "/", all_count)


# 训练
train_crack_captcha_cnn()
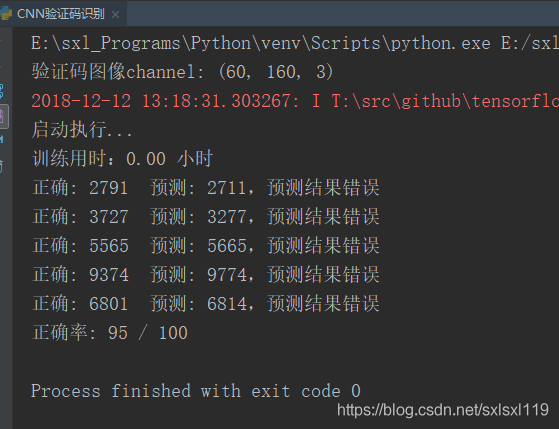
2.2 运行结果:
因为是运行完3000次,再次运行,所以训练用时为0(直接读取训练好的模型测试的)
三,CNN验证码识别-Tensorboard版
3.1,代码
添加Tensorboard可视化功能,可以实时查看准确率和loss值。
# coding: utf-8
import tensorflow as tf
import captcha
from captcha.image import ImageCaptcha  # pip install captcha
import numpy as np
import matplotlib.pyplot as plt
from PIL import Image
import random
import os
import time

import tensorflow as tf
import numpy as np
import matplotlib.pyplot as plt

MODEL_SAVE_PATH = r"./model/" # 模型保存路径
MODEL_NAME = "CNN_Captcha"    # 保存模型名称
IMAGE_HEIGHT = 60             # 图像高
IMAGE_WIDTH = 160             # 图像宽
training_iters = 3000         # 训练次数
w_alpha = 0.01
b_alpha = 0.1
number = ['0', '1', '2', '3', '4', '5', '6', '7', '8', '9']
alphabet = ['a', 'b', 'c', 'd', 'e', 'f', 'g', 'h', 'i', 'j', 'k', 'l', 'm', 'n', 'o', 'p', 'q', 'r', 's', 't', 'u',
            'v', 'w', 'x', 'y', 'z']
ALPHABET = ['A', 'B', 'C', 'D', 'E', 'F', 'G', 'H', 'I', 'J', 'K', 'L', 'M', 'N', 'O', 'P', 'Q', 'R', 'S', 'T', 'U',
            'V', 'W', 'X', 'Y', 'Z']

# 随机生成4个数字的数组
#def random_captcha_text(char_set=number+ alphabet + ALPHABET, captcha_size=4): #数字+大小写字母
def random_captcha_text(char_set=number, captcha_size=4):  #数字
    captcha_text = []  # 初始化一个空列表
    for i in range(captcha_size):  # 产生字符的个数
        c = random.choice(char_set)  # 随机产生数字
        captcha_text.append(c)  # 加入列表
    return captcha_text  # 返回生成的字符

# 随机生成4个数字的图片
def gen_captcha_text_and_image():
    image = ImageCaptcha()  # 生成验证码图片,使用之前先实例化
    captcha_text = random_captcha_text()  # 随机生成4个数字的数组
    captcha_text = ''.join(captcha_text)  # 将数组转成字符串
    captcha = image.generate(captcha_text)  # 根据随机产生的字符串生成验证码图片
    # image.write(captcha_text, captcha_text + '.jpg')  # 写到文件

    captcha_image = Image.open(captcha)  # 打开图像
    captcha_image = np.array(captcha_image)  # 转化成array数组
    return captcha_text, captcha_image

text, image = gen_captcha_text_and_image()  # 随机生成4个数字的图片
print("验证码图像channel:", image.shape)  # (60, 160, 3)
MAX_CAPTCHA = len(text)  # 验证码长度
#char_set = number+ alphabet + ALPHABET + ['_'] #数字+大小写字母
char_set = number+ ['_'] #数字
CHAR_SET_LEN = len(char_set)

# 转换成灰度图
def convert2gray(img):
    if len(img.shape) > 2:
        gray = np.mean(img, -1)
        # 上面的转法较快,正规转法如下
        # r, g, b = img[:,:,0], img[:,:,1], img[:,:,2]
        # gray = 0.2989 * r + 0.5870 * g + 0.1140 * b
        return gray
    else:
        return img

# 字符串转换成0000100的数组
def text2vec(text):
    text_len = len(text)
    if text_len > MAX_CAPTCHA:
        raise ValueError('验证码最长4个字符')

    vector = np.zeros(MAX_CAPTCHA * CHAR_SET_LEN)

    def char2pos(c):
        if c == '_':
            k = 62
            return k
        k = ord(c) - 48
        if k > 9:
            k = ord(c) - 55
            if k > 35:
                k = ord(c) - 61
                if k > 61:
                    raise ValueError('No Map')
        return k

    for i, c in enumerate(text):
        idx = i * CHAR_SET_LEN + char2pos(c)
        vector[idx] = 1
    return vector

# 0000100的数组转换成字符串
def vec2text(vec):
    char_pos = vec.nonzero()[0]
    text = []
    for i, c in enumerate(char_pos):
        char_at_pos = i  # c/63
        char_idx = c % CHAR_SET_LEN
        if char_idx < 10:
            char_code = char_idx + ord('0')
        elif char_idx < 36:
            char_code = char_idx - 10 + ord('A')
        elif char_idx < 62:
            char_code = char_idx - 36 + ord('a')
        elif char_idx == 62:
            char_code = ord('_')
        else:
            raise ValueError('error')
        text.append(chr(char_code))
    return "".join(text)

# 产生用于训练的bacth_size大小的数据集
def get_next_batch(batch_size=128):
    batch_x = np.zeros([batch_size, IMAGE_HEIGHT * IMAGE_WIDTH])
    batch_y = np.zeros([batch_size, MAX_CAPTCHA * CHAR_SET_LEN])

    # 内部定义一个用于产生图片和标签的函数
    def wrap_gen_captcha_text_and_image():
        while True:
            text, image = gen_captcha_text_and_image()
            if image.shape == (60, 160, 3):
                return text, image

    for i in range(batch_size):  # 按batch_size大小循环产生图片
        text, image = wrap_gen_captcha_text_and_image()  # 产生图片
        image = convert2gray(image)  # 转化成灰度图

        batch_x[i, :] = image.flatten() / 255  # image.flatten()是转化为一行,除以255是归一化
        batch_y[i, :] = text2vec(text)  # 转换为标签

    return batch_x, batch_y


#参数概要,tf.summary.scalar的作用主要是存储变量,并赋予变量名,tf.name_scope主要是给表达式命名
def variable_summaries(var):
    with tf.name_scope('summaries'):
        mean = tf.reduce_mean(var)
        tf.summary.scalar('mean', mean)#平均值
        with tf.name_scope('stddev'):
            stddev = tf.sqrt(tf.reduce_mean(tf.square(var - mean)))
        tf.summary.scalar('stddev', stddev)#标准差
        tf.summary.scalar('max', tf.reduce_max(var))#最大值
        tf.summary.scalar('min', tf.reduce_min(var))#最小值
        tf.summary.histogram('histogram', var)#直方图

#初始化权值
def weight_variable(shape,name):
    initial=tf.truncated_normal(shape,stddev=0.1) #生成一个截断的正态分布
    return tf.Variable(initial,name=name)

#初始化偏置
def bias_variable(shape,name):
    initial=tf.constant(0.1,shape=shape)
    return tf.Variable(initial,name=name)

#卷积层
def conv2d(x,W):
    #x input tensor of shape [batch,in_height,in_width,in_channels]
    #W filter/ kernel tensor of shape [filter_height,filter_width,in_channels,out_channels]
    #strides[0]=strides[3]=1恒等于1,
    #strides[1]代表x方向的步长,strides[2]代表y方向的步长,
    #padding:"SAME","VALID"
    return tf.nn.conv2d(x,W,strides=[1,1,1,1],padding='SAME')

#池化层
def max_pool_2x2(x):
    #x input tensor of shape [batch,in_height,in_width,in_channels]
    #ksize [1,x,y,1]
    return tf.nn.max_pool(x,ksize=[1,2,2,1],strides=[1,2,2,1],padding='SAME')


# 运行了几轮batch_size的计数器,初值给0,设为不被训练
with tf.name_scope('global_step'):
    global_step = tf.Variable(0, trainable=False, name='global_step')

#keep_prob用来表示神经元的输出概率
with tf.name_scope('keep_prob'):
    keep_prob=tf.placeholder(tf.float32,name='keep_prob')

# 命名空间
with tf.name_scope('input'):
    #定义两个placeholder
    x=tf.placeholder(tf.float32,[None,IMAGE_HEIGHT * IMAGE_WIDTH],name='x-input')
    y=tf.placeholder(tf.float32,[None,MAX_CAPTCHA * CHAR_SET_LEN],name='y-input')
    with tf.name_scope('x_image'):
        #改变x的格式转为4D的向量[batch,in_height,in_width,in_channels]
        x_image=tf.reshape(x,[-1,IMAGE_HEIGHT, IMAGE_WIDTH,1],name='x_image')

with tf.name_scope('Conv1'):
    #初始化第一个卷积层的权值和偏置
    with tf.name_scope('W_conv1'):
        W_conv1 =tf.Variable(w_alpha * tf.random_normal([3, 3, 1, 32]),name='W_conv1')
    with tf.name_scope('b_conv1'):
        b_conv1 = tf.Variable(b_alpha * tf.random_normal([32]),name='b_conv1')  # 偏置
    #把x_image和权值向量进行卷积,再加上偏置值,然后应用于relu激活函数
    with tf.name_scope('conv2d_1'):
        conv2d_1=conv2d(x_image,W_conv1)+b_conv1
    # with tf.name_scope('relu'):
    #     h_conv1=tf.nn.relu(conv2d_1)
    with tf.name_scope('h_pool1'):
        h_pool1=max_pool_2x2(conv2d_1)  #进行max_pooling
    with tf.name_scope('h_pool1_drop'):
        h_pool1=tf.nn.dropout(h_pool1,keep_prob,name='h_pool1_drop')


with tf.name_scope('Conv2'):
    #初始化第二个卷积层的权值和偏置
    with tf.name_scope('W_conv2'):
        W_conv2 = tf.Variable(w_alpha * tf.random_normal([3, 3, 32, 64]),name='W_conv2')
    with tf.name_scope('b_conv2'):
        b_conv2 = tf.Variable(b_alpha * tf.random_normal([64]),name='b_conv2')

    #把h_pool1和权值向量进行卷积,再加上偏置值,
    with tf.name_scope('conv2d_2'):
        conv2d_2=conv2d(h_pool1,W_conv2)+b_conv2
    # with tf.name_scope('relu'):
    #     h_conv2=tf.nn.relu(conv2d_2)
    with tf.name_scope('h_pool2'):
        h_pool2=max_pool_2x2(conv2d_2)  #进行max_pooling
    with tf.name_scope('h_pool2_drop'):
        h_pool2 = tf.nn.dropout(h_pool2, keep_prob, name='h_pool2_drop')

with tf.name_scope('Conv3'):
    #初始化第三个卷积层的权值和偏置
    with tf.name_scope('W_conv3'):
        W_conv3 = tf.Variable(w_alpha * tf.random_normal([3, 3, 64, 64]),name='W_conv3')
    with tf.name_scope('b_conv3'):
        b_conv3 = tf.Variable(b_alpha * tf.random_normal([64]),name='b_conv3')

    #把h_pool1和权值向量进行卷积,再加上偏置值,
    with tf.name_scope('conv2d_3'):
        conv2d_3=conv2d(h_pool2,W_conv3)+b_conv3
    # with tf.name_scope('relu'):
    #     h_conv2=tf.nn.relu(conv2d_2)
    with tf.name_scope('h_pool3'):
        h_pool3=max_pool_2x2(conv2d_3)  #进行max_pooling
    with tf.name_scope('h_pool3_drop'):
        h_pool3 = tf.nn.dropout(h_pool3, keep_prob, name='h_pool3_drop')

#60*160的图片第一次卷积后还是60*160,第一次池化后变为30*80
#第二次卷积后为30*80,第二次池化后变成了15*40
#经过上面操作后得到64张8*20的平面

with tf.name_scope('fc1'):
    #初始化第一个全连接层的权值
    with tf.name_scope('W_fc1'):
        W_fc1 = tf.Variable(w_alpha * tf.random_normal([8 * 20 * 64, 1024]),name='W_fc1')
    with tf.name_scope('b_fc1'):
        b_fc1 = tf.Variable(b_alpha * tf.random_normal([1024]),name='b_fc1')

    #把池化层3的输出扁平化为1维
    with tf.name_scope('h_pool3_flat'):
        h_pool3_flat=tf.reshape(h_pool3,[-1,W_fc1.get_shape().as_list()[0]],name='h_pool3_flat')
    #求第一个全连接层的输出
    with tf.name_scope('wx_plus_b1'):
        wx_plus_b1=tf.matmul(h_pool3_flat,W_fc1)+b_fc1
    with tf.name_scope('relu'):
        h_fc1=tf.nn.relu(wx_plus_b1)

    with tf.name_scope('h_fc1_drop'):
        h_fc1_drop=tf.nn.dropout(h_fc1,keep_prob,name='h_fc1_drop')

    with tf.name_scope('w_out'):
        w_out = tf.Variable(w_alpha * tf.random_normal([1024, MAX_CAPTCHA * CHAR_SET_LEN]),name='w_out')
    with tf.name_scope('b_out'):
        b_out = tf.Variable(b_alpha * tf.random_normal([MAX_CAPTCHA * CHAR_SET_LEN]),name='b_out')
    with tf.name_scope('b_out'):
        prediction = tf.add(tf.matmul(h_fc1_drop, w_out), b_out)


#交叉熵代价函数
with tf.name_scope('cross_entropy'):
    # cross_entropy = tf.reduce_mean(tf.nn.softmax_cross_entropy_with_logits(labels=y,logits=prediction),name='cross_entropy')
    cross_entropy = tf.reduce_mean(tf.nn.sigmoid_cross_entropy_with_logits(labels=y,logits=prediction),name='cross_entropy')
    tf.summary.scalar('cross_entropy',cross_entropy)

#使用AdamOptimizer进行优化
with tf.name_scope('train'):
    train_step=tf.train.AdamOptimizer(learning_rate=0.001).minimize(cross_entropy,global_step=global_step)  # 断点续训这里不加global_step=global_step会出错

#求准确率
with tf.name_scope('accuracy'):
    with tf.name_scope('correct_prediction'):
        predict = tf.reshape(prediction, [-1, MAX_CAPTCHA, CHAR_SET_LEN])  # 预测结果
        max_idx_p = tf.argmax(predict, 2)  # 求预测的最大值下标
        max_idx_l = tf.argmax(tf.reshape(y, [-1, MAX_CAPTCHA, CHAR_SET_LEN]), 2)  # 求标签的下标
        #结果存放在一个布尔列表中
        correct_prediction=tf.equal(max_idx_p,max_idx_l)#求正确率
    with tf.name_scope('accuracy'):
        #求准确率
        accuracy=tf.reduce_mean(tf.cast(correct_prediction,tf.float32))
        tf.summary.scalar('accuracy',accuracy)

#合并所有的summary
merged=tf.summary.merge_all()
saver = tf.train.Saver(max_to_keep=1)
with tf.Session() as sess:
    print("启动执行...")
    time_start = time.time()  # 计时
    sess.run(tf.global_variables_initializer())  # 初始化全局变量
    sess.run(tf.local_variables_initializer())  # 初始化局部变量

    train_writer=tf.summary.FileWriter('E:/logs/train',sess.graph)
    test_writer=tf.summary.FileWriter('E:/logs/test',sess.graph)
    print("66")
    # ----------断点续训--------------------------
    ckpt = tf.train.get_checkpoint_state(MODEL_SAVE_PATH)
    if ckpt and ckpt.model_checkpoint_path:  # 如果已有模型,则加载
        saver.restore(sess, ckpt.model_checkpoint_path)
    # ----------断点续训--------------------------

    step = 0
    while step < training_iters:  # training_iters 训练次数
        #训练模型
        batch_xs,batch_ys =  get_next_batch(64)  # 产生一组数据
        # sess.run(train_step,feed_dict={x:batch_xs,y:batch_ys,keep_prob:0.5})
        _, loss_, step = sess.run([train_step, cross_entropy, global_step], feed_dict={x:batch_xs,y:batch_ys, keep_prob: 0.75})
        step += 1  # 执行轮数
        #记录训练集计算的参数
        summary=sess.run(merged,feed_dict={x:batch_xs,y:batch_ys,keep_prob:1.0})
        train_writer.add_summary(summary,step)
        #计算测试集计算的参数
        batch_xs,batch_ys =  get_next_batch(64)  # 产生一组数据
        summary=sess.run(merged,feed_dict={x:batch_xs,y:batch_ys,keep_prob:1.0})
        test_writer.add_summary(summary,step)

        if step % 100 == 0:
            print("当前轮数%s,loss:%s"%(step, loss_))  # 打印损失函数值
            # ----------断点续训--------------------------
            saver.save(sess, os.path.join(MODEL_SAVE_PATH, MODEL_NAME), global_step=global_step)
            # ----------断点续训--------------------------

            batch_x_test, batch_y_test = get_next_batch(100)  # 产生一组测试数据
            acc = sess.run(accuracy, feed_dict={x: batch_x_test, y: batch_y_test, keep_prob: 1.})
            print("准确率=", acc)
            if acc > 0.95:
                saver.save(sess, "model/AccAbove9_capcha.model", global_step=step)
    time_end = time.time()
    time_h = (time_end - time_start) / 3600
    print('训练用时:%.2f 小时' % time_h)

    # ==========测试------------------------------
    count = 0
    all_count = 100
    for i in range(all_count):
        text, image = gen_captcha_text_and_image()  # 随机生成4个数字的图片
        gray_image = convert2gray(image)  # 转化成灰度图
        captcha_image = gray_image.flatten() / 255  # image.flatten()是转化为一行,除以255是归一化

        text_list = sess.run(predict, feed_dict={x: [captcha_image], keep_prob: 1})  # 预测
        prediction_labels = np.argmax(text_list, axis=2)  # 转化成数字标签
        predict_text = prediction_labels[0].tolist()  # 转化成列表
        predict_text = str(predict_text)  # 转化成字符串
        predict_text = predict_text.replace("[", "").replace("]", "").replace(",", "").replace(" ", "")
        if text == predict_text:  # 如果预测结果和标签相等,表明预测正确
            count += 1
            check_result = ",预测结果正确"
        else:  # 不正确
            #                 f = plt.figure() #产生一张图
            #                 ax = f.add_subplot(111)
            #                 ax.text(0.1, 0.9, text, ha='center', va='center', transform=ax.transAxes)
            #                 plt.imshow(image) #显示图像
            #                 plt.show()
            check_result = ",预测结果错误"
            print("正确: {}  预测: {}".format(text, predict_text) + check_result)
    print("正确率:", count, "/", all_count)
3.2,运行结束后,在cmd中输入:
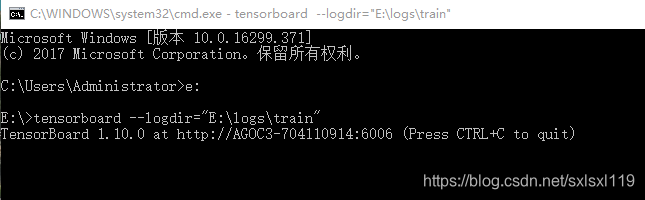
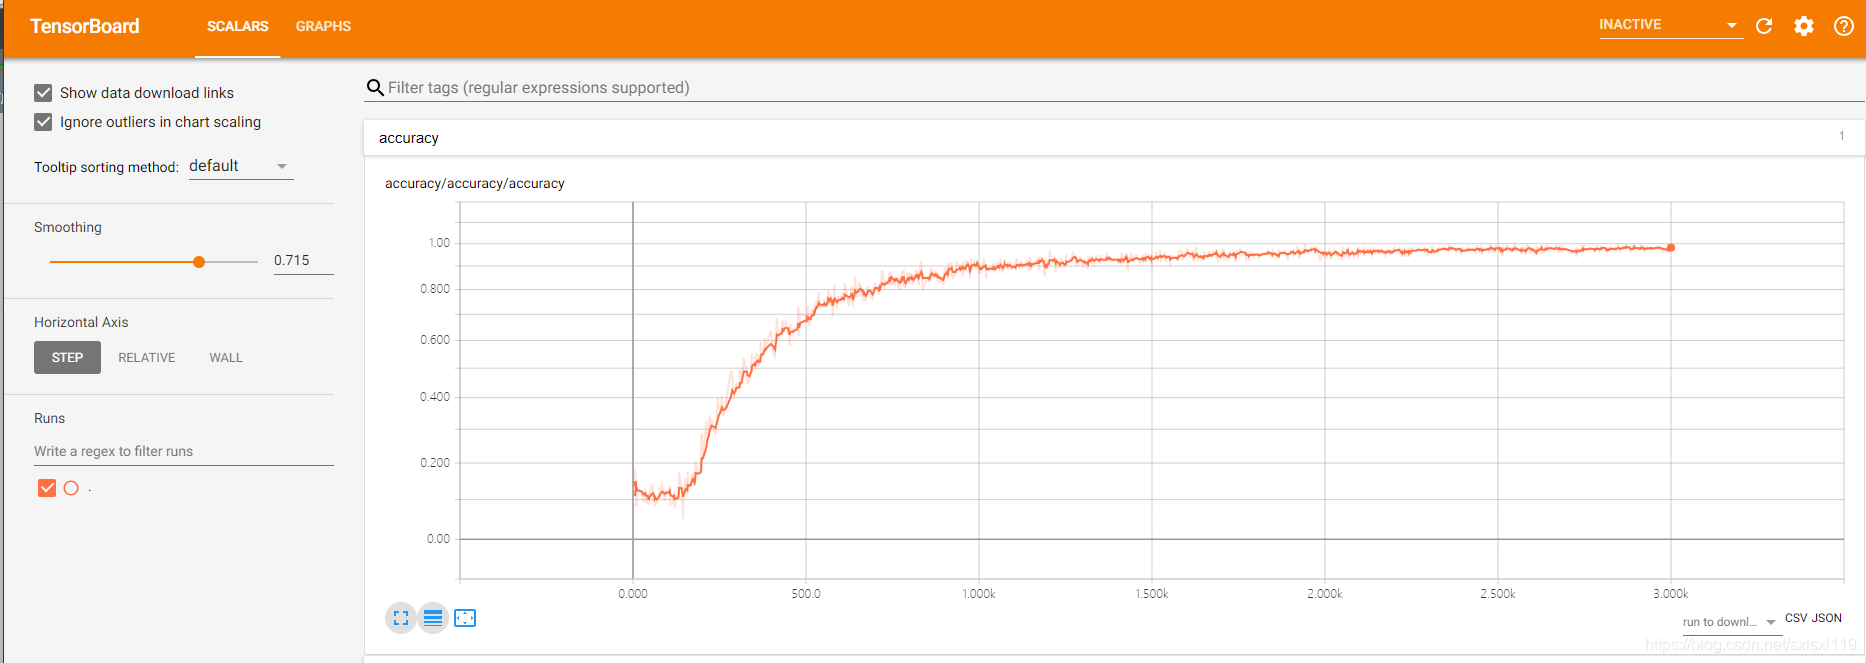
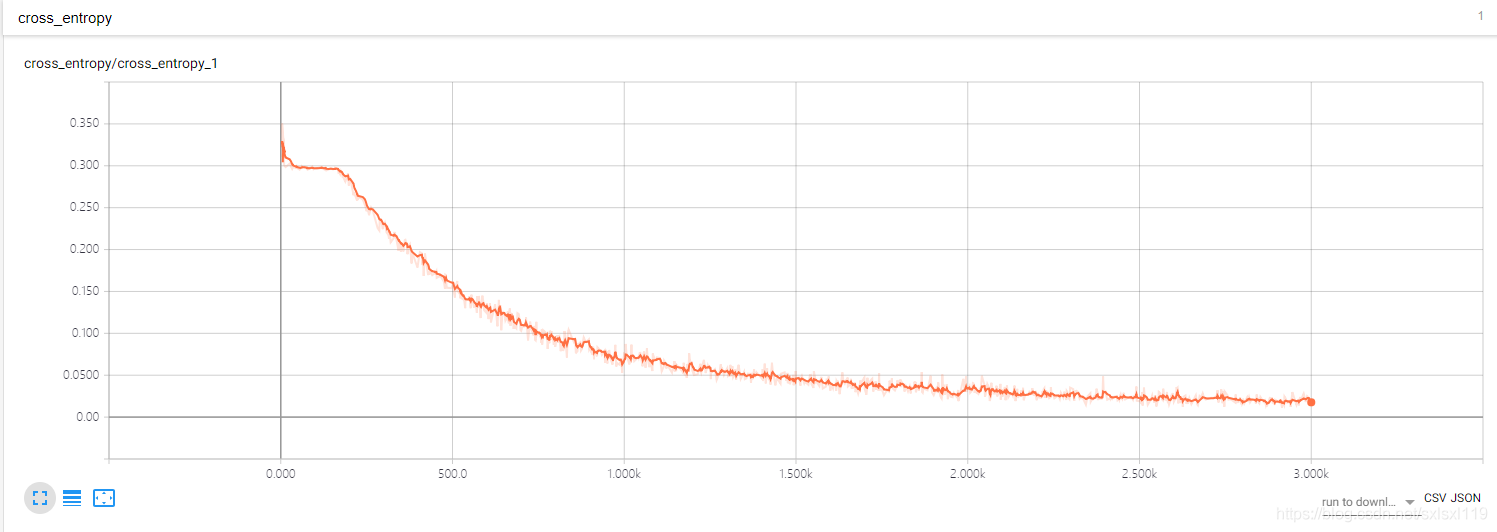
3.3,将网址复制到“谷歌浏览器”上,查看可视化效果:
曲线还算标准,准确率缓慢上升,loss缓慢下降
欢迎扫码关注我的微信公众号


 1022
1022


 被折叠的 条评论
为什么被折叠?
被折叠的 条评论
为什么被折叠?
 到【灌水乐园】发言


