


前置知识:arkts


一套开发工具,一套语言,搞定客户端和云端两个的编写。其中application就是客户端,cloudProgram就是云端。
开发人员->全栈开发工程师,降低了开发成本,且提供了很多现成的云服务:云函数、认证服务(手机、邮箱)、云存储(媒体文件)、云数据库
特点:免运维(不需要关心下层运维),零浪费(调用才会计费)
适合:中小型APP的开发,尽快上线
云函数

开发云函数
-
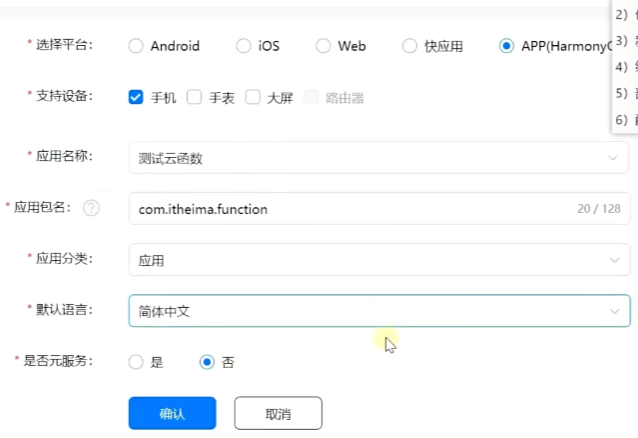
新建项目和应用,开通云函数服务(AGC) app gallery connect
服务是项目级别的,项目包含多个应用
-
使用端云一体化模板创建应用
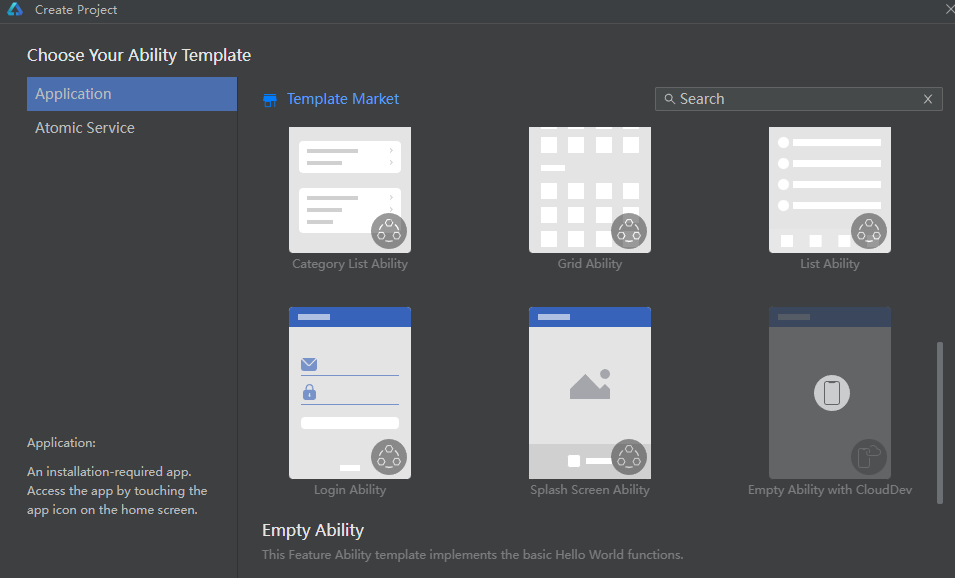
最后一个是端云一体化的模板.
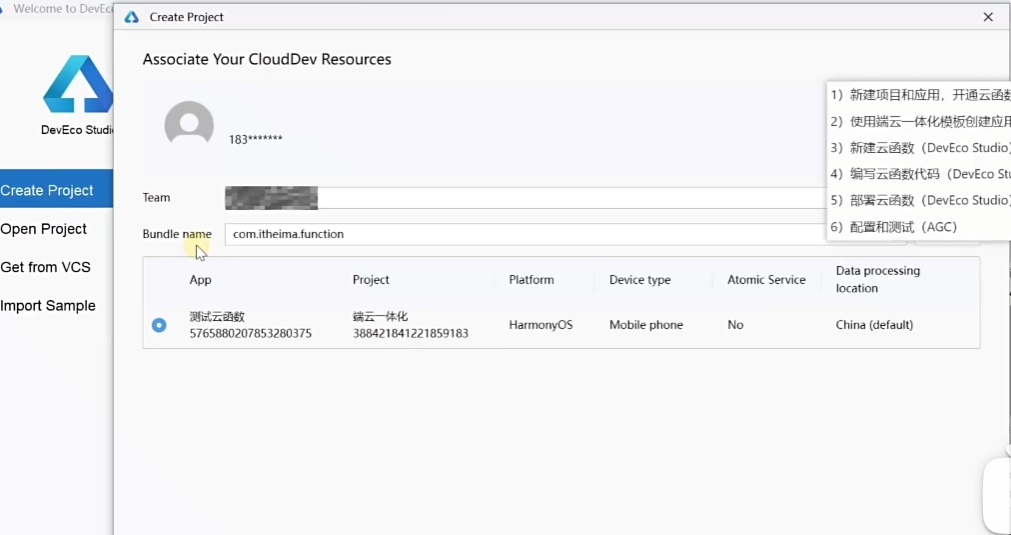
bundlename要和app gallery connect那边一致,就可以把本地项目和云端的关联起来。自动包含一些代码,这是给了一些简单的例子。 -
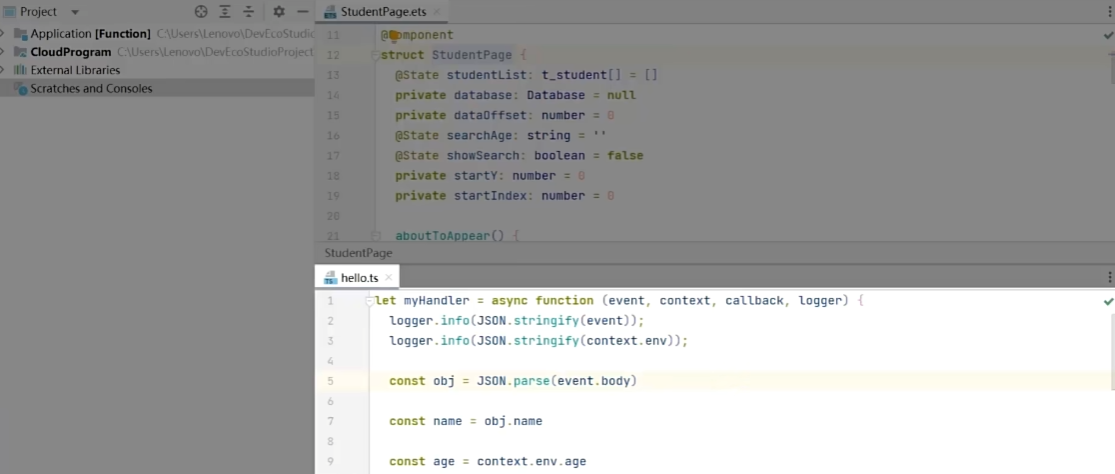
新建云函数
-
编写云函数代码
-
部署云函数
-
配置和测试
认证服务
大纲:
开通认证服务
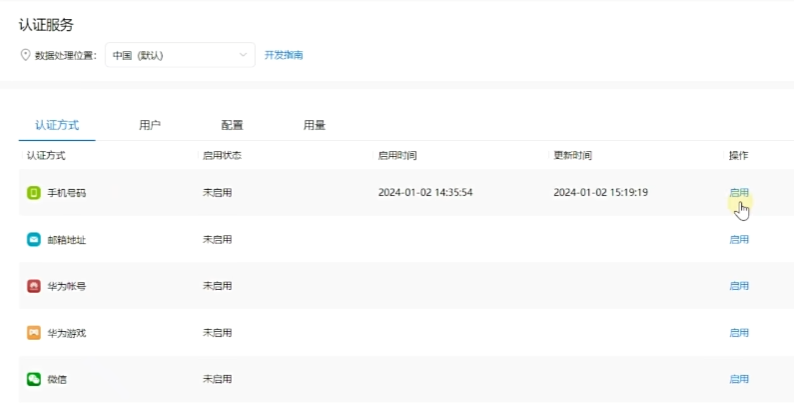
arkTs支持的只有手机号和邮箱
用户标签页-可以停用、删除
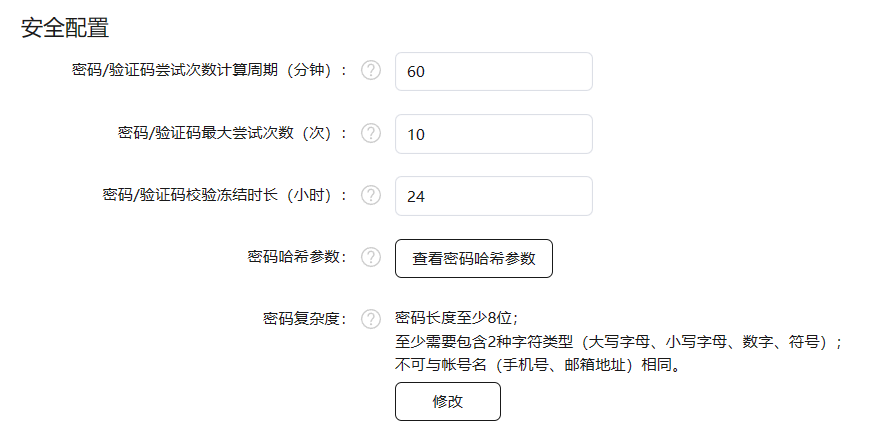
配置标签页-安全相关
使用认证组件进行认证
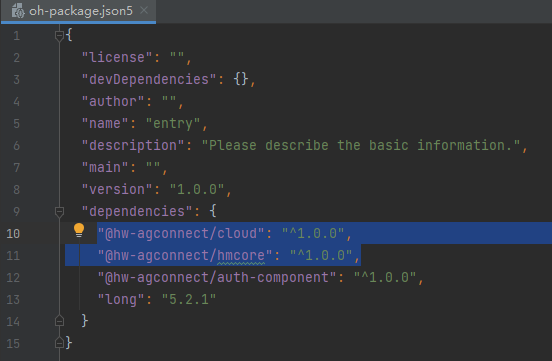
首先要在oh-package.json5里+dependencies,第三个是可选的,提供了更方便的认证组件
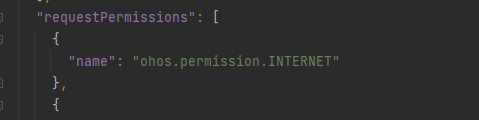
module.json5里要添加网络权限
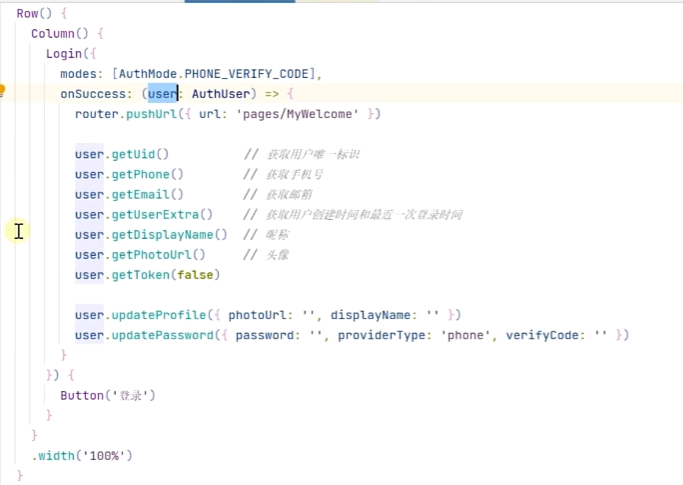
最简单的认证方式:auth-component认证组件里的login组件
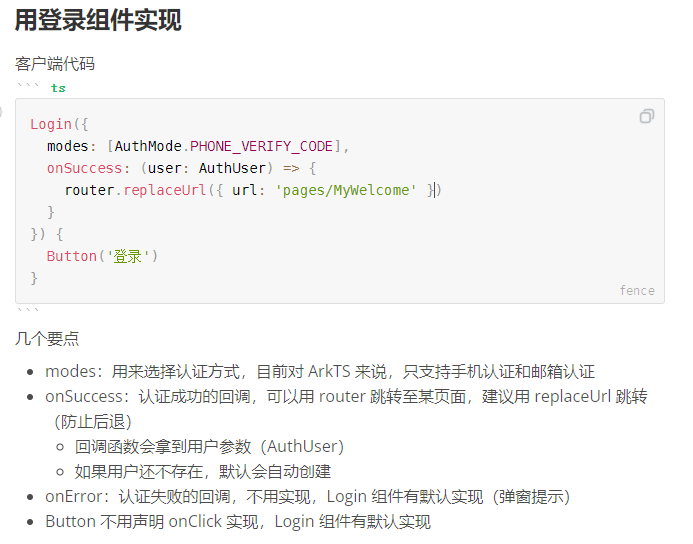
mode:手机或邮箱,它是一个数组,支持多种认证方式(alt+enter可以导包)
onSuccess成功的回调函数,跳转到一个新页面。参数是传入的用户信息。
Button不需要绑定点击事件。
需要在entryAbility里把首页改成登录页
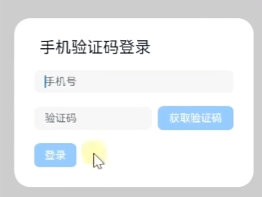
效果:
认证流程
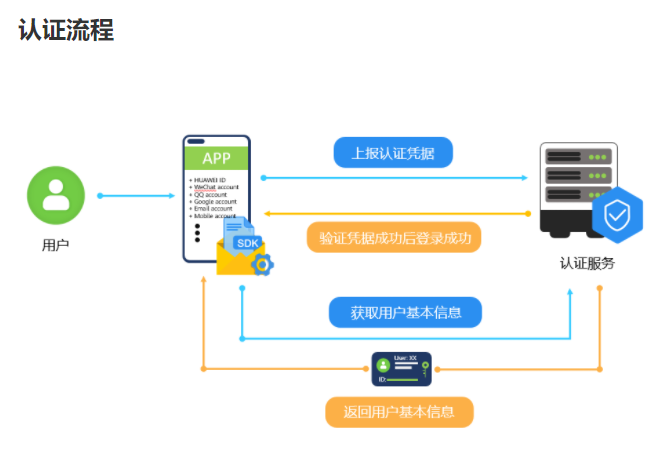
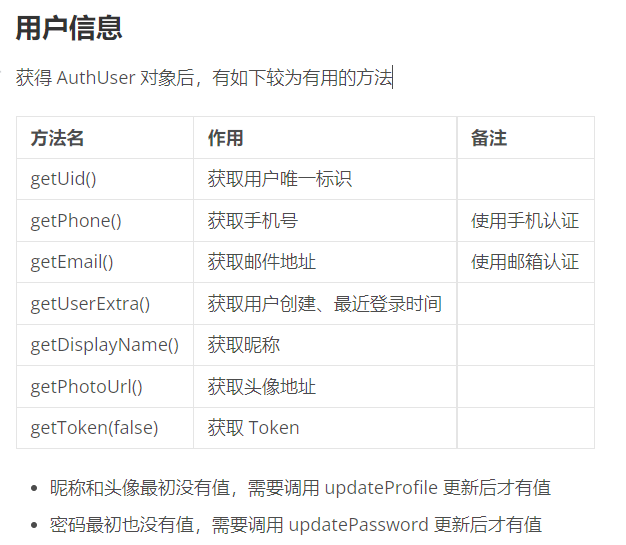
如果是第一次使用,还会创建用户信息。会自动给一个UID(唯一标识)

调用返回的是Promise<AuthUserExtra>
昵称和头像一开始没有值,必须updateProfile
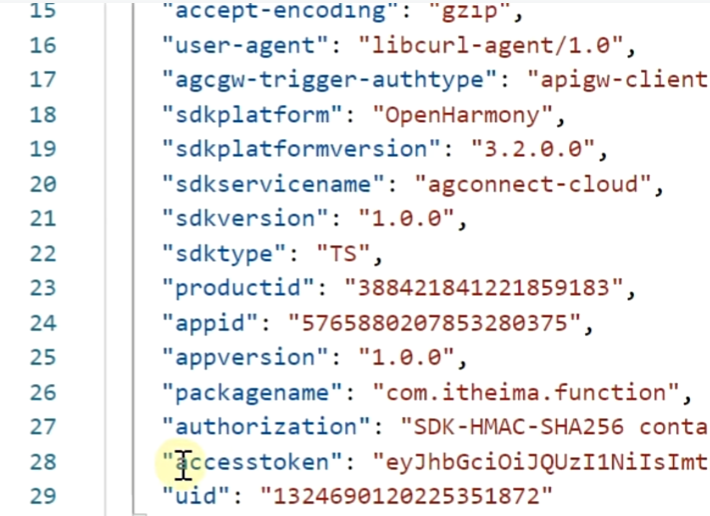
getToken获取令牌,后续的请求,都会把带着令牌发给服务器,作为认证的凭据(参数多了最后两项,accesstoken是访问凭据)
updatePassword得选择一个验证方式去改密码
自行实现登录
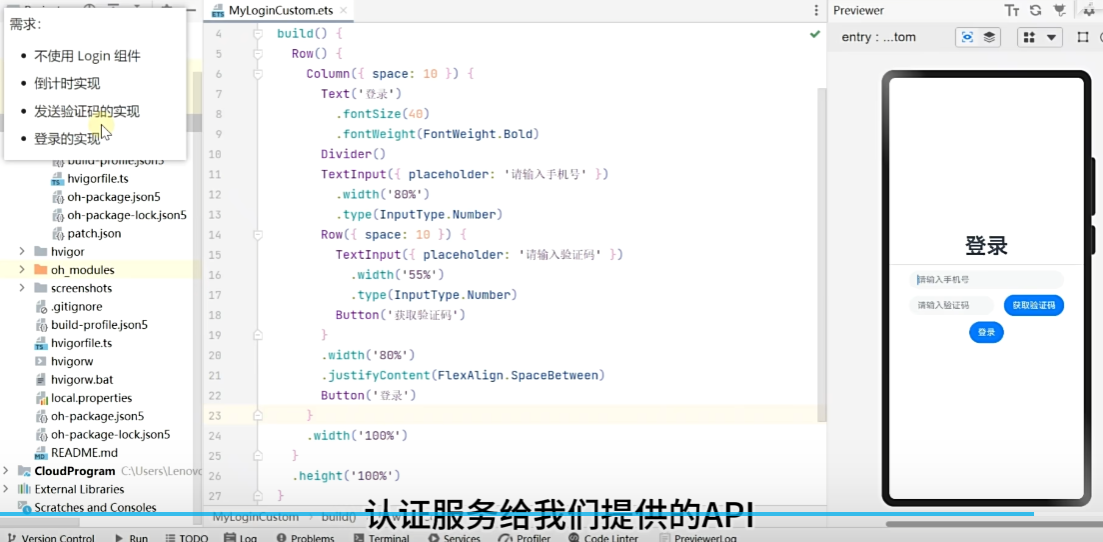
- 倒计时实现
需要一个记录倒计时的变量,需要加state,在点击验证码后开启定时器setInterval(),1000ms.
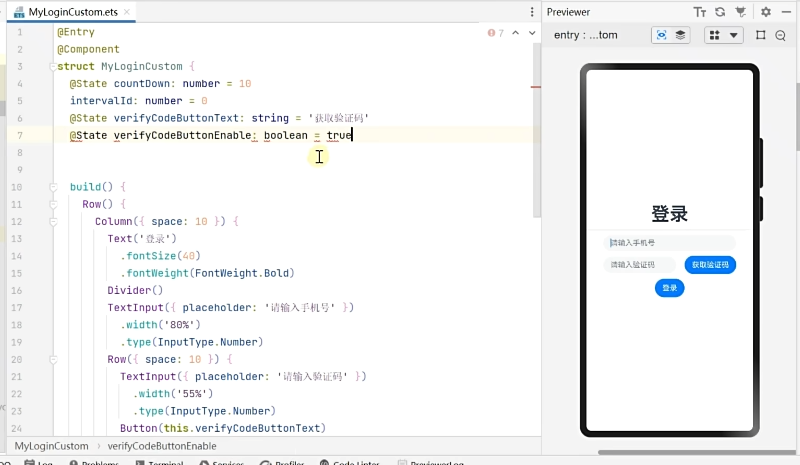
.enable控制按钮是否可用
可以把这段代码封装到一个函数里,封装到waiting里
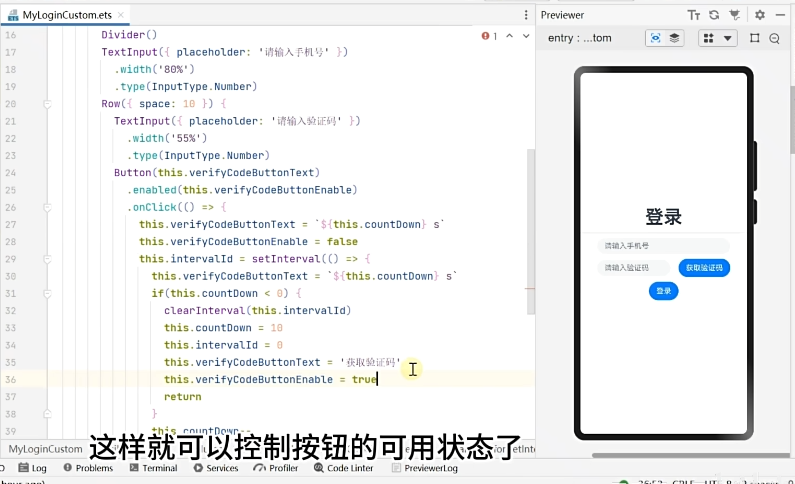
  waiting() {
    this.verifyCodeButtonText = `${this.countDown} s`
    this.verifyCodeButtonEnable = false
    this.intervalId = setInterval(() => {
      this.verifyCodeButtonText = `${this.countDown} s`
      this.countDown--
      if (this.countDown < 0) {
        clearInterval(this.intervalId)
        this.countDown = 10
        this.intervalId = 0
        this.verifyCodeButtonText = '获取验证码'
        this.verifyCodeButtonEnable = true
        return
      }
      this.countDown--
    }, 1000)
  }
调用:
Button(this.verifyCodeButtonText)
            .enabled(this.verifyCodeButtonEnable)
            .onClick(() => {
              this.waiting()
            })
- 发送验证码实现
调用cloud.auth(),返回一个认证对象,里面有requestVerifyCode方法
声明:
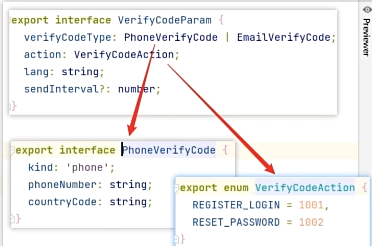
requestVerifyCode(verifyCodeParam: VerifyCodeParam): Promise<VerifyCodeResult>;
结构中有四个属性,VerifyCodeType是验证码类型,内部又是一个复杂的类型;VerifyCodeAction有两种情况,一种是登录时的验证码,一种是重置密码时的验证码;lang语言,可取’zh_CN’,;sendInterval发送间隔,默认60s
@State phoneNumber: string = ''
把手机号记到phoneNumber里
TextInput({ placeholder: '请输入手机号' })
          .width('80%')
          .type(InputType.Number)
          .onChange(value => {
            this.phoneNumber = value
          })
cloud.auth().requestVerifyCode({
        verifyCodeType: {
          kind: 'phone',
          phoneNumber: this.phoneNumber,
          countryCode: '86'
        },
        action: VerifyCodeAction.REGISTER_LOGIN,
        lang: 'zh_CN',
        sendInterval: 10
      })
返回的是Promise,能拿到验证码的最小时间间隔和有效期,目前也用不上;不过发的是Promise,可以同步化sync-await,加try-catch,再封装成sending函数,变成:
async sending() {
    try {
      await cloud.auth().requestVerifyCode({
        verifyCodeType: {
          kind: 'phone',
          phoneNumber: this.phoneNumber,
          countryCode: '86'
        },
        action: VerifyCodeAction.REGISTER_LOGIN,
        lang: 'zh_CN',
        sendInterval: 10
      })
      hilog.info(0, 'VerifyCode', 'Success')
    } catch (e) {
      AlertDialog.show({ title: '错误', message: '验证码发送失败' }) //弹窗提示用户错误
      hilog.error(0, 'VerifyCode', JSON.stringify(e))
    }
  }
这个功能需要在模拟器上测试,
- 登录实现
先看api定义:
/**
   * 登录接口,通过第三方认证来登录AGConnect平台
   *
   * @param credential 第三方OAuth2认证的凭证,需要通过对应的AuthProvider去创建。
   * @return 登录结果异步任务, 在任务成功后通过<code>getUser</code>获取登录的用户信息。
   */
  signIn(signInParam: SignInParam): Promise<SignInResult>;
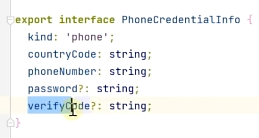
export type CredentialInfo = PhoneCredentialInfo | EmailCredentialInfo;

export interface SignInParam {
  credentialInfo: CredentialInfo;
  autoCreateUser?: boolean; //是否自动创建用户,即第一次登录自动创建用户,默认是true
}
(密码是可选的)

@State verifyCode: string = ''
TextInput({ placeholder: '请输入验证码' })
            .width('55%')
            .type(InputType.Number)
            .onChange(value => {
              this.verifyCode = value
            })
把验证码保存在verifyCode里
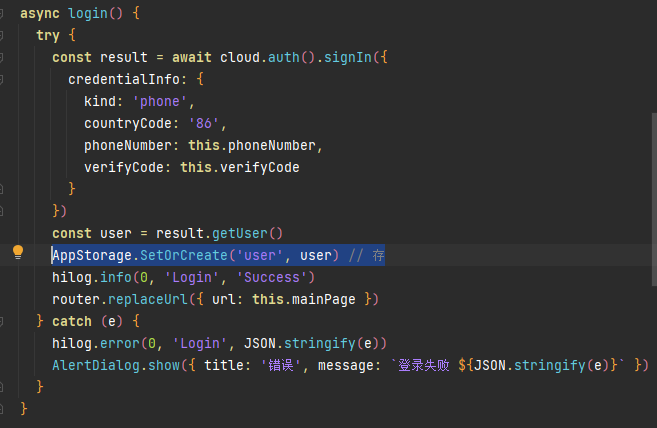
result调getUser方法,拿到AuthUser,记录日志,改成同步模式并封装到函数login中:
  async login() {
    try {
      const result = await cloud.auth().signIn({
        credentialInfo: {
          kind: 'phone',
          countryCode: '86',
          phoneNumber: this.phoneNumber,
          verifyCode: this.verifyCode
        }
      })
      const user = result.getUser()
      AppStorage.SetOrCreate('user', user) // 存
      hilog.info(0, 'Login', 'Success')
      router.replaceUrl({ url: this.mainPage }) //跳转到主页 (alt+enter导包)
    } catch (e) {
      hilog.error(0, 'Login', JSON.stringify(e))
      AlertDialog.show({ title: '错误', message: `登录失败 ${JSON.stringify(e)}` }) //弹出警告窗口
    }
  }
登录按钮:调用login函数,同时要在手机号输入11位并且输入了6位验证码的时候,才可以点击。
Button('登录')
          .enabled(this.phoneNumber.length === 11 && this.verifyCode.length === 6)
          .onClick(() => {
            this.login()
          })
个人设置
初始结构:
登出
signOut不需要参数,返回的promise也没什么东西要处理
Button(`登出`)
 .onClick(async () => {
   try {
     await cloud.auth().signOut()
     hilog.info(0, 'SignOut', 'Success')
     router.replaceUrl({ url: 'pages/MyLoginCustom' })
   } catch (e) {
     hilog.error(0, 'SignOut', JSON.stringify(e))
   }
 })
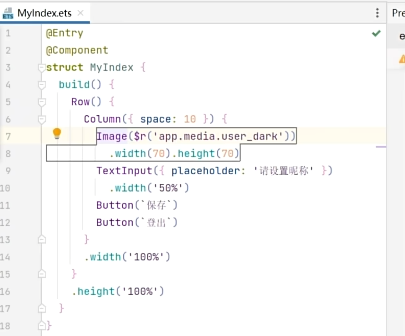
设置头像、昵称
- 取用户原先的头像昵称
用的是appStore方法,在登录的时候存进去
取:@StorageLink('user') user: AuthUser = null//user是对象名
在页面渲染之前准备好数据:
  aboutToAppear() {
    // 1. cloud.auth().getCurrentUser()
    // 2. AppStorage
    this.displayName = this.user?.getDisplayName()
    this.photoUrl = this.user?.getPhotoUrl()
  }
- 用户修改昵称
 TextInput({ placeholder: '请设置昵称', text: this.displayName })
   .width('50%')
   .onChange(value => {
     this.displayName = value
   })
- 头像地址固定
Image(this.photoUrl ? this.photoUrl : $r('app.media.user_dark'))
	.onClick(async () => {
       this.photoUrl = 'https://img.zcool.cn/community/01a6095f110b9fa8012066219b67d4.png@1280w_1l_2o_100sh.png'
       })
- 保存、更新
Button(`保存`)
  .onClick(async () => {
    try {
      await this.user.updateProfile({
        displayName: this.displayName,
        photoUrl: this.photoUrl
      })
      hilog.info(0, 'updateProfile', 'Success')
    } catch (e) {
      hilog.error(0, 'updateProfile', JSON.stringify(e))
    }
  })
- 从相册选择头像,上传云存储
开通云存储服务,sdk配置文件会变化,要重新下载配置文件
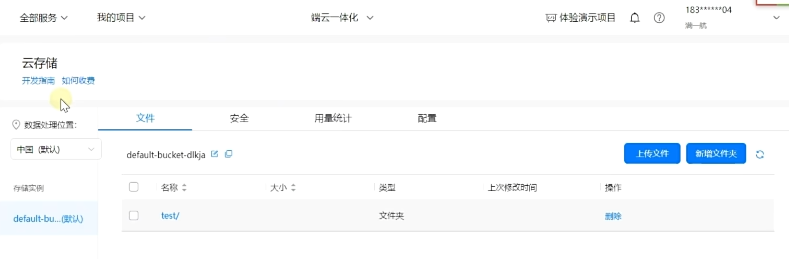

需要更新项目agconnect-services.json文件
从相册中选照片->上传到云存储->拿到网络地址,当头像地址
从相册中选照片,需要picker对象,调用picker.PhotoViewPicker().select():
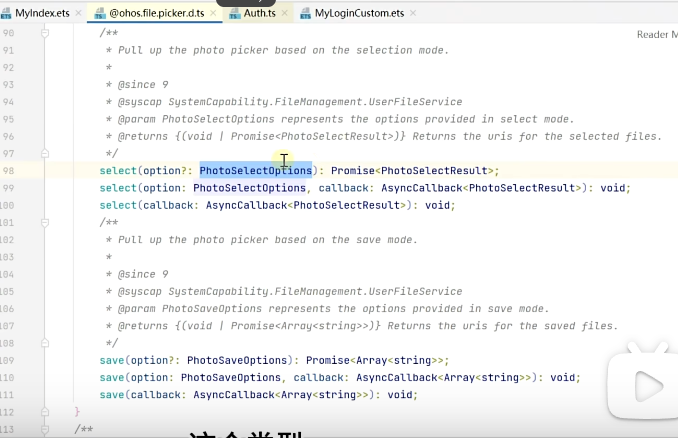
从相册选择照片:
const options = new picker.PhotoSelectOptions()
options.MIMEType = picker.PhotoViewMIMETypes.IMAGE_TYPE //媒体类型:照片/视频/所有
options.maxSelectNumber = 1 //最大选择数量
const result = await new picker.PhotoViewPicker().select(options) //返回promise
hilog.info(0, 'Upload', `Picker Success ${result.photoUris[0]}`)
上传云端:
// 2. 调云存储 api 上传照片
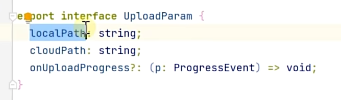
await cloud.storage().upload({
localPath: result.photoUris[0], //本地路径
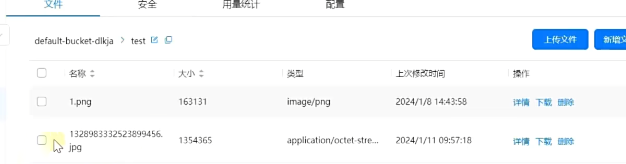
cloudPath: `test/${this.user.getUid()}.jpg`, //云路径
})
获取上传照片的网络地址(云存储的是内部地址,并不是公网地址),调用cloud.storage()云存储对象,获取公网地址
const url = await cloud.storage().getDownloadURL(`test/${this.user.getUid()}.jpg`)
this.photoUrl = url
hilog.info(0, 'Upload', `url: ${url}`)
用try-catch包裹,模拟器选不了照片,使用真机测试。
问题1:
切换头像没有切换过来
云存储过来了
下载下来打开发现,确实改变了,但是程序没更新过来,这是因为图片缓存的问题,两次url名字一样,所以没刷新。
公网地址:
服务器地址-云存储的示例(默认)-目录名-%2F是斜杠-图片名-token参数

切换图片前后公网地址没有发生改变
解决方法:给url加一个随机值(时间值)
this.photoUrl = `${url}&ts=${new Date().getTime()}`
问题2:真机调试无法打印日志
进入华为设备的工程模式
平板在计算器程序里输入()()2846579()()
手机在拨号键盘里输入*#*#2846578#*#*
找到后台设置APLOG设置,打开
问题3:读取照片需要用户授权
端云一体化模板帮忙把配置都做好了,看一下它做了哪些配置
entry/module.json5中,权限部分
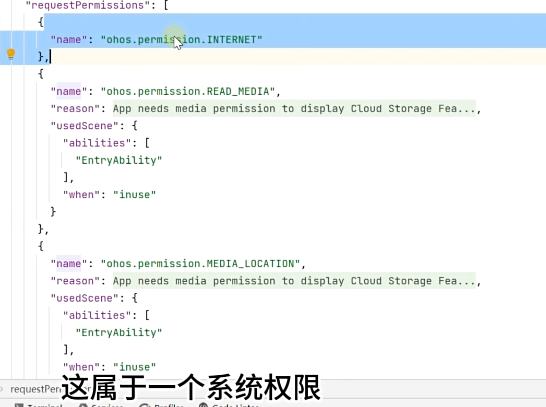
INTERNET是系统权限,READ_MEDIA是读取媒体权限,需要用户授权;MEDIA_LOCATION读取媒体中的地理位置信息,需要用户授权
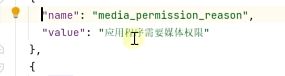
reason:给用户提示信息
usedScene:使用场景(模块)
when,inuse前台,always包括后台也有权限
代码在EntryAbility.ts 的onCreate部分里
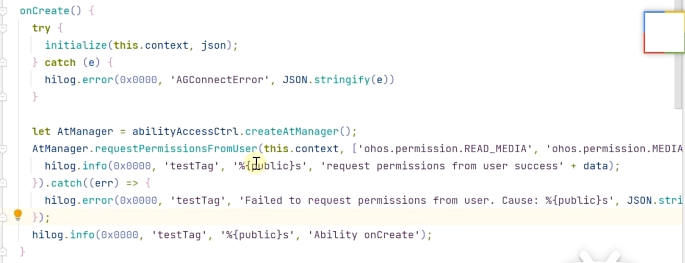
requestPermissionFromUser问用户申请授权,如果拿到,.then(),否则catch((err)=>{}
实际授权效果(在模拟机上也有):
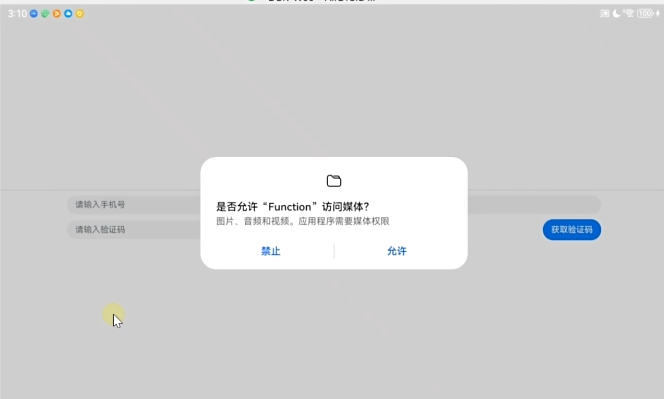
提示信息是从reason来的,那个是一个国际化的信息,其中文是
上传进度功能:展示数字
- 定义上传状态变量(是否处于上传状态中)
@State uploading: boolean = false
 Image(this.photoUrl ? this.photoUrl : $r('app.media.user_dark'))
 .enabled(!this.uploading) //禁止在上传时点击
upload之前设为真,切换好之后设为假
显示上传进度,用stack叠起来
if (this.uploading) {
 // 显示上传进度
 Text(this.uploadingText)
   .width(70) //和图片宽高保持一致
   .height(70)
   .borderRadius(70)
   .fontColor('white')
   .backgroundColor('black')
   .opacity(0.6) //半透明度
   .fontSize(24)
   .fontWeight(FontWeight.Bolder)
   .textAlign(TextAlign.Center)
}
}
- 定义上传百分比
@State uploadingText: string = '0%' - 编写进度回调
await cloud.storage().upload({
   localPath: result.photoUris[0], //本地路径
   cloudPath: `test/${this.user.getUid()}.jpg`, //云路径
   onUploadProgress: event => { //上传过程,回调函数,检测上传进度,可选
     const percent = Math.floor(100 * event.loaded / event.total) //已上传/总的,舍去小数点
     this.uploadingText = `${percent}%`
   }
 })
问题:不能登录
没有登出,强制结束程序,下次再登录就上不去,报错:
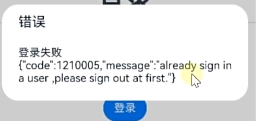
如何检查用户会话还在?找AuthUser是否==0,!=表示没有断开,直接跳到个人主页
async aboutToAppear() {
  try {
    const user = await cloud.auth().getCurrentUser()
    if (user != null) {
      AppStorage.SetOrCreate('user', user) // 存
      router.replaceUrl({ url: this.mainPage })
    }
  } catch (e) {
    hilog.error(0, 'Login', JSON.stringify(e))
  }
}


 476
476


 被折叠的 条评论
为什么被折叠?
被折叠的 条评论
为什么被折叠?
 到【灌水乐园】发言


