


引言:ArrayList和LinkedList都是实现了List接口的容器类,都可以用来用于存储一系列的对象引用。但是他们两者内部的结构却是完全不一致的,ArrayList的内部是基于数组的,而LinkedList的内部却是基于循环双向链表的。下面通过查看两者的源码,来理解内部的实现原理。
1. ArrayList
ArrayList 是一个数组构成的队列,相当于动态大小的数组。与Java中的数组相比,它的容量能动态增长。它继承于AbstractList,实现了List, RandomAccess, Cloneable, java.io.Serializable这些接口。
ArrayList 继承了AbstractList,实现了List。它是一个数组队列,提供了相关的添加、删除、修改、遍历等功能。
ArrayList 实现了RandomAccess接口,即提供了随机访问功能。RandomAccess是java中用来被List实现,为List提供快速访问功能的。在ArrayList中,我们即可以通过元素的序号快速获取元素对象;这就是快速随机访问。
ArrayList 实现了Cloneable接口,即覆盖了函数clone(),能被克隆。
ArrayList 实现java.io.Serializable接口,这意味着ArrayList支持序列化,能通过序列化去传输。
和Vector不同,ArrayList中的操作不是线程安全的!所以,建议在单线程中才使用ArrayList,而在多线程中可以选择Vector或者CopyOnWriteArrayList。

由ArrayList的源代码可以知道,ArrayList是基于数组实现的。那么ArrayList内部的增删改查的方法都是基于这个数组的。下面通过剖析相关操作方法来分析效率如何。
下面查看ArrayList是如何构造的,提供了三个构造函数:
如果传入参数,则代表指定ArrayList的初始数组长度,传入参数如果是大于等于0,则使用用户的参数初始化,如果用户传入的参数小于0,则抛出异常,构造方法如下:
/**
 * Constructs an empty list with the specified initial capacity.
 *
 * @param  initialCapacity  the initial capacity of the list
 * @throws IllegalArgumentException if the specified initial capacity
 *         is negative
 */
public ArrayList(int initialCapacity) {
    if (initialCapacity > 0) {
        this.elementData = new Object[initialCapacity];
    } else if (initialCapacity == 0) {
        this.elementData = EMPTY_ELEMENTDATA;
    } else {
        throw new IllegalArgumentException("Illegal Capacity: "+
                                           initialCapacity);
    }
}

如果不传入参数,则使用默认无参构建方法创建ArrayList对象,如下:
注意:此时我们创建的ArrayList对象中的elementData中的长度是1,size是0,当进行第一次add的时候,elementData将会变成默认的长度:10.
/**
 * Constructs an empty list with an initial capacity of ten.
 */
public ArrayList() {
    this.elementData = DEFAULTCAPACITY_EMPTY_ELEMENTDATA;
}

带Collection对象的构造函数
1)将collection对象转换成数组,然后将数组的地址的赋给elementData。
2)更新size的值,同时判断size的大小,如果是size等于0,直接将空对象EMPTY_ELEMENTDATA的地址赋给elementData
3)如果size的值大于0,则执行Arrays.copy方法,把collection对象的内容(可以理解为深拷贝)copy到elementData中。

注意:this.elementData = arg0.toArray(); 这里执行的简单赋值时浅拷贝,所以要执行Arrays,copy 做深拷贝

/**
 * Constructs a list containing the elements of the specified
 * collection, in the order they are returned by the collection's
 * iterator.
 *
 * @param c the collection whose elements are to be placed into this list
 * @throws NullPointerException if the specified collection is null
 */
public ArrayList(Collection<? extends E> c) {
    elementData = c.toArray();
    if ((size = elementData.length) != 0) {
        // c.toArray might (incorrectly) not return Object[] (see 6260652)
        if (elementData.getClass() != Object[].class)
            elementData = Arrays.copyOf(elementData, size, Object[].class);
    } else {
        // replace with empty array.
        this.elementData = EMPTY_ELEMENTDATA;
    }
}
2.1 add方法
2.1.1 添加元素到数组末尾的add方法
/**
 * Appends the specified element to the end of this list.
 *
 * @param e element to be appended to this list
 * @return <tt>true</tt> (as specified by {@link Collection#add})
 */
public boolean add(E e) {
    ensureCapacityInternal(size + 1);  // Increments modCount!! //确保内部数组有足够的空间
    elementData[size++] = e; //将元素加入到数组的末尾,完成添加
    return true;
}
private void ensureCapacityInternal(int minCapacity) {
if (elementData == DEFAULTCAPACITY_EMPTY_ELEMENTDATA) {
minCapacity = Math.max(DEFAULT_CAPACITY, minCapacity);
}
ensureExplicitCapacity(minCapacity);
}private void ensureExplicitCapacity(int minCapacity) {
modCount++;
// overflow-conscious code
if (minCapacity - elementData.length > 0)
grow(minCapacity);
}/**
* Increases the capacity to ensure that it can hold at least the
* number of elements specified by the minimum capacity argument.
*
* @param minCapacity the desired minimum capacity
*/
private void grow(int minCapacity) {
// overflow-conscious code
int oldCapacity = elementData.length;
int newCapacity = oldCapacity + (oldCapacity >> 1); //扩充当前容量的1.5倍
if (newCapacity - minCapacity < 0)
newCapacity = minCapacity;
if (newCapacity - MAX_ARRAY_SIZE > 0) //如果数组容量不足,进行扩容
newCapacity = hugeCapacity(minCapacity);
// minCapacity is usually close to size, so this is a win:
elementData = Arrays.copyOf(elementData, newCapacity); //将数据复制到一个新的size大小的数组中去
}上面的add的方法代码是在ArrayList的末尾添加一个元素。添加过程如下:
1)确保数组已使用长度(size)加1之后足够存下 下一个数据
2)修改次数modCount 标识自增1,如果当前数组已使用长度(size)加1后的大于当前的数组长度,则调用grow方法,增长数组,grow方法会将当前数组的长度变为原来容量的1.5倍。
3)确保新增的数据有地方存储之后,则将新元素添加到位于size的位置上。
4)返回添加成功布尔值。
2.1.2 添加元素到数组中任意位置的add方法
/**
* Inserts the specified element at the specified position in this
* list. Shifts the element currently at that position (if any) and
* any subsequent elements to the right (adds one to their indices).
*
* @param index index at which the specified element is to be inserted
* @param element element to be inserted
* @throws IndexOutOfBoundsException {@inheritDoc}
*/
public void add(int index, E element) {
rangeCheckForAdd(index);
ensureCapacityInternal(size + 1); // Increments modCount!!
System.arraycopy(elementData, index, elementData, index + 1,
size - index); //
elementData[index] = element;
size++;
}/**
* A version of rangeCheck used by add and addAll.
*/
private void rangeCheckForAdd(int index) {
if (index > size || index < 0)
throw new IndexOutOfBoundsException(outOfBoundsMsg(index));
}
上面的代码是在ArrayList集合的任意位置添加一个元素的方法,添加过程如下:
1)确保数插入的位置小于等于当前数组长度,并且不小于0,否则抛出异常
2)确保数组已使用长度(size)加1之后足够存下 下一个数据
3)修改次数(modCount)标识自增1,如果当前数组已使用长度(size)加1后的大于当前的数组长度,则调用grow方法,增长数组
4)grow方法会将当前数组的长度变为原来容量的1.5倍。
5)确保有足够的容量之后,使用System.arraycopy 将需要插入的位置(index)后面的元素统统往后移动一位。
6)将新的数据内容存放到数组的指定位置(index)上
注意:使用该方法的话将导致指定位置后面的数组元素全部重新移动,即往后移动一位。
从ArrayList的add方法我们可以得出结论,如果是在集合的任意位置(除了末尾)添加元素,过程是非常慢的,添加的位置以后的所有元素都要后移一位,效率非常慢。
2.2 remove方法
2.2.1 删除数组中指定索引位置元素的remove方法
/**
 * Removes the element at the specified position in this list.
 * Shifts any subsequent elements to the left (subtracts one from their
 * indices).
 *
 * @param index the index of the element to be removed
 * @return the element that was removed from the list
 * @throws IndexOutOfBoundsException {@inheritDoc}
 */
public E remove(int index) {
    rangeCheck(index);

    modCount++;
    E oldValue = elementData(index);

    int numMoved = size - index - 1;
    if (numMoved > 0)
        System.arraycopy(elementData, index+1, elementData, index,
                         numMoved); //将指定位置(index)之后的元素都往前移动一位
    elementData[--size] = null; // clear to let GC do its work 将最后面的一个元素置空,好让垃圾回收器回收

    return oldValue;
}
上面的代码remove方法是删除指定索引位置的元素,删除的步骤如下:
1)判断索引有没有越界
2)自增修改次数
3)将指定位置(index)上的元素保存到oldValue
4)将指定位置(index)之后的元素都往前移动一位
5)将最后面的一个元素置空,好让垃圾回收器回收
6)将原来的值oldValue返回
从remove(int index)方法的源码可知,移除指定位置的元素,效率什么缓慢,如果index很在前,而ArrayList size很大的话,remove将什么耗时间。
2.2.2 删除指定对象
/**
* Removes the first occurrence of the specified element from this list,
* if it is present. If the list does not contain the element, it is
* unchanged. More formally, removes the element with the lowest index
* <tt>i</tt> such that
* <tt>(o==null ? get(i)==null : o.equals(get(i)))</tt>
* (if such an element exists). Returns <tt>true</tt> if this list
* contained the specified element (or equivalently, if this list
* changed as a result of the call).
*
* @param o element to be removed from this list, if present
* @return <tt>true</tt> if this list contained the specified element
*/
public boolean remove(Object o) {
if (o == null) {
for (int index = 0; index < size; index++)
if (elementData[index] == null) {
fastRemove(index);
return true;
}
} else {
for (int index = 0; index < size; index++)
if (o.equals(elementData[index])) {
fastRemove(index);
return true;
}
}
return false;
}/*
* Private remove method that skips bounds checking and does not
* return the value removed.
*/
private void fastRemove(int index) {
modCount++;
int numMoved = size - index - 1;
if (numMoved > 0)
System.arraycopy(elementData, index+1, elementData, index,
numMoved);
elementData[--size] = null; // clear to let GC do its work
}从上面的删除代码可以知道,最后也是先获取要删除元素的位置index,然后再删除指定位置的元素,效率也什么缓慢。
2.3 get方法
/**
 * Returns the element at the specified position in this list.
 *
 * @param  index index of the element to return
 * @return the element at the specified position in this list
 * @throws IndexOutOfBoundsException {@inheritDoc}
 */
public E get(int index) {
    rangeCheck(index);

    return elementData(index);
}
@SuppressWarnings("unchecked")
E elementData(int index) {
return (E) elementData[index];
}从上面的get获取方法源代码可以知道,获取get某一个位置的元素的过程什么简单,效率非常高,其实最后就是获取数组中某个位置的元素。
下面总结一下ArrayList的特点:
1. ArrayList自己实现了序列化和反序列化的方法,因为它自己实现了 private void writeObject(java.io.ObjectOutputStream s)和 private void readObject(java.io.ObjectInputStream s) 方法。
2. ArrayList基于数组方式实现,无容量的限制(可以进行容量的扩容)。
3. 线程不安全
4. add,remove性能比较差
5. get性能比较好
2. LinkedList
LinkedList 是一个继承于AbstractSequentialList的双向链表。它也可以被当作堆栈、队列或双端队列进行操作。
LinkedList 实现 List 接口,能对它进行队列操作。
LinkedList 实现 Deque 接口,即能将LinkedList当作双端队列使用。
LinkedList 实现了Cloneable接口,即覆盖了函数clone(),能克隆。
LinkedList 实现java.io.Serializable接口,这意味着LinkedList支持序列化,能通过序列化去传输。
LinkedList 是非同步的,也就是非线程安全的。
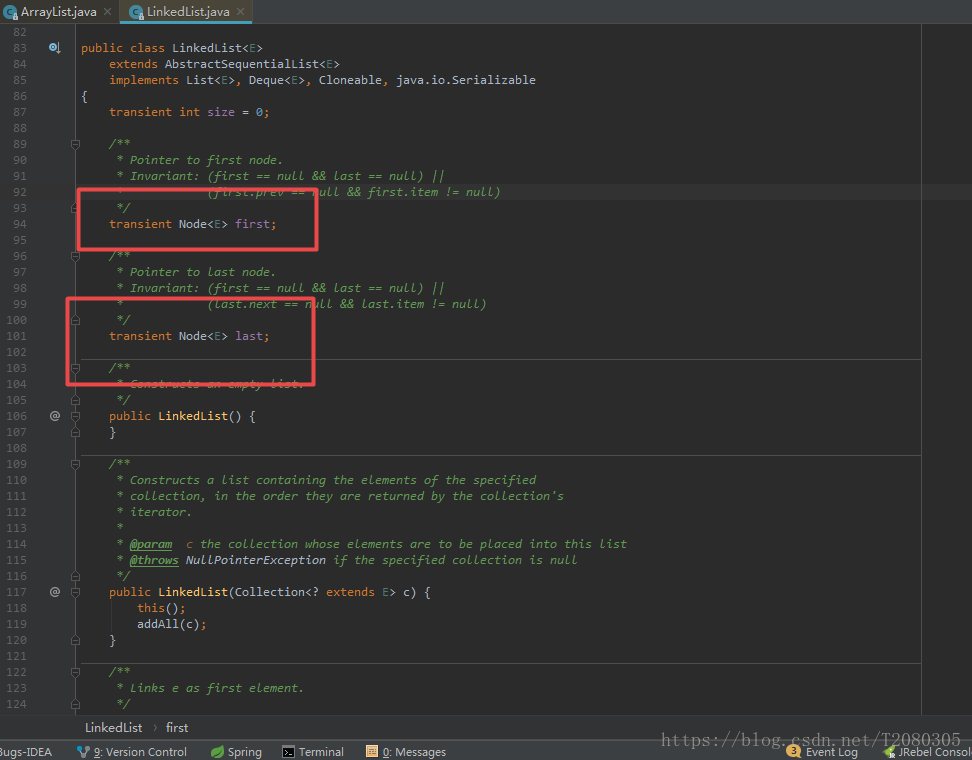
LinkedList内部是一个双端链表结构,有两个变量,first指向链表头部,last指向链表尾部。 其中size表示当前链表中的数据个数
LinkedtList内部的成员变量如下:
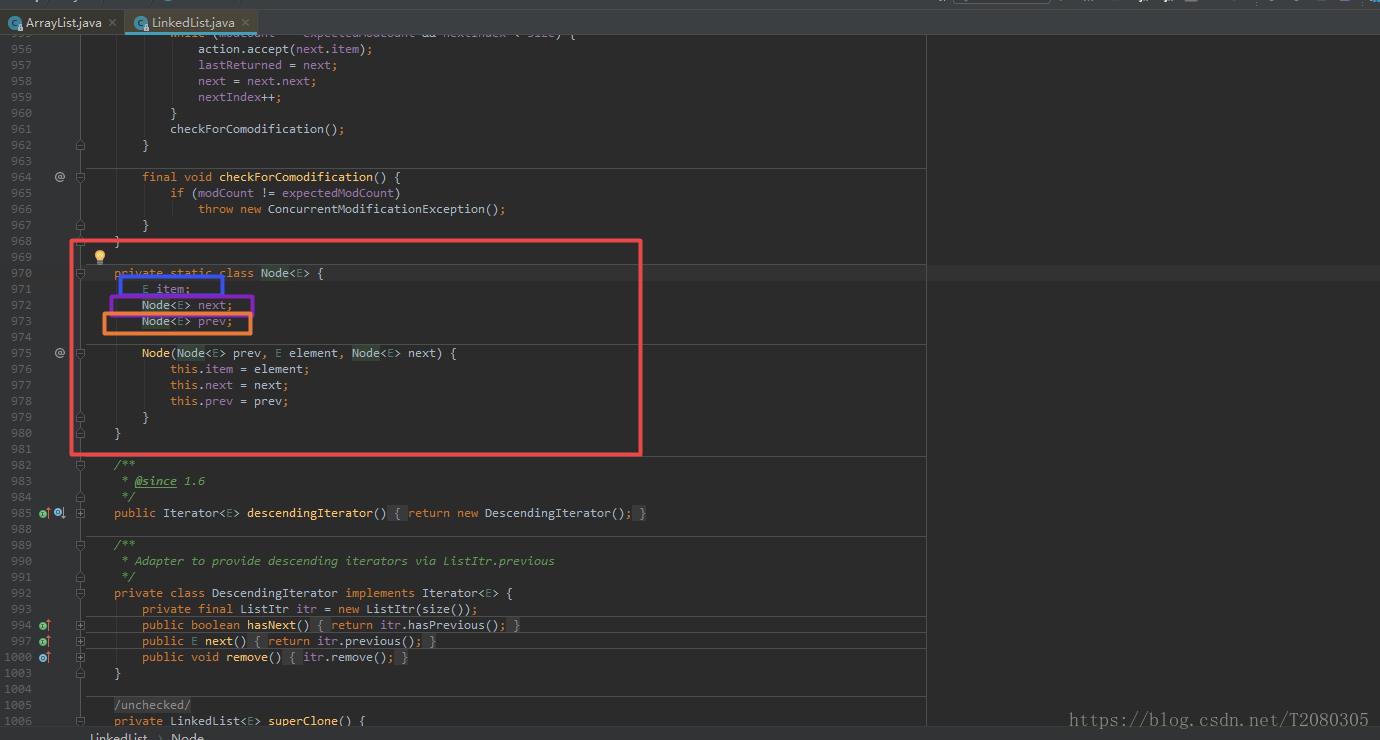
下面是Node节点的定义,Node类是LinkedList类的私有的静态内部类。从Node的结构可以看出,LinkedList是一个循环的双向链表的结构。
下面是LinkedList的构造函数,提供了两个构造函数:

空的构造函数,构造一个空的链表
/**
 * Constructs an empty list.
 */
public LinkedList() {
}

将集合中所有元素添加到链表中
/**
 * Constructs a list containing the elements of the specified
 * collection, in the order they are returned by the collection's
 * iterator.
 *
 * @param  c the collection whose elements are to be placed into this list
 * @throws NullPointerException if the specified collection is null
 */
public LinkedList(Collection<? extends E> c) {
    this();
    addAll(c);
}
下面通过LinkedList的几个操作方法,来观察LinkedList在操作数据方面的效率。
因为LinkedList实现了List接口和两个Deque接口,所以LinkedList既可以将元素添加到尾部,也可以将元素添加到指定索引位置,还可以添加整个集合;另外可以在头部添加,又可以在尾部添加。下面我们分别从List接口和Deque接口分别介绍。
List接口的添加操作
2.1 add方法
2.1.1 将元素添加到链表的尾部
/**
 * Appends the specified element to the end of this list.
 *
 * <p>This method is equivalent to {@link #addLast}.
 *
 * @param e element to be appended to this list
 * @return {@code true} (as specified by {@link Collection#add})
 */
public boolean add(E e) {
    linkLast(e);
    return true;
}
/**
* Links e as last element.
*/
void linkLast(E e) {
final Node<E> l = last; //指向链表尾部
final Node<E> newNode = new Node<>(l, e, null);
last = newNode;//将新节点作为链表的尾部
if (l == null) //如果链表为空,那么该节点既是头结点,也是尾节点
first = newNode;
else 链表不为空,那么将该结点作为原链表尾部的后继节点
l.next = newNode;
size++;
modCount++;
}从上面代码可以看到,linkLast方法中就是一个链表尾部添加一个双端节点的操作,但是需要注意对链表为空时头节点的处理。
2.1.2 在指定位置添加元素
/**
 * Inserts the specified element at the specified position in this list.
 * Shifts the element currently at that position (if any) and any
 * subsequent elements to the right (adds one to their indices).
 *
 * @param index index at which the specified element is to be inserted
 * @param element element to be inserted
 * @throws IndexOutOfBoundsException {@inheritDoc}
 */
public void add(int index, E element) {
    checkPositionIndex(index);

    if (index == size)
        linkLast(element);
    else
        linkBefore(element, node(index));
}
/**
* Inserts element e before non-null Node succ.
*/
void linkBefore(E e, Node<E> succ) {
// assert succ != null;
final Node<E> pred = succ.prev;
final Node<E> newNode = new Node<>(pred, e, succ);
succ.prev = newNode;
if (pred == null)
first = newNode;
else
pred.next = newNode;
size++;
modCount++;
}从上图代码可以看到linkBefore主要分三步:
1. 创建newNode节点,将newNode的后继指针指向succ,前驱指针指向pred
2. 将succ的前驱指针指向newNode
3. 根据pred是否为null,进行不同操作。
- 如果pred为null,说明该节点插入在头节点之前,要重置first头节点
- 如果pred不为null,那么直接将pred的后继指针指向newNode即可
Deque接口的添加操作
addFirst(E e)方法
addFirst()方法用于将元素添加到链表头部
public void addFirst(E e) {
linkFirst(e);
}
private void linkFirst(E e) {
final Node<E> f = first;
final Node<E> newNode = new Node<>(null, e, f);//新建节点,以头节点为后继节点
first = newNode;
//如果链表为空,last节点也指向该节点
if (f == null)
last = newNode;
//否则,将头节点的前驱指针指向新节点
else
f.prev = newNode;
size++;
modCount++;
}
addLast(E e)方法
addLast()方法用于将元素添加到链表尾部,与add()方法一样。所以实现也一样,如下:
public void addLast(E e) {
linkLast(e);
}
从上面的LinkedList的add方法来看,无论是哪种增加的方法,影响的元素很小,也就是说,LinkedList的增加数据的方法的效率很高。不像ArrayList的add方法,如果是在除末尾添加元素,那么会影响当前index之后所有的元素,效率很差。
2.2 remove方法
2.2.1 删除指定元素的方法
/**
* Removes the first occurrence of the specified element from this list,
* if it is present. If this list does not contain the element, it is
* unchanged. More formally, removes the element with the lowest index
* {@code i} such that
* <tt>(o==null ? get(i)==null : o.equals(get(i)))</tt>
* (if such an element exists). Returns {@code true} if this list
* contained the specified element (or equivalently, if this list
* changed as a result of the call).
*
* @param o element to be removed from this list, if present
* @return {@code true} if this list contained the specified element
*/
public boolean remove(Object o) {
if (o == null) {
for (Node<E> x = first; x != null; x = x.next) {
if (x.item == null) {
unlink(x);
return true;
}
}
} else {
for (Node<E> x = first; x != null; x = x.next) {
if (o.equals(x.item)) {
unlink(x);
return true;
}
}
}
return false;
}E unlink(Node<E> x) {
// assert x != null;
final E element = x.item;
final Node<E> next = x.next;//得到后继节点
final Node<E> prev = x.prev;//得到前驱节点
//删除前驱指针
if (prev == null) {
first = next;如果删除的节点是头节点,令头节点指向该节点的后继节点
} else {
prev.next = next;//将前驱节点的后继节点指向后继节点
x.prev = null;
}
//删除后继指针
if (next == null) {
last = prev;//如果删除的节点是尾节点,令尾节点指向该节点的前驱节点
} else {
next.prev = prev;
x.next = null;
}
x.item = null;
size--;
modCount++;
return element;
}/**
* Removes the element at the specified position in this list. Shifts any
* subsequent elements to the left (subtracts one from their indices).
* Returns the element that was removed from the list.
*
* @param index the index of the element to be removed
* @return the element previously at the specified position
* @throws IndexOutOfBoundsException {@inheritDoc}
*/
public E remove(int index) {
checkElementIndex(index);
return unlink(node(index));
}
2.2.2 删除指定位置的元素方法
/**
 * Returns the (non-null) Node at the specified element index.
 */
Node<E> node(int index) {
    // assert isElementIndex(index);

    if (index < (size >> 1)) {
        Node<E> x = first;
        for (int i = 0; i < index; i++)
            x = x.next;
        return x;
    } else {
        Node<E> x = last;
        for (int i = size - 1; i > index; i--)
            x = x.prev;
        return x;
    }
}
从上面的remove方法可以看出,无论是哪种remove方法,其中的删除逻辑都是先找到需要删除的元素,然后再进行节点的重新指向操作,其实删除的效率都花在了循环查找元素的身上,因此删除的效率就依赖于查找的效率。
2.3 get方法
/**
 * Returns the element at the specified position in this list.
 *
 * @param index index of the element to return
 * @return the element at the specified position in this list
 * @throws IndexOutOfBoundsException {@inheritDoc}
 */
public E get(int index) {
    checkElementIndex(index);
    return node(index).item;
}
/**
* Returns the (non-null) Node at the specified element index.
*/
Node<E> node(int index) {
// assert isElementIndex(index);
// 若index < 双向链表长度的1/2,则从前先后查找;
// 否则,从后向前查找。
if (index < (size >> 1)) {
Node<E> x = first;
for (int i = 0; i < index; i++)
x = x.next;
return x;
} else {
Node<E> x = last;
for (int i = size - 1; i > index; i--)
x = x.prev;
return x;
}
}该方法返回双向链表中指定位置处的节点,而链表中是没有下标索引的,要指定位置出的元素,就要遍历该链表,从源码的实现中,我们看到这里有一个加速动作。源码中先将index与长度size的一半比较,如果index<size/2,就只从位置0往后遍历到位置index处,而如果index>size/2,就只从位置size往前遍历到位置index处。这样可以减少一部分不必要的遍历。
3. 两者的优缺点对比
3.1 ArrayList是实现了基于动态数组的数据结构,LinkedList基于链表的数据结构
3.2 LinkedList不支持高效的随机元素访问,ArrayList支持高效的随机元素访问
3.3 对于新增和删除操作add和remove,LinedList比较占优势,因为ArrayList要移动数据,LinkedList只需要改变节点的指向即可。
总结:当操作是在一列数据的后面添加数据而不是在前面或中间,并且需要随机地访问其中的元素时,使用ArrayList会提供比较好的性能,当你的操作是在一列数据的前面或中间添加或删除数据,并且按照顺序访问其中的元素时,就应该使用LinkedList了。


 2万+
2万+


 被折叠的 条评论
为什么被折叠?
被折叠的 条评论
为什么被折叠?
 到【灌水乐园】发言


