


volume
环境
192.168.48.101 master01
192.168.48.201 node01
192.168.48.202 node02
192.168.48.54  nfs
empty
临时存储
编写empty yaml
vim myapp-empty.yaml

apiVersion: v1
kind: Pod
metadata:
  name: myapp-empty
  namespace: default
  labels:
    app: myapp
    type: pod
spec:
  containers:
  - name: myapp
    image: ikubernetes/myapp:v1
    ports:
    - name: http
      containerPort: 80
    volumeMounts:
    - name: html
      mountPath: /usr/share/nginx/html/
  - name: busybox
    image: busybox:latest
    imagePullPolicy: IfNotPresent
    command:
    - "/bin/sh"
    - "-c"
    - "echo 'this is test' > /data/test.html;sleep 3600"
    volumeMounts:
    - name: html
      mountPath: /data/
  volumes:
  - name: html
    emptyDir: {}
创建empty yaml
[root@master01 volume_yaml]# kubectl apply -f myapp-empty.yaml
pod/myapp-empty created

[root@master01 volume_yaml]# kubectl get pod -o wide
NAME                           READY   STATUS    RESTARTS   AGE   IP           NODE     NOMINATED NODE   READINESS GATES
demo-deploy-8675c97685-vhncn   1/1     Running   0          13d   10.244.2.5   node02   <none>           <none>
demo-deploy-8675c97685-w7md2   1/1     Running   0          13d   10.244.1.5   node01   <none>           <none>
demo-pod                       2/2     Running   3          13d   10.244.2.4   node02   <none>           <none>
myapp-empty                    2/2     Running   0          10s   10.244.1.8   node01   <none>           <none>
测试
[root@master01 volume_yaml]# kubectl get pod -o wide
NAME                           READY   STATUS    RESTARTS   AGE     IP           NODE     NOMINATED NODE   READINESS GATES
demo-deploy-8675c97685-vhncn   1/1     Running   0          13d     10.244.2.5   node02   <none>           <none>
demo-deploy-8675c97685-w7md2   1/1     Running   0          13d     10.244.1.5   node01   <none>           <none>
demo-pod                       2/2     Running   3          13d     10.244.2.4   node02   <none>           <none>
myapp-empty                    2/2     Running   0          3m31s   10.244.1.8   node01   <none>           <none>
[root@master01 volume_yaml]# curl 10.244.1.8/test.html
this is test
hostpath
主机本地挂载
编写hostpath yaml
vim myapp-hostpath.yaml

apiVersion: v1
kind: Pod
metadata:
  name: myapp-hostpath
  namespace: default
  labels:
    app: myapp
    type: pod
spec:
  containers:
  - name: myapp
    image: ikubernetes/myapp:v1
    ports:
    - name: http
      containerPort: 80
    volumeMounts:
    - name: html
      mountPath: /usr/share/nginx/html/
  volumes:
  - name: html
    hostPath:
      path: /data/pod/
      type: DirectoryOrCreate
创建hostpath yaml
[root@master01 volume_yaml]# kubectl apply -f myapp-hostpath.yaml
pod/myapp-hostpath created
[root@master01 volume_yaml]# kubectl get pod -o wide
NAME                           READY   STATUS    RESTARTS   AGE   IP           NODE     NOMINATED NODE   READINESS GATES
demo-deploy-8675c97685-vhncn   1/1     Running   0          13d   10.244.2.5   node02   <none>           <none>
demo-deploy-8675c97685-w7md2   1/1     Running   0          13d   10.244.1.5   node01   <none>           <none>
demo-pod                       2/2     Running   3          13d   10.244.2.4   node02   <none>           <none>
myapp-empty                    2/2     Running   0          11m   10.244.1.8   node01   <none>           <none>
myapp-hostpath                 1/1     Running   0          7s    10.244.1.9   node01   <none>           <none>
测试
[root@master01 volume_yaml]# kubectl get pod -o wide
NAME                           READY   STATUS    RESTARTS   AGE     IP           NODE     NOMINATED NODE   READINESS GATES
demo-deploy-8675c97685-vhncn   1/1     Running   0          13d     10.244.2.5   node02   <none>           <none>
demo-deploy-8675c97685-w7md2   1/1     Running   0          13d     10.244.1.5   node01   <none>           <none>
demo-pod                       2/2     Running   3          13d     10.244.2.4   node02   <none>           <none>
myapp-empty                    2/2     Running   0          13m     10.244.1.8   node01   <none>           <none>
myapp-hostpath                 1/1     Running   0          2m22s   10.244.1.9   node01   <none>           <none>

[root@node01 ~]# cd /data/pod/
[root@node01 pod]# echo "this is test" > test.html

[root@master01 volume_yaml]# curl 10.244.1.9/test.html
this is test
nfs
准备一台虚拟机用作nfs服务器
所有节点安装nfs
yum -y install nfs-utils
创建目录
nfs nfs服务器建立共享挂载目录
[root@nfs ~]# mkdir /data/volumes/ -pv
nfs配置文件
[root@nfs ~]# vim /etc/exports

/data/volumes    192.168.48.0/24(insecure,rw,async,no_root_squash)
启动nfs
systemctl start nfs
systemctl enable nfs
各节点挂载nfs
mount -t nfs 192.168.48.54:/data/volumes /mnt
编写nfs yaml
vim myapp-nfs.yaml

apiVersion: v1
kind: Pod
metadata:
  name: myapp-nfs
  namespace: default
  labels:
    app: myapp
    type: pod
spec:
  containers:
  - name: myapp
    image: ikubernetes/myapp:v1
    ports:
    - name: http
      containerPort: 80
    volumeMounts:
    - name: html
      mountPath: /usr/share/nginx/html/
  volumes:
  - name: html
    nfs:
      path: /data/volumes
      server: nfs
创建nfs yaml
[root@master01 volume_yaml]# kubectl apply -f myapp-nfs.yaml
pod/myapp-nfs created
[root@master01 volume_yaml]# kubectl get pod -o wide
NAME                           READY   STATUS    RESTARTS   AGE   IP            NODE     NOMINATED NODE   READINESS GATES
demo-deploy-8675c97685-vhncn   1/1     Running   0          13d   10.244.2.5    node02   <none>           <none>
demo-deploy-8675c97685-w7md2   1/1     Running   0          13d   10.244.1.5    node01   <none>           <none>
demo-pod                       2/2     Running   4          13d   10.244.2.4    node02   <none>           <none>
myapp-empty                    2/2     Running   0          36m   10.244.1.8    node01   <none>           <none>
myapp-hostpath                 1/1     Running   0          17m   10.244.2.6    node02   <none>           <none>
myapp-nfs                      1/1     Running   0          13s   10.244.1.10   node01   <none>           <none>
测试
[root@nfs ~]# echo "this is test" > /data/volumes/test.html

[root@master01 volume_yaml]# kubectl get pod -o wide
NAME                           READY   STATUS    RESTARTS   AGE   IP            NODE     NOMINATED NODE   READINESS GATES
demo-deploy-8675c97685-vhncn   1/1     Running   0          13d   10.244.2.5    node02   <none>           <none>
demo-deploy-8675c97685-w7md2   1/1     Running   0          13d   10.244.1.5    node01   <none>           <none>
demo-pod                       2/2     Running   4          13d   10.244.2.4    node02   <none>           <none>
myapp-empty                    2/2     Running   0          36m   10.244.1.8    node01   <none>           <none>
myapp-hostpath                 1/1     Running   0          17m   10.244.2.6    node02   <none>           <none>
myapp-nfs                      1/1     Running   0          13s   10.244.1.10   node01   <none>           <none>

[root@master01 volume_yaml]# curl 10.244.1.10/test.html
this is test
pv
Kubernetes 支持的 PV 类型有很多,比如常见的 Ceph、GlusterFs、NFS,甚至 HostPath也可以,不过 HostPath 我们之前也说过仅仅可以用于单机测试,更多的支持类型可以前往 Kubernetes PV 官方文档进行查看,因为每种存储类型都有各自的特点,所以我们在使用的时候可以去查看相应的文档来设置对应的参数。
编写nfs配置文件并重启
[root@nfs ~]# mkdir /data/volumes/v{1..5}


[root@nfs ~]# vim /etc/exports

/data/volumes    192.168.48.0/24(insecure,rw,async,no_root_squash)
/data/volumes/v1    192.168.48.0/24(insecure,rw,async,no_root_squash)
/data/volumes/v2    192.168.48.0/24(insecure,rw,async,no_root_squash)
/data/volumes/v3    192.168.48.0/24(insecure,rw,async,no_root_squash)
/data/volumes/v4    192.168.48.0/24(insecure,rw,async,no_root_squash)
/data/volumes/v5    192.168.48.0/24(insecure,rw,async,no_root_squash)

[root@nfs ~]# systemctl restart nfs
编写pv yaml
vim myapp-pv.yaml

apiVersion: v1
kind: PersistentVolume
metadata:
  name: pv01
  labels:
    name: pv01
    type: pv
spec:
  nfs:
    path: /data/volumes/v1
    server: nfs
  accessModes: ["ReadWriteMany"]
  capacity:
    storage: 5Gi
---
apiVersion: v1
kind: PersistentVolume
metadata:
  name: pv02
  labels:
    name: pv02
    type: pv
spec:
  nfs:
    path: /data/volumes/v2
    server: nfs
  accessModes: ["ReadWriteMany"]
  capacity:
    storage: 10Gi
---
apiVersion: v1
kind: PersistentVolume
metadata:
  name: pv03
  labels:
    name: pv03
    type: pv
spec:
  nfs:
    path: /data/volumes/v3
    server: nfs
  accessModes: ["ReadWriteMany"]
  capacity:
    storage: 15Gi
---
apiVersion: v1
kind: PersistentVolume
metadata:
  name: pv04
  labels:
    name: pv04
    type: pv
spec:
  nfs:
    path: /data/volumes/v4
    server: nfs
  accessModes: ["ReadWriteMany"]
  capacity:
    storage: 20Gi
---
apiVersion: v1
kind: PersistentVolume
metadata:
  name: pv05
  labels:
    name: pv05
    type: pv
spec:
  nfs:
    path: /data/volumes/v5
    server: nfs
  accessModes: ["ReadWriteMany"]
  capacity:
    storage: 25Gi
capacity
一般来说,一个 PV 对象都要指定一个存储能力,通过 PV 的 capacity属性来设置的,目前只支持存储空间的设置,就是我们这里的 storage=1Gi,不过未来可能会加入 IOPS、吞吐量等指标的配置。
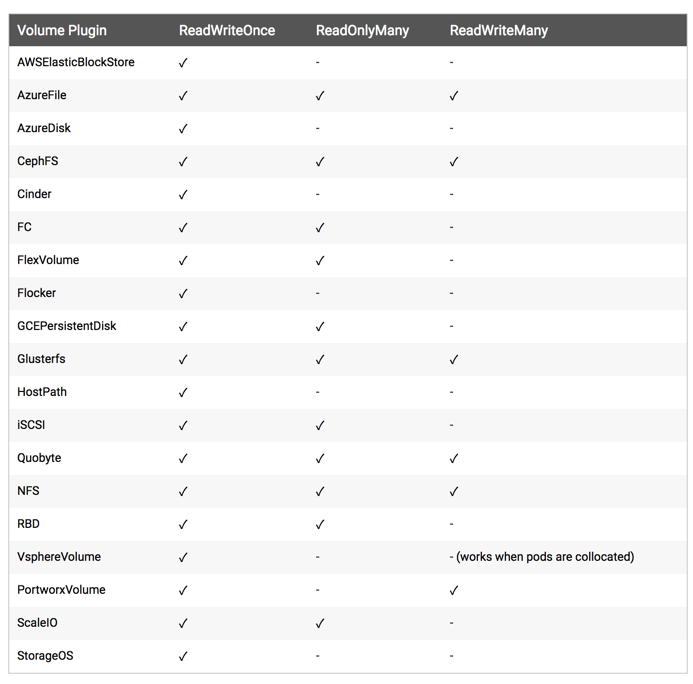
accessModes
AccessModes 是用来对 PV 进行访问模式的设置,用于描述用户应用对存储资源的访问权限,访问权限包括下面几种方式:
- ReadWriteOnce(RWO):读写权限,但是只能被单个节点挂载
- ReadOnlyMany(ROX):只读权限,可以被多个节点挂载
- ReadWriteMany(RWX):读写权限,可以被多个节点挂载
[外链图片转存失败(img-D6E4lpWk-1563104539469)(https://i.loli.net/2019/04/13/5cb1812b861ea.png)]
persistentVolumeReclaimPolicy
我这里指定的 PV 的回收策略为 Recycle,目前 PV 支持的策略有三种:
- Retain(保留)- 保留数据,需要管理员手工清理数据
- Recycle(回收)- 清除 PV 中的数据,效果相当于执行 rm -rf /thevoluem/*
- Delete(删除)- 与 PV 相连的后端存储完成 volume 的删除操作,当然这常见于云服务商的存储服务,比如 ASW EBS。
不过需要注意的是,目前只有 NFS 和 HostPath 两种类型支持回收策略。当然一般来说还是设置为 Retain 这种策略保险一点。
创建pv yaml
[root@master01 pv_yaml]# kubectl apply -f myapp-pv.yaml
persistentvolume/pv01 created
persistentvolume/pv02 created
persistentvolume/pv03 created
persistentvolume/pv04 created
persistentvolume/pv05 created
[root@master01 pv_yaml]# kubectl get pv
NAME   CAPACITY   ACCESS MODES   RECLAIM POLICY   STATUS      CLAIM   STORAGECLASS   REASON   AGE
pv01   5Gi        RWX            Retain           Available                                   4s
pv02   10Gi       RWX            Retain           Available                                   4s
pv03   15Gi       RWX            Retain           Available                                   4s
pv04   20Gi       RWX            Retain           Available                                   4s
pv05   25Gi       RWX            Retain           Available                                   4s
pvc
学习了 PV 的使用,但是在我们真正使用的时候是使用的 PVC,就类似于我们的服务是通过 Pod 来运行的,而不是 Node,只是 Pod 跑在 Node 上而已,所以这节课我们就来给大家讲解下 PVC 的使用方法。
编写pvc yaml
[root@master01 pvc_yaml]# vim myapp-pvc.yaml

apiVersion: v1
kind: PersistentVolumeClaim
metadata:
  name: myapp-pvc
  namespace: default
  labels:
    app: myapp
    type: pvc
spec:
  accessModes: ["ReadWriteMany"]
  resources:
    requests:
      storage: 11Gi
创建pvc yaml
[root@master01 pvc_yaml]# vim myapp-pvc.yaml
[root@master01 pvc_yaml]# kubectl apply -f myapp-pvc.yaml
persistentvolumeclaim/myapp-pvc created
[root@master01 pvc_yaml]# kubectl get pvc
NAME        STATUS   VOLUME   CAPACITY   ACCESS MODES   STORAGECLASS   AGE
myapp-pvc   Bound    pv03     15Gi       RWX                           5s
[root@master01 pvc_yaml]# kubectl get pv
NAME   CAPACITY   ACCESS MODES   RECLAIM POLICY   STATUS      CLAIM               STORAGECLASS   REASON   AGE
pv01   5Gi        RWX            Retain           Available                                               18m
pv02   10Gi       RWX            Retain           Available                                               18m
pv03   15Gi       RWX            Retain           Bound       default/myapp-pvc                           18m
pv04   20Gi       RWX            Retain           Available                                               18m
pv05   25Gi       RWX            Retain           Available                                               18m
创建pod yaml
vim myapp-nfs-pvc.yaml

apiVersion: v1
kind: Pod
metadata:
  name: myapp-nfs-pvc
  namespace: default
  labels:
    app: myapp
    type: pod
spec:
  containers:
  - name: myapp
    image: ikubernetes/myapp:v1
    ports:
    - name: http
      containerPort: 80
    volumeMounts:
    - name: html
      mountPath: /usr/share/nginx/html/
  volumes:
  - name: html
    persistentVolumeClaim:
      claimName: myapp-pvc
[root@master01 volume_yaml]# kubectl apply -f myapp-nfs-pvc.yaml
pod/myapp-nfs-pvc created

[root@master01 volume_yaml]# kubectl get pod -o wide
NAME                           READY   STATUS    RESTARTS   AGE   IP            NODE     NOMINATED NODE   READINESS GATES
demo-deploy-8675c97685-vhncn   1/1     Running   0          13d   10.244.2.5    node02   <none>           <none>
demo-deploy-8675c97685-w7md2   1/1     Running   0          13d   10.244.1.5    node01   <none>           <none>
demo-pod                       2/2     Running   4          13d   10.244.2.4    node02   <none>           <none>
myapp-empty                    2/2     Running   1          91m   10.244.1.8    node01   <none>           <none>
myapp-hostpath                 1/1     Running   0          72m   10.244.2.6    node02   <none>           <none>
myapp-nfs                      1/1     Running   0          54m   10.244.1.10   node01   <none>           <none>
myapp-nfs-pvc                  1/1     Running   0          29s   10.244.1.11   node01   <none>           <none>
测试
[root@master01 volume_yaml]# kubectl get pod -o wide
NAME                           READY   STATUS    RESTARTS   AGE   IP            NODE     NOMINATED NODE   READINESS GATES
demo-deploy-8675c97685-vhncn   1/1     Running   0          13d   10.244.2.5    node02   <none>           <none>
demo-deploy-8675c97685-w7md2   1/1     Running   0          13d   10.244.1.5    node01   <none>           <none>
demo-pod                       2/2     Running   4          13d   10.244.2.4    node02   <none>           <none>
myapp-empty                    2/2     Running   1          91m   10.244.1.8    node01   <none>           <none>
myapp-hostpath                 1/1     Running   0          72m   10.244.2.6    node02   <none>           <none>
myapp-nfs                      1/1     Running   0          54m   10.244.1.10   node01   <none>           <none>
myapp-nfs-pvc                  1/1     Running   0          29s   10.244.1.11   node01   <none>           <none>

[root@master01 volume_yaml]# kubectl get pvc
NAME        STATUS   VOLUME   CAPACITY   ACCESS MODES   STORAGECLASS   AGE
myapp-pvc   Bound    pv03     15Gi       RWX                           2m49s
[root@nfs ~]# echo "this is test" > /data/volumes/v3/test.html
[root@master01 volume_yaml]# curl 10.244.1.11/test.html
this is test
storageclass
前面的课程中我们学习了 PV 和 PVC 的使用方法,但是前面的 PV 都是静态的,什么意思?就是我要使用的一个 PVC 的话就必须手动去创建一个 PV,我们也说过这种方式在很大程度上并不能满足我们的需求,比如我们有一个应用需要对存储的并发度要求比较高,而另外一个应用对读写速度又要求比较高,特别是对于 StatefulSet 类型的应用简单的来使用静态的 PV 就很不合适了,这种情况下我们就需要用到动态 PV,也就是我们今天要讲解的 StorageClass。
要使用 StorageClass,我们就得安装对应的自动配置程序,比如我们这里存储后端使用的是 nfs,那么我们就需要使用到一个 nfs-client 的自动配置程序,我们也叫它 Provisioner,这个程序使用我们已经配置好的 nfs 服务器,来自动创建持久卷,也就是自动帮我们创建 PV。
配置nfs服务器
[root@nfs ~]# mkdir /volume
[root@nfs ~]# vim /etc/exports
/volume   192.168.48.0/24(insecure,rw,async,no_root_squash)

[root@nfs ~]# systemctl restart nfs
准备deployment
vim nfs-client.yaml

kind: Deployment
apiVersion: extensions/v1beta1
metadata:
  name: nfs-client-provisioner
spec:
  replicas: 1
  strategy:
    type: Recreate
  template:
    metadata:
      labels:
        app: nfs-client-provisioner
    spec:
      serviceAccountName: nfs-client-provisioner
      containers:
        - name: nfs-client-provisioner
          image: quay.io/external_storage/nfs-client-provisioner:latest
          imagePullPolicy: IfNotPresent
          volumeMounts:
            - name: nfs-client-root
              mountPath: /persistentvolumes
          env:
            - name: PROVISIONER_NAME
              value: nfs-provisioner
            - name: NFS_SERVER
              value: 192.168.48.54
            - name: NFS_PATH
              value: /volume
      volumes:
        - name: nfs-client-root
          nfs:
            server: 192.168.48.54
            path: /volume
创建sa
vim nfs-client-sa.yaml

apiVersion: v1
kind: ServiceAccount
metadata:
  name: nfs-client-provisioner

---
kind: ClusterRole
apiVersion: rbac.authorization.k8s.io/v1
metadata:
  name: nfs-client-provisioner-runner
rules:
  - apiGroups: [""]
    resources: ["persistentvolumes"]
    verbs: ["get", "list", "watch", "create", "delete"]
  - apiGroups: [""]
    resources: ["persistentvolumeclaims"]
    verbs: ["get", "list", "watch", "update"]
  - apiGroups: ["storage.k8s.io"]
    resources: ["storageclasses"]
    verbs: ["get", "list", "watch"]
  - apiGroups: [""]
    resources: ["events"]
    verbs: ["list", "watch", "create", "update", "patch"]
  - apiGroups: [""]
    resources: ["endpoints"]
    verbs: ["create", "delete", "get", "list", "watch", "patch", "update"]

---
kind: ClusterRoleBinding
apiVersion: rbac.authorization.k8s.io/v1
metadata:
  name: run-nfs-client-provisioner
subjects:
  - kind: ServiceAccount
    name: nfs-client-provisioner
    namespace: default
roleRef:
  kind: ClusterRole
  name: nfs-client-provisioner-runner
  apiGroup: rbac.authorization.k8s.io
编写storageclass yaml
vim nfs-client-class.yaml

apiVersion: storage.k8s.io/v1
kind: StorageClass
metadata:
  name: course-nfs-storage
provisioner: nfs-provisioner
创建storageclass yaml
[root@master01 ~]# kubectl apply -f nfs-client.yaml
deployment.extensions/nfs-client-provisioner created

[root@master01 ~]# kubectl apply -f nfs-client-sa.yaml
serviceaccount/nfs-client-provisioner created
clusterrole.rbac.authorization.k8s.io/nfs-client-provisioner-runner created
clusterrolebinding.rbac.authorization.k8s.io/run-nfs-client-provisioner created

[root@master01 ~]# kubectl apply -f nfs-client-class.yaml
storageclass.storage.k8s.io/course-nfs-storage created
[root@master01 ~]# kubectl get pods
NAME                                      READY   STATUS    RESTARTS   AGE
demo-deploy-8675c97685-vhncn              1/1     Running   0          13d
demo-deploy-8675c97685-w7md2              1/1     Running   0          13d
demo-pod                                  2/2     Running   6          13d
myapp-nfs-pvc                             1/1     Running   0          110m
nfs-client-provisioner-7fbb54945f-8rbcb   1/1     Running   0          46s
[root@master01 ~]# kubectl get storageclasses.storage.k8s.io
NAME                 PROVISIONER       AGE
course-nfs-storage   nfs-provisioner   52s
创建pvc
上面把StorageClass资源对象创建成功了,接下来我们来通过一个示例测试下动态 PV,首先创建一个 PVC 对象
vim test-pvc.yaml

apiVersion: v1
kind: PersistentVolumeClaim
metadata:
  name: test-pvc
  annotations:
    volume.beta.kubernetes.io/storage-class: "course-nfs-storage"
spec:
  accessModes:
  - ReadWriteMany
  resources:
    requests:
      storage: 1Mi
[root@master01 pvc_yaml]# kubectl apply -f myapp-pvc.yaml
persistentvolumeclaim/test-pvc created
[root@master01 pvc_yaml]# kubectl get pvc
NAME        STATUS   VOLUME                                     CAPACITY   ACCESS MODES   STORAGECLASS         AGE
myapp-pvc   Bound    pv03                                       15Gi       RWX                                 116m
test-pvc    Bound    pvc-7fb9ad47-5dc8-11e9-8bc6-000c296cdc6e   1Mi        RWX            course-nfs-storage   14s
测试
接下来我们还是用一个简单的示例来测试下我们上面用 StorageClass 方式声明的 PVC 对象吧:(test-pod.yaml)
vim test-pod.yaml

apiVersion: v1
kind: Pod
metadata:
  name: test-pod
  namespace: default
  labels:
    app: myapp
    type: pod
spec:
  containers:
  - name: myapp
    image: ikubernetes/myapp:v1
    ports:
    - name: http
      containerPort: 80
    volumeMounts:
    - name: html
      mountPath: /usr/share/nginx/html/
  volumes:
  - name: html
    persistentVolumeClaim:
      claimName: test-pvc
[root@master01 ~]# kubectl apply -f test-pod.yaml
pod/test-pod created


[root@master01 ~]# kubectl get pod -o wide
NAME                                      READY   STATUS    RESTARTS   AGE     IP            NODE     NOMINATED NODE   READINESS GATES
demo-deploy-8675c97685-vhncn              1/1     Running   0          13d     10.244.2.5    node02   <none>           <none>
demo-deploy-8675c97685-w7md2              1/1     Running   0          13d     10.244.1.5    node01   <none>           <none>
demo-pod                                  2/2     Running   6          13d     10.244.2.4    node02   <none>           <none>
myapp-nfs-pvc                             1/1     Running   0          118m    10.244.1.11   node01   <none>           <none>
nfs-client-provisioner-7fbb54945f-8rbcb   1/1     Running   0          7m47s   10.244.2.7    node02   <none>           <none>
test-pod                                  1/1     Running   0          10s     10.244.1.12   node01   <none>           <none>
[root@nfs ~]# cd /volume/
[root@nfs volume]# ll
total 4
drwxrwxrwx 2 root root  6 Apr 13 16:45 default-test-pvc-pvc-7fb9ad47-5dc8-11e9-8bc6-000c296cdc6e
[root@nfs volume]# cd default-test-pvc-pvc-7fb9ad47-5dc8-11e9-8bc6-000c296cdc6e/
[root@nfs default-test-pvc-pvc-7fb9ad47-5dc8-11e9-8bc6-000c296cdc6e]# ll
total 0
[root@nfs default-test-pvc-pvc-7fb9ad47-5dc8-11e9-8bc6-000c296cdc6e]# echo "this is test" > test.html
[root@master01 ~]# curl 10.244.1.12/test.html
this is test
实际工作中,使用 StorageClass 更多的是 StatefulSet 类型的服务,StatefulSet 类型的服务我们也可以通过一个 volumeClaimTemplates 属性来直接使用 StorageClass
vim test-statefulset-nfs.yaml

apiVersion: apps/v1beta1
kind: StatefulSet
metadata:
  name: nfs-web
spec:
  serviceName: "nginx"
  replicas: 3
  template:
    metadata:
      labels:
        app: nfs-web
    spec:
      terminationGracePeriodSeconds: 10
      containers:
      - name: nginx
        image: ikubernetes/myapp:v1
        ports:
        - containerPort: 80
          name: web
        volumeMounts:
        - name: www
          mountPath: /usr/share/nginx/html
  volumeClaimTemplates:
  - metadata:
      name: www
      annotations:
        volume.beta.kubernetes.io/storage-class: course-nfs-storage
    spec:
      accessModes: [ "ReadWriteOnce" ]
      resources:
        requests:
          storage: 1Gi
[root@master01 ~]# kubectl apply -f test-statefulset-nfs.yaml

[root@master01 ~]# kubectl get pod -o wide
NAME                                      READY   STATUS    RESTARTS   AGE    IP            NODE     NOMINATED NODE   READINESS GATES
demo-deploy-8675c97685-vhncn              1/1     Running   0          13d    10.244.2.5    node02   <none>           <none>
demo-deploy-8675c97685-w7md2              1/1     Running   0          13d    10.244.1.5    node01   <none>           <none>
demo-pod                                  2/2     Running   7          13d    10.244.2.4    node02   <none>           <none>
myapp-nfs-pvc                             1/1     Running   0          130m   10.244.1.11   node01   <none>           <none>
nfs-client-provisioner-7fbb54945f-8rbcb   1/1     Running   0          20m    10.244.2.7    node02   <none>           <none>
nfs-web-0                                 1/1     Running   0          39s    10.244.1.13   node01   <none>           <none>
nfs-web-1                                 1/1     Running   0          33s    10.244.2.8    node02   <none>           <none>
nfs-web-2                                 1/1     Running   0          17s    10.244.2.9    node02   <none>           <none>
test-pod                                  1/1     Running   0          12m    10.244.1.12   node01   <none>           <none>
我们可以看到是不是也生成了3个 PVC 对象,名称由模板名称 name 加上 Pod 的名称组合而成,这3个 PVC 对象也都是 绑定状态了,很显然我们查看 PV 也可以看到对应的3个 PV 对象:
[root@master01 ~]# kubectl get pv
NAME                                       CAPACITY   ACCESS MODES   RECLAIM POLICY   STATUS      CLAIM                   STORAGECLASS         REASON   AGE
pv01                                       5Gi        RWX            Retain           Released    default/test-pvc                                      133m
pv02                                       10Gi       RWX            Retain           Available                                                         133m
pv03                                       15Gi       RWX            Retain           Bound       default/myapp-pvc                                     133m
pv04                                       20Gi       RWX            Retain           Available                                                         133m
pv05                                       25Gi       RWX            Retain           Available                                                         133m
pvc-7fb9ad47-5dc8-11e9-8bc6-000c296cdc6e   1Mi        RWX            Delete           Bound       default/test-pvc        course-nfs-storage            16m
pvc-9502037e-5dca-11e9-8bc6-000c296cdc6e   1Gi        RWO            Delete           Bound       default/www-nfs-web-0   course-nfs-storage            98s
pvc-9871e0ab-5dca-11e9-8bc6-000c296cdc6e   1Gi        RWO            Delete           Bound       default/www-nfs-web-1   course-nfs-storage            83s
pvc-a244e88f-5dca-11e9-8bc6-000c296cdc6e   1Gi        RWO            Delete           Bound       default/www-nfs-web-2   course-nfs-storage            68s
[root@master01 ~]# kubectl get pvc
NAME            STATUS   VOLUME                                     CAPACITY   ACCESS MODES   STORAGECLASS         AGE
myapp-pvc       Bound    pv03                                       15Gi       RWX                                 133m
test-pvc        Bound    pvc-7fb9ad47-5dc8-11e9-8bc6-000c296cdc6e   1Mi        RWX            course-nfs-storage   16m
www-nfs-web-0   Bound    pvc-9502037e-5dca-11e9-8bc6-000c296cdc6e   1Gi        RWO            course-nfs-storage   103s
www-nfs-web-1   Bound    pvc-9871e0ab-5dca-11e9-8bc6-000c296cdc6e   1Gi        RWO            course-nfs-storage   97s
www-nfs-web-2   Bound    pvc-a244e88f-5dca-11e9-8bc6-000c296cdc6e   1Gi        RWO            course-nfs-storage   81s
查看 nfs 服务器上面的共享数据目录
[root@nfs ~]# cd /volume/
[root@nfs volume]# ll
total 0
drwxrwxrwx 2 root root 23 Apr 13 16:51 default-test-pvc-pvc-7fb9ad47-5dc8-11e9-8bc6-000c296cdc6e
drwxrwxrwx 2 root root 23 Apr 13 17:05 default-www-nfs-web-0-pvc-9502037e-5dca-11e9-8bc6-000c296cdc6e
drwxrwxrwx 2 root root  6 Apr 13 17:00 default-www-nfs-web-1-pvc-9871e0ab-5dca-11e9-8bc6-000c296cdc6e
drwxrwxrwx 2 root root  6 Apr 13 17:00 default-www-nfs-web-2-pvc-a244e88f-5dca-11e9-8bc6-000c296cdc6e
[root@nfs volume]# cd default-www-nfs-web-0-pvc-9502037e-5dca-11e9-8bc6-000c296cdc6e/
[root@nfs default-www-nfs-web-0-pvc-9502037e-5dca-11e9-8bc6-000c296cdc6e]# echo "this is test" > test.html
[root@master01 ~]# kubectl get pod -o wide
NAME                                      READY   STATUS    RESTARTS   AGE     IP            NODE     NOMINATED NODE   READINESS GATES
demo-deploy-8675c97685-vhncn              1/1     Running   0          13d     10.244.2.5    node02   <none>           <none>
demo-deploy-8675c97685-w7md2              1/1     Running   0          13d     10.244.1.5    node01   <none>           <none>
demo-pod                                  2/2     Running   7          13d     10.244.2.4    node02   <none>           <none>
myapp-nfs-pvc                             1/1     Running   0          135m    10.244.1.11   node01   <none>           <none>
nfs-client-provisioner-7fbb54945f-8rbcb   1/1     Running   0          24m     10.244.2.7    node02   <none>           <none>
nfs-web-0                                 1/1     Running   0          5m16s   10.244.1.13   node01   <none>           <none>
nfs-web-1                                 1/1     Running   0          5m10s   10.244.2.8    node02   <none>           <none>
nfs-web-2                                 1/1     Running   0          4m54s   10.244.2.9    node02   <none>           <none>
test-pod                                  1/1     Running   0          17m     10.244.1.12   node01   <none>           <none>
[root@master01 ~]# curl 10.244.1.13/test.html
this is test


 470
470


 被折叠的 条评论
为什么被折叠?
被折叠的 条评论
为什么被折叠?
 到【灌水乐园】发言


