


感谢朋友支持本博客,欢迎共同探讨交流,由于能力和时间有限,错误之处在所难免,欢迎指正!
如有转载,请保留源作者博客信息。
如需交流,欢迎大家博客留言。
centos 6.5 min版:
openstack ice版:
192.168.1.210 controller
192.168.1.211 network
192.168.1.213 compute1
|
2、贴出官网配置:
|
OpenStack Compute supports VNC consoles to guests. The VNC protocol is fairly limited, lacking support for multiple monitors, bi-directional audio, reliable cut-and-paste, video streaming and more. SPICE is a new protocol that aims to address the limitations in VNC and provide good remote desktop support. SPICE support in OpenStack Compute shares a similar architecture to the VNC implementation. The OpenStack dashboard uses a SPICE-HTML5 widget in its console tab that communicates to the VNC must be explicitly disabled to get access to the SPICE console. Set the Use the following options to configure SPICE as the console for OpenStack Compute:
| ||||||||||||||||
|
agent_enabled = false enabled = true
配置作用源代码:
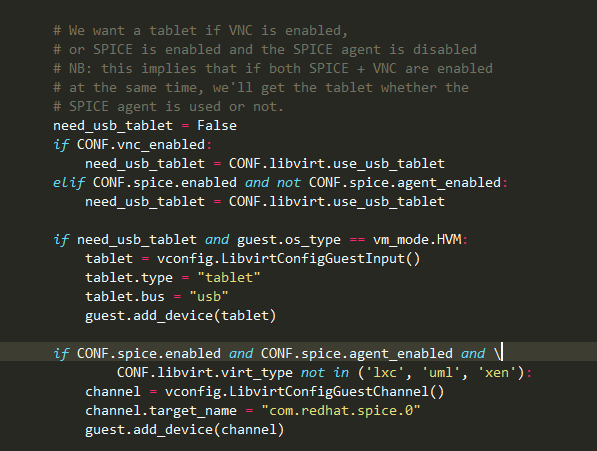
可以看出首先必须打开enabled = true,才能支持添加spice端口到对应实例xml文件中。
agent_enabled 设置为false时,xml中会增加tablet.type = "tablet"选项 (注:此选项用来将虚拟机中的鼠标与外面同步)(
这句代码:CONF.spice.enabled and not CONF.spice.agent_enabled)
html5proxy_base_url = http://192.168.1.210:6082/spice_auto.html地址为安装了spice-html5.noarch spice-server的节点,此处为控制节点 server_listen = 0.0.0.0监听所有地址 server_proxyclient_address = 192.168.1.213生成虚拟机的计算节点的ip地址 注其中ip地址不能用127.0.0.1配置,这样在页面访问时候会请求到127.0.0.1ip地址(当然如果是宿主机本地登陆将可以),实际需要访问到的是宿主机控制节点地址。 |
3、首先在控制节点上安装以下包:
yum install -y spice-html5.noarch spice-server spice-client spice-protocol
4.关闭vnc代理服务、开启spice代理服务
chkconfig openstack-nova-novncproxy off
chkconfig openstack-nova-spicehtml5proxy on
service openstack-nova-novncproxy stop
service openstack-nova-spicehtml5proxy restart
假若启动openstack-nova-spicehtml5proxy失败,直接执行nova-spicehtml5proxy命令,看错误日志。
日志报找不到js、css文件,则是spice-html5.noarch 没有安装成功。spice-html5.noarch 在centos官网的epel源里能找到。
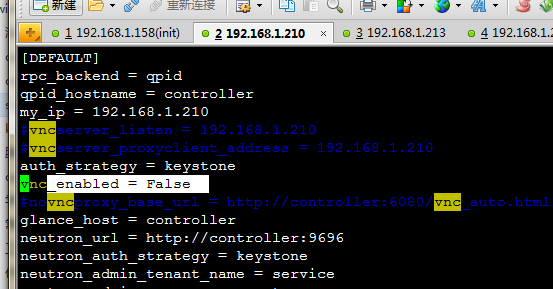
修改控制节点配置:
|
vim /etc/nova/nova.conf
以下为截图:

|
4.修改计算节点nova.conf文件
|
vim /etc/nova/nova.conf
vnc_enabled = false
[spice]
# # Options defined in nova.spice # # Location of spice HTML5 console proxy, in the form # "http://127.0.0.1:6082/spice_auto.html" (string value) html5proxy_base_url=http://192.168.1.210:6082/spice_auto.html # IP address on which instance spice server should listen # (string value) server_listen=0.0.0.0 # The address to which proxy clients (like nova- # spicehtml5proxy) should connect (string value) server_proxyclient_address=192.168.1.213 # Enable spice related features (boolean value) enabled=true # Enable spice guest agent support (boolean value) agent_enabled=false # Keymap for spice (string value) keymap=en-us 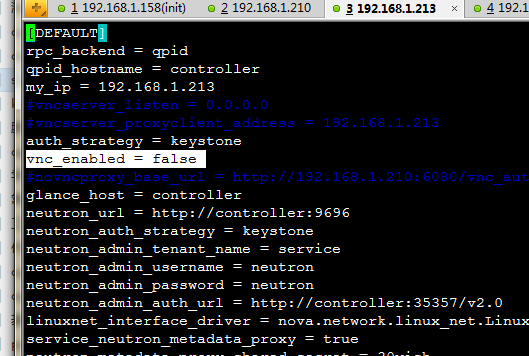

|
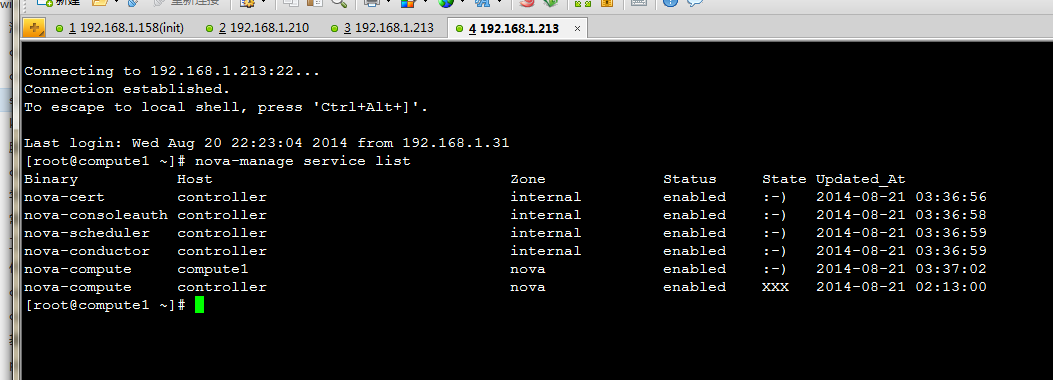
5、重启服务配置文件生效:
service openstack-nova-compute restart
查看服务状态:
nova-manage service list
|

6、在dashboard生成一台虚拟机:
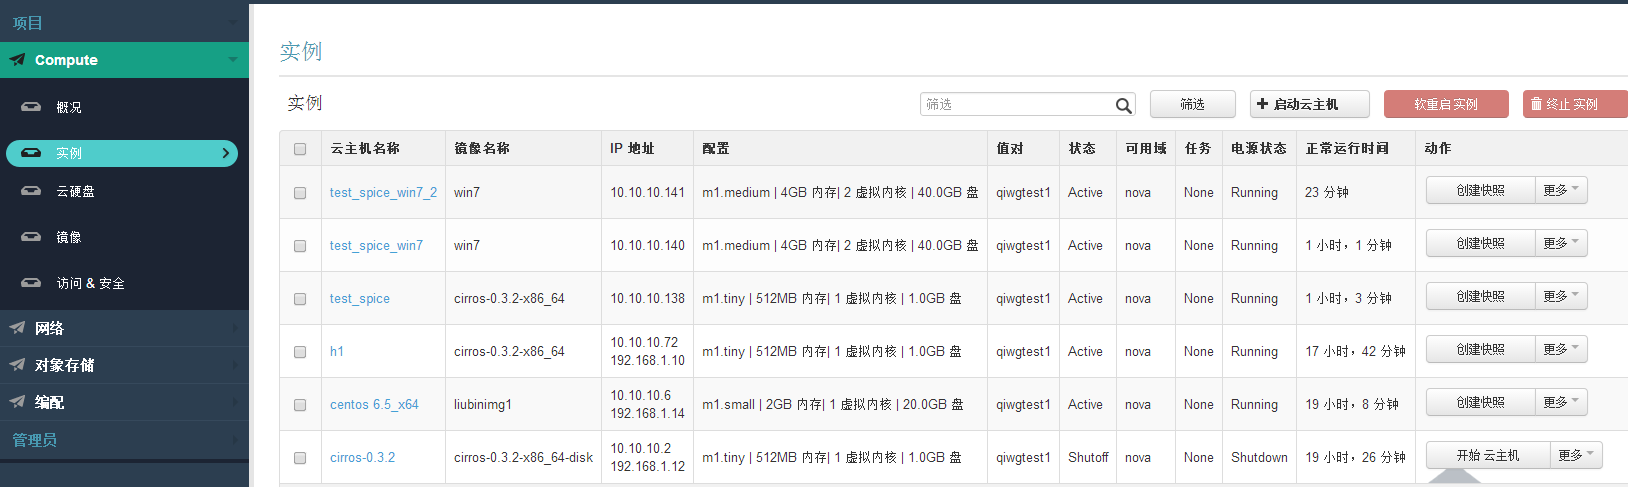
点击进入test_spice_win7_2控制台:
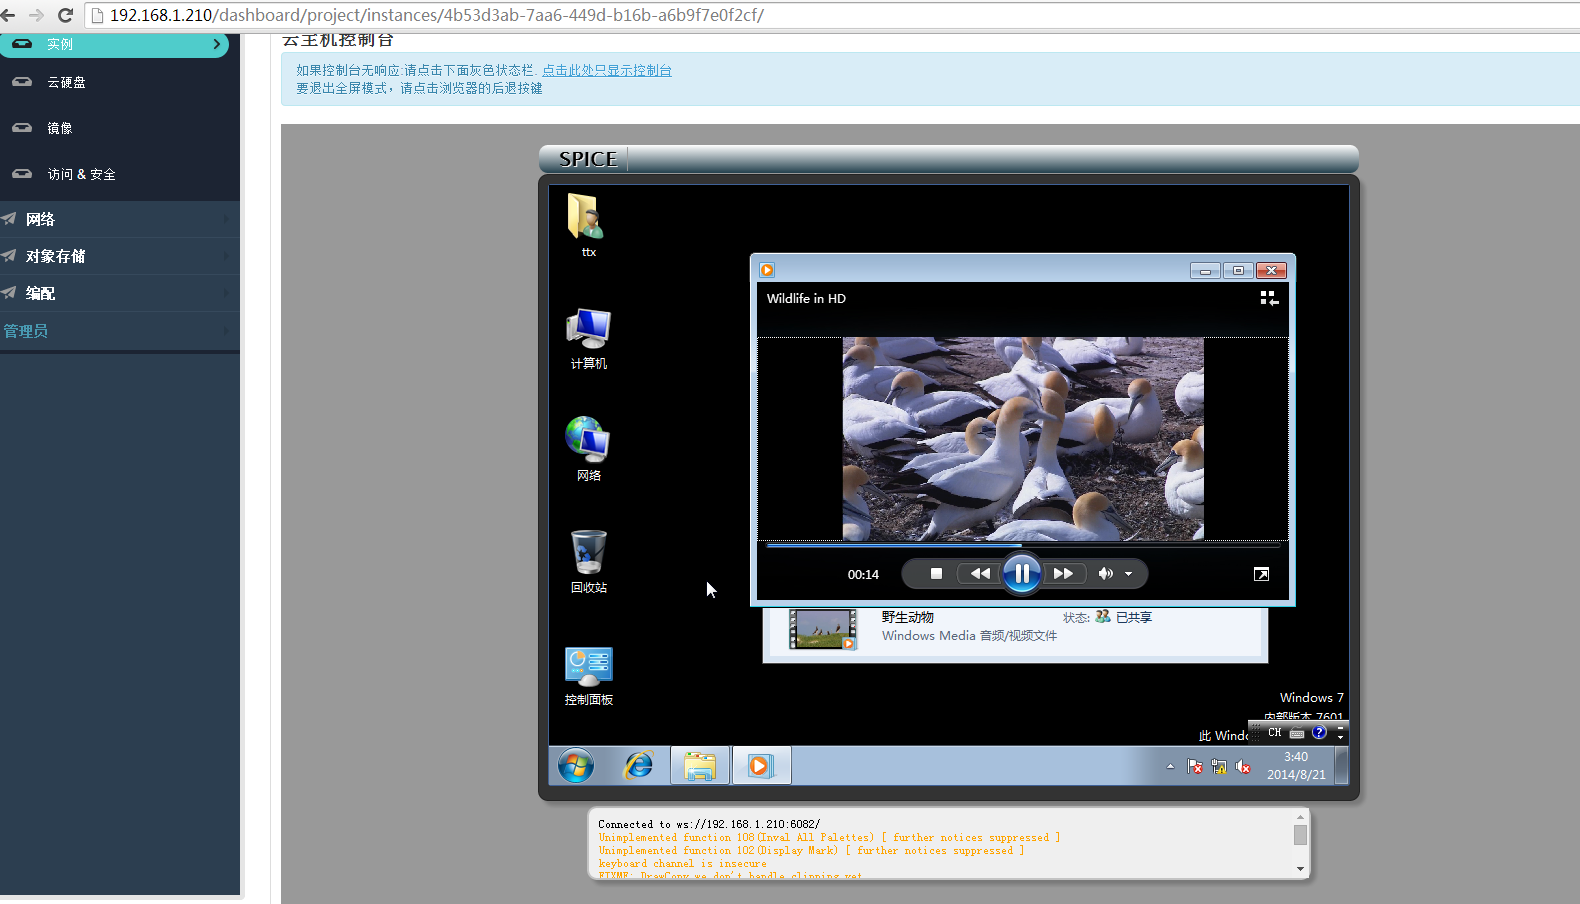
至此完成openstack icehouse版本的
补充1:假若dashboard访问页面的spice控制台,出现连接不上。而且底层的nova-compute挂掉。消息队列出错的话,可能是debug功能将thread=false设置导致。
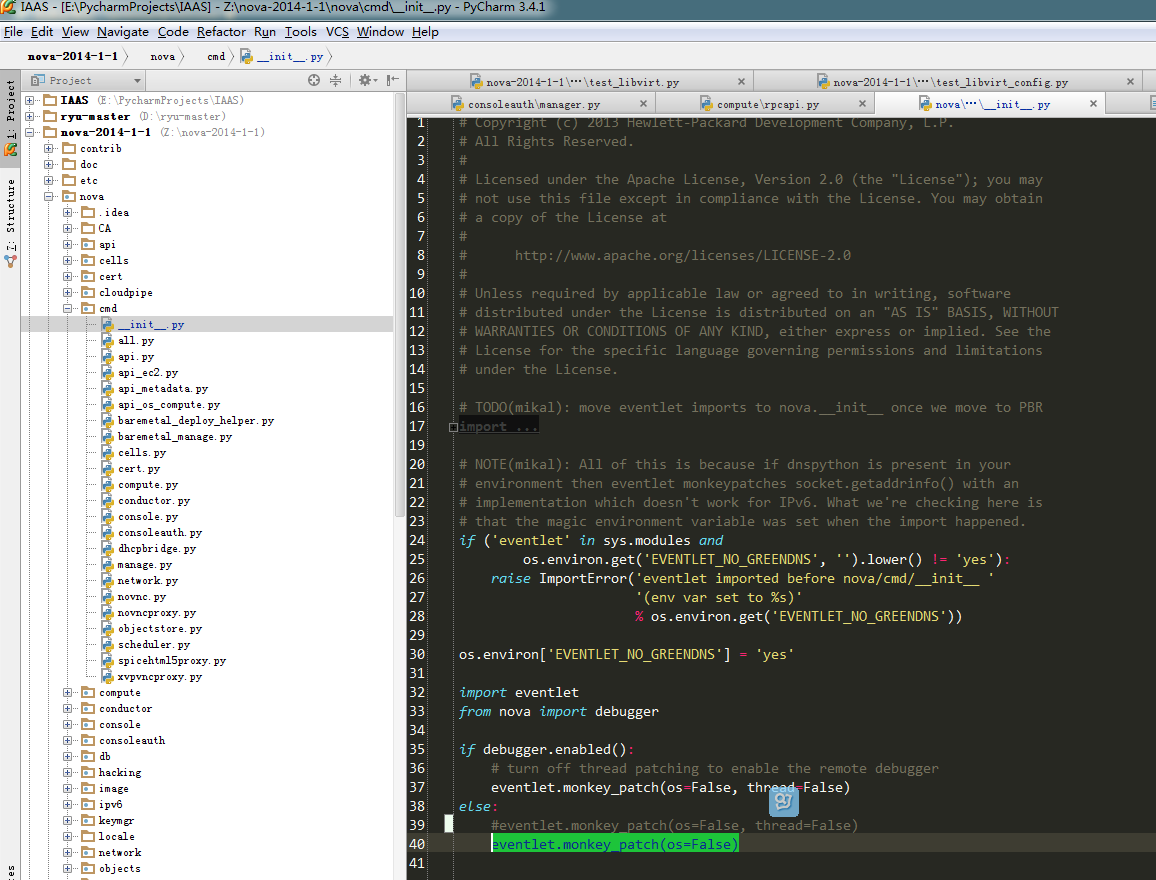
本次实践中假若将代码修改为以下将出现上述问题:
|
if ('eventlet' in sys.modules and
os.environ.get('EVENTLET_NO_GREENDNS', '').lower() != 'yes'):
raise ImportError('eventlet imported before nova/cmd/__init__ '
'(env var set to %s)'
% os.environ.get('EVENTLET_NO_GREENDNS'))
os.environ['EVENTLET_NO_GREENDNS'] = 'yes'
import eventlet
from nova import debugger
if debugger.enabled():
# turn off thread patching to enable the remote debugger
eventlet.monkey_patch(os=False, thread=False)
else:
eventlet.monkey_patch(os=False, thread=False)
#eventlet.monkey_patch(os=False)
|
所以建议配置spice时候,不要修改代码为debug的thread=false。
补充2:用opentstack自带的cirros镜像用dashboard的spice连接时候有时候会出现虚拟机启动故障,建议用自定义的完整镜像。
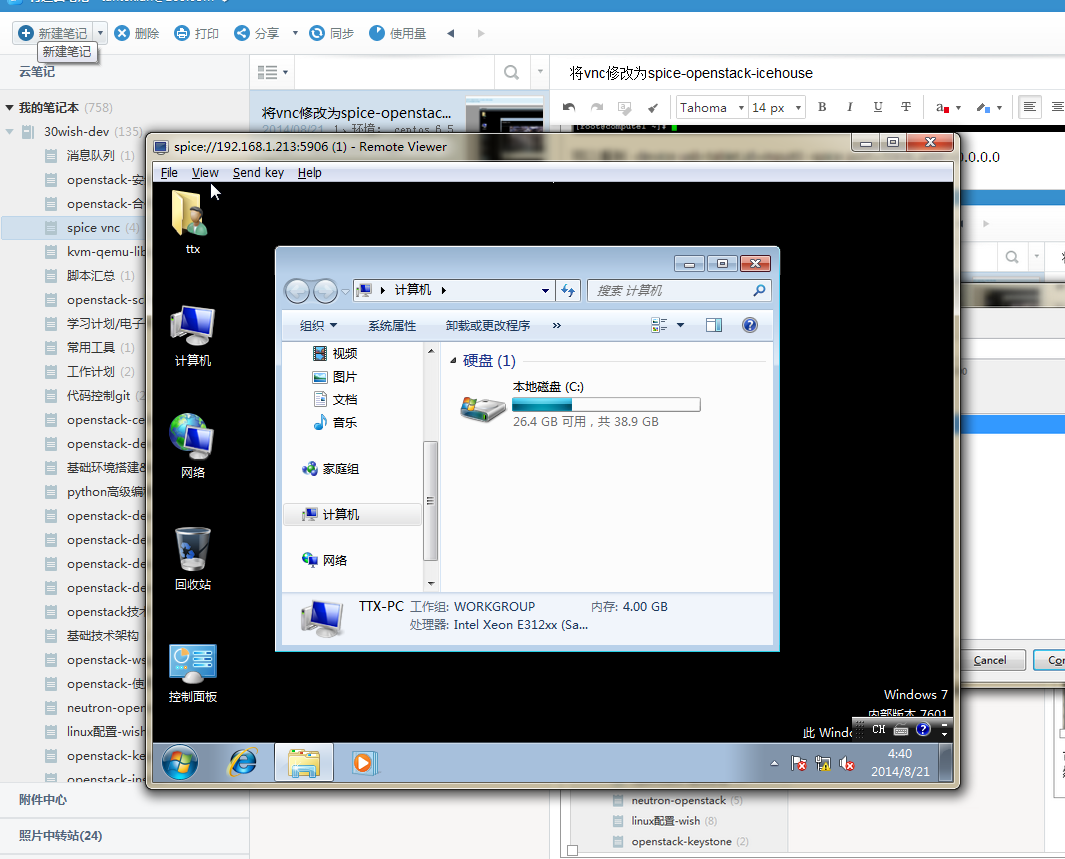
7、spice客户端连接vm:(spice放在176共享,自行下载)
如果想用客户端连接虚拟机则需要知道ip和端口:
在虚拟机对应的计算节点执行:
|
ps aux | grep qemu-kvm
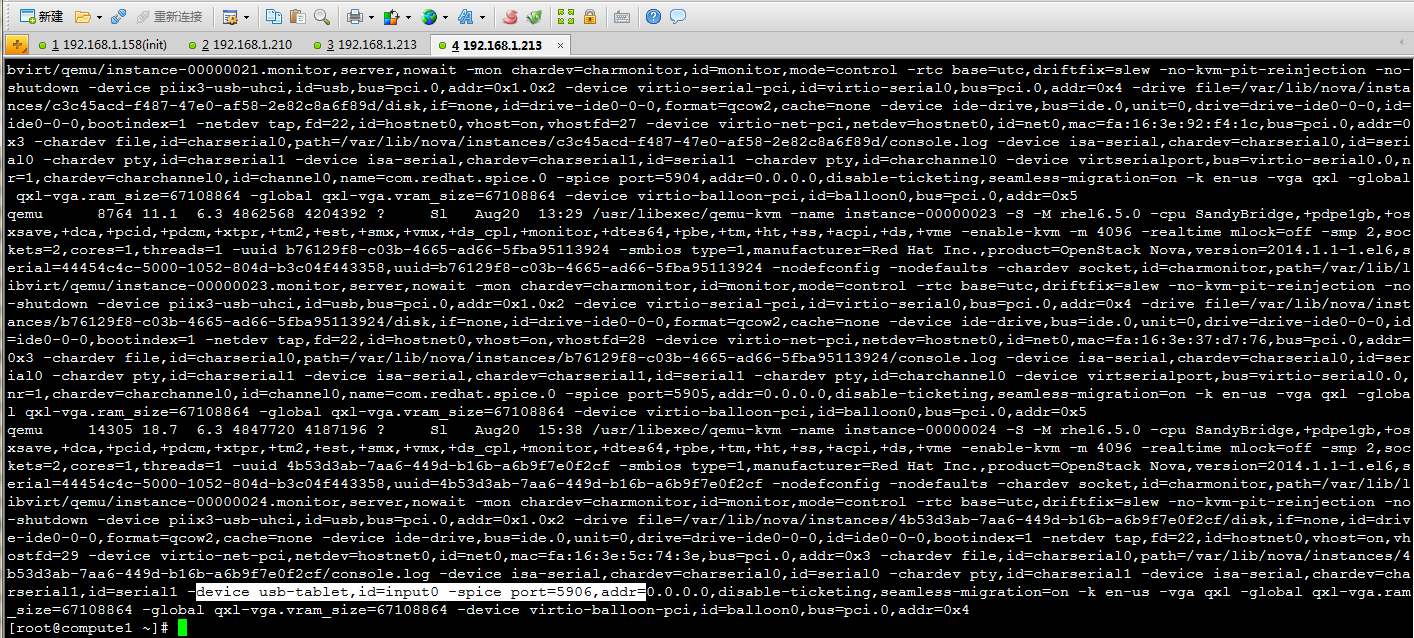
可以看到 -device usb-tablet,id=input0 -spice port=5906,addr=0.0.0.0
然后用客户端连接:

|


 4277
4277

 被折叠的 条评论
为什么被折叠?
被折叠的 条评论
为什么被折叠?
 到【灌水乐园】发言


