Flutter电子时间的实现(下)

根据

Flutter秒表计时器的实现(上)_teddy_Ma的博客-CSDN博客

对TimerTest进行更改
引入

import 'package:flutter/material.dart';
import 'dart:async';

使用main函数进入组件

void main(List<String> args) {
  runApp(MyHome());
}

class MyHome extends StatelessWidget {
  const MyHome({Key? key}) : super(key: key);

  @override
  Widget build(BuildContext context) {
    return MaterialApp(
      theme: ThemeData(),
      home: const MyHomePage(),
    );
  }
}

更改 TimerTest 组件 

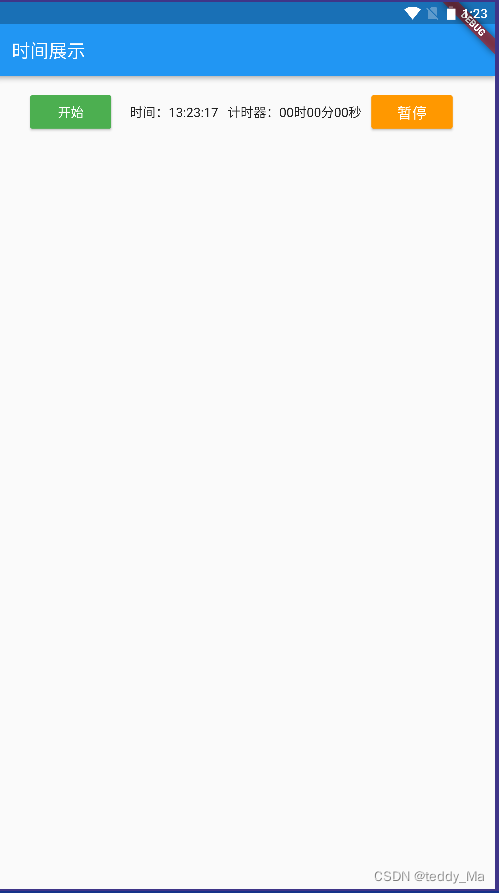
点击开始按钮,时间开始走动,点击暂停按钮,时间停止

点击继续按钮,时间继续, 点击完成计时结束

class TimerTest extends StatefulWidget {
  const TimerTest({Key? key, required this.title}) : super(key: key);
  final String title;
  @override
  State<TimerTest> createState() => _TimerTestState();
}

class _TimerTestState extends State<TimerTest> {
  late Timer _timer = _timer;
  int secondsDown = 0;
  int secondsUp = 0;
  bool _timeState = true;
  bool timeState = true;
  bool timeSuspend = true;
  String _title = '开始';
  String _titlePause = '暂停';
  String _content = DateTime.now().hour.toString() +
      ":" +
      DateTime.now().minute.toString() +
      ":" +
      DateTime.now().second.toString();
  String content = '00:00:00';

  @override
  Widget build(BuildContext context) {
    _content = constDownTime(secondsDown);
    content = constUpTime(secondsUp);

    return Scaffold(
      body: Container(
        padding: const EdgeInsets.all(15.0),
        child: SingleChildScrollView(
          scrollDirection: Axis.vertical,
          child: Column(
            children: [
              SingleChildScrollView(
                scrollDirection: Axis.horizontal,
                child: Row(
                  mainAxisAlignment: MainAxisAlignment.spaceEvenly,
                  children: [
                    MaterialButton(
                      onPressed: countUpTest,
                      child: Text(_title,
                          style: const TextStyle(color: Colors.white)),
                      color: timeState ? Colors.green : Colors.red,
                    ),
                    const SizedBox(
                      width: 10,
                    ),
                    const SizedBox(
                      width: 10,
                    ),
                    Text("时间:$_content"),
                    const SizedBox(
                      width: 10,
                    ),
                    Text("计时器:$content"),
                    const SizedBox(
                      width: 10,
                    ),
                    MaterialButton(
                        onPressed: countSuspendTest,
                        child: Text(_titlePause,
                            style: const TextStyle(
                                fontSize: 16, color: Colors.white)),
                        color: !timeSuspend ? Colors.blue : Colors.orange),
                    const SizedBox(
                      width: 10,
                    ),
                  ],
                ),
              ),
            ],
          ),
        ),
      ),
    );
  }

  //时间格式化,根据总秒数转换为对应的 hh:mm:ss 格式
  String constDownTime(int seconds) {
    int hour = secondsDown ~/ 3600;
    int minute = secondsDown % 3600 ~/ 60;
    int second = secondsDown % 60;
    return formatTime(hour) +
        ":" +
        formatTime(minute) +
        ":" +
        formatTime(second);
  }

  String constUpTime(int seconds) {
    int hour = secondsUp ~/ 3600;
    int minute = secondsUp % 3600 ~/ 60;
    int second = secondsUp % 60;
    return formatTime(hour) +
        "时" +
        formatTime(minute) +
        "分" +
        formatTime(second) +
        "秒";
  }

  //数字格式化,将 0~9 的时间转换为 00~09
  String formatTime(int timeNum) {
    return timeNum < 10 ? "0" + timeNum.toString() : timeNum.toString();
  }

  // 初始化方法
  @override
  void initState() {
    Timer(const Duration(seconds: 1), () => countDownTest());
    super.initState();

    // print('initState');
  }

  void countDownTest() {
    _timeState = !_timeState;
    if (!_timeState) {
      //获取当期时间
      var now = DateTime.now();
      // 时分秒转换
      var downHours = now
          .add(Duration(
              hours: DateTime.now().hour,
              minutes: DateTime.now().minute,
              seconds: DateTime.now().second))
          .difference(now);
      //获取总秒数
      secondsDown = downHours.inSeconds;
      startDownTimer();
    } else {
      secondsDown = 0;
      cancelTimer();
    }
  }

  void countUpTest() {
    timeState = !timeState;
    setState(() {
      if (timeState) {
        _title = '开始';
        _titlePause = '暂停';
      } else {
        _title = '完成';
      }
    });

    if (!timeState) {
      //获取当期时间
      var now = DateTime.now();
      //获取时间间隔
      var twoHours = now.difference(now);
      //获取总秒数,2 分钟为 120 秒
      secondsUp = twoHours.inSeconds;
      startUpTimer();
    } else {
      secondsUp = 0;
      cancelTimer();
    }
  }

  void countSuspendTest() {
    if (!timeState) {
      timeSuspend = !timeSuspend;
      setState(() {
        if (timeSuspend) {
          _titlePause = '暂停';
        } else {
          _titlePause = '继续';
        }
      });
      if (timeSuspend && !timeState) {
        startUpTimer();
      } else {
        cancelTimer();
      }
    }
  }

  void startDownTimer() {
    //设置 1 秒回调一次
    const period = Duration(seconds: 1);
    _timer = Timer.periodic(period, (timer) {
      //更新界面
      setState(() {
        //秒数减一,因为一秒回调一次R
        secondsDown++;
      });
    });
  }

  void startUpTimer() {
    //设置 1 秒回调一次
    const period = Duration(seconds: 1);
    _timer = Timer.periodic(period, (timer) {
      //更新界面
      setState(() {
        //秒数减一,因为一秒回调一次R
        secondsUp++;
      });
    });
  }

  void cancelTimer() {
    _timer.cancel();
  }

  @override
  void dispose() {
    cancelTimer();
    super.dispose();
  }
}

  • 2
    点赞
  • 0
    收藏
    觉得还不错? 一键收藏
  • 1
    评论
Flutter动态表单实现的一般步骤如下: 1. 定义表单字段数据模型:定义一个类来表示每个表单字段,包括字段类型、名称、值、是否必填等属性。 2. 构建表单UI:使用Flutter提供的表单控件,如TextFormField、Checkbox、Radio等来构建表单的UI。 3. 根据字段数据模型动态生成表单控件:根据表单字段数据模型动态生成相应的表单控件,可以使用Flutter的Widget库中的工厂方法来实现。 4. 收集表单数据:根据表单字段数据模型收集用户填写的表单数据,并进行校验处理。 5. 提交表单数据:将收集到的表单数据提交到服务器进行处理。 下面是一个简单的Flutter动态表单实现的示例代码: ```dart class FormField { final String label; final String type; final bool required; String value; FormField({ required this.label, required this.type, this.required = false, this.value = '', }); } class DynamicFormScreen extends StatefulWidget { @override _DynamicFormScreenState createState() => _DynamicFormScreenState(); } class _DynamicFormScreenState extends State<DynamicFormScreen> { final GlobalKey<FormState> _formKey = GlobalKey<FormState>(); List<FormField> _fields = [ FormField(label: 'Name', type: 'text', required: true), FormField(label: 'Email', type: 'email', required: true), FormField(label: 'Phone', type: 'tel', required: true), FormField(label: 'Message', type: 'textarea', required: false), ]; @override Widget build(BuildContext context) { return Scaffold( appBar: AppBar( title: Text('Dynamic Form'), ), body: Form( key: _formKey, child: ListView.builder( itemCount: _fields.length, itemBuilder: (BuildContext context, int index) { FormField field = _fields[index]; Widget widget; switch (field.type) { case 'text': case 'email': case 'tel': widget = TextFormField( decoration: InputDecoration( labelText: field.label, ), keyboardType: TextInputType.text, validator: (value) { if (field.required && value!.isEmpty) { return 'This field is required'; } return null; }, onSaved: (value) { field.value = value!; }, ); break; case 'textarea': widget = TextFormField( decoration: InputDecoration( labelText: field.label, ), keyboardType: TextInputType.multiline, maxLines: 4, validator: (value) { if (field.required && value!.isEmpty) { return 'This field is required'; } return null; }, onSaved: (value) { field.value = value!; }, ); break; default: widget = Container(); } return widget; }, ), ), floatingActionButton: FloatingActionButton( onPressed: () { if (_formKey.currentState!.validate()) { _formKey.currentState!.save(); // Submit form data } }, child: Icon(Icons.send), ), ); } } ``` 在上面的示例代码中,我们定义了一个FormField类来表示表单字段,包括字段名称、类型、是否必填以及字段值等属性。然后我们在StatefulWidget的状态类中定义了一个_fields列表来存储表单字段数据模型。在build方法中,我们使用ListView.builder来构建表单UI,根据表单字段数据模型动态生成相应的表单控件。最后,在提交按钮的点击事件中,我们根据表单字段数据模型收集用户填写的表单数据,并进行校验处理。

“相关推荐”对你有帮助么?

  • 非常没帮助
  • 没帮助
  • 一般
  • 有帮助
  • 非常有帮助
提交
评论 1
添加红包

请填写红包祝福语或标题

红包个数最小为10个

红包金额最低5元

当前余额3.43前往充值 >
需支付:10.00
成就一亿技术人!
领取后你会自动成为博主和红包主的粉丝 规则
hope_wisdom
发出的红包
实付
使用余额支付
点击重新获取
扫码支付
钱包余额 0

抵扣说明:

1.余额是钱包充值的虚拟货币,按照1:1的比例进行支付金额的抵扣。
2.余额无法直接购买下载,可以购买VIP、付费专栏及课程。

余额充值