


文章目录
前言
Qt是一个强大的GUI开发框架,它提供了多种布局方式来实现用户界面的设计。其中,我们可以通过可视化界面编辑器设计界面布局,也可以通过手动编写代码来控制布局。虽然可视化界面编辑器可以实现快速的布局设计,但是在一些复杂的应用场景下,手动编写布局代码往往更具优势,因为它可以更加精细地控制控件的位置、大小和布局关系,实现更加灵活、高效的布局效果。本篇博客将重点介绍手动编写布局代码的方式,帮助读者更好地掌握Qt布局的核心概念和技能,实现更加出色的用户界面设计。
一、Qt中常见的布局有哪些?
- 垂直布局(QVBoxLayout)
- 水平布局(QHBoxLayout)
- 网格布局(QGridLayout)
- 栅格布局(QFormLayout)
下面我将各个介绍这四种布局。
二、布局介绍
1.垂直布局(QVBoxLayout)
话不多说,先上代码
#include <QWidget>
#include <QVBoxLayout>
#include <QPushButton>
#include <QLabel>

int main(int argc, char *argv[])
{
    QApplication a(argc, argv);

    QWidget *window = new QWidget;

    QVBoxLayout *layout = new QVBoxLayout;
    QPushButton *button1 = new QPushButton("Button 1");
    QPushButton *button2 = new QPushButton("Button 2");
    QLabel *label = new QLabel("This is a label");
    layout->addWidget(button1);
    layout->addWidget(button2);
    layout->addWidget(label);

    window->setLayout(layout);
    window->show();

    return a.exec();
}
这是运行结果:
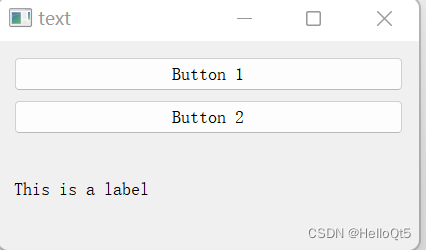
这里先实例化了一个垂直布局,再实例化两个QPushButton控件和一个QLabel文本,然后将其添加到布局中,
还可以通过添加如下代码来优化按键:
button1->setText("按键1"); // 设置控件名称
button1->setFixedHeight(100); // 设置按钮高度
button1->setFixedWidth(100); // 设置宽度
2.水平布局(QHBoxLayout)
水平布局与垂直布局非常类似,看下面代码就能理解:
#include "widget.h"
#include <QApplication>
#include <QWidget>
#include <QHBoxLayout>
#include <QPushButton>
#include <QLabel>

int main(int argc, char *argv[])
{
    QApplication a(argc, argv);

    QWidget *window = new QWidget;

    QHBoxLayout *layout = new QHBoxLayout;
    QPushButton *button1 = new QPushButton("Button 1");
    button1->setFixedHeight(50); // 设置按钮高度
    QPushButton *button2 = new QPushButton("Button 2");
    button2->setFixedHeight(50); // 设置按钮高度
    QLabel *label = new QLabel("This is a label");
    layout->addWidget(button1);
    layout->addWidget(button2);
    layout->addWidget(label);

    window->setLayout(layout);
    window->show();

    return a.exec();
}
运行结果如下:

怎么说,代码几乎和垂直布局一模一样吧,就换了个名字。
3.网格布局(QGridLayout)
网格布局就有点不一样了,他不同于水平和垂直布局,它需要定位,先看代码:
#include "widget.h"
#include <QApplication>
#include <QGridLayout>
#include <QLabel>
#include <QPushButton>

int main(int argc, char *argv[])
{
	QApplication a(argc, argv);
	QWidget *window = new QWidget;

    //网格布局
    QGridLayout *pGrid_layouts;

    QPushButton *button1;
    QPushButton *button2;
    QPushButton *button3;
    QPushButton *button4;

    button1 = new QPushButton(this);
    button1->setText("第一区:顶部菜单栏选项");
    button1->setFixedHeight(100); // 设置按钮高度
//    button1->setFixedSize(100, 40);  // 设置按钮宽度和高度
    button1->setSizePolicy(QSizePolicy::Expanding, QSizePolicy::Expanding);

    button2 = new QPushButton(this);
    button2->setText("第二区:侧边栏选项");
    button2->setFixedWidth(150); // 设置宽度
    button2->setSizePolicy(QSizePolicy::Expanding, QSizePolicy::Expanding);

    button3 = new QPushButton(this);
    button3->setText("第三区:底部栏选项");
    button3->setFixedHeight(100); // 设置宽度
    button3->setSizePolicy(QSizePolicy::Expanding, QSizePolicy::Expanding);

    button4 = new QPushButton(this);
    button4->setText("第四区:子窗体选项");
//    button4->setFixedWidth(100); // 设置宽度
    button4->setSizePolicy(QSizePolicy::Expanding, QSizePolicy::Expanding);

    pGrid_layouts = new QGridLayout();

    // 设置左侧,顶部, 右侧,底部边距
    pGrid_layouts->setContentsMargins(0, 0, 0, 0); // 外边距

    pGrid_layouts->setMargin(30); // 外边距
    pGrid_layouts->setSpacing(30); // 内边距

    // 设置显示位置  addWidget(参数1, 参数2, 参数3, 参数4, 参数5, 参数6)
    /* 参数说明
     * 1:插入的对象,(任意按钮)
     * 2:插入的开始行
     * 3:插入的开始列
     * 4:占用的行数
     * 5:占用的列数
     * 6:指定对齐方式
     */
    pGrid_layouts->addWidget(button1, 0, 1); // 0行1列
    pGrid_layouts->addWidget(button2, 0, 0, 3, 1); // 0行0列 占三行 占1列
    pGrid_layouts->addWidget(button3, 2, 1); // 2行1列
    pGrid_layouts->addWidget(button4, 1, 1); // 1行1列

    windows->setLayout(pGrid_layouts);
    window->show();
    return a.exec();
}
重点讲一下addWidget()这个函数:
addWidget(参数1, 参数2, 参数3, 参数4, 参数5, 参数6)
/* 参数说明
* 1:插入的对象,(任意按钮)
* 2:插入的开始行
* 3:插入的开始列
* 4:占用的行数
* 5:占用的列数
* 6:指定对齐方式
*/
例如:
 	pGrid_layouts->addWidget(button1, 0, 1); // 第0行 第1列
    pGrid_layouts->addWidget(button2, 0, 0, 3, 1); // 第0行 第0列 占三行 占1列
    pGrid_layouts->addWidget(button3, 2, 1); // 第2行 第1列
    pGrid_layouts->addWidget(button4, 1, 1); // 第1行 第1列
注意,是从第0行第0列开始的。还有就是边距的把控:
	pGrid_layouts->setContentsMargins(0, 0, 0, 0); // 外边距
    pGrid_layouts->setMargin(30); // 外边距
    pGrid_layouts->setSpacing(30); // 内边距
和css有点类似,具体如何可以自己去试试,毕竟只有动手实践才能理解更加深刻
运行结果:

4.栅格布局(QFormLayout)
#include "widget.h"
#include <QApplication>
#include <QLabel>
#include <QPushButton>

#include <QFormLayout>
#include <QLineEdit>

int main(int argc, char *argv[])
{
	QApplication a(argc, argv);
	QWidget *window = new QWidget;

    setFixedSize(250, 200);
    QFormLayout *qLayout = new QFormLayout(this);

    QLineEdit *le1 = new QLineEdit();
    QLineEdit *le2 = new QLineEdit();
    QLineEdit *le3 = new QLineEdit();

    qLayout->addRow("学号", le1);
    qLayout->addRow("姓名", le2);
    qLayout->addRow("学校", le3);

    qLayout->setSpacing(8);


    qLayout->setRowWrapPolicy(QFormLayout::WrapLongRows);

    qLayout->setLabelAlignment(Qt::AlignLeft); // 设置标签对其方式

    setWindowTitle("栅格布局");

    windows->setLayout(qLayout);
    window->show();
    return a.exec();
}
也很好理解,就是和其他三个布局也一样的是,他不是构建按钮布局,而是表单布局,添加方法也有所区别:
    QLineEdit *le1 = new QLineEdit();
    QLineEdit *le2 = new QLineEdit();
    QLineEdit *le3 = new QLineEdit();

    qLayout->addRow("学号", le1);
    qLayout->addRow("姓名", le2);
    qLayout->addRow("学校", le3);
对照着运行结果很好理解
上结果:

总结
下面简单总结一下:
垂直布局(QVBoxLayout): 垂直布局是一种线性布局,控件按照垂直方向排列,一个接一个地放置在同一列中。这种布局适合于需要在同一列中放置多个控件的情况。
水平布局(QHBoxLayout): 水平布局是一种线性布局,控件按照水平方向排列,一个接一个地放置在同一行中。这种布局适合于需要在同一行中放置多个控件的情况。网格布局(QGridLayout): 网格布局是一种二维布局,控件按照行和列的形式排列,可以在同一行或同一列中放置多个控件。这种布局适合于需要在二维空间中放置控件的情况。
栅格布局(QFormLayout): 栅格布局是一种标签和控件对齐的布局方式,控件按照列的形式排列,每个控件旁边都有一个标签。这种布局适合于需要在同一行中放置标签和控件的情况。


 1万+
1万+


 被折叠的 条评论
为什么被折叠?
被折叠的 条评论
为什么被折叠?
 到【灌水乐园】发言


