


一 、SpringCloudConfig 配置搭建步骤
1.引入 依赖pom文件
引入 spring-cloud-config-server 是因为已经配置了注册中心
<dependencies>
        <dependency>
            <groupId>org.springframework.cloud</groupId>
            <artifactId>spring-cloud-config-server</artifactId>
        </dependency>
        <dependency>
            <groupId>org.springframework.cloud</groupId>
            <artifactId>spring-cloud-starter-netflix-eureka-client</artifactId>
        </dependency>

        <dependency>
            <groupId>org.springframework.cloud</groupId>
            <artifactId>spring-cloud-netflix-eureka-client</artifactId>
        </dependency>
    </dependencies>
2. 添加bootstrap.yml 配置文件
启动Spring Cloud Config服务器,它会从Git仓库中读取配置并通过HTTP接口暴露。
以下是配置application.properties
server.port=8050
spring.application.name=config-server

# 注册到服务注册中心
eureka.client.service-url.defaultZone=http://localhost:8761/eureka/

#####################读取git远程配置中心文件位置################################
# github的仓库地址
spring.cloud.config.server.git.uri=https://gitee.com/yunzhongfan/zhangcloudconfig.git
# 搜索 Github/Gitee 上名为 config-server 仓库的目录
spring.cloud.config.server.git.searchPaths=repo
# github的分支,默认是master
spring.cloud.config.label=master
# git 仓库登录用户名
spring.cloud.config.server.git.username=xxxx@qq.com
# git 仓库登录密码
spring.cloud.config.server.git.password=yyyyyy
#启动时直接从远程 Git 仓库获取配置 (GitHub/Gitee)
spring.cloud.config.server.git.lone-on-start=true


#######################读取本地配置文件配置###################################
#表示配置读取选择本地的地址
# spring.profiles.active=native
#本地配置文件位置
#spring.cloud.config.server.native.search-locations=G:\\env-properties\\spring-config
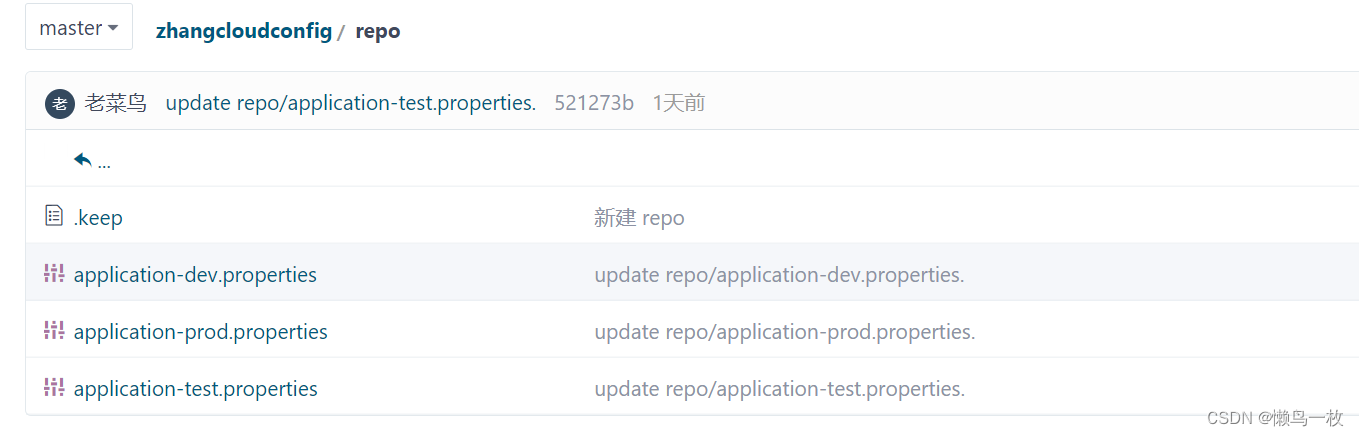
3.在git 仓库 添加配置文件
确保你的Git仓库中有一个config目录,并且配置文件遵循{application}-{profile}.properties或{application}-{profile}.yml的命名规则。
启动Spring Cloud Config服务器的主类可能看起来像这样:
4.开启服务注册发现和配置服务注解
@SpringBootApplication
@EnableConfigServer
@EnableDiscoveryClient
public class ConfigServerApplication {

    public static void main(String[] args) {
        SpringApplication.run(ConfigServerApplication.class, args);
    }

}
5. 测试配置中心的配置文件
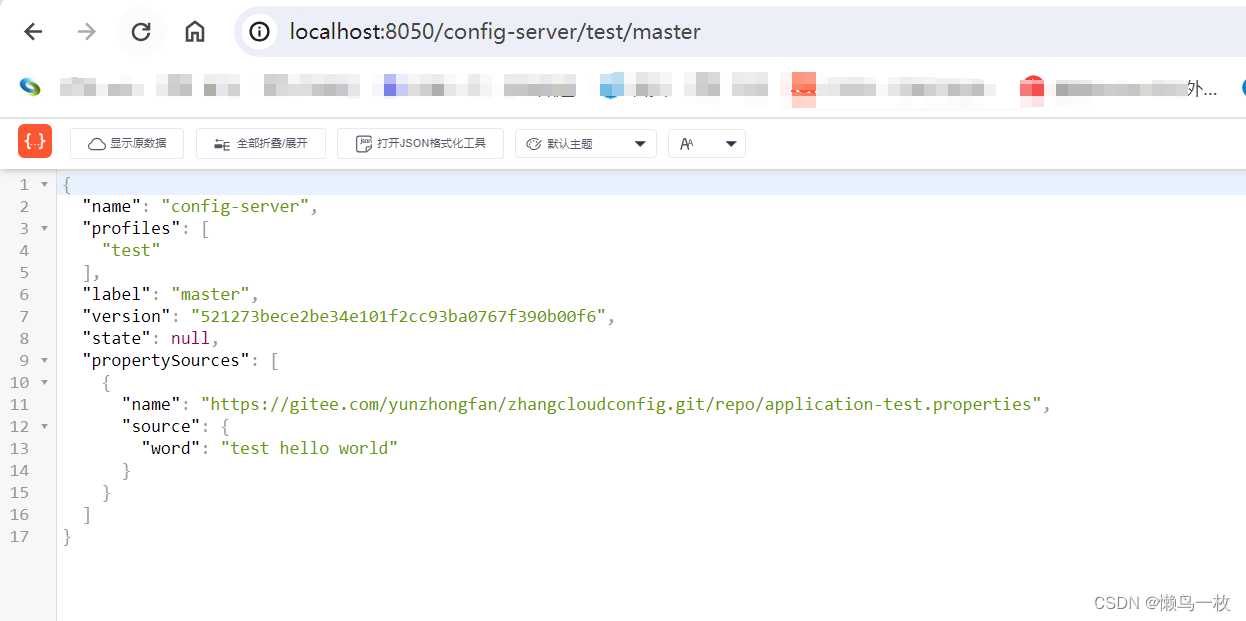
启动后,你可以通过访问如下URL来获取配置信息:
http://localhost:port/application-name/profile/label
其中application-name是配置文件的应用名,profile是环境名(如dev, test, prod),label是Git的分支名。如果在application.properties中设置了默认的label,则可以省略。
请确保你的开发环境安装了Git,并且网络可以访问GitHub或其他Git仓库的URL。
http://localhost:8050/config-server/test/master
http://localhost:8050/config-server/dev/master

Config支持我们使用的请求的参数规则为:
/ { 应用名 } / { 环境名 } [ / { 分支名 } ] eg: http://localhost:8050/config-server/dev/master
/ { 应用名 } - { 环境名 }.yml
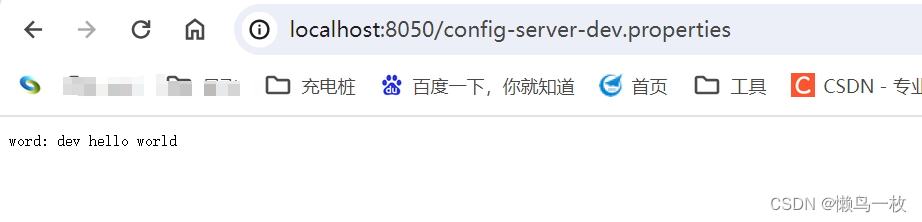
/ { 应用名 } - { 环境名 }.properties eg: http://localhost:8050/config-server-dev.properties
/ { 分支名 } / { 应用名 } - { 环境名 }.yml
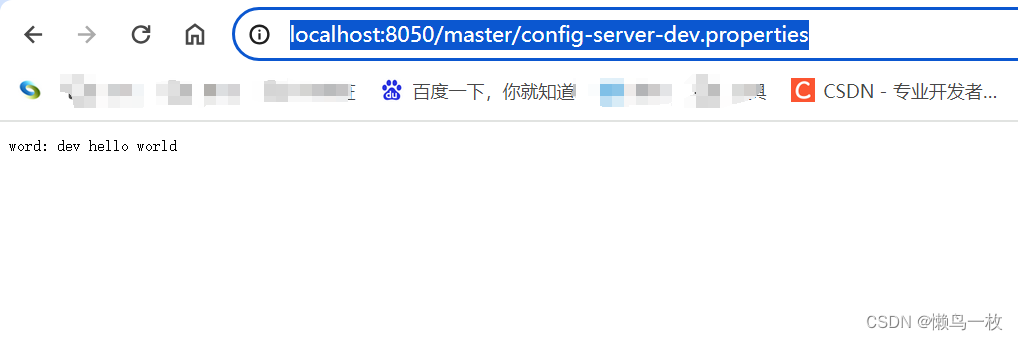
/ { 分支名 } / { 应用名 } - { 环境名 }.properties eg:http://localhost:8050/master/config-server-dev.properties
http://localhost:8050/config-server-dev.properties
http://localhost:8050/master/config-server-dev.properties
二、springcloud Client 客户端搭建
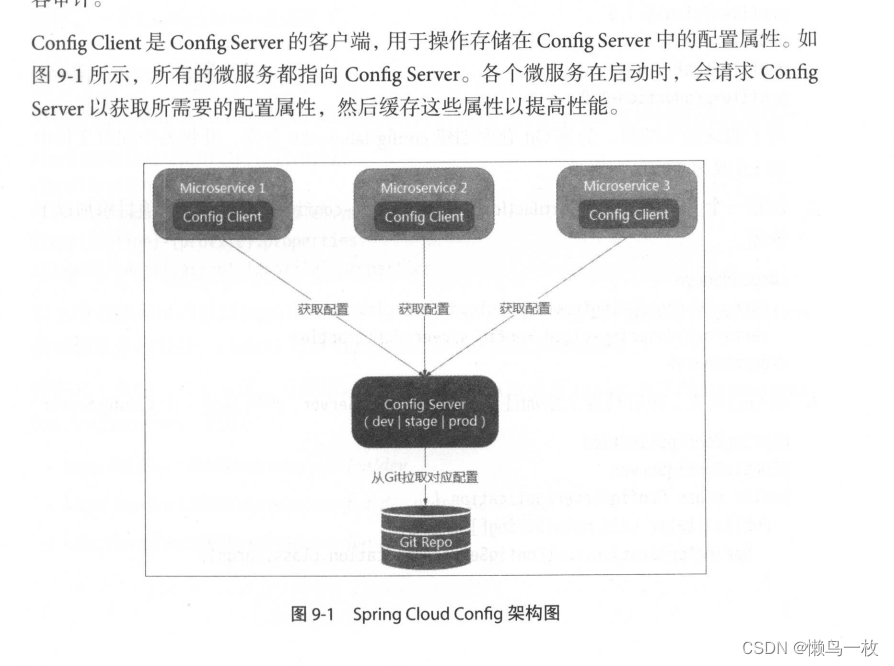
Config Server 是一个可横向扩展、集中式的配置服务器,它用于集中管理应用程序各个环境下的配置,默认使用 Git存储配置内容(也可使用Subversion、本地文件系统或 Vault存储配置,限于篇幅,本书不做讨论),因此可以很方便地实现对配置的版本控制与内容审计
1.引入相关的jar包
 <dependencies>
        <dependency>
            <groupId>org.springframework.boot</groupId>
            <artifactId>spring-boot-starter-data-redis</artifactId>
        </dependency>
        <dependency>
            <groupId>org.springframework.boot</groupId>
            <artifactId>spring-boot-starter-web</artifactId>
        </dependency>
        <dependency>
            <groupId>org.springframework.boot</groupId>
            <artifactId>spring-boot-starter-actuator</artifactId>
        </dependency>
        <dependency>
            <groupId>org.springframework.cloud</groupId>
            <artifactId>spring-cloud-starter-config</artifactId>
        </dependency>

        <dependency>
            <groupId>org.springframework.cloud</groupId>
            <artifactId>spring-cloud-starter-netflix-eureka-client</artifactId>
        </dependency>


        <dependency>
            <groupId>org.projectlombok</groupId>
            <artifactId>lombok</artifactId>
            <optional>true</optional>
        </dependency>
        <dependency>
            <groupId>com.zhang.buiness</groupId>
            <artifactId>amaster-config-pub</artifactId>
            <version>0.0.1-SNAPSHOT</version>
        </dependency>
    </dependencies>
2.搭建bootstrap.yml 配置文件,配置springcloud 相关信息
server:
    port: 9006
eureka:
    client:
        service-url:
            # 注册中心地址
            defaultZone: http://localhost:8761/eureka/
spring:
    cloud:
        config:
            discovery:
                #表示使用服务发现组件Erurker中的ConfigServer,而不自己指定Config Server#的uri,默认false
                enabled: true
                #指定ConfigServer在服务发现中的serviceId,默认是configserver
                serviceId: config-server
            # github的分支,默认是master
            label: master
            name: config-server
            #git仓库中配置文件的profile
            profile: dev
            uri: http://127.0.0.1:8050
3.建立application.yml 配置文件 应用程序级别的胚子文件
server:
  port: 9006

spring:
  application:
    name: amaster-config-env-server

4.建立启动类
@EnableDiscoveryClient
@SpringBootApplication
@EnableEurekaClient
public class AmasterConfigEnvServerApplication {

    public static void main(String[] args) {
        SpringApplication.run(AmasterConfigEnvServerApplication.class, args);
    }

}
5. 建立测试代码从配置中心拉取配置值
@RestController
@RequestMapping("/env")
public class EnvWebController {
@Autowired
private EnvServiceImpl envService;
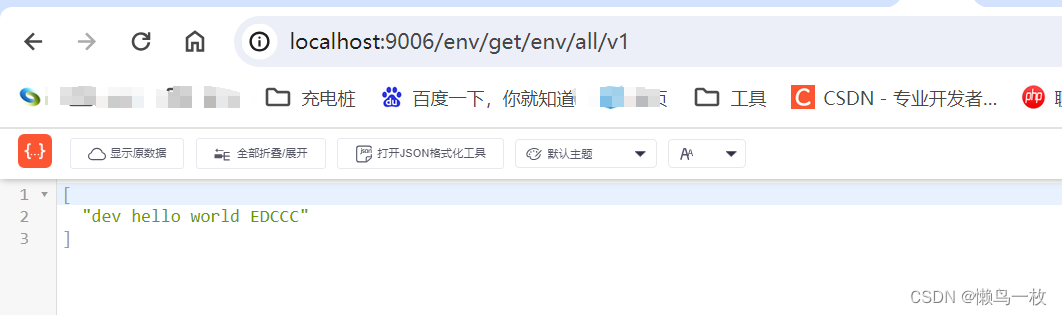
@RequestMapping("/get/env/all/v1")
private List<String> getEnvConfig(){
return envService.getEnvConfig();
}
}
@Service
public class EnvServiceImpl {
@Value("${word}")
private String word;
public List<String> getEnvConfig() {
return Arrays.asList(word);
}
}
6.启动测试类
6.1.启动注册中心、和配置中心服务端
6.2 启动cloudConfig 客户端
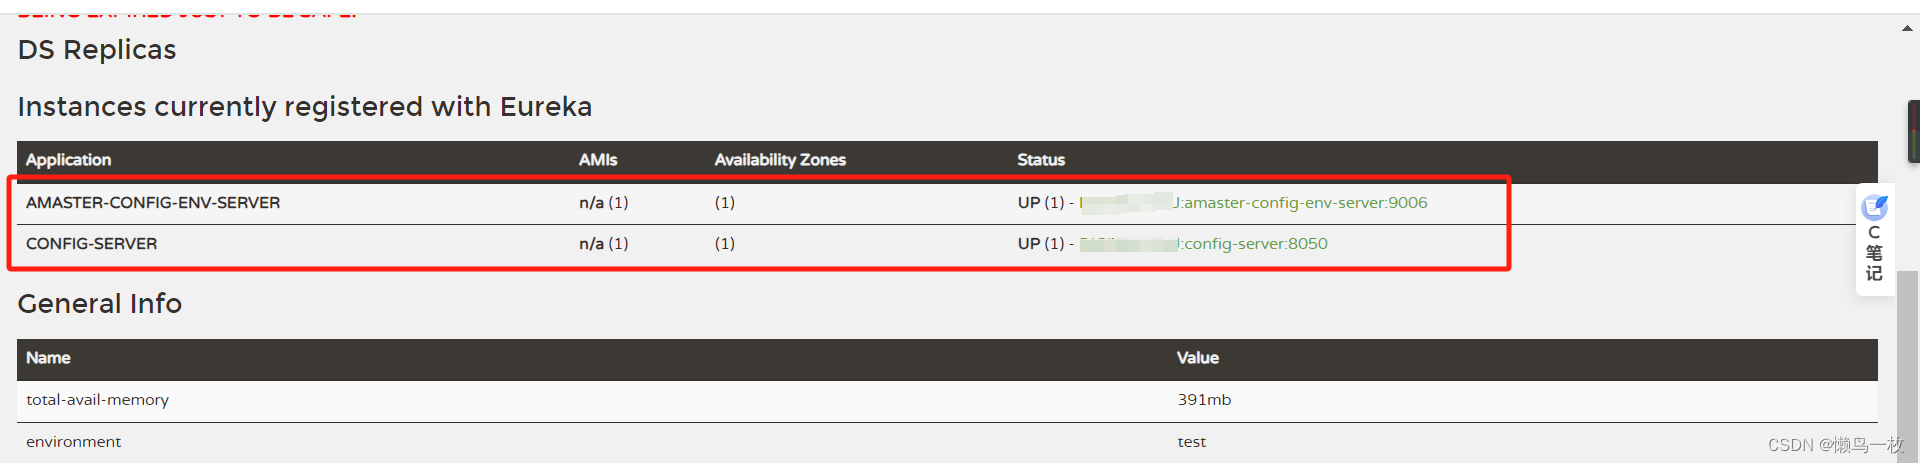
启动测试类后,在启动日志中会看到对应的配置中心地址

启动成功后会在注册中心中看到配置中心和配置中心客户端
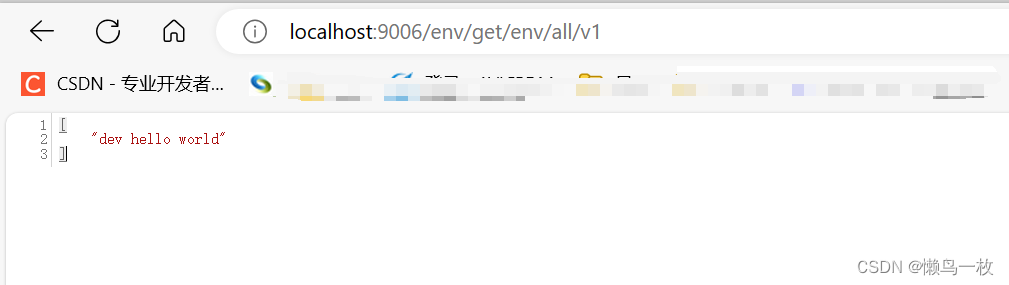
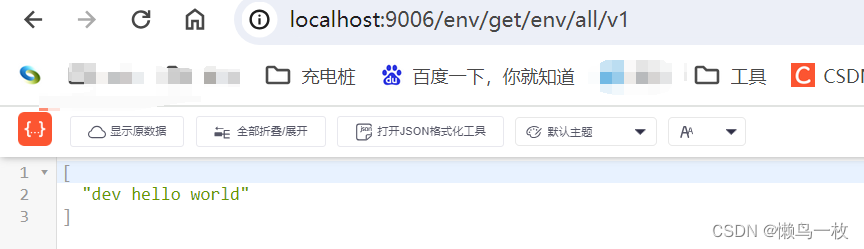
访问测试配置文件的值,可以看到成功读取配置中心git中的值

读取配置中心常见错误,读取不到配置配置中心报,
Spring Cloud 服务启动连接 报:Fetching config from server at : http://localhost:8888
配置文件的优先级
通过错误日志,发现服务还是取的8888的配置中心的文件,这就涉及到了一个配置文件的优先级,在spring Cloud 中,有个 “启动上下文”,用来加载ConfigServer里面的配置,默认的加载顺序为:本地bootstrap.配置 --> 链接 configServer,加载远程配置 --> 加载本地application. 配置。
三 、springcloud 配置文件刷新
3.1 基于spring-boot-starter-actuator 的配置文件手动刷新功能
1.添加依赖包
 <!--springcloud 使用/refresh端点手动刷新项目依赖-->
        <dependency>
            <groupId>org.springframework.boot</groupId>
            <artifactId>spring-boot-starter-actuator</artifactId>
        </dependency>
2.在对应需要刷新的属性上增加@RefreshScope 刷新依赖
@Service
@RefreshScope
public class EnvServiceImpl {

    @Value("${word}")
    private String word;
    public List<String> getEnvConfig() {
        return Arrays.asList(word);
    }
}
-
修改git配置文件仓库的配置

-
执行刷新配置的命令
>curl -X POST http://localhost:9006/actuator/refresh

如果有配置更新则显示更新的配置key

5.测试
刷新前
显示更新后的属性
3.2 基于springcloudConfig Bus 自动刷新配置
四、SpringCloud config Server 的登录用户认证
Spring Cloud Confg的用户认证
在前文的示例中,ConfgServer是允许匿名访问的。为了防止配置内容的外泄,应该保护ConfgServer 的安全。有多种方式做到这一点,例如通过物理网络安全,或者为ConfgServer添加用户认证等。
在未配置SpringCloud config Server安全认证登录之前,可以直接通过
http://localhost:8050/config-server/test/master 等查看配置中心的配置文件,SpringCloud config Client 也可以不经过认证直接访问配置中心。因此可以通过security 进行登录访问的安全认证设置
4.1 config Server 端配置 用户认证配置
添加依赖
 <dependency>
            <groupId>org.springframework.boot</groupId>
            <artifactId>spring-boot-starter-security</artifactId>
        </dependency>
2.配置文件开启basic安全认证
########开始springcloud Server的 配置文件访问的安全认证#######
#开启基于HTTP basic的认证

spring.security.basic.enabled=true
spring.security.user.name=admin
spring.security.user.password=12345678
3.测试访问
直接访问 http://localhost:8050/config-server/test/master ,会跳到登录窗口,登录成功后可以看到访问的内容

4.2 SpringCloudConfig Client端登录访问的用户认证
在Config server端开启用户认证之后,Config Client端虽然可以启动的事时候连接配置中心显示如下

在Config Client 端需要加入以下用户认证配置
spring.cloud.config.discovery.username 和 spring.cloud.config.discovery.password 用户认证属性才可以访问到配置文件
spring:
    cloud:
        config:
            discovery:
                #表示使用服务发现组件Erurker中的ConfigServer,而不自己指定Config Server#的uri,默认false
                enabled: true
                #指定ConfigServer在服务发现中的serviceId,默认是configserver
                serviceId: config-server
            # github的分支,默认是master
            label: master
            # github的分支,默认是master
            name: config-server
            #git仓库中配置文件的profile
            profile: @profiles.active@
            # 配置中心地址 不使用注册中心的时候配置使用
            #uri: http://127.0.0.1:8050
            #uri: http://admin:12345678@127.0.0.1:8050
            # Config Client 用户认证 用户名 ,在Config server 端开启用户认证后需要加入
            username: admin
            # Config Client 用户认证 用户名  ,在Config server 端开启用户认证后需要加入
            password: 12345678
五、SpringCloud Server的高可用
5.1 Git 仓库的高可用
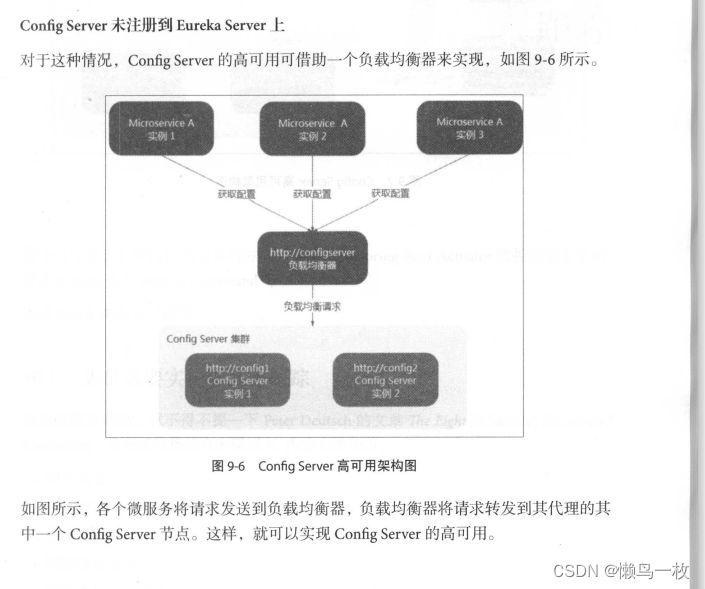
由于配置内容都存储在 Git 仓库中,所以要想实现 ConfgServer 的高可用,必须有一个高可用的Git 仓库。有两种方式可以实现Git 仓库的高可用。
- 使用第三方 Git 仓库:这种方式非常简单,可使用例如 GitHub、BitBucket、git@osc、Coding等提供的仓库托管服务,这些服务本身就已实现了高可用。
- 自建Git 仓库管理系统:使用第三方服务的方式虽然省去了很多烦恼,但是很多场景下,倾向于自建 Git仓库管理系统。此时就需要保证自建Git的高可用。以 GitLab为例,读者可参照官方文档搭建高可用的 GitLab:https://about.gitlab.com/high-availability/
5.2 基于SpringCloudConfig Bus的高可用
- RabbitMQ的高可用
还记得前文使用 Spring Cloud Bus实现了配置的自动刷新吗?由于 Spring Cloud Bus依赖RabbitMQ(当然也可使用其他 MQ),所以 RabbitMQ 的高可用也是必不可少的。搭建高可用RabbitMQ的资料详见:https://www.rabbitmg.com/ha.html。由于比较简单,笔者不做赘述。当然,也可使用云平台的提供的RabbitMQ服务
5.3 基于SpringCloud Server 的高可用
5.3.1 Config Server 未注册到Eureka Server 上
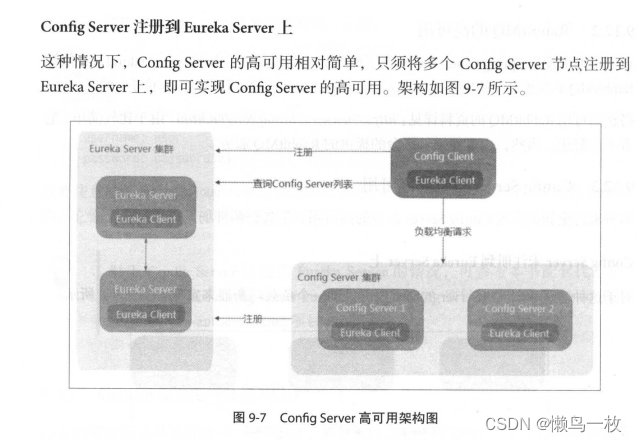
5.3.1 Config Server 注册到 Eureka Server 上
六 、SpringCloudConfig 配置常见属性
Spring Cloud Config 是一个用于集中管理应用程序配置的框架,它将配置存储在一个外部系统(如Git仓库)中,并使用Spring Enviroment和Vault支持密码等敏感信息的管理。
Spring Cloud Config 常见的配置属性如下:
spring.cloud.config.server.git.uri: 配置Git仓库的地址。

spring.cloud.config.server.git.username: 配置Git仓库的用户名(如有权限限制)。

spring.cloud.config.server.git.password: 配置Git仓库的密码(如有权限限制)。

spring.cloud.config.server.git.cloneOnStart: 配置是否在启动时克隆仓库,默认为true。

spring.cloud.config.server.git.skipSslValidation: 配置是否跳过Git仓库SSL验证。

spring.cloud.config.server.git.timeout: 配置Git仓库连接的超时时间。

spring.cloud.config.server.git.defaultLabel: 配置默认的Git分支,默认为master。

spring.cloud.config.server.git.searchPaths: 配置Git仓库中查找配置文件的路径。

spring.cloud.config.server.port: 配置Config Server的端口。

spring.cloud.config.server.prefix: 配置Config Server的URL前缀。
| 属性名 | 说明 | 默认值 |
|---|---|---|
| spring.cloud.config.allow-override | 标记以指示可以使用{@link #isSystemPropertiesOverride()systemPropertiesOverride}。设置为false以防止用户意外更改默认值 | true |
| spring.cloud.config.authorization | 客户端使用的授权令牌连接到服务器 | |
| spring.cloud.config.discovery.enabled | 标记以指示启用配置服务器发现 | false |
| spring.cloud.config.discovery.service-id | 服务ID来定位配置服务器 | configserver |
| spring.cloud.config.enabled | 标记说远程配置启用 | true |
| spring.cloud.config.fail-fast | 标记表示无法连接到服务器是致命的 | false |
| spring.cloud.config.label | 用于拉取远程配置属性的标签名称 | |
| spring.cloud.config.name | 用于获取远程属性的应用程序名称 | |
| spring.cloud.config.override-none | 标志表示当{@link #setAllowOverride(boolean)allowOverride}为true时,外部属性应该采用最低优先级,并且不覆盖任何现有的属性源(包括本地配置文件) | false |
| spring.cloud.config.override-system-properties | 标记以指示外部属性应覆盖系统属性 | true |
| spring.cloud.config.password | 联系远程服务器时使用的密码 | |
| spring.cloud.config.profile | 获取远程配置时使用的默认配置文件(逗号分隔) | default |
| spring.cloud.config.retry.initial-interval | 初始重试间隔(以毫秒为单位) | 1000 |
| spring.cloud.config.retry.max-attempts | 最大尝试次数 | 6 |
| spring.cloud.config.retry.max-interval | 退避的最大间隔 | 2000 |
| spring.cloud.config.retry.multiplier | 下一个间隔的乘数 | 1.1 |
| spring.cloud.config.server.bootstrap | 表示配置服务器应使用远程存储库中的属性初始化其自己的环境 | false |
| spring.cloud.config.server.default-application-name | application 传入请求没有特定的默认应用程序名称 application | |
| spring.cloud.config.server.default-label | 传入请求没有特定标签时的默认存储库标签 | |
| spring.cloud.config.server.default-profile | 传入请求没有特定的默认应用程序配置文件时 | default |
| spring.cloud.config.server.encrypt.enabled | 在发送给客户端之前启用对环境属性的解密 | true |
| spring.cloud.config.server.git.force-pull | 标记表示存储库应该强制拉。如果真的丢弃任何本地更改并从远程存储库获取 | |
| spring.cloud.config.server.git.password | 使用远程存储库验证密码 | |
| spring.cloud.config.server.git.repos | 存储库标识符映射到位置和其他属性 | |
| spring.cloud.config.server.git.search-paths | 在本地工作副本中使用的搜索路径 | |
| spring.cloud.config.server.git.timeout | 用于获取HTTP或SSH连接的超时(以秒为单位) | 5 |
| spring.cloud.config.server.git.uri | 远程存储库的URI | |
| spring.cloud.config.server.git.username | 用于远程存储库的身份验证用户名 | |
| spring.cloud.config.server.native.fail-on-error | 标识以确定在解密期间如何处理异常 | false |
| spring.cloud.config.server.native.search-locations | 搜索配置文件的位置 | [] |
| spring.cloud.config.server.native.version | 为本地存储库报告的版本字符串 | |
| spring.cloud.config.server.overrides | 无条件发送给所有客户的资源的额外地图 | |
| spring.cloud.config.server.prefix | 配置资源路径的前缀 | |
| spring.cloud.config.server.strip-document-from-yaml | 标记为指示作为文本或集合(而不是映射)的YAML文档应以“本机”形式返回 | true |
| spring.cloud.config.uri | 远程服务器的URI | http:// localhost:8888 |
| spring.cloud.config.username | 联系远程服务器时使用的用户名 |


 162
162


 被折叠的 条评论
为什么被折叠?
被折叠的 条评论
为什么被折叠?
 到【灌水乐园】发言


