


一. Linux内核链表简介
Linux内核中需要经常用到双链表,该链表只有指针域,没有数据域。在很多的数据结构中都会嵌入struct list_head结构体变量,它可以使结构体加入到一个双向链表中。链表的初始化,增加,删除等操作的接口在linux-x.x.x/include/linux/list.h里面,内核链表在内核中使用的是如此广泛,所以需要深刻的理解。
二. Linux内核链表使用介绍
1. 基本数据结构
struct list_head {
	struct list_head *next, *prev;
};
从结构体成员看,内核链表是一个双向链表,没有数据域,next指向下一个链表元素,prev指向上一个链表元素。
2. 链表的初始化
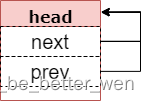
#define LIST_HEAD_INIT(name) { &(name), &(name) }

#define LIST_HEAD(name) \
	struct list_head name = LIST_HEAD_INIT(name)
链表声明和初始化的通常用LIST_HEAD(name)处理。LIST_HEAD定义了一个变量struct list变量name,并且name的next和prev指针都指向name的地址。如下图所示
3. 链表元素添加
static inline void __list_add(struct list_head *new,
			      struct list_head *prev,
			      struct list_head *next)
{
	next->prev = new;
	new->next = next;
	new->prev = prev;
	prev->next = new;
}

# 向头部添加 (在链表头指针和链表第一个元素之间插入元素)
static inline void list_add(struct list_head *new, struct list_head *head)
{
	__list_add(new, head, head->next);
}

# 向尾部添加 (在链表最后一个元素和链表头指针之间插入元素)
static inline void list_add_tail(struct list_head *new, struct list_head *head)
{
	__list_add(new, head->prev, head);
} __list_add函数的作用是在prev和next指针指向的元素之间插入new元素。如下图所示。
list_add函数向__list_add函数传入的prev和next参数分别是head和head->next,所以list_add函数是在链表头指针和链表第一个元素之间插入new元素。
list_add_tail函数向__list_add函数传入的prev和next指针分别是head->prev和head,head->prev就是指向链表的最后一个元素,所以list_add_tail是在链表最后一个元素和链表头指针之间插入元素。
4. 链表元素删除
static inline void __list_del(struct list_head * prev, struct list_head * next)
{
	next->prev = prev;
	prev->next = next;
}

static inline void __list_del_entry(struct list_head *entry)
{
	__list_del(entry->prev, entry->next);
}

static inline void list_del(struct list_head *entry)
{
	__list_del(entry->prev, entry->next);
	entry->next = LIST_POISON1;
	entry->prev = LIST_POISON2;
}
_list_del函数的作用是删除prev和next指针指向的元素之间的元素,如下图所示
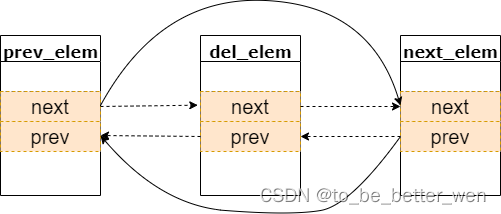
__list_del_entry函数向__list_del函数传入的的prev和next参数分别指向是要删除元素的前一个元素和后一个元素。
list_del函数和__list_del_entry函数的区别是将删除元素的前向指针和后向指针都指向一个非法值,如元素从链表中删除后仍然反问,则会产生内存页错误。
5. 链表的遍历
/**
* list_for_each - iterate over a list
* @pos: the &struct list_head to use as a loop cursor.
* @head: the head for your list.
*/
#define list_for_each(pos, head) \
for (pos = (head)->next; pos != (head); pos = pos->next)
/**
* list_for_each_prev - iterate over a list backwards
* @pos: the &struct list_head to use as a loop cursor.
* @head: the head for your list.
*/
#define list_for_each_prev(pos, head) \
for (pos = (head)->prev; pos != (head); pos = pos->prev)
/**
* list_for_each_safe - iterate over a list safe against removal of list entry
* @pos: the &struct list_head to use as a loop cursor.
* @n: another &struct list_head to use as temporary storage
* @head: the head for your list.
*/
#define list_for_each_safe(pos, n, head) \
for (pos = (head)->next, n = pos->next; pos != (head); \
pos = n, n = pos->next)
/**
* list_for_each_prev_safe - iterate over a list backwards safe against removal of list entry
* @pos: the &struct list_head to use as a loop cursor.
* @n: another &struct list_head to use as temporary storage
* @head: the head for your list.
*/
#define list_for_each_prev_safe(pos, n, head) \
for (pos = (head)->prev, n = pos->prev; \
pos != (head); \
pos = n, n = pos->prev)
/**
* list_for_each_entry - iterate over list of given type
* @pos: the type * to use as a loop cursor.
* @head: the head for your list.
* @member: the name of the list_struct within the struct.
*/
#define list_for_each_entry(pos, head, member) \
for (pos = list_first_entry(head, typeof(*pos), member); \
&pos->member != (head); \
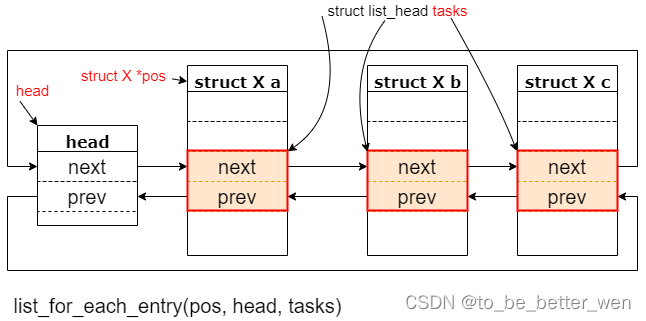
pos = list_next_entry(pos, member))list_for_each函数是按照从前往后的顺序遍历链表,通过不断指向元素的next元素,直到元素的指针和链表头指针地址相同,则表示链表遍历完成。
list_for_each_prev函数则是从链表的尾部元素向前遍历。
list_for_each_safe函数引入了指针n,用于存储pos的下一个元素的地址。引入指针n可以方便在遍历链表的时候删除pos指向的元素,而不影响遍历。list_for_each无法做到这一点。
list_for_each_prev_safe函数和list_for_each_safe函数的区别是从后往前遍历。
list_for_each_entry函数是list_for_each和list_entry的结合,有pos,head,member三个参数,pos是一个中间变量,指向当前访问的链表元素,head指链表头,member指pos指向的结构体中链表成员变量的名称,示意图如下:
6. 查找链表元素
/**
 * list_entry - get the struct for this entry
 * @ptr:	the &struct list_head pointer.
 * @type:	the type of the struct this is embedded in.
 * @member:	the name of the list_struct within the struct.
 */
#define list_entry(ptr, type, member) \
	container_of(ptr, type, member)
list_entry宏有三个参数ptr,type,member。ptr是指数据结构中struct list_head变量成员的地址,type是指数据结构的类型,member是指数据结构中struct list_head的变量名。list_entry宏的结果是ptr指向的type类型的数据结构的变量地址。
示意图如下:

代码示例:
struct task_struct {
    ...
    struct list_head tasks;
    ...
};
如果要获取某个struct task_struct类型的变量的地址,ptr指向该变量的tasks指针变量的地址,则可以这么写
struct task_struct *addr = list_entry(ptr, struct task_struct, tasks);举例:list_for_each和list_entry配合使用
list_for_each函数用于获取数据结构中struct list_head成员的地址,list_entry则是通过struct list_head成员的地址获取到数据结构的地址。
代码示例:
list_for_each(pos, &list)
{
    struct task_struct *addr = list_entry(pos, struct task_struct, tasks);
}
三. 总结
代码示例:
#include <linux/init.h>
#include <linux/slab.h>
#include <linux/module.h>
#include <linux/kernel.h>
#include <linux/list.h>
#include <linux/rculist.h>

struct stu_info
{
   char* name;
   int age;
   void (*print)(struct stu_info *stu);
   struct list_head list;
};

void print_info(struct stu_info *stu)
{
    printk("name = %s, age = %d\n", stu->name, stu->age);
}

struct stu_info students[8] = {
	{"Zhao", 20, print_info},
	{"Qian", 21, print_info},
	{"Sun", 22, print_info},
	{"Li", 23, print_info},
};

LIST_HEAD(stu);

static int student_list_init(void)
{
	struct list_head *pos;
	struct stu_info *s;

	list_add(&students[0].list, &stu);
	list_add(&students[1].list, &stu);
	list_add(&students[2].list, &stu);
	list_add(&students[3].list, &stu);

	list_for_each(pos, &stu)
	{
		s = list_entry(pos, struct stu_info, list);
		s->print(s);
	}


    return 0;
}

static void student_list_exit(void)
{
   printk("student_list_exit\n");

   return;
}

module_init(student_list_init);
module_exit(student_list_exit);
MODULE_LICENSE("Dual BSD/GPL");
输出结果:
[19764.110000] name = Li, age = 23
[19764.120000] name = Sun, age = 22
[19764.120000] name = Qian, age = 21
[19764.130000] name = Zhao, age = 20


 2368
2368


 被折叠的 条评论
为什么被折叠?
被折叠的 条评论
为什么被折叠?
 到【灌水乐园】发言


