


一:CORS跨域简介
CORS (Cross-Origin Resource Sharing )是由W3C制定的一种基于 HTTP 头的跨域资源共享技术标准,其目的就是为了解决前端的跨域请求,该机制通过允许服务器标示除了它自己以外的其它 origin(域,协议和端口),使得浏览器允许这些 origin 访问加载自己的资源。在JavaEE 开发中,最常见的前端跨域请求解决方案是早期的JSONP,但是JSONP只支持GET请求,这是一个很大的缺陷,而CORS则支持多种HTTP请求方法,也是目前主流的跨域解决方案。
CORS中新增了一组HTTP请求头字段,通过这些字段,服务器告诉浏览器,那些网站通过浏览器有权限访问哪些资源。同时规定,对那些可能修改服务器数据的HTTP请求方法(如GET以外的HTTTP请求等),浏览器必须首先使用OPTIONS方法发起一个预检请求(prenightst), 预检请求的目的是查看服务端是否支持即将发起的跨域请求,如果服务端允许,才包实际的HTTP请求。在预检请求的返回中,服务器端也可以通知客户端,是否需要携带身份凭证(如Cookies、HTTP认证信息等)。
1.1:简单请求
某些请求不会触发 CORS 预检请求。本文称这样的请求为“简单请求”,请注意,该术语并不属于 Fetch(其中定义了 CORS)规范。若请求满足所有下述条件,则该请求可视为“简单请求”:
- 使用下列方法之一:
- GET
- HEAD
- POST
- 除了被用户代理自动设置的首部字段(例如 Connection,User-Agent)和在 Fetch 规范中定义为禁用首部名称的其他首部,允许人为设置的字段为 Fetch 规范定义的 对 CORS 安全的首部字段集合。该集合为:
- Accept
- Accept-Language
- Content-Language
- Content-Type(需要注意额外的限制)
- Content-Type 的值仅限于下列三者之一:
- text/plain
- multipart/form-data
- application/x-www-form-urlencoded
- 请求中的任意 XMLHttpRequest 对象均没有注册任何事件监听器;XMLHttpRequest 对象可以使用 XMLHttpRequest.upload 属性访问。
- 请求中没有使用 ReadableStream 对象
比如说,假如站点 https://foo.example 的网页应用想要访问 https://bar.other 的资源。foo.example 的网页中可能包含类似于下面的 JavaScript 代码:
const xhr = new XMLHttpRequest();
const url = 'https://bar.other/resources/public-data/';

xhr.open('GET', url);
xhr.onreadystatechange = someHandler;
xhr.send();
以下是浏览器发送给服务器的请求报文:
GET /resources/public-data/ HTTP/1.1
Host: bar.other
User-Agent: Mozilla/5.0 (Macintosh; Intel Mac OS X 10.14; rv:71.0) Gecko/20100101 Firefox/71.0
Accept: text/html,application/xhtml+xml,application/xml;q=0.9,*/*;q=0.8
Accept-Language: en-us,en;q=0.5
Accept-Encoding: gzip,deflate
Connection: keep-alive
Origin: https://foo.example
请求首部字段 Origin 表明该请求来源于 http://foo.example。
HTTP/1.1 200 OK
Date: Mon, 01 Dec 2008 00:23:53 GMT
Server: Apache/2
Access-Control-Allow-Origin: *
Keep-Alive: timeout=2, max=100
Connection: Keep-Alive
Transfer-Encoding: chunked
Content-Type: application/xml

[XML Data]
本例中,服务端返回的Access-Control-Allow-Origin: *表明,该资源可以被任意外域访问。
使用 Origin 和 Access-Control-Allow-Origin 就能完成最简单的访问控制。如果服务端仅允许来自 https://foo.example 的访问,该首部字段的内容如下:
Access-Control-Allow-Origin: https://foo.example
备注: 当响应的是附带身份凭证的请求时,服务端必须明确 Access-Control-Allow-Origin 的值,而不能使用通配符“*”。
1.2:预检请求
与前述简单请求不同,“需预检的请求”要求必须首先使用OPTIONS方法发起一个预检请求到服务器,以获知服务器是否允许该实际请求。"预检请求“的使用,可以避免跨域请求对服务器的用户数据产生未预期的影响。
如下是一个需要执行预检请求的 HTTP 请求:
const xhr = new XMLHttpRequest();
xhr.open('POST', 'https://bar.other/resources/post-here/');
xhr.setRequestHeader('X-PINGOTHER', 'pingpong');
xhr.setRequestHeader('Content-Type', 'application/xml');
xhr.onreadystatechange = handler;
xhr.send('<person><name>Arun</name></person>');
上面的代码使用 POST 请求发送一个 XML 文档,该请求包含了一个自定义的请求首部字段(X-PINGOTHER: pingpong)。另外,该请求的 Content-Type 为 application/xml。因此,该请求需要首先发起“预检请求”。
备注: 如下所述,实际的 POST 请求不会携带 Access-Control-Request-* 首部,它们仅用于 OPTIONS 请求。
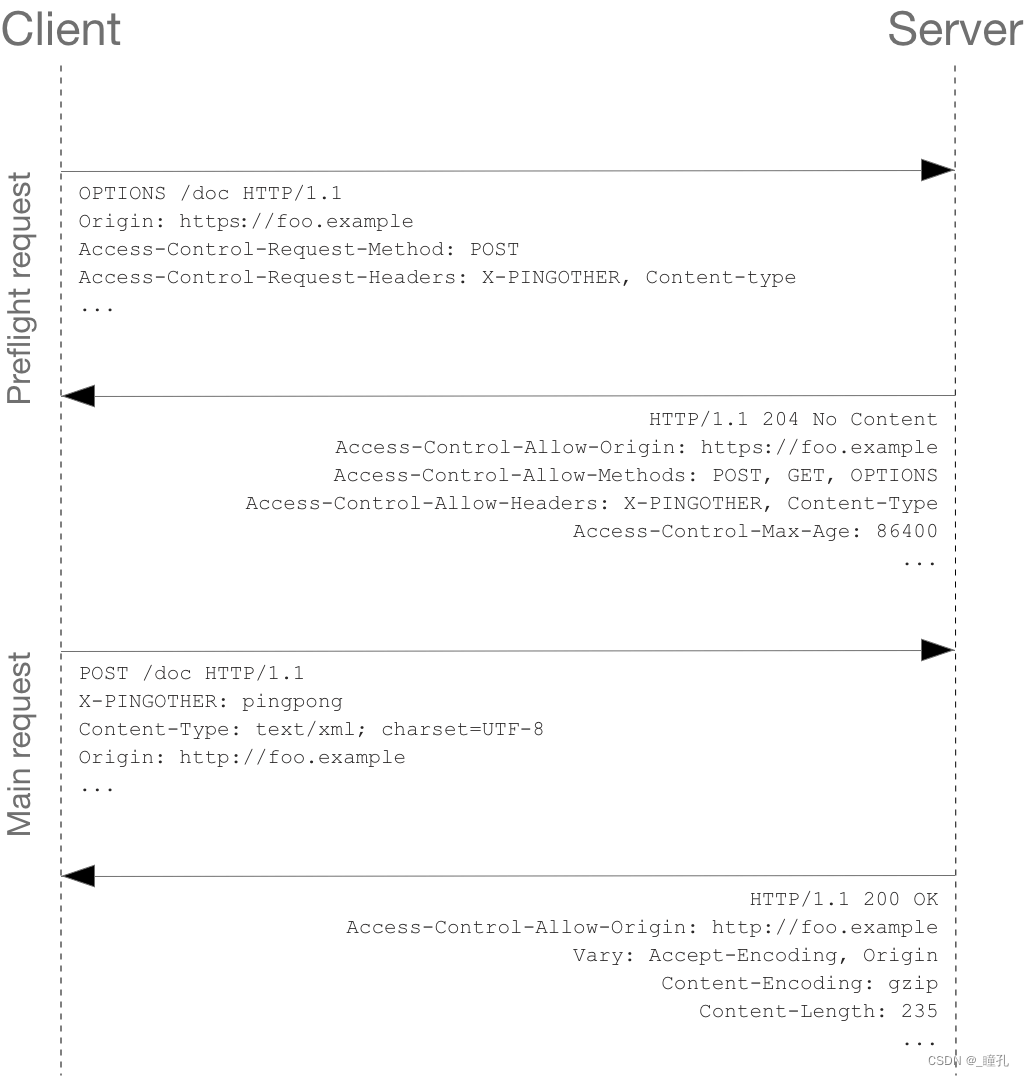
下面是服务端和客户端完整的信息交互。首次交互是 预检请求/响应:
OPTIONS /doc HTTP/1.1
Host: bar.other
User-Agent: Mozilla/5.0 (Macintosh; Intel Mac OS X 10.14; rv:71.0) Gecko/20100101 Firefox/71.0
Accept: text/html,application/xhtml+xml,application/xml;q=0.9,*/*;q=0.8
Accept-Language: en-us,en;q=0.5
Accept-Encoding: gzip,deflate
Connection: keep-alive
Origin: https://foo.example
Access-Control-Request-Method: POST
Access-Control-Request-Headers: X-PINGOTHER, Content-Type

HTTP/1.1 204 No Content
Date: Mon, 01 Dec 2008 01:15:39 GMT
Server: Apache/2
Access-Control-Allow-Origin: https://foo.example
Access-Control-Allow-Methods: POST, GET, OPTIONS
Access-Control-Allow-Headers: X-PINGOTHER, Content-Type
Access-Control-Max-Age: 86400
Vary: Accept-Encoding, Origin
Keep-Alive: timeout=2, max=100
Connection: Keep-Alive
浏览器检测到,从 JavaScript 中发起的请求需要被预检。从上面的报文中,我们看到,第 1~10 行发送了一个使用 OPTIONS 方法 的“预检请求”。OPTIONS 是 HTTP/1.1 协议中定义的方法,用以从服务器获取更多信息。该方法不会对服务器资源产生影响。 预检请求中同时携带了下面两个首部字段:
Access-Control-Request-Method: POST
Access-Control-Request-Headers: X-PINGOTHER, Content-Type
首部字段 Access-Control-Request-Method 告知服务器,实际请求将使用 POST 方法。首部字段 Access-Control-Request-Headers 告知服务器,实际请求将携带两个自定义请求首部字段:X-PINGOTHER 与 Content-Type。服务器据此决定,该实际请求是否被允许。
第 13~22 行为预检请求的响应,表明服务器将接受后续的实际请求。重点看第 16~19 行:
Access-Control-Allow-Origin: https://foo.example
Access-Control-Allow-Methods: POST, GET, OPTIONS
Access-Control-Allow-Headers: X-PINGOTHER, Content-Type
Access-Control-Max-Age: 86400
服务器的响应携带了 Access-Control-Allow-Origin: https://foo.example,从而限制请求的源域。同时,携带的 Access-Control-Allow-Methods 表明服务器允许客户端使用 POST 和 GET 方法发起请求(与 Allow 响应首部类似,但其具有严格的访问控制)。
首部字段 Access-Control-Allow-Headers 表明服务器允许请求中携带字段 X-PINGOTHER 与 Content-Type。与 Access-Control-Allow-Methods 一样,Access-Control-Allow-Headers 的值为逗号分割的列表。
最后,首部字段 Access-Control-Max-Age 表明该响应的有效时间为 86400 秒,也就是 24 小时。在有效时间内,浏览器无须为同一请求再次发起预检请求。请注意,浏览器自身维护了一个 最大有效时间,如果该首部字段的值超过了最大有效时间,将不会生效。
预检请求完成之后,发送实际请求:
POST /doc HTTP/1.1
Host: bar.other
User-Agent: Mozilla/5.0 (Macintosh; Intel Mac OS X 10.14; rv:71.0) Gecko/20100101 Firefox/71.0
Accept: text/html,application/xhtml+xml,application/xml;q=0.9,*/*;q=0.8
Accept-Language: en-us,en;q=0.5
Accept-Encoding: gzip,deflate
Connection: keep-alive
X-PINGOTHER: pingpong
Content-Type: text/xml; charset=UTF-8
Referer: https://foo.example/examples/preflightInvocation.html
Content-Length: 55
Origin: https://foo.example
Pragma: no-cache
Cache-Control: no-cache

<person><name>Arun</name></person>

HTTP/1.1 200 OK
Date: Mon, 01 Dec 2008 01:15:40 GMT
Server: Apache/2
Access-Control-Allow-Origin: https://foo.example
Vary: Accept-Encoding, Origin
Content-Encoding: gzip
Content-Length: 235
Keep-Alive: timeout=2, max=99
Connection: Keep-Alive
Content-Type: text/plain

[Some XML payload]
二:Spring跨域解决方案
2.1:@CrossOrigin
Spring中第一种处理跨域的方式是通过@CrossOrigin注解来标记支持跨域,其源码如下:
@Target({ElementType.TYPE, ElementType.METHOD})
@Retention(RetentionPolicy.RUNTIME)
@Documented
public @interface CrossOrigin {

	/** Spring 5.0已弃用,支持CorsConfiguration.applyPermitDefaultValues */
	@Deprecated
	String[] DEFAULT_ORIGINS = {"*"};

	/** Spring 5.0已弃用,支持CorsConfiguration.applyPermitDefaultValues */
	@Deprecated
	String[] DEFAULT_ALLOWED_HEADERS = {"*"};

	/** Spring 5.0已弃用,支持CorsConfiguration.applyPermitDefaultValues */
	@Deprecated
	boolean DEFAULT_ALLOW_CREDENTIALS = false;

	/** Spring 5.0已弃用,支持CorsConfiguration.applyPermitDefaultValues */
	@Deprecated
	long DEFAULT_MAX_AGE = 1800;


	/**
	 * origins的别名,即默认是origins
	 */
	@AliasFor("origins")
	String[] value() default {};

	/**
	 * 允许的域, *号代表允许所有域
	 */
	@AliasFor("value")
	String[] origins() default {};

	/**
	 * 请求被允许的请求头字段
	 */
	String[] allowedHeaders() default {};

	/**
	 * 哪些响应头可以作为响应的一部分暴露出来
	 */
	String[] exposedHeaders() default {};

	/**
	 * 支持的请求方式
	 */
	RequestMethod[] methods() default {};

	/**
	 * 浏览器是否应当发送凭证信息,如Cookie
	 */
	String allowCredentials() default "";

	/**
	 * 预检请求的有效期,有效期内不必再发送预检请求
	 * 默认是1800秒(30 minutes)
	 */
	long maxAge() default -1;
}
从@Target({ElementType.TYPE, ElementType.METHOD})可以了解到,可以使用在类上和方法上,当在类上时,对该类的所有方法生效
@RestController
@CrossOrigin
public class TestController {

    @CrossOrigin(origins = "http://localhost:8080")
    @GetMapping("/hello")
    public String Hello() {
        return "hello";
    }
}
大家可以测试一下,如果对前端知识不太了解的话,可以直接用下面这段代码,注意,这段代码是要发http请求的,因此直接双击点开html文件是不行的,需要用支持html的编译器打开
<!DOCTYPE html>
<html lang="en">

<head>
    <meta charset="UTF-8">
    <meta http-equiv="X-UA-Compatible" content="IE=edge">
    <meta name="viewport" content="width=device-width, initial-scale=1.0">
    <title>Document</title>
</head>

<body>
    <button onclick="getData()">获取数据</button>
    <div id="data"></div>
    <script src="https://cdn.bootcdn.net/ajax/libs/jquery/3.6.0/jquery.min.js"></script>
    <script>
        function getData() {
        	let url = "你的接口地址";
            $.get(url, data => {
                let str = (typeof data == 'string') && data.constructor == String
                        ? data
                        : Object.entries(data);
                $("#data").html(str);
            })
        }
    </script>
</body>

</html>
2.2:addCrosMapping
@CrossOrigin注解需要添加到所有的Controller上,很麻烦,而还有一种方法可以做到全局配置,那就是实现WebMvcConfigurer接口,通过实现addCrosMapping方法来完成:
@Configuration
public class WebMvcConfig implements WebMvcConfigurer {
    @Override
    public void addCorsMappings(CorsRegistry registry) {

    }
}
Spring会给addCorsMappings方法注入一个CorsRegistry对象,我们可以通过源码看看CorsRegistry提供了什么配置(部分源码,仅展示可链式调用的方法):
public class CorsRegistry {

	private final List<CorsRegistration> registrations = new ArrayList<>();

	/**
	 * 为指定的路径启用跨源请求处理
	 * 支持完整的路径映射URI(例如“/admin”)以及Ant风格的路径模式(例如“/admin/**”)
	 * 默认情况下,此CorsConfiguration使用CorsConfiguration.applyPermitDefaultValues()中所述的默认值初始化。
	 */
	public CorsRegistration addMapping(String pathPattern) {
		CorsRegistration registration = new CorsRegistration(pathPattern);
		this.registrations.add(registration);
		return registration;
	}

	// 这个是protected,不能链式调用,但是后面会用到,所以放这里
	protected Map<String, CorsConfiguration> getCorsConfigurations() {
		Map<String, CorsConfiguration> configs = new LinkedHashMap<>(this.registrations.size());
		for (CorsRegistration registration : this.registrations) {
			configs.put(registration.getPathPattern(), registration.getCorsConfiguration());
		}
		return configs;
	}
}
很明显,可链式调用的方法只有这一个,通过注释可以知道,如果是配置允许跨域的接口,可以使用addMapping方法,而addMapping方法返回的是CorsRegistration对象,因此我们可以知道,应该可以链式调用进行更多的配置:
public class CorsRegistration {

	private final String pathPattern;

	private final CorsConfiguration config;

	/**
	 * 允许的域, *号代表允许所有域
	 */
	public CorsRegistration allowedOrigins(String... origins) {
		this.config.setAllowedOrigins(Arrays.asList(origins));
		return this;
	}


	/**
	 * 支持的请求方式
	 */
	public CorsRegistration allowedMethods(String... methods) {
		this.config.setAllowedMethods(Arrays.asList(methods));
		return this;
	}

	/**
	 * 请求被允许的请求头字段
	 */
	public CorsRegistration allowedHeaders(String... headers) {
		this.config.setAllowedHeaders(Arrays.asList(headers));
		return this;
	}

	/**
	 * 哪些响应头可以作为响应的一部分暴露出来
	 */
	public CorsRegistration exposedHeaders(String... headers) {
		this.config.setExposedHeaders(Arrays.asList(headers));
		return this;
	}

	/**
	 * 浏览器是否应当发送凭证信息,如Cookie
	 */
	public CorsRegistration allowCredentials(boolean allowCredentials) {
		this.config.setAllowCredentials(allowCredentials);
		return this;
	}

	/**
	 * 预检请求的有效期,有效期内不必再发送预检请求
	 * 默认是1800秒(30 minutes)
	 */
	public CorsRegistration maxAge(long maxAge) {
		this.config.setMaxAge(maxAge);
		return this;
	}
}
因此如果是全局允许跨域,可以如下配置:
@Configuration
public class WebMvcConfig implements WebMvcConfigurer {
    @Override
    public void addCorsMappings(CorsRegistry registry) {
        registry.addMapping("/**")
                .allowCredentials(false)
                .allowedHeaders("*")
                .allowedMethods("*")
                .allowedOrigins("*")
                .exposedHeaders("*");
    }
}
而如果说部分接口需要允许跨域,而另一部分不允许跨域,或者说部分接口有着不同的允许跨域客户端,这时候我们就需要多次调用addMapping()方法,对每个匹配的路径进行各自的配置,而要如何做到呢,我们可以看看addMapping()的源码,源码我已经在上面贴出来了,这里再截个图
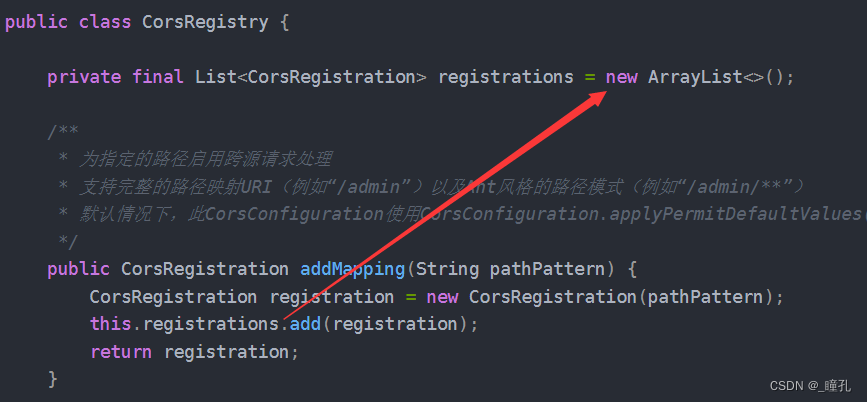

所以我们知道addMapping()方法是可以多次调用的,就像下面这样:
@Configuration
public class WebMvcConfig implements WebMvcConfigurer {
    @Override
    public void addCorsMappings(CorsRegistry registry) {
        registry.addMapping("/hello1/**")
                .allowCredentials(false)
                .allowedHeaders("*")
                .allowedMethods("*")
                .allowedOrigins("*")
                .exposedHeaders("*");

        registry.addMapping("/hello2/**")
                .allowCredentials(true)
                .allowedHeaders("*")
                .allowedMethods("GET")
                .allowedOrigins("*")
                .exposedHeaders("*")
                .maxAge(1000);
    }
}
2.3:CrosFilter
CrosFilter是Spring Web中提供的一个处理跨域的过滤器,开发者也可以通过该过滤器处理跨域,源码就不翻了,累了,原理与之前两个基本相同
import org.springframework.boot.web.servlet.FilterRegistrationBean;
import org.springframework.context.annotation.Bean;
import org.springframework.context.annotation.Configuration;
import org.springframework.web.cors.CorsConfiguration;
import org.springframework.web.cors.UrlBasedCorsConfigurationSource;
import org.springframework.web.filter.CorsFilter;

import java.util.Collections;

@Configuration
public class WebMvcConfig {
    @Bean
    FilterRegistrationBean<CorsFilter> corsFilter() {
        // 配置跨域策略
        CorsConfiguration corsConfiguration = new CorsConfiguration();
        corsConfiguration.setAllowedHeaders(Collections.singletonList("*"));
        corsConfiguration.setAllowedMethods(Collections.singletonList("*"));
        corsConfiguration.setAllowedOrigins(Collections.singletonList("*"));
        corsConfiguration.setMaxAge(3600L);

        // 将配置注册到CorsConfiguration中
        UrlBasedCorsConfigurationSource source = new UrlBasedCorsConfigurationSource();
        source.registerCorsConfiguration("/**", corsConfiguration);

        // 放进Bean中
        FilterRegistrationBean<CorsFilter> registrationBean = new FilterRegistrationBean<>();
        registrationBean.setFilter(new CorsFilter(source));
        registrationBean.setOrder(-1);  // 设置filter顺序,-1表示优先所有内置filter

        return registrationBean;
    }
}
三:Spring Security跨域解决方案
当我们为项目添加了Spring Security依赖后,通过@CrossOrigin注解或者重写addCorsMappings方法配置跨域的预检请求都失效了,而通过CrosFilter配置的跨域,预检请求有没有失效跟设置的优先级有关,如果过滤器优先级高于Spring Security过滤器,即先于Spring Security过滤器执行,则CorsFiter所配置的跨域处理依然有效,如果过滤器优先级低于Spring Security过滤器,则CorsFilter所配置的跨域处理就会失效。为了理清楚这个问题,我们先简略了解一下 Filter、DispatchserServlet 以及Interceptor执行顺序。
由于非简单请求都要首先发送一个预检请求, 而预检请求并不会携带认证信息,所以预检请求就有被Spring Security拦截的可能。因此通过@CrossOrigin 注解或者重写addCorsMappings方法配置跨域就会失效。如果使用CorsFilter配置的跨域,只要过滤器优先级高于SpringSecurity 过滤器就不会有问题。否则同样会出现问题。
为了方便测试,这里提供一个发送预检请求的前端代码(之前发的是简单请求,因此不会有跨域问题):
<!DOCTYPE html>
<html lang="en">

<head>
    <meta charset="UTF-8">
    <meta http-equiv="X-UA-Compatible" content="IE=edge">
    <meta name="viewport" content="width=device-width, initial-scale=1.0">
    <title>Document</title>
</head>

<body>
    <button onclick="getData()">获取数据</button>
    <div id="data"></div>
    <script src="https://cdn.bootcdn.net/ajax/libs/jquery/3.6.0/jquery.min.js"></script>
    <script>
        let url = "你的接口地址";
        function getData() {
            $.ajax({
                url: url,
                type: "DELETE",
                success: data => {
                    let str = (typeof data == 'string') && data.constructor == String
                        ? data
                        : Object.entries(data);
                    $("#data").html(str);
                }
            });
        }
    </script>
</body>

</html>
基于上面问题,Spring Security提供了更专业的跨域方案:
@Configuration
public class WebSecurityConfig extends WebSecurityConfigurerAdapter {
    @Override
    protected void configure(HttpSecurity http) throws Exception {
        http.authorizeRequests()
                .mvcMatchers("/hello1").permitAll()
                .anyRequest().authenticated()
                .and()
                .formLogin()
                // 跨域配置
                .and()
                .cors()
                .configurationSource(configurationSource());
    }

    CorsConfigurationSource configurationSource() {
        CorsConfiguration corsConfiguration = new CorsConfiguration();
        corsConfiguration.setAllowedHeaders(Collections.singletonList("*"));
        corsConfiguration.setAllowedMethods(Collections.singletonList("*"));
        corsConfiguration.setAllowedOrigins(Collections.singletonList("*"));
        corsConfiguration.setMaxAge(3600L);

        UrlBasedCorsConfigurationSource source = new UrlBasedCorsConfigurationSource();
        source.registerCorsConfiguration("/**", corsConfiguration);
        return source;
    }
}
如果有兴趣了解更多相关内容,欢迎来我的个人网站看看:瞳孔的个人网站


 502
502


 被折叠的 条评论
为什么被折叠?
被折叠的 条评论
为什么被折叠?
 到【灌水乐园】发言


