


前两个项目都用的GreenDao框架(开源地址:[https://github.com/greenrobot/greenDAO](https://github.com/greenrobot/greenDAO))作为我们数据库操作框架,觉得确实好用。但之前一直用的是Eclipse项目,现在我们开发项目已经全部用AndroidStudio作为开发工具,如何在AndroidStudio中使用GreenDao框架呢?看了一些网上的介绍,按照大神们的指点,终于也完成了在AndroidStudio中使用GreenDao的小目标,还是做个笔记,以后做新的项目再用GreenDao就可以直接使用了。
- 第一步:在AndroidStudio中新建一个项目,我的项目就叫greendao。
- 第二步:在项目的Gradle文件中进行配置:
配置代码:
在sourceSets 中添加: java.srcDirs = [‘src/main/java’, ‘src/main/java-gen’]
在dependencies 中添加:compile ‘de.greenrobot:greendao:1.3.7’
当然你的版本可能并不是1.3.7,不过配置方法是一样的。
sourceSets {
main {
java.srcDirs = ['src/main/java', 'src/main/java-gen']
}
}
dependencies {
compile 'de.greenrobot:greendao:1.3.7'
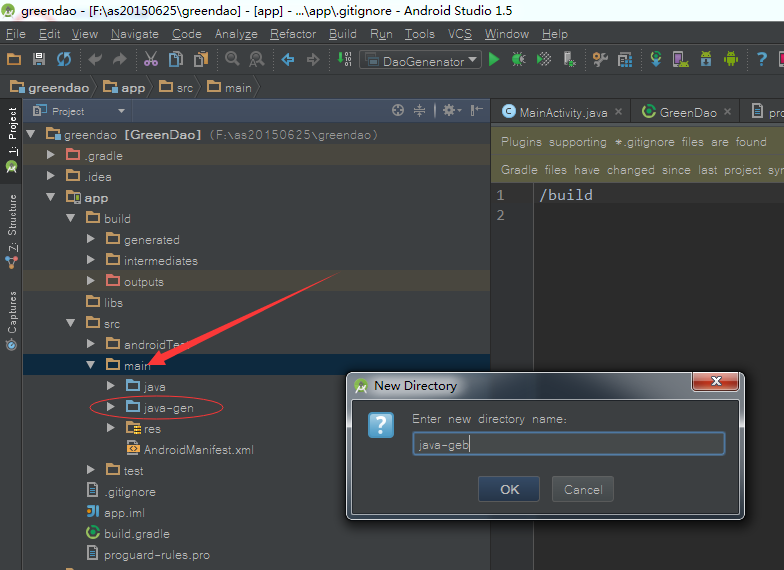
}第三步:在项目的src–>main文件夹下新建java-gen文件:
4.第四步:在项目中新建java类型的module,我的module名称是daoexaple:File–>New–>New Module:
5.第五步:在新建的daoexaple中添加代码,用来建数据库,表格等,示例代码如下,很多介绍GreenDao的代码都是一样的:
public class DaoGenenator {
    public static void main(String[] args) throws Exception {
        // 两个参数分别代表:数据库版本号与自动生成代码的包路径。
        Schema schema = new Schema(1, "com.ldm.greendao");
        // 模式(Schema)同时也拥有两个默认的 flags,分别用来标示 entity 是否是 activie 以及是否使用 keep sections。
        // schema2.enableActiveEntitiesByDefault();
        // schema2.enableKeepSectionsByDefault();
        // 一旦你拥有了一个 Schema 对象后,你便可以使用它添加实体(Entities)了。
        addNote(schema);
        // 最后我们将使用 DAOGenerator 类的 generateAll() 方法自动生成代码,此处你需要根据自己的情况更改输出目录(既之前创建的 java-gen)。输出目录的路径也可以在 build.gradle 中设置
        new DaoGenerator().generateAll(schema, "F:/as20150625/greendao/app/src/main/java-gen");
    }

    /**
     * @param schema
     */
    private static void addNote(Schema schema) {
        // 一个实体(类)就关联到数据库中的一张表,此处表名为「Note」(既类名)
        Entity note = schema.addEntity("Note");
        // 你也可以重新给表命名
        // note.setTableName("NODE");

        // greenDAO 会自动根据实体类的属性值来创建表字段,并赋予默认值
        // 接下来你便可以设置表中的字段:
        note.addIdProperty();
        note.addStringProperty("text").notNull();
        // 与在 Java 中使用驼峰命名法不同,默认数据库中的命名是使用大写和下划线来分割单词的。
        // For example, a property called “creationDate” will become a database column “CREATION_DATE”.
        note.addStringProperty("comment");
        note.addDateProperty("date");
    }
}

 6. 第六步:如果上面五步没问题,则刷新下工程,在你主项目的java-gen文件夹下会多出几个类文件,这就是GreenDao工具生成的文件。
 7. 接下来就可以进行数据库操作了。上面我们只新建了一个表,对应一个实体类:Note,如果你还要增加表或其它变动,只要在DaoGenenator这个类中进行对应的操作就可以。
 下面贴下我的demo简单代码:
public class MainActivity extends Activity implements View.OnClickListener {
private Button greendao_add;
private Button greendao_del;
private Button greendao_update;
private Button greendao_query;
private EditText input_edt;
private TextView show_result;
private SQLiteDatabase db;
private DaoMaster daoMaster;
private DaoSession daoSession;
private Cursor cursor;
private NoteDao noteDao;
private ListnoteList;
@Override
protected void onCreate(Bundle savedInstanceState) {
    super.onCreate(savedInstanceState);
    setContentView(R.layout.activity_main);
    initGreenDao();
    initViews();
    initEvents();
}

private void initGreenDao() {

    DaoMaster.DevOpenHelper helper = new DaoMaster.DevOpenHelper(this, "notes-db", null);
    db = helper.getWritableDatabase();
    daoMaster = new DaoMaster(db);
    daoSession = daoMaster.newSession();
    noteDao = daoSession.getNoteDao();
    cursor = db.query(noteDao.getTablename(), noteDao.getAllColumns(), null, null, null, null, null);
}

private void initViews() {
    this.greendao_add = (Button) findViewById(R.id.greendao_add);
    this.greendao_del = (Button) findViewById(R.id.greendao_del);
    this.greendao_update = (Button) findViewById(R.id.greendao_update);
    this.greendao_query = (Button) findViewById(R.id.greendao_query);
    this.input_edt = (EditText) findViewById(R.id.input_edt);
    this.show_result = (TextView) findViewById(R.id.show_result);
}

private void initEvents() {
    this.greendao_add.setOnClickListener(this);
    this.greendao_del.setOnClickListener(this);
    this.greendao_update.setOnClickListener(this);
    this.greendao_query.setOnClickListener(this);
}

@Override
public void onClick(View v) {
    switch (v.getId()) {
        case R.id.greendao_add:
            addNote();
            break;
        case R.id.greendao_del:
            long id = 10;
            noteDao.deleteByKey(id);//根据id删除,比如id=10
            //noteDao.deleteAll();//全部删除
           // noteDao.delete(Note note);删除一个对象
            //还有其它几种不同的删除方法,只要传入对应的参数就可以参数数据
            break;
        case R.id.greendao_update:
            update();
            break;
        case R.id.greendao_query:
            noteList=search();
            //数据处理
            break;
    }

}

private void addNote() {
    String noteText = input_edt.getText().toString().trim();
    input_edt.setText("");
    final DateFormat df = DateFormat.getDateTimeInstance(DateFormat.MEDIUM, DateFormat.MEDIUM);
    String comment = "Added on " + df.format(new Date());
    //新建要插入的对象
    Note note = new Note(null, noteText, comment, new Date());
    //数据插入
    noteDao.insert(note);
    cursor.requery();
}

private List<Note>  search() {
    Query query = noteDao.queryBuilder()
            .where(NoteDao.Properties.Text.eq("ABC"))
            .orderAsc(NoteDao.Properties.Date)
            .build();
  List<Note> notes = query.list();
    return notes;
}
private void update(){//用的个人觉得比较简单的更新方式,直接更新对应的note对象
    noteList=search();
    if(noteList.size()>0) {
        Note note = noteList.get(0);
        note.setComment("新comment");
        note.setDate(new Date());
        note.setText("text");
        noteDao.update(note);
    }
}
}
如有不妥,请大家多指教!


 3773
3773

 被折叠的 条评论
为什么被折叠?
被折叠的 条评论
为什么被折叠?
 到【灌水乐园】发言


