


1 下载
安装包版本
libfastcommon-1.0.39.tar.gz
fastdfs-5.11.tar.gz
fastdfs-nginx-module-1.20.tar.gz
nginx-1.8.0.tar.gz
https://github.com/happyfish100/libfastcommon/archive/refs/tags/V1.0.39.tar.gz
https://github.91chi.fun//https://github.com//happyfish100/fastdfs/archive/refs/tags/V5.11.tar.gz
https://github.91chi.fun//https://github.com//happyfish100/fastdfs-nginx-module/archive/refs/tags/V1.20.tar.gz
http://nginx.org/download/nginx-1.8.0.tar.gz
2 安装
设置安装目录
export DESTDIR=/root/services/fastdfs
2.1 安装libfastcommon
解压
tar -xvf /root/packages/libfastcommon-1.0.39.tar.gz -C /root/packages
安装
cd /root/packages/libfastcommon-1.0.39
./make.sh && ./make.sh install
2.2 安装fastdfs
1 解压
tar -xvf /root/packages/fastdfs-5.11.tar.gz -C /root/packages
2 修改文件
vim /root/packages/fastdfs-5.11/tracker/Makefile.in
把第4、5行
INC_PATH = -I../common -I/usr/include/fastcommon
LIB_PATH = $(LIBS) -lfastcommon
改成如下
INC_PATH = -I../common -I../tracker -I${DESTDIR}/usr/include/fastcommon
LIB_PATH = $(LIBS) -lfastcommon -L${DESTDIR}/usr/lib64
vim /root/packages/fastdfs-5.11/storage/Makefile.in
把第4、5行
INC_PATH = -I. -Itrunk_mgr -I../common -I../tracker -I../client -Ifdht_client -I/usr/include/fastcommon
LIB_PATH = $(LIBS)  -lfastcommon
改成
INC_PATH = -I. -Itrunk_mgr -I../common -I../tracker -I../client -Ifdht_client -I${DESTDIR}/usr/include/fastcommon
LIB_PATH = $(LIBS)  -lfastcommon -L${DESTDIR}/usr/lib64
vim /root/packages/fastdfs-5.11/client/Makefile.in
把第6、7行
INC_PATH = -I../common -I../tracker -I/usr/include/fastcommon
LIB_PATH = $(LIBS) -lfastcommon
改成如下
INC_PATH = -I../common -I../tracker -I${DESTDIR}/usr/include/fastcommon
LIB_PATH = $(LIBS)  -lfastcommon -L${DESTDIR}/usr/lib64
3 安装
cd /root/packages/fastdfs-5.11
./make.sh && ./make.sh install
把配置文件拷贝到安装目录
cp /root/packages/fastdfs-5.11/conf/* /root/services/fastdfs/etc/fdfs/
修改fdfs_trackerd
vim /root/services/fastdfs/etc/init.d/fdfs_trackerd
PRG=/root/services/fastdfs/usr/bin/fdfs_trackerd
CONF=/root/services/fastdfs/etc/fdfs/tracker.conf
修改fdfs_storage
vim /root/services/fastdfs/etc/init.d/fdfs_storaged
PRG=/root/services/fastdfs/usr/bin/fdfs_storaged
CONF=/root/services/fastdfs/etc/fdfs/storage.conf
3 设置环境变量
vim ~/.bashrc
export FASTDFS_HOME=/root/services/fastdfs
export PATH=$PATH:$FASTDFS_HOME/etc/init.d:$FASTDFS_HOME/usr/bin
source ~/.bashrc
5 修改配置文件
创建tracker工作目录
mkdir /root/services/fastdfs/tracker
修改tracker.conf
vim /root/services/fastdfs/etc/fdfs/tracker.conf
base_path=/root/services/fastdfs/tracker
创建storage工作目录和数据存储目录
mkdir -p /root/services/fastdfs/storage/data/{db1,db2}
修改storage.conf
vim /root/services/fastdfs/etc/fdfs/storage.conf
base_path=/root/services/fastdfs/storage
store_path_count=2 #存储路径个数,需要和store_path个数匹配
store_path0=/root/services/fastdfs/storage/data/db1
store_path1=/root/services/fastdfs/storage/data/db2
tracker_server=fdfs-server:22122
6 启动
/root/services/fastdfs/etc/init.d/fdfs_trackerd start
/root/services/fastdfs/etc/init.d/fdfs_storaged start
验证是否启动成功
ps -ef | grep fdfs
验证storage是否注册到tracker
/root/services/fastdfs/usr/bin/fdfs_monitor /root/services/fastdfs/etc/fdfs/storage.conf
7 访问
配置客户端
vim /root/services/fastdfs/etc/fdfs/client.conf
base_path=/root/services/fastdfs/tracker
tracker_server=fdfs-server:22122
上传图片,成功后会返回图片的路径
/root/services/fastdfs/usr/bin/fdfs_upload_file /root/services/fastdfs/etc/fdfs/client.conf /root/1.png
返回结果

8 安装Nginx
1 解压
tar -xvf /root/packages/fastdfs-nginx-module-1.20.tar.gz -C /root/packages
tar -xvf /root/packages/nginx-1.8.0.tar.gz -C /root/packages
2 安装依赖
yum -y install zlib zlib-devel openssl openssl-devel pcre pcre-devel
3 修改配置文件
vim /root/packages/fastdfs-nginx-module-1.20/src/config
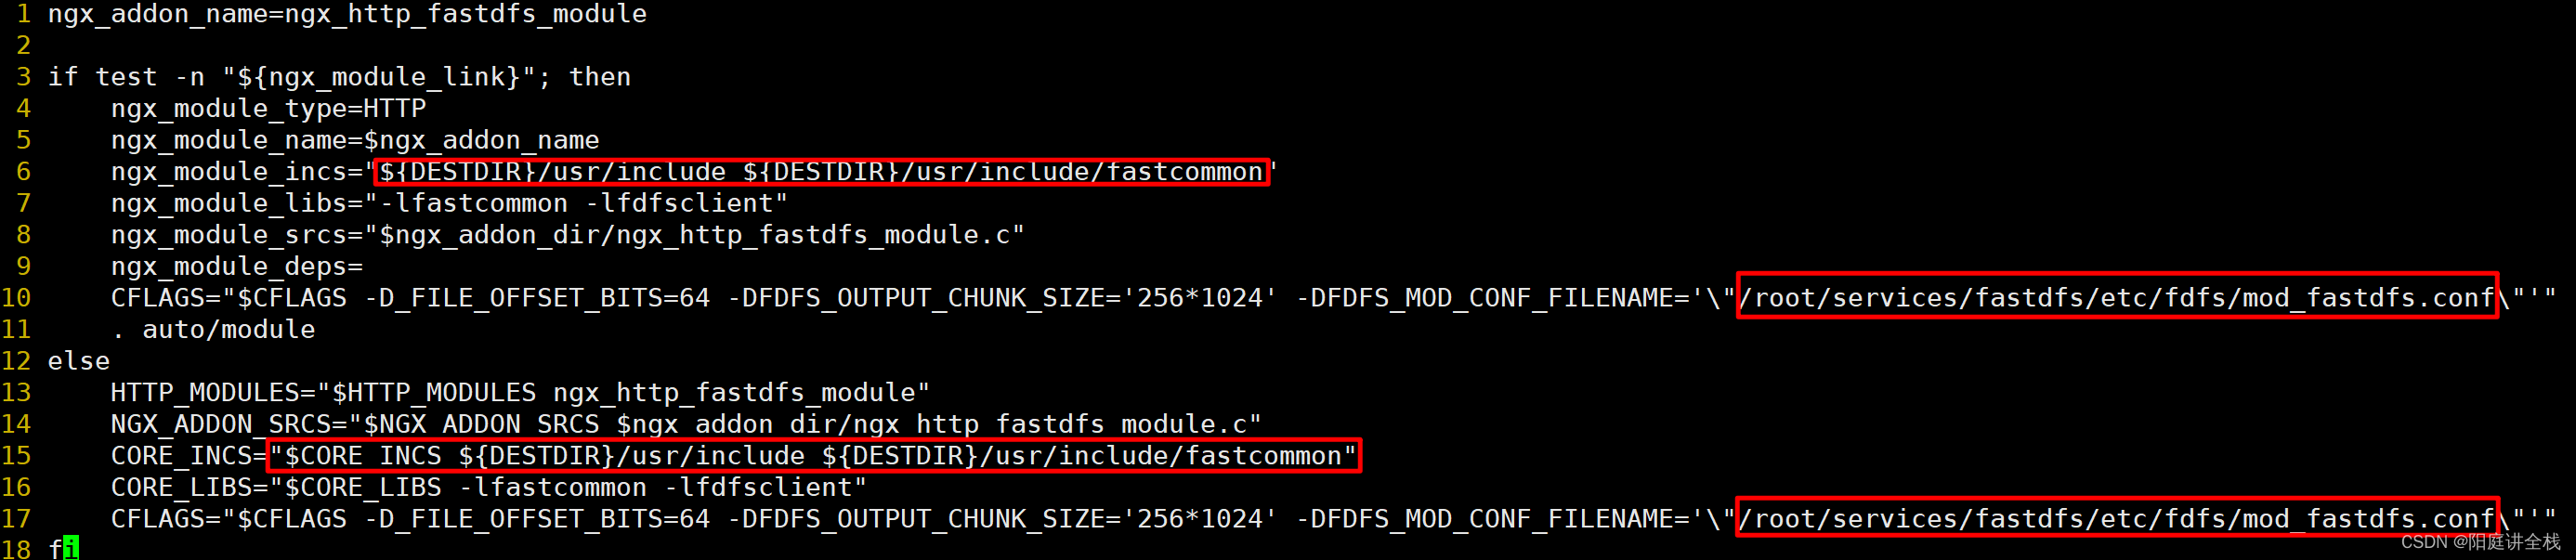
修改6,10,15,17行
ngx_module_incs="${DESTDIR}/usr/include ${DESTDIR}/usr/include/fastcommon"
CORE_INCS="$CORE_INCS ${DESTDIR}/usr/include ${DESTDIR}/usr/include/fastcommon"
/root/services/fastdfs
如下图所示,
4 复制fastdfs-nginx-module下的src中的mod_fastdfs.conf文件到fastdfs配置文件目录
cp /root/packages/fastdfs-nginx-module-1.20/src/mod_fastdfs.conf /root/services/fastdfs/etc/fdfs/
5 mod_fastdfs.conf中的配置要和storage.conf的对应
vim /root/services/fastdfs/etc/fdfs/mod_fastdfs.conf
tracker_server=fdfs-server:22122
url_have_group_name = true
store_path_count=2
store_path0=/root/services/fastdfs/storage/data/db1
store_path1=/root/services/fastdfs/storage/data/db2
6 安装
cd /root/packages/nginx-1.8.0
./configure --prefix=/root/services/nginx --add-module=/root/packages/fastdfs-nginx-module-1.20/src --with-http_ssl_module --with-ld-opt="-L /root/services/fastdfs/usr/lib -Wl,-rpath=/root/services/fastdfs/usr/lib64"
make -j4
export DESTDIR=""
make install
7 修改nginx配置文件
vim /root/services/nginx/conf/nginx.conf
用户改为root,
user root;
location ^~ /group1/M00 {
	root /root/services/fastdfs/storage/data/db1/data;
	ngx_fastdfs_module;
}

location ^~ /group1/M01 {
	root /root/services/fastdfs/storage/data/db2/data;
	ngx_fastdfs_module;
}
8 启动
cd /root/services/nginx/sbin
./nginx
9 访问
http://IP/group1/M00/00/00/wKgAxWTOFxGAYnG7AACx-Csx-Z4524.png
其中 group1/M00/00/00/wKgAxWTOFxGAYnG7AACx-Csx-Z4524.png 是测试时上传的文件。


 1554
1554


 被折叠的 条评论
为什么被折叠?
被折叠的 条评论
为什么被折叠?
 到【灌水乐园】发言


