


正如你所疑惑的那样,BeanFactory我们已经束之高阁多年啦,我们正在使用威力更加强大的ApplicationContext为我们服务,我们来看下这个新东西,到底如何为我们提供面貌一新的服务;
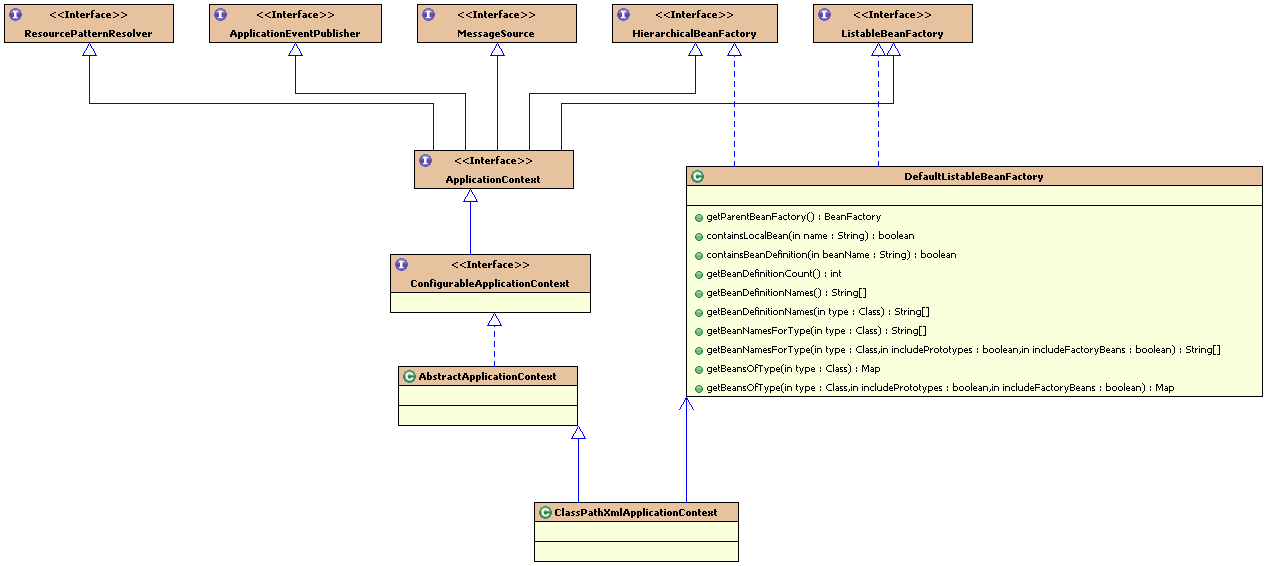
要了解ApplicationContext比BeanFactory功能强大在哪里,我们就必须来分析ApplicationContext接口的实现,因为功能及方法是通过interface来设定的,我们来看一下ApplicationContext的接口类图;

从这里我们可以看出来,我们的ApplicationContext比BeanFactory多实现了这两个接口
这个接口可以通过参数从特定的多语言文件中获取信息;
其中:
code:消息键;
args[]:参数;
defaultMessage:默认消息;
locale:语言区域;
应用信息广播接口,广播信息;
我们看一下具体的实现:
这是ClassPathXmlApplicationContext的初始化函数,在refresh函数里面,调用了refreshBeanFactory();这个函数如下:
将一个BeanFactory设定ApplicationContext的属性,然后,我们可见:
ApplicationContext将原来BeanFactory接口的方法全部委托给BeanFacroty,在这里我们可以把这个看做适配器和装饰模式的一种结合应用;这样,既复用了以前遗留的功能,有将现有系统的功能得到了扩展;
同时,MessageSource功能的实现也是委托给配置的MessageSource文件的;
这是策略模式的应用;通过MessageSource之间的组合关系,实现了算法之间的更换,可以在配置文件中更换MessageSource的实现,从而利用不同的NessageSource之间的功能切换;
现在,我们再来看看事件发布的实现代码:
在这段refresh代码中,我们可以看见:
initApplicationEventMulticaster();
在ApplicationContext中存在
ApplicationEventMulticaster,这其实是一个典型的观察者模式的运用,对于事件的广播我们都很容易的联想到了观察着,对!
ApplicationEventMulticaster这里就是一个主题,在这段代码中,我们可见,我们可以在配置文件中重写这个
ApplicationEventMulticaster类,如果我们没有配置这个类的话,那么就会默认实现一个:
这是一个notifyAll的方法,调用所有监听者的onApplicationEvent()方法;
我们来看看这个 multicastEvent方法是在什么时候调用的:
可见,我们的真正的主题类是ApplicationContext类,只是他把管理监听者队列和消息广播的功能委托给了
SimpleApplicationEventMulticaster,然后再在ApplicationContext里面实现setChange()方法,这是对观察着模式的灵活运用,他很好的符合了单一职责原则,方便了
SimpleApplicationEventMulticaster的复用,很好,很强大!
如在refresh最后,我们调用了:
publishEvent( new ContextRefreshedEvent( this ));
通知系统中的监听者对象;
要了解ApplicationContext比BeanFactory功能强大在哪里,我们就必须来分析ApplicationContext接口的实现,因为功能及方法是通过interface来设定的,我们来看一下ApplicationContext的接口类图;
从这里我们可以看出来,我们的ApplicationContext比BeanFactory多实现了这两个接口
- public interface MessageSource {
- String getMessage(String code, Object[] args, String defaultMessage, Locale locale);
- String getMessage(String code, Object[] args, Locale locale) throws NoSuchMessageException;
- String getMessage(MessageSourceResolvable resolvable, Locale locale) throws NoSuchMessageException;
- }
其中:
code:消息键;
args[]:参数;
defaultMessage:默认消息;
locale:语言区域;
- public interface ApplicationEventPublisher {
- void publishEvent(ApplicationEvent event);
- }
应用信息广播接口,广播信息;
我们看一下具体的实现:
- public ClassPathXmlApplicationContext(String[] configLocations, boolean refresh) throws BeansException {
- this.configLocations = configLocations;
- if (refresh) {
- refresh();
- }
- }
- protected final void refreshBeanFactory() throws BeansException {
- // Shut down previous bean factory, if any.
- if (this.beanFactory != null) {
- this.beanFactory.destroySingletons();
- this.beanFactory = null;
- }
- // Initialize fresh bean factory.
- try {
- DefaultListableBeanFactory beanFactory = createBeanFactory();
- loadBeanDefinitions(beanFactory);
- this.beanFactory = beanFactory;
- if (logger.isInfoEnabled()) {
- logger.info("Bean factory for application context [" + getDisplayName() + "]: " + beanFactory);
- }
- }
- catch (IOException ex) {
- throw new ApplicationContextException(
- "I/O error parsing XML document for application context [" + getDisplayName() + "]", ex);
- }
- }
ApplicationContext将原来BeanFactory接口的方法全部委托给BeanFacroty,在这里我们可以把这个看做适配器和装饰模式的一种结合应用;这样,既复用了以前遗留的功能,有将现有系统的功能得到了扩展;
- public Object getBean(String name) throws BeansException {
- return getBeanFactory().getBean(name);
- }
- public Object getBean(String name, Class requiredType) throws BeansException {
- return getBeanFactory().getBean(name, requiredType);
- }
- public boolean containsBean(String name) {
- return getBeanFactory().containsBean(name);
- }
- public boolean isSingleton(String name) throws NoSuchBeanDefinitionException {
- return getBeanFactory().isSingleton(name);
- }
- public Class getType(String name) throws NoSuchBeanDefinitionException {
- return getBeanFactory().getType(name);
- }
- public String[] getAliases(String name) throws NoSuchBeanDefinitionException {
- return getBeanFactory().getAliases(name);
- }
- protected void loadBeanDefinitions(DefaultListableBeanFactory beanFactory) throws IOException {
- // Create a new XmlBeanDefinitionReader for the given BeanFactory.
- XmlBeanDefinitionReader beanDefinitionReader = new XmlBeanDefinitionReader(beanFactory);
- // Configure the bean definition reader with this context's
- // resource loading environment.
- beanDefinitionReader.setResourceLoader(this);
- if (getClassLoader() != null) {
- beanDefinitionReader.setBeanClassLoader(getClassLoader());
- }
- beanDefinitionReader.setEntityResolver(new ResourceEntityResolver(this));
- // Allow a subclass to provide custom initialization of the reader,
- // then proceed with actually loading the bean definitions.
- initBeanDefinitionReader(beanDefinitionReader);
- loadBeanDefinitions(beanDefinitionReader);
- }
- public String getMessage(String code, Object args[], String defaultMessage, Locale locale) {
- return getMessageSource().getMessage(code, args, defaultMessage, locale);
- }
- public String getMessage(String code, Object args[], Locale locale) throws NoSuchMessageException {
- return getMessageSource().getMessage(code, args, locale);
- }
- public String getMessage(MessageSourceResolvable resolvable, Locale locale) throws NoSuchMessageException {
- return getMessageSource().getMessage(resolvable, locale);
- }
现在,我们再来看看事件发布的实现代码:
- // Invoke factory processors registered as beans in the context.
- invokeBeanFactoryPostProcessors();
- // Register bean processors that intercept bean creation.
- registerBeanPostProcessors();
- // Initialize message source for this context.
- initMessageSource();
- // Initialize event multicaster for this context.
- initApplicationEventMulticaster();
- // Initialize other special beans in specific context subclasses.
- onRefresh();
- // Check for listener beans and register them.
- registerListeners();
- // Instantiate singletons this late to allow them to access the message source.
- beanFactory.preInstantiateSingletons();
- // Last step: publish corresponding event.
- publishEvent(new ContextRefreshedEvent(this));
- }
- }
initApplicationEventMulticaster();
- private void initApplicationEventMulticaster() throws BeansException {
- if (containsLocalBean(APPLICATION_EVENT_MULTICASTER_BEAN_NAME)) {
- this.applicationEventMulticaster = (ApplicationEventMulticaster)
- getBean(APPLICATION_EVENT_MULTICASTER_BEAN_NAME, ApplicationEventMulticaster.class);
- if (logger.isDebugEnabled()) {
- logger.debug("Using ApplicationEventMulticaster [" + this.applicationEventMulticaster + "]");
- }
- }
- else {
- this.applicationEventMulticaster = new SimpleApplicationEventMulticaster();
- if (logger.isDebugEnabled()) {
- logger.debug("Unable to locate ApplicationEventMulticaster with name '" +
- APPLICATION_EVENT_MULTICASTER_BEAN_NAME +
- "': using default [" + this.applicationEventMulticaster + "]");
- }
- }
- }
- public class SimpleApplicationEventMulticaster extends AbstractApplicationEventMulticaster {
- public void multicastEvent(ApplicationEvent event) {
- for (Iterator it = getApplicationListeners().iterator(); it.hasNext();) {
- ApplicationListener listener = (ApplicationListener) it.next();
- listener.onApplicationEvent(event);
- }
- }
- }
我们来看看这个 multicastEvent方法是在什么时候调用的:
- public void publishEvent(ApplicationEvent event) {
- Assert.notNull(event, "Event must not be null");
- if (logger.isDebugEnabled()) {
- logger.debug("Publishing event in context [" + getDisplayName() + "]: " + event);
- }
- getApplicationEventMulticaster().multicastEvent(event);
- if (this.parent != null) {
- this.parent.publishEvent(event);
- }
- }
如在refresh最后,我们调用了:
publishEvent( new ContextRefreshedEvent( this ));
通知系统中的监听者对象;


 1997
1997


 被折叠的 条评论
为什么被折叠?
被折叠的 条评论
为什么被折叠?
 到【灌水乐园】发言


