


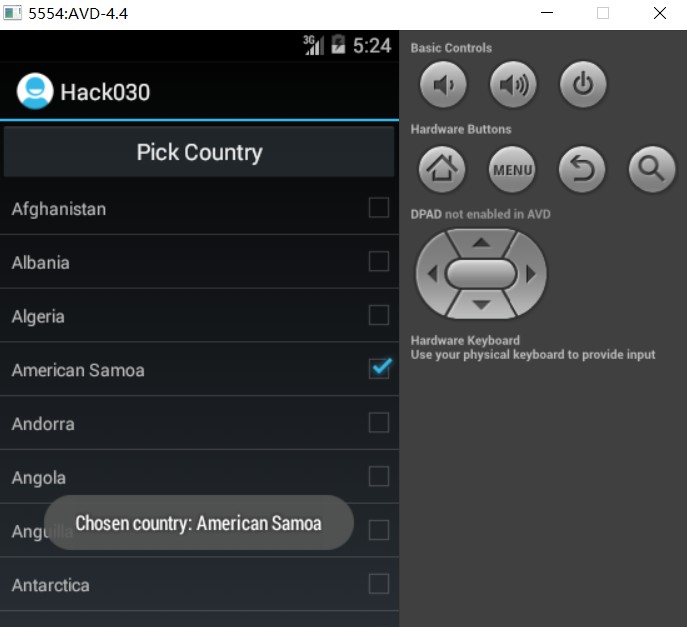
在这个demo里,我们会掌握如何使用ListView创建一个国家选择器。该选择器的运行效果如下图所示。当选择了一个国家时,点击“Pick Country”按钮,就会在Toast中显示出国家名。
ListView定义了choiceMode属性。开发文档对该属性的解释如下:
“用于为视图定义选择行为。默认情况下,列表是没有任何选择行为的。如果把choiceMode设置为singleChoice,列表允许有一个列表项处于被选状态。如果把choiceMode设置为multipleChoice,那么列表允许有任意数量的列表项处于被选状态”。
ListView另外一个有趣的功能是:不管使用singleChoice还是multipleChoice,所选列表项的位置信息都会被自动保存。现在,我们已经知道choiceMode设置为singleChoice便可以为ListView创建选择器。接下来我们创建Activity的布局文件,源码如下所示:
<LinearLayout xmlns:android="http://schemas.android.com/apk/res/android"
    android:layout_width="fill_parent"
    android:layout_height="fill_parent"
    android:orientation="vertical" >

    <Button
        android:layout_width="fill_parent"
        android:layout_height="wrap_content"
        android:onClick="onPickCountryClick"
        android:text="@string/activity_main_add_selection" />

    <ListView
        android:id="@+id/activity_main_list"
        android:layout_width="fill_parent"
        android:layout_height="fill_parent"
        android:choiceMode="singleChoice" />

</LinearLayout>
现在创建列表项的布局文件以及Activity的源代码。列表项的布局文件如下所示:
<LinearLayout xmlns:android="http://schemas.android.com/apk/res/android"
    android:layout_width="fill_parent"
    android:layout_height="wrap_content"
    android:orientation="horizontal" >

    <TextView
        android:id="@+id/country_view_title"
        android:layout_width="0dp"
        android:layout_height="wrap_content"
        android:layout_weight="0.9"
        android:padding="10dp" />

    <CheckBox
        android:id="@+id/country_view_checkbox"
        android:layout_width="0dp"
        android:layout_height="wrap_content"
        android:layout_weight="0.1"
        android:gravity="center_vertical"
        android:padding="10dp" />

</LinearLayout>
Activity的源代码如下:
package com.manning.androidhacks.hack030;

import java.util.ArrayList;
import java.util.List;

import com.manning.androidhacks.hack030.adapter.CountryAdapter;
import com.manning.androidhacks.hack030.model.Country;

import android.app.Activity;
import android.os.Bundle;
import android.view.View;
import android.widget.ListView;
import android.widget.Toast;

public class MainActivity extends Activity {
  private ListView mListView;
  private CountryAdapter mAdapter;
  private List<Country> mCountries;
  private String mToastFmt;

  @Override
  public void onCreate(Bundle savedInstanceState) {
    super.onCreate(savedInstanceState);
    setContentView(R.layout.activity_main);

    createCountriesList();
    mToastFmt = getString(R.string.activity_main_toast_fmt);
    //创建适配器并设置给ListView
    mAdapter = new CountryAdapter(this, -1, mCountries);
    mListView = (ListView) findViewById(R.id.activity_main_list);
    mListView.setAdapter(mAdapter);
  }

  public void onPickCountryClick(View v) {
    int pos = mListView.getCheckedItemPosition();

    //如果选择了某个国家,就再Toast中显示国家名称
    if (ListView.INVALID_POSITION != pos) {
      String msg = String.format(mToastFmt, mCountries.get(pos)
          .getName());
      Toast.makeText(this, msg, Toast.LENGTH_SHORT).show();
    }
  }

  /**
   * 向列表中填充国家信息的辅助方法
   */
  private void createCountriesList() {
    mCountries = new ArrayList<Country>(Countries.COUNTRIES.length);
    for (int i = 0; i < Countries.COUNTRIES.length; i++) {
      Country country = new Country();
      country.setName(Countries.COUNTRIES[i]);
      mCountries.add(country);
    }
  }

}
上述代码比较简单,但是有一个技巧需要掌握,即需要理解ListView是如何将某个位置设置为已选或未选,并正确使用它。
此时,如果我们通过网络搜索ListView的choiceMode相关信息,就会发现多数代码使用了CheckedTextView类作为列表项的视图,这与本例中使用自定义视图有所不同。如果我们分析CheckedTextView类的源代码,便会发现该类是TextView的子类,并且实现了Checkable接口。
因此ListView以某种方法通过Checkable接口来处理视图的选择状态。如果我们分析过ListView的源码,就会发现下述代码:
if (mChoiceMode != CHOICE_MODE_NONE && mCheckStates != null) {
            if (child instanceof Checkable) {
                ((Checkable) child).setChecked(mCheckStates.get(position));
            }
}
如果需要ListView处理选择行为,需要令列表项对应的自定义视图实现Checkable接口。遗憾的是,这种方式必须创建自定义视图。我们创建CountryView类,其源码如下所示:
package com.manning.androidhacks.hack030.view;

import android.content.Context;
import android.util.AttributeSet;
import android.view.LayoutInflater;
import android.view.View;
import android.widget.CheckBox;
import android.widget.Checkable;
import android.widget.LinearLayout;
import android.widget.TextView;

import com.manning.androidhacks.hack030.R;

public class CountryView extends LinearLayout implements Checkable {

  private TextView mTitle;
  private CheckBox mCheckBox;

  public CountryView(Context context) {
    this(context, null);
  }

  public CountryView(Context context, AttributeSet attrs) {
    super(context, attrs);
    LayoutInflater inflater = LayoutInflater.from(context);
    //填充布局
    View v = inflater.inflate(R.layout.country_view, this, true);
    mTitle = (TextView) v.findViewById(R.id.country_view_title);
    mCheckBox = (CheckBox) v.findViewById(R.id.country_view_checkbox);
  }

  public void setTitle(String title) {
    mTitle.setText(title);
  }

  @Override
  public boolean isChecked() {
    return mCheckBox.isChecked();
  }

  @Override
  public void setChecked(boolean checked) {
    mCheckBox.setChecked(checked);
  }

  @Override
  public void toggle() {
    mCheckBox.toggle();
  }

}
运行程序,我们会发现当点击某行时,CheckBox中并没有打勾,但是当点击CheckBox时,CheckBox就会打勾。甚至还会发现,可以选择多行。哪里出问题了?
问题出在我们添加了一个可获取焦点的UI控件CheckBox。解决上述问题的最好办法便是不允许CheckBox获取焦点。此外,由于ListView才是决定某项是否可选的主角,因此还需要将CheckBox设置为不可点击。要实现上述要求,可以在XML布局文件中添加如下代码:
 android:clickable="false"
 android:focusable="false"
 android:focusableInTouchMode="false"
添加上述修改后,重新运行应用程序,此时便会看到期望的效果。
这个demo解决了Android开发文档含混不清而引入的一个问题。要正确使用ListView的choiceMode属性,需要阅读SDK源代码,但是一旦理解了其运行原理,开发者就掌握了一项不错的特性,当需要从列表中选择一个或者多个列表项时,这项特性就派上用场了。


 272
272

 被折叠的 条评论
为什么被折叠?
被折叠的 条评论
为什么被折叠?
 到【灌水乐园】发言


