


一. ARToolKit SDK中基于多标示的识别例程:
ART是基于OPENGL和DSVL的增强现实软件包,它遵循OPENGL的运行模式,基于帧循环实现3D图像的渲染,
在每次进入帧循环后做标识物的检测和摄像机的重定位。
当然这里使用DSVL的视频处理和基于OPENGL的图像处理,都可以用其他方式来代替。比如可以用OSG图形
引擎来完成较为复杂的图像处理,效果会更好,它也是基于OPENGL的接口,也需要在帧循环中处理。
| Initialization | 1. 初始化视频捕获和读取文件的标记模式和相机参数. |
Main Loop  | 2. 获取一帧输入视频. |
| 3. 在输入视频图像中检测标识和注册的模版. | |
| 4. 计算摄像机相对于检测到的模版的位置. | |
| 5. 绘制虚拟模型到检测到的模板上. | |
| Shutdown | 6. 关闭视频捕获,回收资源. |
#ifdef _WIN32
#include <windows.h>
#endif
#include <stdio.h>
#include <stdlib.h>
#ifndef __APPLE__
#include <GL/gl.h>
#include <GL/glut.h>
#else
#include <OpenGL/gl.h>
#include <GLUT/glut.h>
#endif
#include <AR/gsub.h>
#include <AR/video.h>
#include <AR/param.h>
#include <AR/ar.h>
#include <AR/arMulti.h>
/* set up the video format globals */
#ifdef _WIN32
char *vconf = "Data//WDM_camera_flipV.xml"; //摄像机默认参数
#else
char *vconf = "";
#endif
int xsize, ysize;
int thresh = 100;
int count = 0;
char *cparam_name = "Data/camera_para.dat"; //摄像机特征参数
ARParam cparam;
char *config_name = "Data/multi/marker.dat"; //标识信息
ARMultiMarkerInfoT *config;
static void init(void);
static void cleanup(void);
static void keyEvent( unsigned char key, int x, int y);
static void mainLoop(void);
static void draw( double trans1[3][4], double trans2[3][4], int mode );
//程序入口
int main(int argc, char **argv)
{
//初始化OPENGL
glutInit(&argc, argv);
//初始化摄像机参数和显示窗口
init();
//启动摄像机
arVideoCapStart();
//注册响应事件函数(分别是鼠标事件、键盘事件、帧循环)
//实际是用OPENGL的内部事件处理机制,这里只是传递函数指针
argMainLoop( NULL, keyEvent, mainLoop );
return (0);
}
//键盘事件响应函数
static void keyEvent( unsigned char key, int x, int y)
{
/* quit if the ESC key is pressed */
/* 点击ESC退出 */
if( key == 0x1b ) {
printf("*** %f (frame/sec)/n", (double)count/arUtilTimer());
//释放资源
cleanup();
exit(0);
}
//调整二值化闸值
if( key == 't' ) {
printf("*** %f (frame/sec)/n", (double)count/arUtilTimer());
printf("Enter new threshold value (current = %d): ", thresh);
scanf("%d",&thresh); while( getchar()!='/n' );
printf("/n");
count = 0;
}
/* turn on and off the debug mode with right mouse */
/* 调试模式开关,显示二值化图像*/
if( key == 'd' ) {
printf("*** %f (frame/sec)/n", (double)count/arUtilTimer());
arDebug = 1 - arDebug;
if( arDebug == 0 ) {
glClearColor( 0.0, 0.0, 0.0, 0.0 );
glClear(GL_COLOR_BUFFER_BIT);
//交换缓冲区
argSwapBuffers();
glClear(GL_COLOR_BUFFER_BIT);
argSwapBuffers();
}
count = 0;
}
}
/* main loop */
/* 主循环:完成标示物的检测和位置的重定位,并渲染模型。 */
static void mainLoop(void)
{
ARUint8 *dataPtr;
ARMarkerInfo *marker_info; //标志信息结构
int marker_num;
double err;
int i;
/* grab a vide frame */
/* 获取一帧图像 */
if( (dataPtr = (ARUint8 *)arVideoGetImage()) == NULL ) {
//调用延时
arUtilSleep(2);
return;
}
//计时复位
if( count == 0 ) arUtilTimerReset();
count++;
/* detect the markers in the video frame */
/* 检测标识 */
if( arDetectMarkerLite(
dataPtr, //帧数据
thresh, //二值化闸值
&marker_info, //标识特征信息
&marker_num // 标识数量
) < 0 ) {
cleanup();
exit(0);
}
//为渲染2D或3D对象更新当前摄像机参数
argDrawMode2D();
if( !arDebug ) {
argDispImage( dataPtr, 0,0 );
}
else {
argDispImage( dataPtr, 1, 1 );//调试模式下不显示摄像机图像作为背景
if( arImageProcMode == AR_IMAGE_PROC_IN_HALF )
argDispHalfImage( arImage, 0, 0 );
else
argDispImage( arImage, 0, 0);
glColor3f( 1.0, 0.0, 0.0 );
glLineWidth( 1.0 );
for( i = 0; i < marker_num; i++ ) {
argDrawSquare( marker_info[i].vertex, 0, 0 );
}
glLineWidth( 1.0 );
}
//每帧必须调用这个函数,完成诸多功能的支持...
arVideoCapNext();
//获取摄像机位置
if( (err=arMultiGetTransMat(marker_info, marker_num, config)) < 0 ) {
argSwapBuffers();
return;
}
printf("err = %f/n", err);
if(err > 100.0 ) {
argSwapBuffers();
return;
}
/*
for(i=0;i<3;i++) {
for(j=0;j<4;j++) printf("%10.5f ", config->trans[i][j]);
printf("/n");
}
printf("/n");
*/
argDrawMode3D();
argDraw3dCamera( 0, 0 );//3D模式开关
glClearDepth( 1.0 );
glClear(GL_DEPTH_BUFFER_BIT);
//将模型绘制到对应位置
for( i = 0; i < config->marker_num; i++ ) {
if( config->marker[i].visible >= 0 ) draw( config->trans, config->marker[i].trans, 0 );
else draw( config->trans, config->marker[i].trans, 1 );
}
argSwapBuffers();
}
//初始化函数
static void init( void )
{
ARParam wparam;
/* open the video path */
/* 打开摄像机参数文件 */
if( arVideoOpen( vconf ) < 0 ) exit(0);
/* find the size of the window */
/* 获取视频窗口大小 */
if( arVideoInqSize(&xsize, &ysize) < 0 ) exit(0);
printf("Image size (x,y) = (%d,%d)/n", xsize, ysize);
/* set the initial camera parameters */
/* 设置摄像机特征参数,这里的参数与摄像机安装和内部参数相关,主要是为了能更好的识别标识物。
该参数文件可用用标准模版程序得到。 */
if( arParamLoad(cparam_name, 1, &wparam) < 0 ) {
printf("Camera parameter load error !!/n");
exit(0);
}
arParamChangeSize( &wparam, xsize, ysize, &cparam );
//初始化摄像机
arInitCparam( &cparam );
printf("*** Camera Parameter ***/n");
arParamDisp( &cparam );
//读取多标识的定义文件,该文件中记录有各个标识的特征信息和序号。
if( (config = arMultiReadConfigFile(config_name)) == NULL ) {
printf("config data load error !!/n");
exit(0);
}
/* open the graphics window */
/* 打开图像窗口 */
argInit( &cparam, 1.0, 0, 2, 1, 0 );
arFittingMode = AR_FITTING_TO_IDEAL;
arImageProcMode = AR_IMAGE_PROC_IN_HALF;
argDrawMode = AR_DRAW_BY_TEXTURE_MAPPING;
argTexmapMode = AR_DRAW_TEXTURE_HALF_IMAGE;
}
/* cleanup function called when program exits */
/* 当退出程序时回收资源 */
static void cleanup(void)
{
arVideoCapStop();
arVideoClose();
argCleanup();
}
//绘制3D模型,这部分完全属于OPENGL的内容
static void draw( double trans1[3][4], double trans2[3][4], int mode )
{
double gl_para[16];
GLfloat mat_ambient[] = {0.0, 0.0, 1.0, 1.0};
GLfloat mat_ambient1[] = {1.0, 0.0, 0.0, 1.0};
GLfloat mat_flash[] = {0.0, 0.0, 1.0, 1.0};
GLfloat mat_flash1[] = {1.0, 0.0, 0.0, 1.0};
GLfloat mat_flash_shiny[] = {50.0};
GLfloat mat_flash_shiny1[]= {50.0};
GLfloat light_position[] = {100.0,-200.0,200.0,0.0};
GLfloat ambi[] = {0.1, 0.1, 0.1, 0.1};
GLfloat lightZeroColor[] = {0.9, 0.9, 0.9, 0.1};
//进入3D绘图模式
argDrawMode3D();
argDraw3dCamera( 0, 0 );
glEnable(GL_DEPTH_TEST);
glDepthFunc(GL_LEQUAL);
/* load the camera transformation matrix */
/* 加载摄像机转换矩阵 */
glMatrixMode(GL_MODELVIEW);
argConvGlpara(trans1, gl_para);
glLoadMatrixd( gl_para );
argConvGlpara(trans2, gl_para);
glMultMatrixd( gl_para );
if( mode == 0 ) {
glEnable(GL_LIGHTING);
glEnable(GL_LIGHT0);
glLightfv(GL_LIGHT0, GL_POSITION, light_position);
glLightfv(GL_LIGHT0, GL_AMBIENT, ambi);
glLightfv(GL_LIGHT0, GL_DIFFUSE, lightZeroColor);
glMaterialfv(GL_FRONT, GL_SPECULAR, mat_flash);
glMaterialfv(GL_FRONT, GL_SHININESS, mat_flash_shiny);
glMaterialfv(GL_FRONT, GL_AMBIENT, mat_ambient);
}
else {
glEnable(GL_LIGHTING);
glEnable(GL_LIGHT0);
glLightfv(GL_LIGHT0, GL_POSITION, light_position);
glLightfv(GL_LIGHT0, GL_AMBIENT, ambi);
glLightfv(GL_LIGHT0, GL_DIFFUSE, lightZeroColor);
glMaterialfv(GL_FRONT, GL_SPECULAR, mat_flash1);
glMaterialfv(GL_FRONT, GL_SHININESS, mat_flash_shiny1);
glMaterialfv(GL_FRONT, GL_AMBIENT, mat_ambient1);
}
glMatrixMode(GL_MODELVIEW);
glTranslatef( 0.0, 0.0, 25.0 );
if( !arDebug ) glutSolidCube(50.0);
else glutWireCube(50.0);
glDisable( GL_LIGHTING );
glDisable( GL_DEPTH_TEST );
}
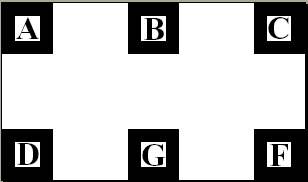
二 这个程序使用的标示图像如下:
其中包括了六个标示,这些标示的特征被记录在六个独体的PATT文件中。加载时不需要一一说明,只需要加载这六个文件
的总说明文件即“marker.dat”即可。
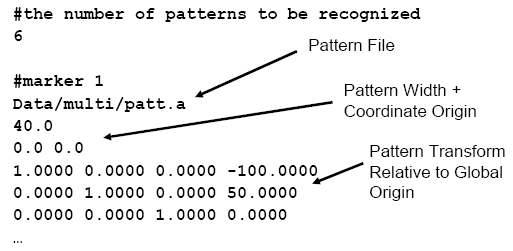
三 标示特征文件“marker.dat”的内部结构:
这个文件中并没有标示物的具体特征参数,而是他们加载后的识别顺序和对应的特征文件名。
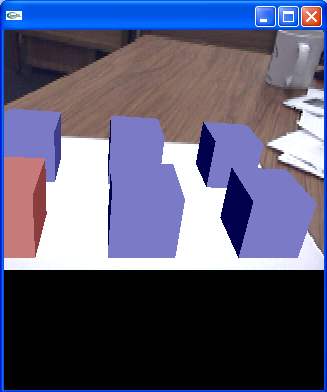
四 程序运行的效果:
五 如果对这个说明还有任何疑问,可以留言。我会尽量补充!


 8345
8345

 被折叠的 条评论
为什么被折叠?
被折叠的 条评论
为什么被折叠?
 到【灌水乐园】发言


