


一、CoreData概述
Core Data是一个功能强大的层,位于SQLite数据库之上,它避免了SQL的复杂性,能让我们以更自然的方式与数据库进行交互。Core Data将数据库行转换为OC对象(托管对象)来实现,这样无需任何SQL知识就能操作他们。
CoreData与sqlite的比较
sqlite:
1.基于C接口,需要使用SQL语句,代码繁琐
2.在处理大量数据时,表关系更直观
3.在OC中不是可视化
CoreData:
1.可视化,有undo/redo能力
2.可以实现多种文件格式NSSQLiteStoreType、NSBinaryStoreType、NSInMemoryStoreType、NSXMLStoreType等
3.苹果官方API支持,与iOS结合更紧密
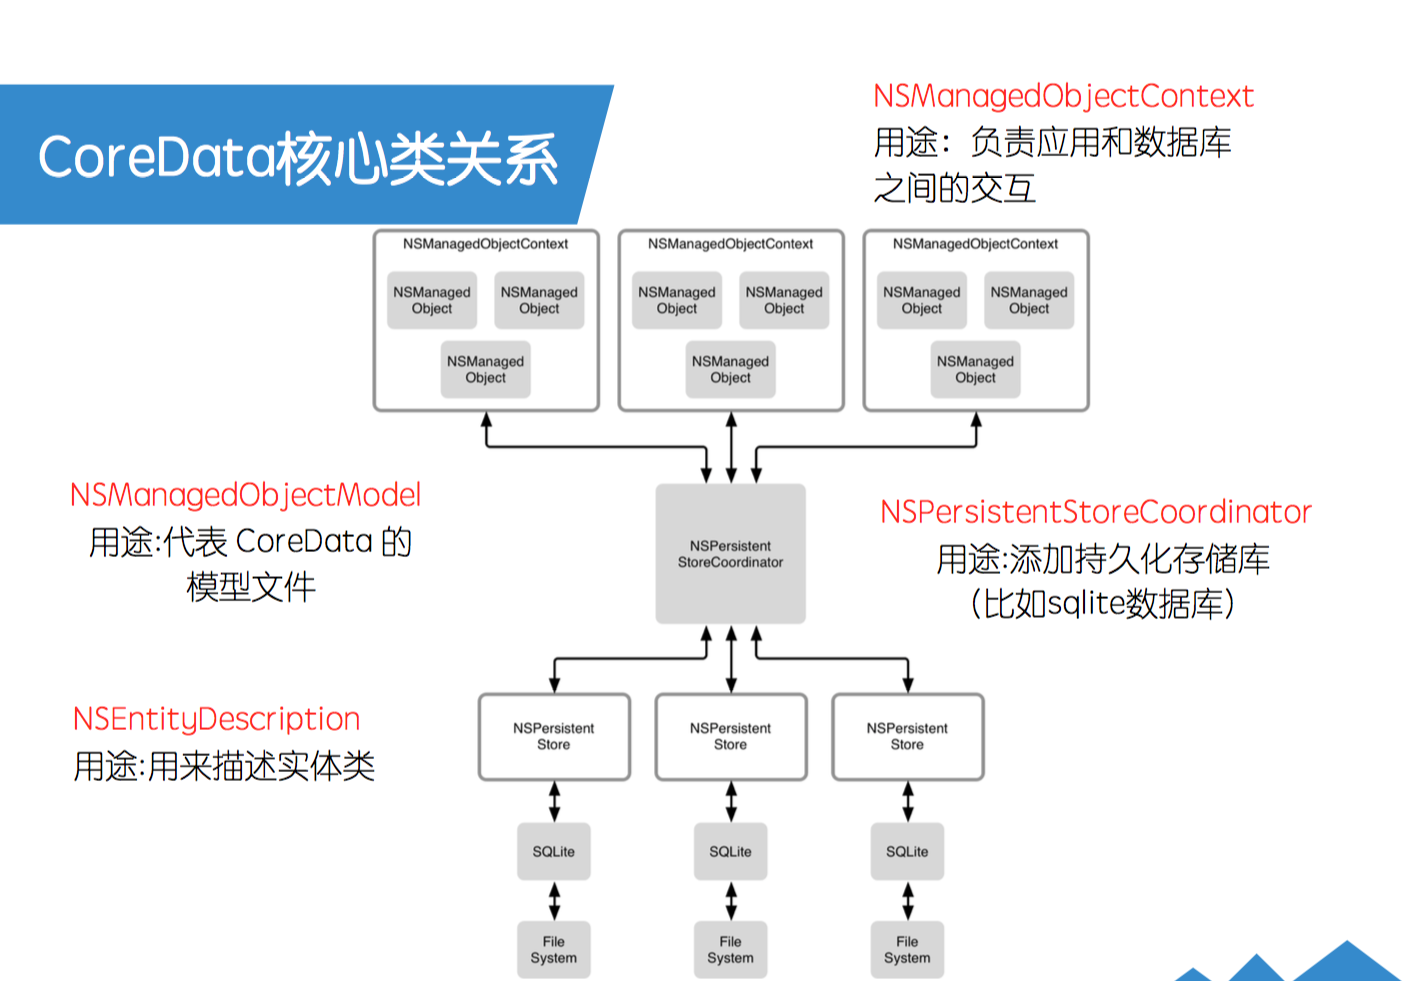
下面说一下CoreData的核心类和结构
| 名称 | 作用 |
|---|---|
| NSManagedObjectModel | 对象模型,指定所用对象文件 |
| NSPersistentStoreCoordinator | 持久化存储协调器,设置对象的存储方式和数据存放位置 |
| NSManagedObjectContext | 对象管理上下文,负责数据的实际操作(重要) |
| NSEntityDescriptor | 实体描述符,描述一个实体,可以用来生成实体对应的对象 |
| NSManagedObject | 对象 |
| NSFetchRequest | 对象查询,相当于SQL的Select语句 |
二、CoreData的使用
下面开始建使用CoreData的工程
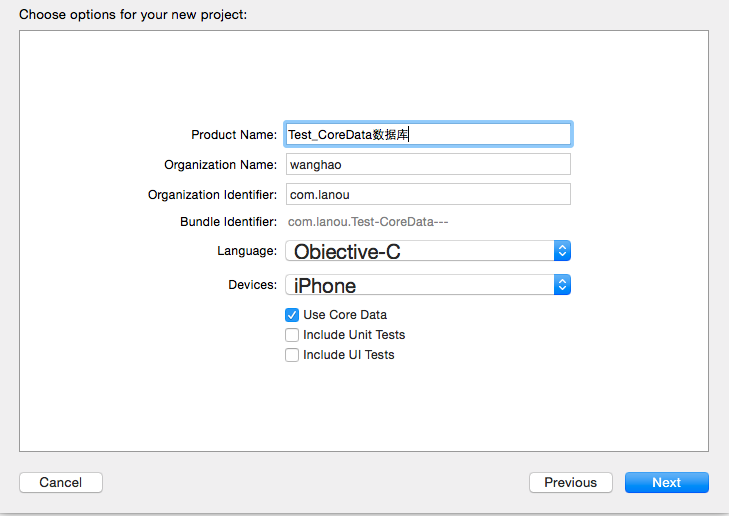
1.建立使用CoreData的工程
勾选Use Core Data选项
把Include Unit Tests和Include UI Tests选项取消勾选
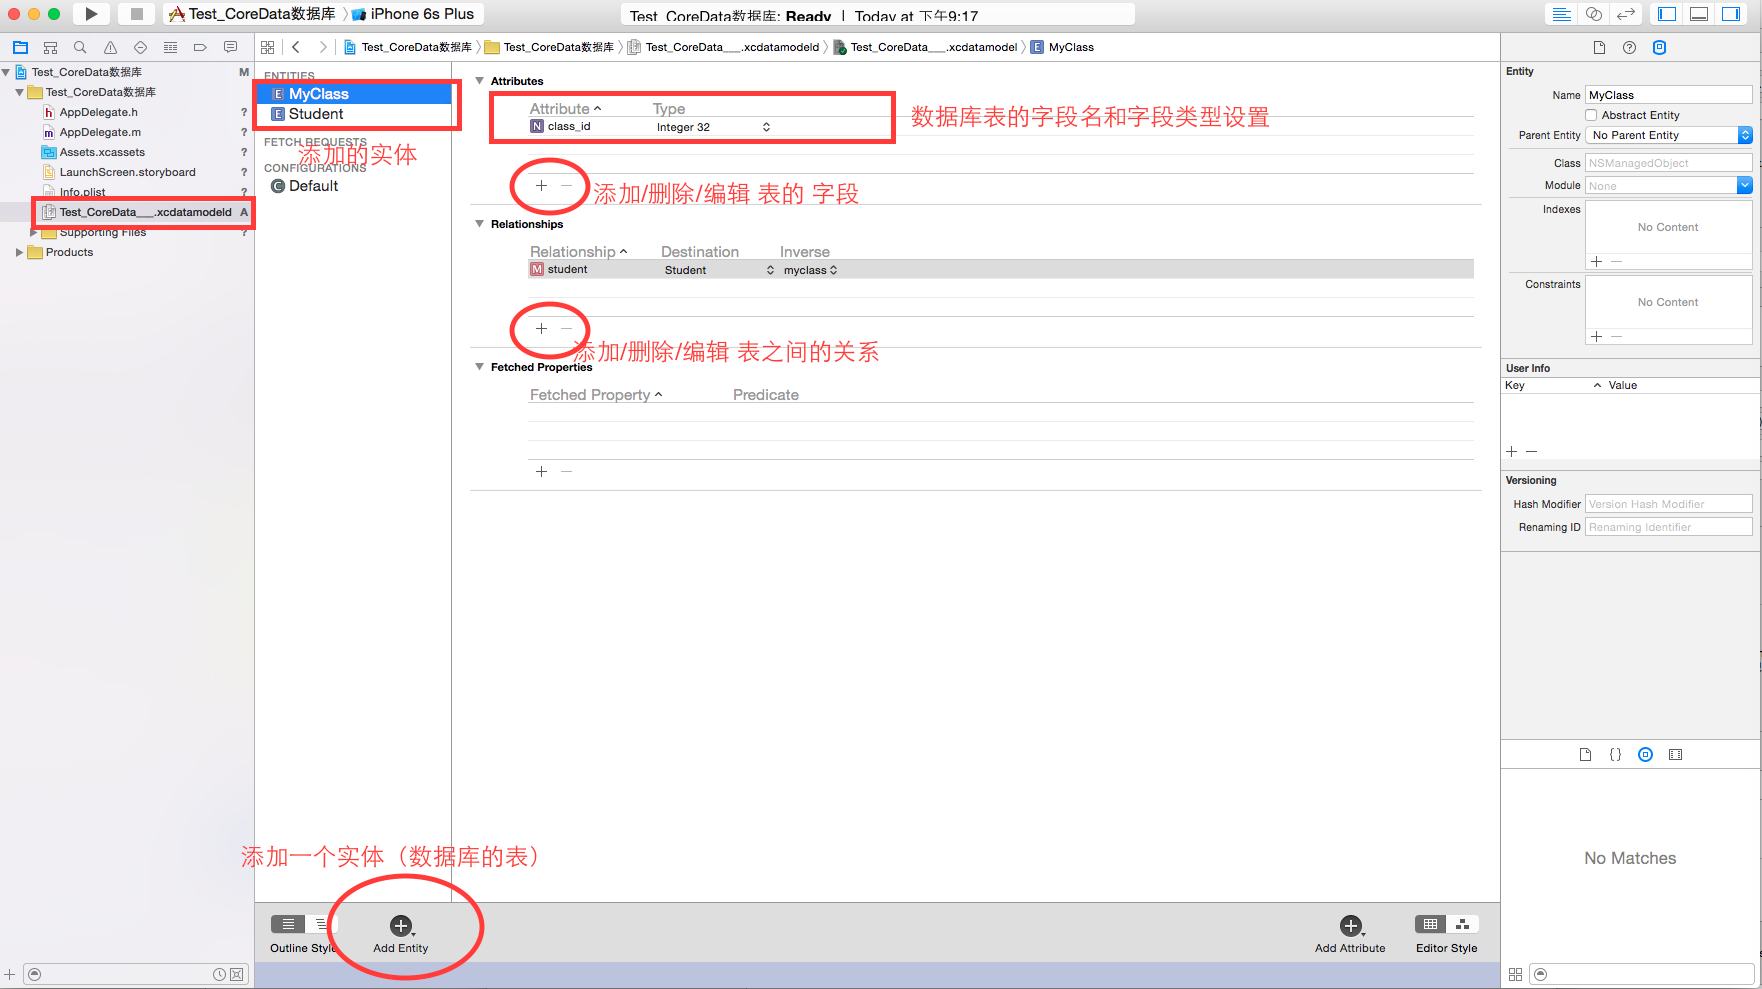
2.进入工程新建数据库表
可以看到Test_CoreData___.xcdatamodeld文件就是我们生产的CoreData数据库
点击左下方的Add Entity可以添加新实体(表)
使用Attributes选项下的+ -号可以给表添加和删除字段
在Relationships下面可以添加表之间的关系
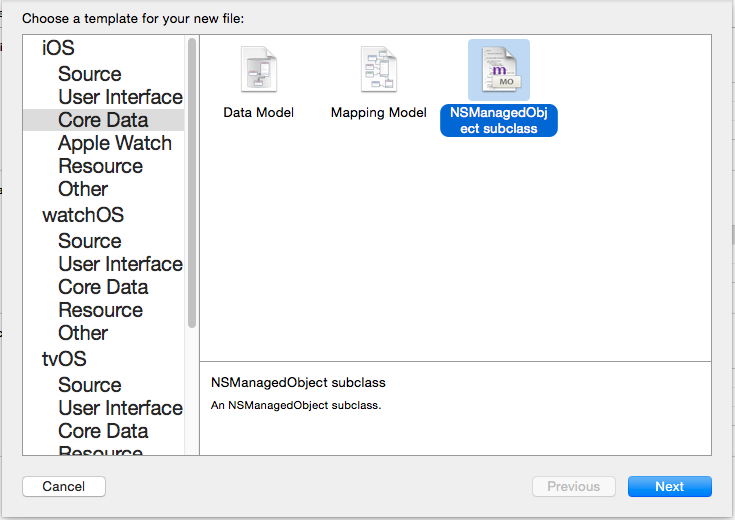
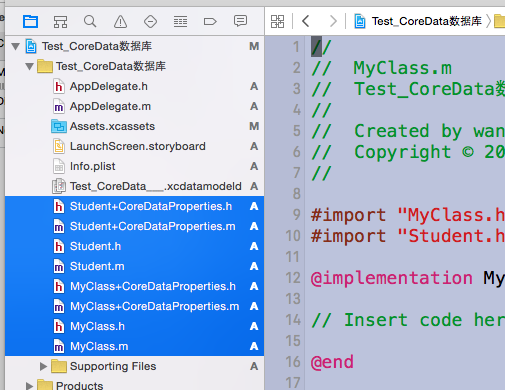
3.生成实体类
command+N新建类,选择Core Data 下的NSManagedObject subclass文件新建,一直点next,选择要新建的model,选择新建类的实体。
Use scalar properties for primitive data types选项,如果勾选,数据库中的integer类型就在类中变成int,不勾选,就变成NSNumber
产生了八个类,至此基础工作才完成,进入AppDelegate里面可以看到一些新的关于CoreData的方法
我们现在实现以学生信息的表视图,可以添加修改删除和查询。
1.我们先写两个方法,分别用来得到Appdelegate对象和context对象
//为了得到临时数据库context
//先得到Appdelegate对象
-(AppDelegate*)appDelegate
{
    //整个应用程序的代理
    return [UIApplication sharedApplication].delegate;
}

//得到context对象
-(NSManagedObjectContext*)context
{
    return [[self appDelegate]managedObjectContext];//这是在Appdelegate里面系统自动添加的发
}
2.再写增删改查的四个方法
//为数据库增加数据
-(void)insertData
{
    //通过实体描述对象,获得实体(相当于得到我们要操作的数据库表)
    NSEntityDescription *entity = [NSEntityDescription entityForName:@"Student" inManagedObjectContext:[self context]];
    //写入数据
    for (int i = 0; i< 10; i++) {
        //插入操作
        Student *student = [[Student alloc]initWithEntity:entity insertIntoManagedObjectContext:[self context]];
        student.name = [NSString stringWithFormat:@"若风%d",i];
        student.age = 20+i;
        student.gender = @"m";
    }
    //将context中存储的数据同步到真实的文件中
    [[self appDelegate]saveContext];//这个方法是在AppDelegate中写好的
}

//查询操作
-(NSArray*)fetch
{
    //构造出需要查询的实体
    NSEntityDescription *entity = [NSEntityDescription entityForName:@"Student" inManagedObjectContext:[self context]];
    //初始化查询工具
    NSFetchRequest *req = [[NSFetchRequest alloc]init];
    //为查询工具设置所需要查询的实体
    [req setEntity:entity];
    //设置查询条件,不加就是查询全部
    //NSPredicate *predicate = [NSPredicate predicateWithFormat:@"age < 24"];
    //[req setPredicate:predicate];

    //排序方法
    NSSortDescriptor *sort = [NSSortDescriptor sortDescriptorWithKey:@"age" ascending:YES];
    [req setSortDescriptors:@[sort]];

    //执行查询(相当于执行查询语句)
    NSArray *allDataArray = [[self context]executeFetchRequest:req error:nil];
    if (allDataArray&&allDataArray.count) {
        return allDataArray;
    }
    else
    {
        NSLog(@"no result");
        return nil;
    }
}

//删除数据
-(void)deleteData
{
    //从当前数据取出要删除的对象
    Student *delStu = [self.allDataArray lastObject];
    //删除context里的
    [[self context]deleteObject:delStu];

    //同步
    [[self appDelegate]saveContext];
}


//更新数据
-(void)updateData
{
    //得到要查询的表
    NSEntityDescription *entity = [NSEntityDescription entityForName:@"Student" inManagedObjectContext:[self context]];
    //建立查询的工具类
    NSFetchRequest *req = [[NSFetchRequest alloc]init];
    [req setEntity:entity];
    //谓词
    NSPredicate *predicate = [NSPredicate predicateWithFormat:@"name CONTAINS %@",@"若风"];
    [req setPredicate:predicate];

    //结果
    NSArray *array = [[self context]executeFetchRequest:req error:nil];
    //遍历结果集更改对象属性
    for (Student *stu in array) {
        stu.name = @"倾城";
    }
    //更新操作需要同步
    [[self appDelegate]saveContext];
}
其他的tableView的设置
#import "RootViewController.h"
#import "AppDelegate.h"//导入目的为,得到临时数据库(为了应用可以和数据文件交互)(context)
#import "Student+CoreDataProperties.h"
@interface RootViewController ()<UITableViewDelegate,UITableViewDataSource>
@property (nonatomic,retain)UITableView *myTabelView;
@property (nonatomic,retain)NSMutableArray *allDataArray;//表视图用的数组
@end
//添加按钮
-(void)addData:(UIBarButtonItem*)sender
{
[self insertData];
}
//查询按钮
-(void)fetchData:(UIBarButtonItem*)sender
{
self.dataArray = [self fetch];
self.allDataArray = [NSMutableArray arrayWithArray:[self fetch]];
//刷新UI
[_myTabelView reloadData];
}
- (void)viewDidLoad {
[super viewDidLoad];
self.navigationItem.title = @"CoreData";
self.navigationItem.leftBarButtonItem = [[UIBarButtonItem alloc]initWithBarButtonSystemItem:UIBarButtonSystemItemAdd target:self action:@selector(addData:)];
UIBarButtonItem *serBarBtn = [[UIBarButtonItem alloc]initWithTitle:@"查询" style:UIBarButtonItemStylePlain target:self action:@selector(fetchData:)];
// Do any additional setup after loading the view.
UIBarButtonItem *delBarBtn = [[UIBarButtonItem alloc]initWithBarButtonSystemItem:UIBarButtonSystemItemTrash target:self action:@selector(deleteData)];
UIBarButtonItem *upDateBarBtn = [[UIBarButtonItem alloc]initWithBarButtonSystemItem:UIBarButtonSystemItemRefresh target:self action:@selector(updateData)];
self.navigationItem.rightBarButtonItems = @[serBarBtn,delBarBtn,upDateBarBtn];
//添加tableView
_myTabelView = [[UITableView alloc]initWithFrame:self.view.frame style:UITableViewStylePlain];
[self.view addSubview:_myTabelView];
//设置代理
_myTabelView.delegate = self;
_myTabelView.dataSource = self;
//注册cell
[_myTabelView registerClass:[UITableViewCell class] forCellReuseIdentifier:@"CELL"];
}
#pragma mark -- cell
//rows
-(NSInteger)tableView:(UITableView *)tableView numberOfRowsInSection:(NSInteger)section
{
return _allDataArray.count;
}
//cell in
-(UITableViewCell *)tableView:(UITableView *)tableView cellForRowAtIndexPath:(NSIndexPath *)indexPath
{
UITableViewCell *cell = [_myTabelView dequeueReusableCellWithIdentifier:@"CELL" forIndexPath:indexPath];
Student *stu = _allDataArray[indexPath.row];
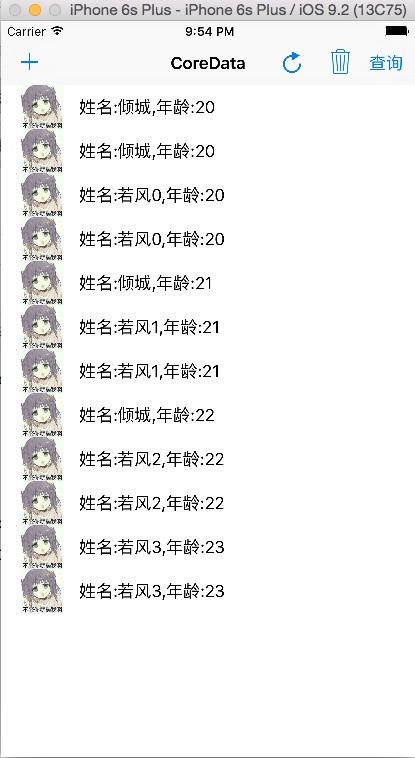
cell.textLabel.text = [NSString stringWithFormat:@"姓名:%@,年龄:%d",[stu name],stu.age];
cell.imageView.image = [UIImage imageNamed:@"bufu.jpg"];
return cell;
}实现效果,上面的按钮分别是 增 改 删 查
三、CoreData实体之间的关系,数据库迁移
1.实体之间的关系,类似于表之间的外键关系。但是两个实体比不需要一个相同的字段。
举个栗子,一个Students实体,一个MyClass实体,给他们添加一个关系,MyClass设置为一对多,Students设置为一对一。
这样,每次在添加了一个Student数据时,都可以把他添加到一条MyClass数据里。
我们拿出一条MyClass数据,也可以从中取出该MyClass里面的所有Student
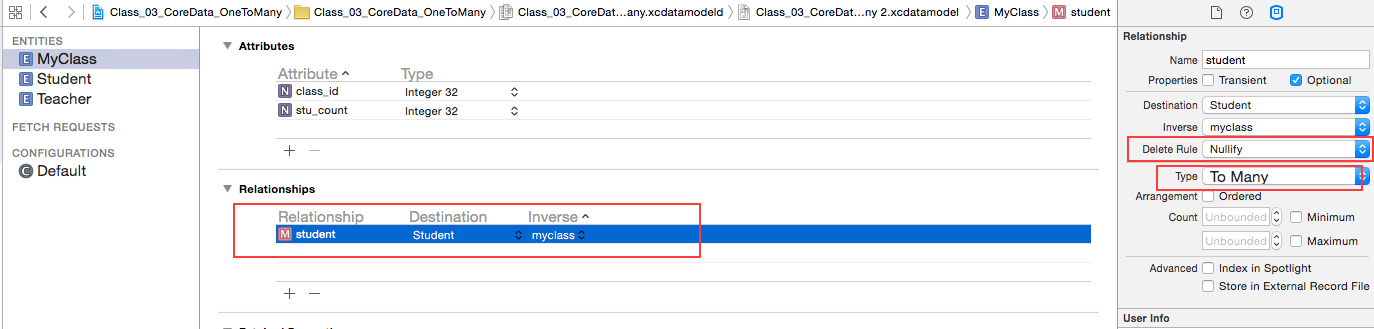
(1)首先在MyClass的Relationships中添加一条关系,Relationship项为关系的名称,Destination为链接的数据实体(表),type选择To Many,表示一个班级可以有多个学生
Delete Rule表示删除规则,规定如果删除一个班级,班级里的学生如何处理。
nullify斩断学生和班级的关系
NoAction 指向空,一般不选
cascade删除班级里的学生
deny 要把班级里的学生删除,才能删除这个班级
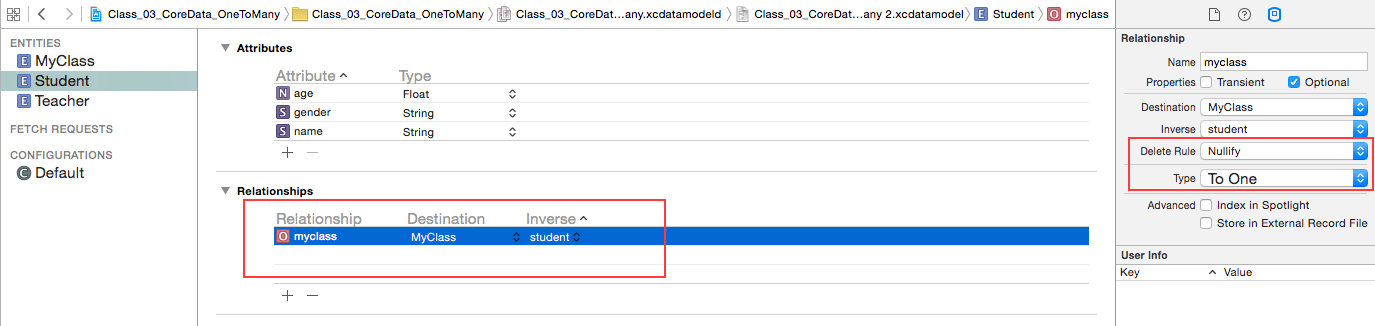
(2)然后在Student实体的RelationShips中添加一个关系,type设置为To One,一个学生只能对应一个班级
(3)这样关系就建立好了,我们再通过上面的方法建立实体的类
会发现在MyClass+CoreDataProperties.h中多了几个方法和一个属性student
#import "MyClass.h"

NS_ASSUME_NONNULL_BEGIN

@interface MyClass (CoreDataProperties)

@property (nullable, nonatomic, retain) NSNumber *class_id;
@property (nullable, nonatomic, retain) NSNumber *stu_count;

//这个属性就是该条MyClass记录里面所有的Student信息
 @property (nullable, nonatomic, retain) NSSet<Student *> *student;

@end

@interface MyClass (CoreDataGeneratedAccessors)

//这四个方法就是给MyClass添加学生和删除学生的方法。
//当学生记录建立好后,使用这些方法,就可以把学生添加到对应的MyClass记录里

- (void)addStudentObject:(Student *)value;
- (void)removeStudentObject:(Student *)value;
- (void)addStudent:(NSSet<Student *> *)values;
- (void)removeStudent:(NSSet<Student *> *)values;

@end
同时,在Student+CoreDataProperties.h中也多了一个属性myClass
#import "Student.h"

NS_ASSUME_NONNULL_BEGIN

@interface Student (CoreDataProperties)

@property (nullable, nonatomic, retain) NSNumber *age;
@property (nullable, nonatomic, retain) NSString *gender;
@property (nullable, nonatomic, retain) NSString *name;

//表示该学生所属的MyClass
 @property (nullable, nonatomic, retain) MyClass *myclass;

@end
使用的时候这样用
  //创建一个MyClass对象
  MyClass *myClass = [NSEntityDescription insertNewObjectForEntityForName:@"LanOuClass" inManagedObjectContext:[self context]];

  //创建一个Student对象
  Student *stu = [NSEntityDescription insertNewObjectForEntityForName:@"Student" inManagedObjectContext:[self context]];

  //将学生和班级建立关联
  [myClass addStudentObject:stu];

  //移除关联
  [myClass removeStudentObject:stu];

  //得到myClass下的所有student
   for (Student *stu in myClass.student) {
        //对stu进行操作
    }
2.数据库的迁移
我们知道,当一个项目做得差不多了,突然需要修改一下数据表,比如添加字段,修改字段类型,改变主外键关系时,会出无限问题。
如果只是加一个表,就不用数据迁移
在CoreData的实体需要修改时,可以通过数据库迁移的方式
数据迁移有三个阶段
(1)创建基于源实例对象的目标实例对象
(2)重新建立联系
(3)验证与保存
a. 按下图的Creat NSManagedObject Subclass可以新建一个实例对象。然后可以按我们的需求修改里面的表
b. 在下图右下角Current选项里选择新建的实例对象

c. 在Appdelegate.m的- (NSPersistentStoreCoordinator *)persistentStoreCoordinator 方法里的这句代码的option参数里面添加一个字典
@{NSMigratePersistentStoresAutomaticallyOption:@YES,NSInferMappingModelAutomaticallyOption:@YES}
表示支持版本迁移,以及版本迁移后自动设置映射关系
就可以用了,好累..
//版本迁移要在option加字典
    if (![_persistentStoreCoordinator addPersistentStoreWithType:NSSQLiteStoreType configuration:nil URL:storeURL
       options:@{NSMigratePersistentStoresAutomaticallyOption:@YES,NSInferMappingModelAutomaticallyOption:@YES}
       error:&error])
d.如果运行还报错,把模拟器的app删除了重新生成


 2535
2535


 被折叠的 条评论
为什么被折叠?
被折叠的 条评论
为什么被折叠?
 到【灌水乐园】发言


