


坚持 成长 每日一篇
建立关联的两个表和对应的模型类
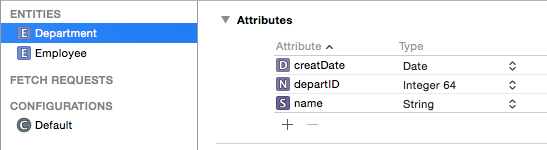
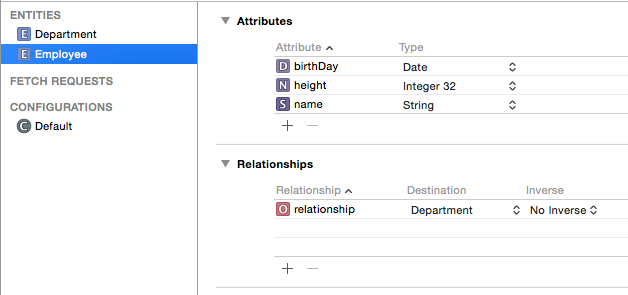
1.如图在模型文件里创建两个Department(部门)和Employee(员工)两个实体,并在员工实体里添加一个Relationships设置Relaytionship为departMent(后面创建的属性将以此命名),Destination为Department(属性的类为Department类)。
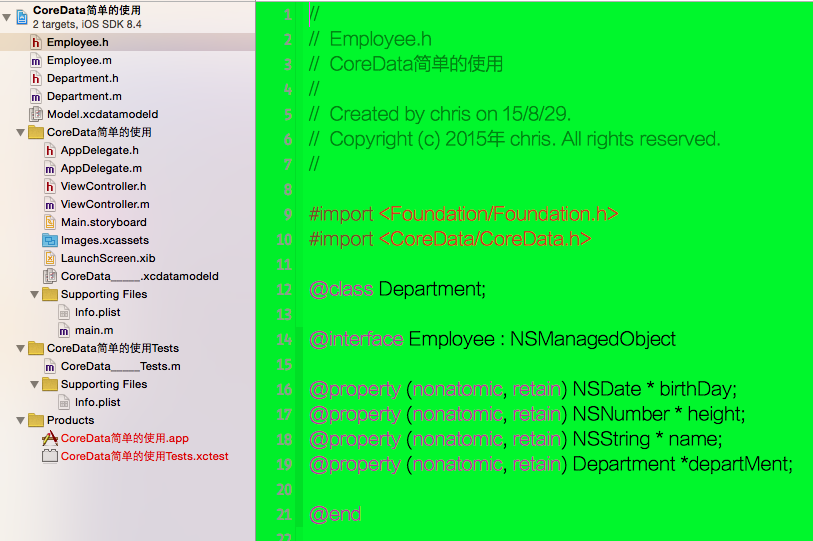
2.依次先创建Department的模型类再创建Employee模型类。如图我们会在Employee模型类里面看到一个department属性。其属性类型为Department
如何使用多表关联
1.假设我们有两个部门android和iOS部门,给各部门分配一个员工。 张三 属于ios部门 李四 属于android部门。实现代码如下。
-(IBAction)addEmployee{
   // 创建两个部门 ios android
    Department *iosDepart = [NSEntityDescription insertNewObjectForEntityForName:@"Department" inManagedObjectContext:_context];
    iosDepart.name = @"ios";
    iosDepart.departNo = @"0001";
    iosDepart.createDate = [NSDate date];

    Department *andrDepart = [NSEntityDescription insertNewObjectForEntityForName:@"Department" inManagedObjectContext:_context];
    andrDepart.name = @"android";
    andrDepart.departNo = @"0002";
    andrDepart.createDate = [NSDate date];

    // 创建两个员工对象 张三 属于ios部门 李四 属于android部门
    Employee *zhangsan = [NSEntityDescription insertNewObjectForEntityForName:@"Employee" inManagedObjectContext:_context];
    zhangsan.name = @"张三";
    zhangsan.height = @(1.90);
    zhangsan.birthday = [NSDate date];
    zhangsan.depart = iosDepart;

    Employee *lisi = [NSEntityDescription insertNewObjectForEntityForName:@"Employee" inManagedObjectContext:_context];

    lisi.name = @"李四";
    lisi.height = @2.0;
    lisi.birthday = [NSDate date];
    lisi.depart = andrDepart;

    // 直接保存数据库
    NSError *error = nil;
    [_context save:&error];

    if (error) {
        NSLog(@"%@",error);
    }
}
2.分配好员工我们如果要实现找出所有iOS员工可以进行如下操作
-(IBAction)readEmployee{

    // 读取ios部门的员工
    // 1.FectchRequest 抓取请求对象
    NSFetchRequest *request = [NSFetchRequest fetchRequestWithEntityName:@"Employee"];
    // 2.设置过滤条件 这里我们设置了查找部门类型的name属性为ios的所有员工
    NSPredicate *pre = [NSPredicate predicateWithFormat:@"depart.name = %@",@"ios"];
    request.predicate = pre;

      // 4.执行请求
    NSError *error = nil;

    NSArray *emps = [_context executeFetchRequest:request error:&error];
    if (error) {
        NSLog(@"error");
    }

    //NSLog(@"%@",emps);
    //遍历员工
    for (Employee *emp in emps) {
        NSLog(@"名字 %@ 部门 %@",emp.name,emp.depart.name);
    }

}
这样我们就实现了2个表点关联使用,多表使用也是类似的


 3095
3095

 被折叠的 条评论
为什么被折叠?
被折叠的 条评论
为什么被折叠?
 到【灌水乐园】发言


