


shape标签
基础
参考:http://kofi1122.blog.51cto.com/2815761/521605
一个shape可以理解为一个通过xml文件定义的一个图形,它包含有:四个角、边界线、内部的填充颜色等属性。<shape>节点下的子节点就是用来定义这些属性的。
由于一个图形可能是点、线等,所以可以通过<shape>标签下的shape属性指定图形的具体样式。如shape为line时代表一条线,为rectangle代表矩形等。
它是一个放在res/drawable文件夹下的xml文件,它的根结点是shape。如test_shape.xml:
<shape
	xmlns:android="http://schemas.android.com/apk/res/android">
	<corners android:radius="5dp" />
</shape>android:background="@drawable/<span style="font-size:18px;">test_shape</span>"内部标签
solid:定义内部的填充颜色,只有一个属性android:color。
gradient:和solid一样,也是用来定义内部的渐变的填充颜色,两者谁在后就以谁为准。和solid的区别是:gradient的颜色是渐变的,而solid的颜色是固定的。
android:startColor,endColor分别指渐变色的起始色和结束色。
android:angle,颜色的旋转角度。在线性渐变时,默认时0度为从左到右,顺时针转动angle为负,逆时针是为正。
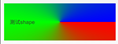
android:type:设置渐变的样式。linear为线性渐变,从图形的左边到右边渐变。radial为径向渐变,即以一个点为圆心,放射性的向外渐变(放射的范围不会超过android:gradientRadius半径,范围外的部分用endColor来填充),如果设置为radial,那么必须要设置android:gradientRadius,它指的是径向渐变的半径;sweep为扫描渐变,即以一点为圆心,以向右为起线,沿顺时针方向扫描360度,在扫描的过程中渐变。
type为radial时的效果
<shape xmlns:android="http://schemas.android.com/apk/res/android" >
      <!-- 颜色 -->
     <gradient
        android:startColor="#ff0000"
        android:endColor="#00ffff"
		android:type="radial"
		android:gradientRadius="200"
        />
</shape>
的结果图为
type为sweep时的效果:
<shape xmlns:android="http://schemas.android.com/apk/res/android" >
      <!-- 颜色 -->
     <gradient
        android:startColor="#ff0000"
        android:endColor="#0000ff"
        android:centerColor="#00ff00"
		android:type="sweep"
        />
</shape>
android:centerX,centerY:用来确定渐变色的起始点,如果值为一个百分数(如10%此类),那么就是相对于该图形的左上角。如
<shape xmlns:android="http://schemas.android.com/apk/res/android" >
      <!-- 颜色 -->
     <gradient
        android:startColor="#ff0000"
        android:endColor="#00ffff"
        android:type="sweep"
		android:centerX="10%"
		android:centerY="10%"
        />
</shape>
stroke
用来定义边界,它是以虚线的形式画边界线。android:width,边界线的厚度;android:color:边界线中短实线的颜色;android:dashWidth,边界线中短实线的长度;android:dashGap:短实线之间的空白区域的宽度,当该值为0时,虚线就会变成实线。
corners
用来定义四个角。android:topLeftRadius等四个值分别用来定义相应的四个角中圆弧。
padding
用来定义内容与四条边界线的距离,和textview中的paddingLeft等一个效果。
使用
与selector联用
由于一个shape相当于一个通过xml自定义出来的图形,所以可以和selector联用,就像使用一个drawable一样。如
<selector xmlns:android="http://schemas.android.com/apk/res/android" >
    <item android:state_pressed="true" android:drawable="@drawable/listview_shape"></item>
    <item android:drawable="@drawable/bind_ic_preference_one_normal"></item>
</selector>还有一种使用方法,直接将shape定义在selector中。示例:
<selector xmlns:android="http://schemas.android.com/apk/res/android">
    <item android:state_pressed="true">
        <shape xmlns:android="http://schemas.android.com/apk/res/android">
            <!-- 将shape定义在selector中 -->
            <gradient
                android:centerX="10%"
                android:centerY="10%"
                android:endColor="#00ffff"
                android:startColor="#ff0000"
                android:type="sweep" />
        </shape>
    </item>
    <item android:drawable="@drawable/bind_ic_preference_one_normal"></item>
</selector>
画虚线
其中的dotted_line.xml如下:
<?xml version="1.0" encoding="utf-8"?>
<shape xmlns:android="http://schemas.android.com/apk/res/android"
    android:shape="line" >

    <stroke
        android:dashGap="3dp"
        android:dashWidth="5dp"
        android:width="1dp"
        android:color="@android:color/darker_gray" />

</shape> <View
android:id="@+id/view1"
android:layout_width="match_parent"
android:layout_height="2dp"
android:layout_below="@id/textView1"
android:background="@drawable/dotted_line" />注意:
一、layout_height的值一定要比<stroke>中的width的值大。
二、上述方法在低版本(3.0以下)会出现虚线,如果运行在3.0以上则是实线。解决办法是:禁掉程序的硬件加速。有两种方法,其一,在清单文件的application节点下配置android:hardwareAccelerated="false";其二,通过代码控制,如下:
if (Build.VERSION.SDK_INT > 11) {// 下面的方法是api11以上才能使用
			//R.id.view1对应的是虚线的组件
			findViewById(R.id.view1).setLayerType(View.LAYER_TYPE_SOFTWARE,
					null);
		}
Shape对象
主要用于在代码中定义一个图形。在ShapeDrawable中使用到该类。
子类
OvalShape:椭圆。在ShapeDrawable中通过setBounds()设置椭圆显示的矩形区域。如果矩形为正方形,那么该类定义的就是一个正圆。
RectShape:矩形。正方形,长方形的设置同OvalShape。
RoundRectShape:圆角矩形。该矩形可以设置两层。如下:
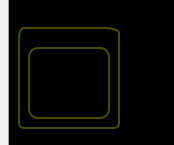
在构造该类的实例时,需要传入三个参数:第一个参数指的是外层矩形的圆角(一个size为8的数组,分别对应左上,右上,右下,左下的x,y轴的圆弧所在圆的半径),第二个参数指的是内矩形与外矩形的距离(按左上右下),第三个为内矩形的圆角。


 5472
5472


 被折叠的 条评论
为什么被折叠?
被折叠的 条评论
为什么被折叠?
 到【灌水乐园】发言


