


课时1:前言
随着云原生、AI等技术的向前推进,容器技术逐渐成为每位算法同学的必备技能之一。 本文档主要面向算法开发同学,从0基础实现将代码打包docker镜像-调试-提交仓库-提交云服务训练模型/天池大赛提交/学校服务器训练等流程。也同样适用于初次接触docker的同学。 区别于开发同学,对于算法同学而言 仅需要掌握一部分基础命令达到自己的使用目的即可。因此此次简明教程面向算法同学和AI竞赛参赛者,帮助大家快速上手大赛提交和远程服务器训练。
Docker的出现是一种历史趋势,因为微服务的出现,导致了使用的技术更加多元化,所以在部署上的难度也变得更大。而docker可以减轻我们在部署上面的复杂性。
docker相当于起到了承上启下的桥梁作用:将App连带环境一同打包直接部署到服务器上。
如果是使用Mac或者windows系统使用docker的话,建议使用Vagrant,它是不需要使用iso镜像就可以创建虚拟机的,这样的好处是方便我们的使用以及删除。
那么下面开始我们的docker之旅。
虚拟机与docker之间的区别

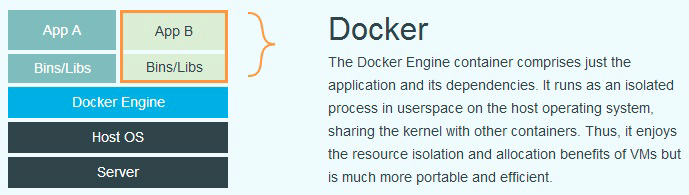
我们可以看到,传统的虚拟机是在宿主机之上,又添加了一个新的操作系统,这就直接导致了虚拟机的臃肿,不适合迁移。而docker这是直接寄存在宿主机上,完全就会避免大部分虚拟机带来的困扰。
另外Docker其实是一个黑盒的进程,为什么说是黑盒的,区别于传统的进程,Docker可以独立出一个自己的空间,不会使得在docker中的行为以及变量溢出到宿主机上。
为什么用docker
在没出现docker的时候,我们完成的java web项目需要打成一个war。然后得在服务器中配置各种各样的参数,例如说jdk,tomcat,数据库等。配置的周期相当的冗杂并且繁琐。但是现在有了docker,我们不但可以使用一个空的镜像,从头开始构建,还可以使用之前各种大牛已经build好的镜像,直接使用。而且在项目需要迁移的时候,我们只需要在需要部署的地方,直接使用之前项目使用的docker放置好自己的项目即可,方便快捷。
docker底层技术支持
- NameSpaces:用于做进程之间的隔离
- Control Groups: 用于做资源控制,根据需求划分资源的核心数,内存,硬盘等等,例如我们之前新建一个虚拟机一样
- Union file systems(UFS,联合文件系统):Container和image的分层
docker的基本概念
docker最重要的三个概念是:镜像(image),容器(container),仓库(repository),在这三个概念中,镜像是最重要的概念。
镜像
- 镜像是文件与meta data的集合
- 分层的,并且每一层都可以添加删除文件,从而形成新的镜像
- 不同的镜像可以共享相同的层(layout)
- 只读的
镜像我们可以理解为树状结构,每一个镜像都会依赖于另一个镜像,这个依赖关系是体现在docker镜像制作的dockerfile中的FROM指令中的。如果要是树的根,那么我们需要"FROM scratch",这个是值得注意的。如果需要对它进行修改,该怎么办呢,别着急,这个就得看我们的容器了。
容器
- 通过image创建
- 在image 的最后一层上面再添加一层,这一层比较特殊,可读写。
- image负责存储和分发,container负责运行
容器是镜像的一个运行实例,可以不准确的把镜像当作类,容器当作对象。容器其实他的结构是与镜像相类似的,底部也是一层层的只读层,只不过在最上层会存在一个存储层,我们可以在这一层定制化我们的这个容器,还可以通过build命令,把容器打包成我们自己需要的镜像。另外镜像启动后会形成一个容器,容器在计算机中是一个进程,但这个进程对其他进程并不可见。
容器的启动过程:
检查镜像是否在本地存在,如果不存在去远程仓库下载
==>利用镜像创建一个容器
==>启动刚刚创建的容器
==>分配一个文件系统给容器,并且在镜像层外挂载一个可读可写层
==>从宿主主机的网桥接口中桥接一个给容器
==>从网桥中分一个ip地址给容器
==>执行用户指定的应用程序
==>执行完毕后容器自动终止
仓库
这个理解起来就很简单了,大家应该有使用过git,他是有一个远程的仓库,这个仓库记录着我们的代码,和每一次我们提交的记录。但是在这里,把docker的仓库比做maven仓库更加恰当,就相当于我们可以去maven远程仓库取我们需要的依赖,多个依赖构成了我们的整个项目,这个思想同样适用于docker。默认情况下,我们都是从docker hub中取得的镜像(http://registry.hub.docker.com/)
其他名词解释:
TCC(天池竞赛计算平台-TianChi Computing):天池大赛docker提交模型评估的平台简称。
Docker:docker作为虚拟机领域成熟的轻量化容器产品,可以轻松的将代码和所依赖的整个环境(可以理解为包含整个操作系统)都打包在一起,不依赖于软件环境,方便把自己的代码从windows电脑分享到mac电脑运行、或者服务器上运行等。 docker三要素:镜像(image)、容器(contarin)、registry(包含多个仓库)
本文来源:https://developer.aliyun.com/article/734130
课时2:docker 安装
这里主要介绍 Linux 、Windows 10 和 MacOS 上的安装。
Linux
$ sudo curl -sS https://get.docker.com/ | sh
测试
$ docker run hello-world
Unable to find image 'hello-world:latest' locally
latest: Pulling from library/hello-world
d1725b59e92d: Pull complete
Digest: sha256:0add3ace90ecb4adbf7777e9aacf18357296e799f81cabc9fde470971e499788
Status: Downloaded newer image for hello-world:latest
Hello from Docker!
This message shows that your installation appears to be working correctly.
To generate this message, Docker took the following steps:
 1. The Docker client contacted the Docker daemon.
 2. The Docker daemon pulled the "hello-world" image from the Docker Hub.
    (amd64)
 3. The Docker daemon created a new container from that image which runs the
    executable that produces the output you are currently reading.
 4. The Docker daemon streamed that output to the Docker client, which sent it
    to your terminal.
To try something more ambitious, you can run an Ubuntu container with:
 $ docker run -it ubuntu bash
Share images, automate workflows, and more with a free Docker ID:
 https://hub.docker.com/
For more examples and ideas, visit:
 https://docs.docker.com/get-started/
* 如果机器有支持深度学习的GPU,可以继续执行如下命令以支持容器对gpu的调用[目前仅支持linux]:
# Add the package repositories
distribution=$(. /etc/os-release;echo $ID$VERSION_ID)
curl -s -L https://nvidia.github.io/nvidia-docker/gpgkey | sudo apt-key add -
curl -s -L https://nvidia.github.io/nvidia-docker/$distribution/nvidia-docker.list | sudo tee /etc/apt/sources.list.d/nvidia-docker.list


sudo apt-get update && sudo apt-get install -y nvidia-container-toolkit
sudo systemctl restart docker
# stable
$ winget install Docker.DockerDesktop
# edge
$ winget install Docker.DockerDesktopEdge
Windows
在 Windows 搜索栏输入 Docker 点击 Docker Desktop 开始运行。
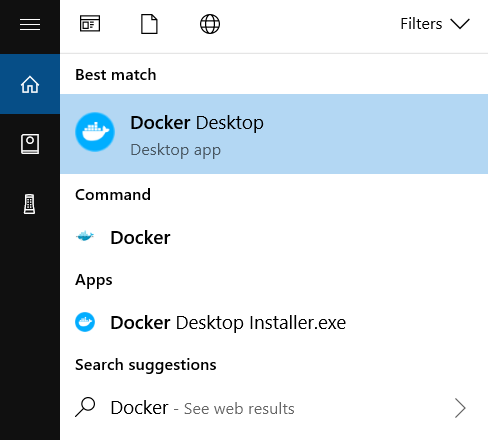
Docker 启动之后会在 Windows 任务栏出现鲸鱼图标。

等待片刻,点击 Got it 开始使用 Docker。
MacOS
如果你已经安装了 Homebrew ,使用brew 安装非常方便
Homebrew (opens new window)的 Cask (opens new window)已经支持 Docker Desktop for Mac,因此可以很方便的使用 Homebrew Cask 来进行安装:
$ brew cask install docker
没有安装brew也可以手动下载安装
点击下载 Stable (opens new window)或 Edge (opens new window)版本的 Docker Desktop for Mac。
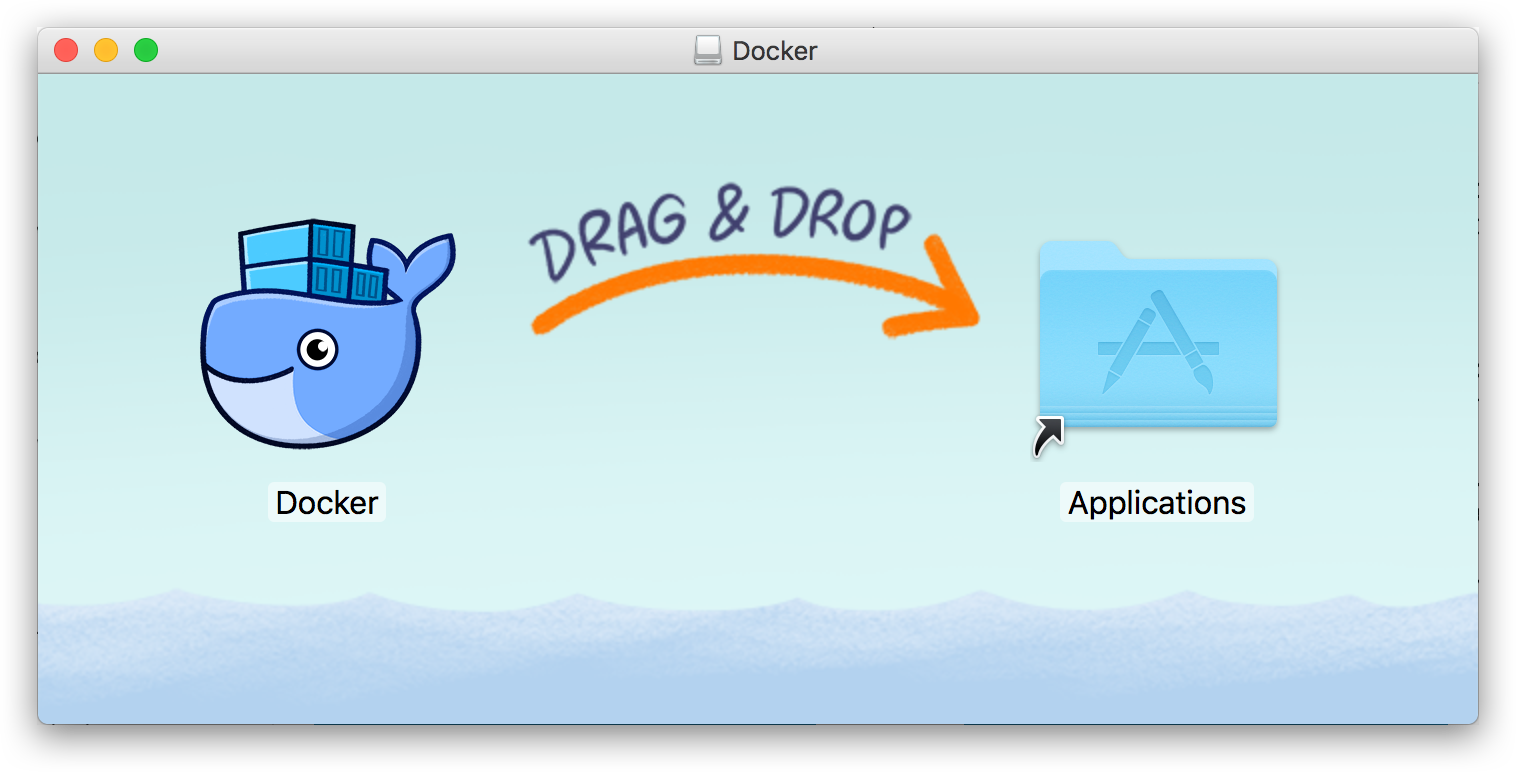
如同 MacOS 其它软件一样,安装也非常简单,双击下载的 .dmg 文件,然后将那只叫 Moby (opens new window)的鲸鱼图标拖拽到 Application 文件夹即可(其间需要输入用户密码)。
运行
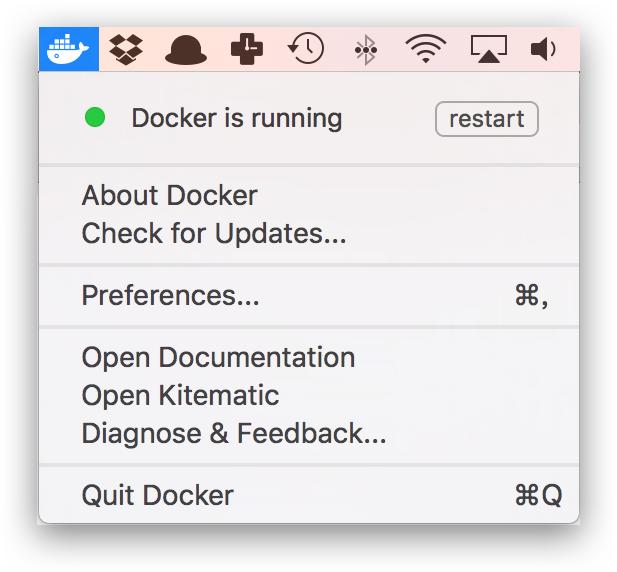
从应用中找到 Docker 并点击运行。
运行之后,会在右上角菜单栏看到多了一个鲸鱼图标,这个图标表明了 Docker 的运行状态。

第一次点击图标,可能会看到这个安装成功的界面,点击 “Got it!” 可以关闭这个窗口。以后每次点击鲸鱼图标会弹出操作菜单。
启动终端后,通过命令可以检查安装后的 Docker 版本。
$ docker --version
Docker version 19.03.8, build afacb8b
$ docker-compose --version
docker-compose version 1.25.5, build 8a1c60f6
测试
$ docker run hello-world

Unable to find image 'hello-world:latest' locally
latest: Pulling from library/hello-world
d1725b59e92d: Pull complete
Digest: sha256:0add3ace90ecb4adbf7777e9aacf18357296e799f81cabc9fde470971e499788
Status: Downloaded newer image for hello-world:latest

Hello from Docker!
This message shows that your installation appears to be working correctly.

To generate this message, Docker took the following steps:
 1. The Docker client contacted the Docker daemon.
 2. The Docker daemon pulled the "hello-world" image from the Docker Hub.
    (amd64)
 3. The Docker daemon created a new container from that image which runs the
    executable that produces the output you are currently reading.
 4. The Docker daemon streamed that output to the Docker client, which sent it
    to your terminal.

To try something more ambitious, you can run an Ubuntu container with:
 $ docker run -it ubuntu bash

Share images, automate workflows, and more with a free Docker ID:
 https://hub.docker.com/

For more examples and ideas, visit:
 https://docs.docker.com/get-started/
课时3: docker 基础命令学习
3.1 拉取镜像
docker pull [选项] [docker镜像地址:标签]
如:
docker pull hello-world:latest
** 此处感谢@常源博同学提出更正建议
3.2 运行镜像
$ docker run hello-world

Hello from Docker!
This message shows that your installation appears to be working correctly.

To generate this message, Docker took the following steps:
 1. The Docker client contacted the Docker daemon.
 2. The Docker daemon pulled the "hello-world" image from the Docker Hub.
    (amd64)
 3. The Docker daemon created a new container from that image which runs the
    executable that produces the output you are currently reading.
 4. The Docker daemon streamed that output to the Docker client, which sent it
    to your terminal.

To try something more ambitious, you can run an Ubuntu container with:
 $ docker run -it ubuntu bash

Share images, automate workflows, and more with a free Docker ID:
 https://hub.docker.com/

For more examples and ideas, visit:
 https://docs.docker.com/get-started/
3.3 运行镜像并进入容器
$ docker run -it --rm ubuntu:18.04 bash
root@e7009c6ce357:/#  uname -a
Linux bff9f261bab2 4.15.0-106-generic #107-Ubuntu SMP Thu Jun 4 11:27:52 UTC 2020 x86_64 x86_64 x86_64 GNU/Linux
root@e7009c6ce357:/# exit
docker run 就是运行容器的命令,后面如果只跟镜像,那么就执行镜像的默认命令然后退出。
-it:这是两个参数,一个是-i:交互式操作,一个是-t终端。我们这里打算进入bash执行一些命令并查看返回结果,因此我们需要交互式终端。--rm:这个参数是说容器退出后随之将其删除。默认情况下,为了排障需求,退出的容器并不会立即删除,除非手动docker rm。我们这里只是随便执行个命令,看看结果,不需要排障和保留结果,因此使用--rm可以避免浪费空间。ubuntu:18.04:这是指用ubuntu:18.04镜像为基础来启动容器。bash:放在镜像名后的是 命令,这里我们希望有个交互式 Shell,因此用的是bash。
进入容器后,我们可以在 Shell 下操作,执行任何所需的命令。通过exit 退出。
3.4 查看本地镜像(list 镜像)
$ docker images
REPOSITORY           TAG                 IMAGE ID            CREATED             SIZE
redis                latest              5f515359c7f8        5 days ago          183 MB
nginx                latest              05a60462f8ba        5 days ago          181 MB
IMAGE ID 是镜像的唯一标识。
3.5 查看运行中的容器
$ docker ps
CONTAINER ID        IMAGE          COMMAND      CREATED             STATUS              PORTS               NAMES
9363b1b51118        testlog:1      "bash"       7 weeks ago         Up 7 weeks                              vigilant_bhaskara
CONTAINER ID 容器唯一id 可以通过指定这个ID操作exec shell进入容器、commit 这个容器的修改、tag 给这个容器打标签等
docker ps 罗列的是当前活跃的容器
要查看所有容器执行docker ps -a
$ docker ps -a
3.6 进入运行中/后台运行的容器
$ docker exec -it [CONTAINER ID] /bin/bash
进入运行中的容器后不仅可以调试镜像,还可以对镜像做修改如安装python包,如果想对修改做保留,可以执行3.7提交
3.7 保存修改
docker commit [CONTAINER ID] registry.cn-shanghai.aliyuncs.com/test/pytorch:myversion
注意:通过commint的形式保存现场为一个新的镜像虽然也能直观的达到构建新镜像的目的,但是实际操作中,并不推荐这种形式,因为1.commit操作不仅会把有用的修改保存下来,对一些无关的修改也会保存下来(每一个命令行操作都会生成存储如ls操作)就会导致镜像比较臃肿;2.因为commit操作属于黑箱操作,后续如果有什么问题维护起来会比较麻烦。
建议commit仅作为保留现场的手段,然后通过修改dockerfile构建镜像。
3.8 打TAG
有时需要对临时版本,或者节点版本做一个标记保留,打TAG标签非常好用,并不会额外占用空间
docker tag registry.cn-shanghai.aliyuncs.com/test/pytorch:myversion my_tmp_version:0.1
3.9 推送镜像到仓库
docker push registry.cn-shanghai.aliyuncs.com/test/pytorch:myversion
3.10 使用dockerfile构建镜像
Dockerfile示例(注意一般文件名命名为Dockerfile 无后缀名,如果命名为其他名字,构建时需要额外指定文件名)
# Base Images
## 从天池基础镜像构建(from的base img 根据自己的需要更换,建议使用天池open list镜像链接:https://tianchi.aliyun.com/forum/postDetail?postId=67720)
FROM registry.cn-shanghai.aliyuncs.com/tcc-public/python:3
##安装依赖包
RUN pip install numpy -i https://pypi.tuna.tsinghua.edu.cn/simple
##或者从requirements.txt安装
##RUN pip install --no-cache-dir -r requirements.txt -i https://pypi.tuna.tsinghua.edu.cn/simple
## 把当前文件夹里的文件构建到镜像的根目录下,并设置为默认工作目录
ADD . /
WORKDIR /
## 镜像启动后统一执行 sh run.sh
CMD ["sh", "run.sh"]
3.11 构建镜像
docker build -t registry.cn-shanghai.aliyuncs.com/target:test .
如要指定dockerfile :
docker build -f ./dockerfile -t registry.cn-shanghai.aliyuncs.com/target:test .
3.12 删除镜像/容器
删除镜像:
docker rmi registry.cn-shanghai.aliyuncs.com/target:test
删除容器:
docker rm [CONTAINER ID]
如果容器还在运行,则会删除失败,应先结束掉容器:
docker kill [CONTAINER ID]
查看运行中的容器:
docker ps
查看所有容器:
docker ps -a
3.13 常规技巧
a.检查基础镜像软件源和pip源是否替换为国内源,如果非国内源后续每次构建镜像会比较浪费时间。
b.必备软件包可直接安装于基础镜像内,以减少每次构建镜像时都要安装一遍的等待时间。
c.镜像面临调试问题时,可交互式进入容器后直接调试修改,直到成功后退出再在dockerfile中修改。
d.养成使用Dockerfile的习惯,不要依赖于commit
e.每次镜像修改都给定新的版本号或标签,方便区分版本管理,有意义的版本最好使用有含义的字符作为版本号,如:frist_submit
3.14 深度学习常用镜像集合(包含国内源和海外源)
https://tianchi.aliyun.com/forum/postDetail?postId=67720
3.15 海外选手网速受限提交方案
a.使用github等代码托管(推荐code.aliyun.com)
b.在cr(阿里云容器服务)产品做代码源绑定,并开启自动构建
课时8: 创建镜像仓库账号
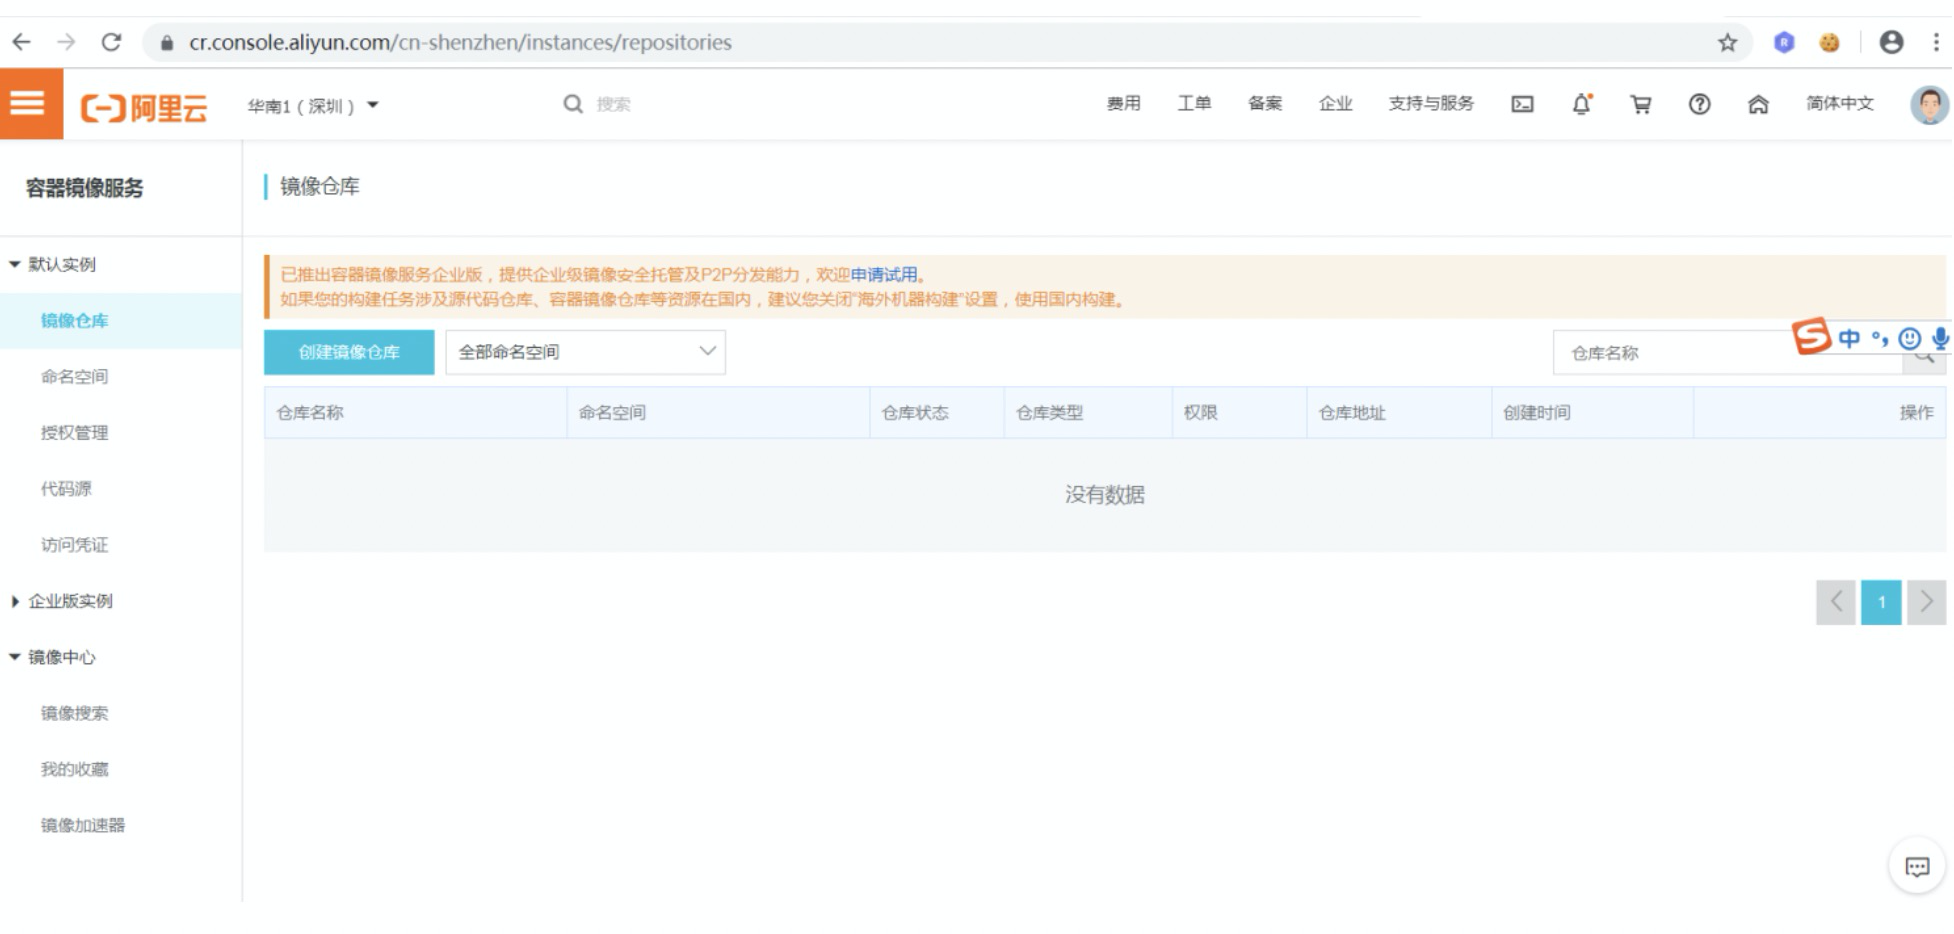
这里以申请阿里云容器镜像服务(免费),并创建仓库为例,其他仓库如dockerhub、谷歌、亚马逊、腾讯等详见对应产品说明书。 打开阿里云容器服务地址为(https://cr.console.aliyun.com) 注册开通后产品页面如下
第一步切换标签页到命名空间,创建地址唯一的命名空间
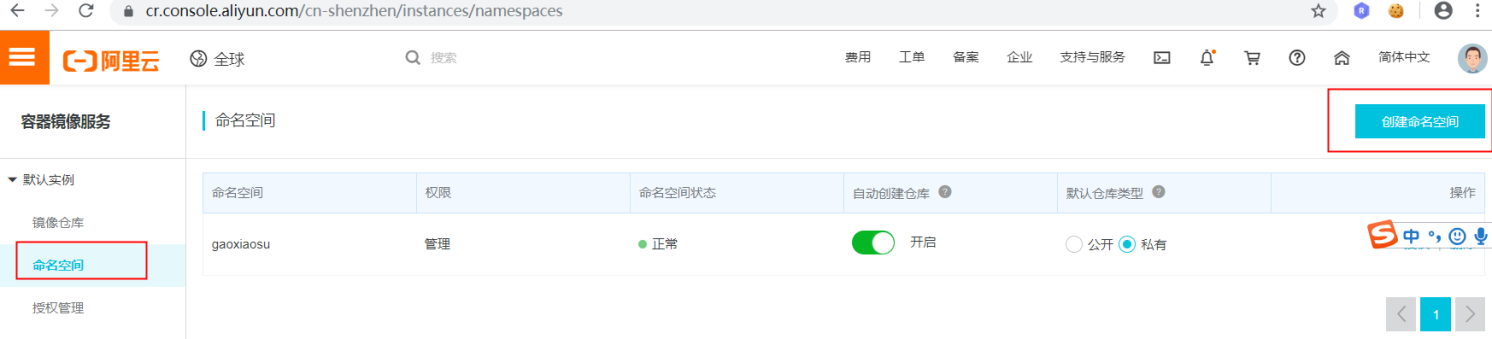
根据大赛要求选择对应的地域,其他的按照自己需求选择或填写
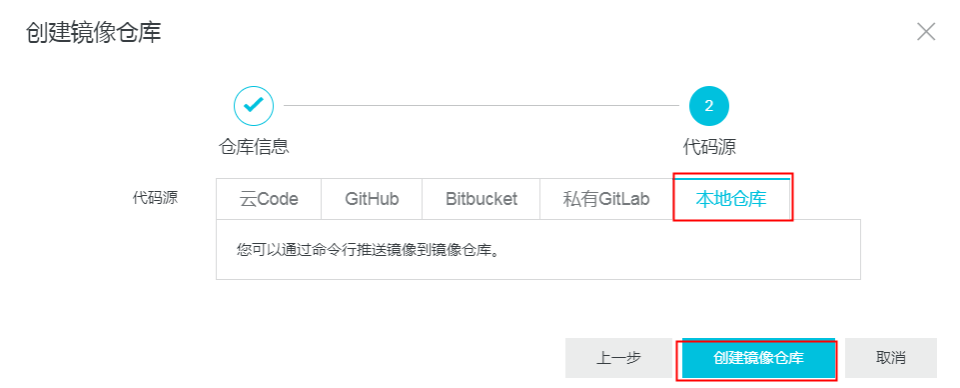
下一步,选择本地仓库,不建议其他选项,完成创建。
点击管理,可查看详情。

详情页如下,有基本的操作命令,仓库地址一般使用公网地址即可。
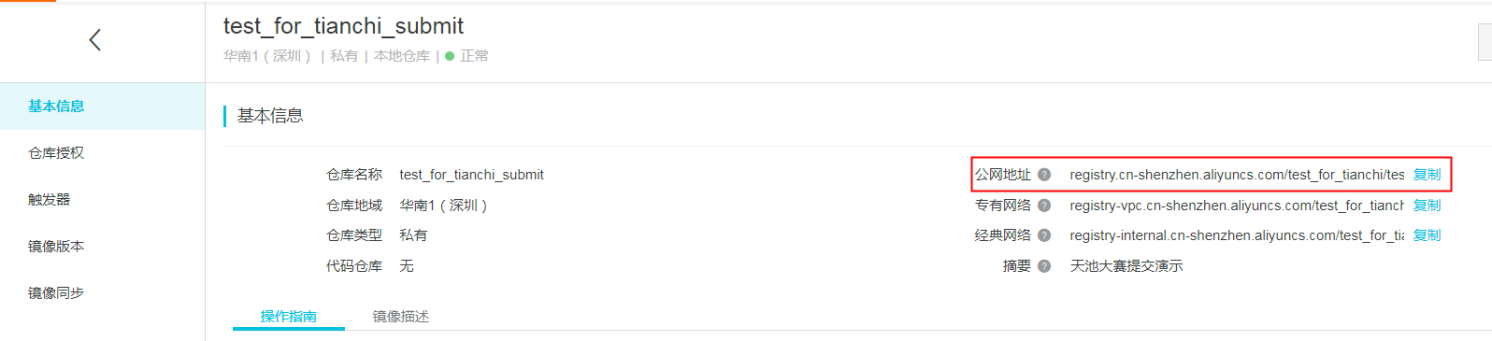
按照页面的指令在本地完成登陆:
export DOCKER_REGISTRY= your_registry_url
(注意这里your_registry_url最后字段结尾,不能多不能少E.g registry.cn-shanghai.aliyuncs.com/xxxx/xxxx)
docker login $DOCKER_REGISTRY \
    --username your_username \
    --password your_password
课时9: 实践docker 练习赛(天池)
2.1 练习赛链接&资料
gpu版本练习赛链接 【推荐】
2.2 GPU版docker练习赛实践
这里以GPU版docker 练习赛中的练习一为例来构建镜像并提交: 首先我们写一个main.py,实现读取/tcdata下的数据,计算a*b 生成result.npy文件
#main.py
import os
import numpy as np
import torch

device = torch.device("cuda")

data_dir = '/tcdata'
a = np.load(os.path(data_dir,a.npy))
b = np.load(os.path(data_dir,b.npy))

a = torch.from_numpy(a).to(device)
b = torch.from_numpy(b).to(device)
c = torch.matmul(a,b).cpu()

print(c)
np.save("result.npy", c)
编写入口文件run.sh
#bin/bash
#打印GPU信息
nvidia-smi
#执行math.py
python3 math.py
然后编写Dockerfile 用于打包main.py和运行环境为镜像
# Base Images
## 从天池基础镜像构建(from的base img 根据自己的需要更换,建议使用天池open list镜像链接:https://tianchi.aliyun.com/forum/postDetail?postId=67720)
FROM registry.cn-shanghai.aliyuncs.com/tcc-public/pytorch:1.1.0-cuda10.0-py3
##安装python依赖包
RUN pip install numpy -i https://pypi.tuna.tsinghua.edu.cn/simple
## 把当前文件夹里的文件构建到镜像的根目录下,并设置为默认工作目录
ADD . /
WORKDIR /
## 镜像启动后统一执行 sh run.sh
CMD ["sh", "run.sh"]
命令行执行,构建镜像: tips: 镜像命名根据自己申请的仓库registry来,可以省去tag步骤直接上传,保持本地镜像清洁。
$ docker build -t registry.cn-shanghai.aliyuncs.com/xxxx/test:0.1 .
上传镜像仓库
$ docker push registry.cn-shanghai.aliyuncs.com/xxxx/test:0.1
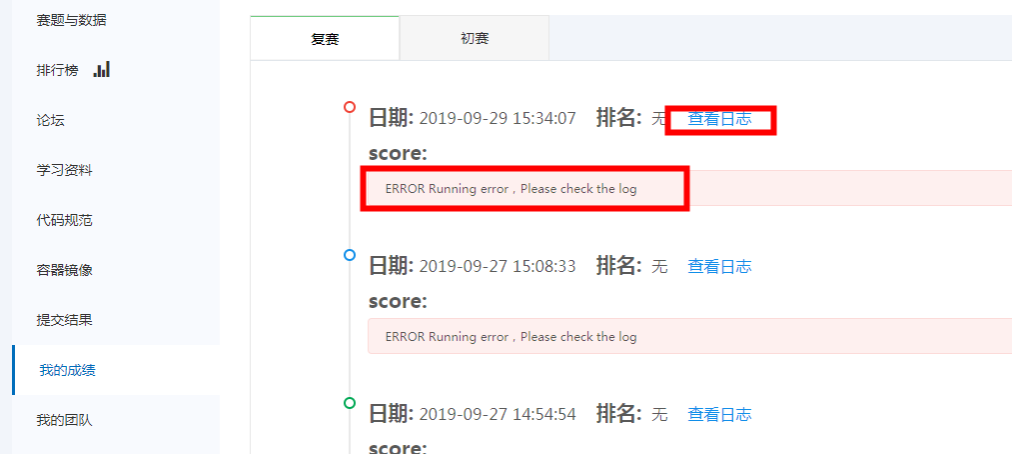
天池页面提交
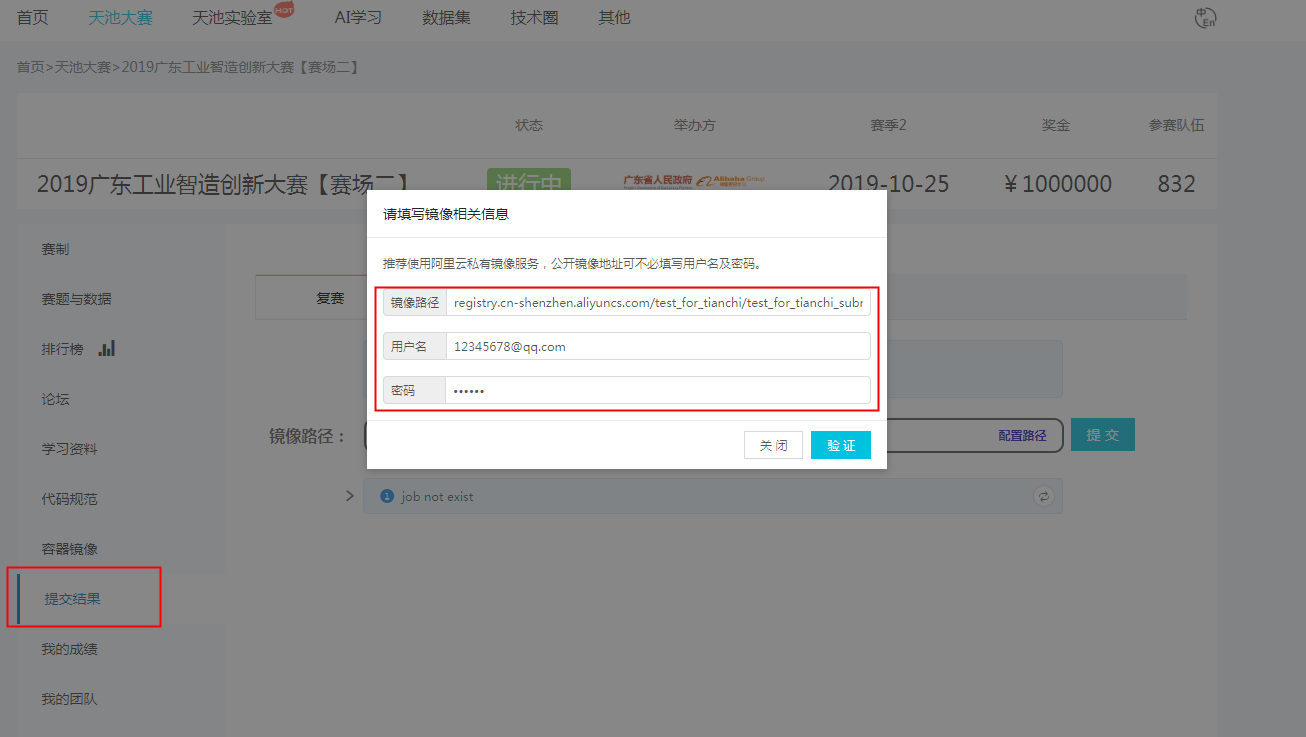
正在运行的状态running,其他状态对应展开也可以看到详情,如错误状态展开可看到大致reason.
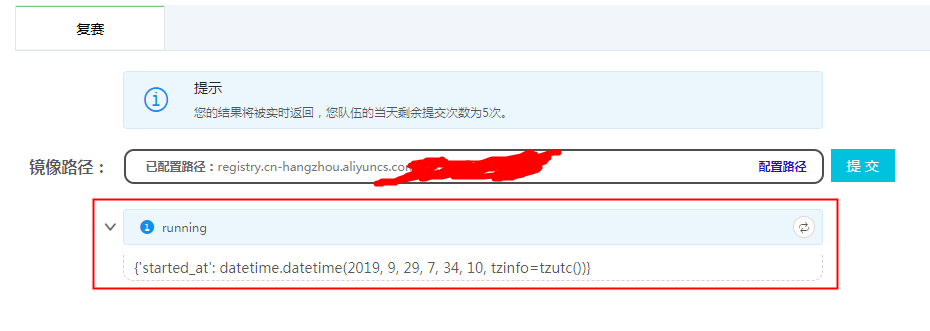
运行结束或者运行失败都会有邮件通知到提交人留在天池的邮箱里,收到提示即可回到大赛页面查看成绩及日志
3.docker 在本地使用gpu
docker在新的版本中均已支持直接调用gpu,通过–gpu 指定使用哪个gpu, --gpu all 则是使用所有gpu 前提:请确保已按照前文环境篇linux末尾安装了Nvidia对docker的软件支持。
docker run --gpu all registry.cn-shanghai.aliyuncs.com/xxxx/test:0.1
调试:
docker run -it --gpu all registry.cn-shanghai.aliyuncs.com/xxxx/test:0.1 /bin/bash
#  nvidia-smi
Thu Jan  7 19:04:55 2021
+-----------------------------------------------------------------------------+
| NVIDIA-SMI 418.87.01    Driver Version: 418.87.01    CUDA Version: 10.1     |
|-------------------------------+----------------------+----------------------+
| GPU  Name        Persistence-M| Bus-Id        Disp.A | Volatile Uncorr. ECC |
| Fan  Temp  Perf  Pwr:Usage/Cap|         Memory-Usage | GPU-Util  Compute M. |
|===============================+======================+======================|
|   0  Tesla P100-PCIE...  On   | 00000000:00:08.0 Off |                    0 |
| N/A   29C    P0    24W / 250W |      0MiB / 16280MiB |      0%      Default |
+-------------------------------+----------------------+----------------------+
|   1  Tesla P100-PCIE...  On   | 00000000:00:09.0 Off |                    0 |
| N/A   31C    P0    26W / 250W |      0MiB / 16280MiB |      0%      Default |
+-------------------------------+----------------------+----------------------+

+-----------------------------------------------------------------------------+
| Processes:                                                       GPU Memory |
|  GPU       PID   Type   Process name                             Usage      |
|=============================================================================|
|  No running processes found                                                 |
+-----------------------------------------------------------------------------+


 252
252

 被折叠的 条评论
为什么被折叠?
被折叠的 条评论
为什么被折叠?
 到【灌水乐园】发言


