


简介
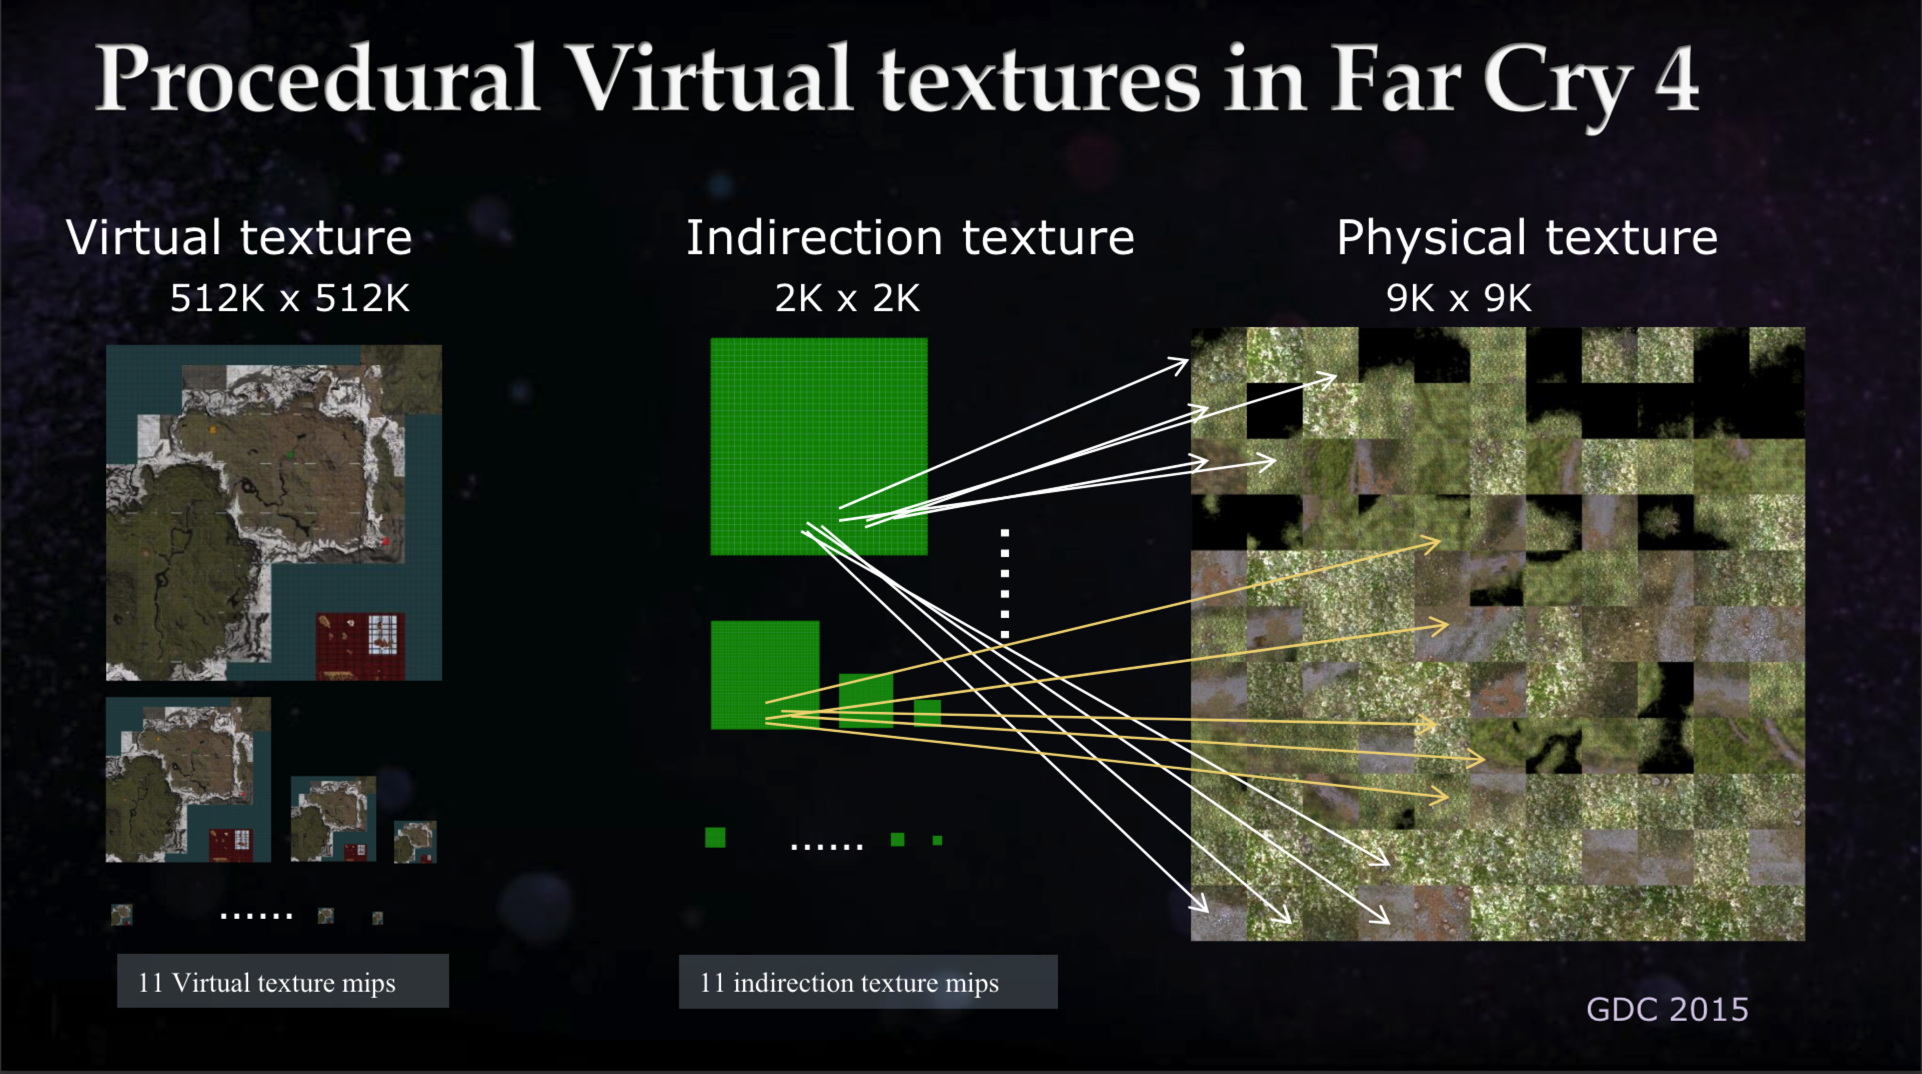
Terrain Runtime Virual Texture 简称RVT
一种空间换时间的技术
正常地形需要做混合,Unity支持12层纹理混合,3个Control纹理
假如只有Diffuse和Normal,12*2+3需要27次纹理采样,如果是PBR还需要增加12*3+3
如果我们用RVT,我们会先把地形烘培到一组纹理数组里面
运行的时候,只需要一次Diffuse和Normal,一次IndirectMap,一共3次纹理采样
先来看下效果,帧率大概可以提升80左右,CPU也从2.4ms点击到2.0ms

Frame Debugger查看下,
因为我用的MBP m1(没有WIN系统),不支持Geometry Shader,为了和Unity效果做比较,我把2边的法线去掉了

准备数据
								TerrainBlenderInfo terrainBlenderInfo = new TerrainBlenderInfo();
                var controlNum = terrainData.alphamapTextureCount;
                var splatNum = terrainData.alphamapLayers;
                terrainBlenderInfo.controls = new Texture[controlNum];
                terrainBlenderInfo.controls_st = new Vector4[controlNum];
                terrainBlenderInfo.splats = new Texture[splatNum];
                terrainBlenderInfo.normals = new Texture[splatNum];
                terrainBlenderInfo.splats_st = new Vector4[splatNum];
                terrainBlenderInfo.smoothness = new float[splatNum];
                terrainBlenderInfo.metallic = new float[splatNum];
                terrainBlenderInfo.rect = new Rect(offsetX, offsetY, heightSize, heightSize);
                for (int i = 0; i < controlNum; i++)
                {
                    terrainBlenderInfo.controls[i] = terrainData.alphamapTextures[i];
                    terrainBlenderInfo.controls_st[i] = new Vector4(1f / terrainData.alphamapWidth,
                        1f / terrainData.alphamapWidth, terrainData.alphamapWidth, terrainData.alphamapWidth);
                }

                var terrainSize = terrainData.size;
                for (int i = 0; i < splatNum; i++)
                {
                    var terrainLayer = terrainData.terrainLayers[i];
                    terrainBlenderInfo.splats[i] = terrainLayer.diffuseTexture;
                    terrainBlenderInfo.normals[i] = terrainLayer.normalMapTexture;
                    terrainBlenderInfo.smoothness[i] = terrainLayer.smoothness;
                    terrainBlenderInfo.metallic[i] = terrainLayer.metallic;
                    var tileSize = terrainLayer.tileSize;
                    var tileOffset = terrainLayer.tileOffset;
                    Vector4 splatSt = new Vector4(terrainSize.x / tileSize.x, terrainSize.z / tileSize.y,
                        tileOffset.x / tileSize.x, tileOffset.y / tileSize.y);
                    terrainBlenderInfo.splats_st[i] = splatSt;
                }

                terrainBlenderInfos[k] = terrainBlenderInfo;
我们直接用Unity原始地形数据,储存在TerrainBlenderInfo
这里smoothness,metallic暂时没用到
public struct TerrainBlenderInfo
{
    public Rect rect;
    public Texture[] controls;
    public Texture[] splats;
    public Texture[] normals;
    public Vector4[] controls_st;
    public Vector4[] splats_st;
    public float[] smoothness;
    public float[] metallic;
}
TextureArray
		void InitializeTexture(int depth)
    {
        tempNullRt = new RenderTexture(1, 1, 0, RenderTextureFormat.ARGBHalf);
        tempNullRt.useMipMap = false;
        albedoMap = TerrainConfig.CreateRenderTextureArray(_RTSize.x, depth, true,
            RenderTextureFormat.ARGB32, TextureWrapMode.Clamp, FilterMode.Bilinear);
        normalMap = TerrainConfig.CreateRenderTextureArray(_RTSize.x, depth, true,
            RenderTextureFormat.ARGBHalf, TextureWrapMode.Clamp, FilterMode.Bilinear);
        indirectMap = TerrainConfig.CreateRenderTextureArray(IndirectSize, MipLevelMax + 1, false,
            RenderTextureFormat.ARGBFloat, TextureWrapMode.Repeat, FilterMode.Point);
        _taskList = new Queue<Chunk>(depth);
        _curRTIdList = new LinkedList<LinkedTile>();
        for (int i = 0; i < depth; i++)
        {
            _curRTIdList.AddLast(new LinkedTile(i + 1));
        }
    }
这里直接用了一个很大的depth,各个MipLevel共用同一个TextureArray,并且给每个纹理分配一个phyId
这个phyId会储存在indirectMap中,绘制地形的时候,会根据不同MipLevel采样相同级别的indirectMap
phyId会一直重复使用,卸载目前没用到的,加载当前需要用到的
算法很简单,如果相机位置改变,会把所有的sector分析下,看当前需要用到哪些MipLevel
把当前还在用的放在_curRTIdList的末尾
这样没被用到的就在前面,就会被卸载,重新用
(如果相机移动快会导致bug,因为我们一帧渲染最多8张,)
        Vector2Int cameraXZ = SectorToXZ(cameraSector);
        if (cameraSector != lastSector)
        {
            cmd.SetGlobalVector(TerrainConfig.SID_CurrentSectorXY, new Vector2(cameraXZ.x, cameraXZ.y));
            for (int i = 0; i < sectorCount; i++)
            {
                Vector2Int distance = GetVectorIntDistance(cameraXZ, i);
                int tempMipLevel = CalculateMipLevel(distance);
                DistributeTile(i, tempMipLevel);
            }
            lastSector = cameraSector;
        }

MipLevel
我们把地形分成一个个sector,整个地形2k x 2k
Mip0 1024x1024
Mip1 512x512
Mip2 256x256
Mip3 128x128
Mip4 64x64
Mip5 32x32
Mip6 16x16
Mip7 8x8
每个sector对应一个纹理贴图,sectorXZ表示坐标
然后根据Camera位置,算出当前需要渲染的sector
public const int MipInitial = 2;
public const int MipDifference = 2;
public const int MipLevelMax = 7;
int absMax = Mathf.Max(distanceCamera.x, distanceCamera.y);
tempMipLevel = (int)Mathf.Floor((-2.0f * MipInitial - MipDifference +
                                         Mathf.Sqrt(8.0f * MipDifference * absMax +
                                                    (2.0f * MipInitial - MipDifference) *
                                                    (2.0f * MipInitial - MipDifference)))
                                        / (2.0f * MipDifference)) + 1;
tempMipLevel = Mathf.Clamp(tempMipLevel, 0, MipLevelMax);
这个算法可以优化,可以只渲染出视野范围内的sector
俯视图

透视图

TerrainMix
现在我们知道了哪些级别sector需要渲染
这里我们用Compute Shdader去计算
首先准备数据
    private void SetTerrainSplatMap(CommandBuffer cmd, TerrainBlenderInfo terrainBlenderInfo)
    {
        for (int i = 0; i < 3; i++)
        {
            cmd.SetComputeTextureParam(_computeShader, 0, "_Control" + i,
                i < terrainBlenderInfo.controls.Length ? terrainBlenderInfo.controls[i] : tempNullRt);
            if (i < terrainBlenderInfo.controls.Length)
                cmd.SetComputeVectorParam(_computeShader, "_ST_Control" + i, terrainBlenderInfo.controls_st[i]);
        }

        for (int i = 0; i < 12; i++)
        {
            cmd.SetComputeTextureParam(_computeShader, 0, "_Splat" + i,
                i < terrainBlenderInfo.splats.Length ? terrainBlenderInfo.splats[i] : tempNullRt);
            if (i < terrainBlenderInfo.splats.Length)
                cmd.SetComputeVectorParam(_computeShader, "_ST_Splat" + i, terrainBlenderInfo.splats_st[i]);
        }

        for (int i = 0; i < 12; i++)
        {
            cmd.SetComputeTextureParam(_computeShader, 0, "_Normal" + i,
                i < terrainBlenderInfo.normals.Length ? terrainBlenderInfo.normals[i] : tempNullRt);
        }
    }
_ST_Splat是个Vector4,下图的数据

下面开始混合
_Node_ST.xy表示sector的缩放,zw就是偏移
(uv * (_ST_Control0.zw - 1.0f) + 0.5f) * _ST_Control0.xy和Unity一样的
[numthreads(8, 8, 1)]
void TerrainBlender(uint3 id : SV_DispatchThreadID)
{
    float2 uv = (id.xy + 0.5) / _TerrainTexSize;
    uv = uv * _Node_ST.xy + _Node_ST.zw;
    float4 splatControl0 = MY_SAMPLE_TEXTURE2D(_Control0, sampler_Control0,
                                               (uv * (_ST_Control0.zw - 1.0f) + 0.5f) * _ST_Control0.xy);
    float4 splatControl1 = MY_SAMPLE_TEXTURE2D(_Control1, sampler_Control1,
                                               (uv * (_ST_Control1.zw - 1.0f) + 0.5f) * _ST_Control1.xy);
    float4 splatControl2 = MY_SAMPLE_TEXTURE2D(_Control2, sampler_Control2,
                                               (uv * (_ST_Control2.zw - 1.0f) + 0.5f) * _ST_Control2.xy);

    float4 diffAlbedo0 = SAMPLE_SPLAT(0, uv);
    float4 diffAlbedo1 = SAMPLE_SPLAT(1, uv);
    float4 diffAlbedo2 = SAMPLE_SPLAT(2, uv);
    float4 diffAlbedo3 = SAMPLE_SPLAT(3, uv);
    float4 diffAlbedo4 = SAMPLE_SPLAT(4, uv);
    float4 diffAlbedo5 = SAMPLE_SPLAT(5, uv);
    float4 diffAlbedo6 = SAMPLE_SPLAT(6, uv);
    float4 diffAlbedo7 = SAMPLE_SPLAT(7, uv);
    float4 diffAlbedo8 = SAMPLE_SPLAT(8, uv);
    float4 diffAlbedo9 = SAMPLE_SPLAT(9, uv);
    float4 diffAlbedo10 = SAMPLE_SPLAT(10, uv);
    float4 diffAlbedo11 = SAMPLE_SPLAT(11, uv);

    half3 nrm0 = SAMPLE_NORMAL(0, uv);
    half3 nrm1 = SAMPLE_NORMAL(1, uv);
    half3 nrm2 = SAMPLE_NORMAL(2, uv);
    half3 nrm3 = SAMPLE_NORMAL(3, uv);
    half3 nrm4 = SAMPLE_NORMAL(4, uv);
    half3 nrm5 = SAMPLE_NORMAL(5, uv);
    half3 nrm6 = SAMPLE_NORMAL(6, uv);
    half3 nrm7 = SAMPLE_NORMAL(7, uv);
    half3 nrm8 = SAMPLE_NORMAL(8, uv);
    half3 nrm9 = SAMPLE_NORMAL(9, uv);
    half3 nrm10 = SAMPLE_NORMAL(10, uv);
    half3 nrm11 = SAMPLE_NORMAL(11, uv);

    const float weight = dot(splatControl0, 1) + dot(splatControl1, 1) + dot(splatControl2, 1);
    splatControl0 /= (dot(splatControl0, 1) + 6.103515625e-5);
    splatControl1 /= (dot(splatControl1, 1) + 6.103515625e-5);
    splatControl2 /= (dot(splatControl2, 1) + 6.103515625e-5);

    half3 mixedDiffuse =
        diffAlbedo0 * splatControl0.r
        + diffAlbedo1 * splatControl0.g
        + diffAlbedo2 * splatControl0.b
        + diffAlbedo3 * splatControl0.a
        + diffAlbedo4 * splatControl1.r
        + diffAlbedo5 * splatControl1.g
        + diffAlbedo6 * splatControl1.b
        + diffAlbedo7 * splatControl1.a
        + diffAlbedo8 * splatControl2.r
        + diffAlbedo9 * splatControl2.g
        + diffAlbedo10 * splatControl2.b
        + diffAlbedo11 * splatControl2.a;

    half3 mixedNormal = nrm0 * splatControl0.r
            + nrm1 * splatControl0.g
            + nrm2 * splatControl0.b
            + nrm3 * splatControl0.a
            + nrm4 * splatControl1.r
            + nrm5 * splatControl1.g
            + nrm6 * splatControl1.b
            + nrm7 * splatControl1.a
            + nrm8 * splatControl2.r
            + nrm9 * splatControl2.g
            + nrm10 * splatControl2.b
            + nrm11 * splatControl2.a
        ;
    #if HAS_HALF
    mixedNormal.z += half(0.01);
    #else
    mixedNormal.z += 1e-5f;
    #endif
    mixedNormal = normalize(mixedNormal);
    mixedNormal.z = weight;
    _MixedDiffuseTex[uint3(id.xy, _ZIndex)] = float4(mixedDiffuse.rgb, 1);
    _MixedNormalTex[uint3(id.xy, _ZIndex)] = float4(mixedNormal, 1);
}

现在我们把所需要的sector渲染出来,放在的TextureArray中
IndirectMap
我们把地形烘培出来了,我们怎么知道那块sector用哪个纹理呢
首先我们设定IndirectMap大小为64
我们把sectorXZ映射到这个范围内
indirectTasks[currIndirectTaskNum++] = new int4(chunkXZ.x, chunkXZ.y, mipLevel, phyTile.Value.Value);
然后把这个数据传入Compute Shader
[numthreads(1, 1, 1)]
void TerrainIndirectMipMap(uint3 id : SV_DispatchThreadID)
{
    uint4 data = _IndirectList[id.x];
    int mipLevel = data.z;
    int mipLevelSize = _MipLevelList[mipLevel].x;
    _IndirectMap[uint3(data.xy % _IndirectSize, mipLevel)] = float4(data.x / (float)mipLevelSize,
                                                                    data.y / (float)mipLevelSize,
                                                                    data.w, 1);
}
xy表示世界uv,稍后我们会用来算出实际uv
z就是我们的纹理id
w稍后再说

我们的地形是根据队列创建的,如果这时候我们当前MipLevel还没有创建
我们想用上一级的贴图,并且不想在渲染TerrainLit中添加判断,或者增加纹理采样数量怎么办?
我们直接写在IndirectMap
[numthreads(8, 8, 1)]
void TerrainCheckIndirectMipMap(uint3 id : SV_DispatchThreadID)
{
    uint2 src_uv = id.xy;
    int mipLevel = MipLevelMax - id.z - 1;
    int2 mipLevelSize = _MipLevelList[mipLevel];
    uint2 target_uv;
    if (mipLevelSize.x > _IndirectSize)
    {
        int2 pos = src_uv - (_IndirectSize >> 1) + (_CurrentSectorXY >> mipLevel);
        if (pos.x < 0 || pos.y < 0)
            return;
        src_uv = pos % _IndirectSize;
        target_uv = (pos >> 1) % _IndirectSize;
    }
    else
    {
        target_uv = src_uv >> 1;
    }
    float4 info = _IndirectMap[uint3(src_uv, mipLevel)];
    // w=1表示固定值
    if (info.w > 0)
        return;

    info = _IndirectMap[uint3(target_uv, mipLevel + 1)];
    if (info.w > 0 && info.z > 0)
        _IndirectMap[uint3(src_uv, mipLevel)] = float4(info.xy, info.z, 0);
}
下面看下效果,可以看到范围变大了
w=1表示固定值,就是真实数据,0就表示复制的上一次的MipLevel

TerrainLit
地形渲染,顶点着色器没什么好说的,跟我们上次用的一样
如果uv这里我们改成o.uv.xy = worldPos.xz / float2(_TerrainSize, _TerrainSize);
v2f vert(appdata v, uint instanceID : SV_InstanceID)
            {
                v2f o;
                RenderPatch patch = _BlockPatchList[instanceID];
                const NodeInfoStruct blockInfo = _NodeStructs[patch._wpos.z];
                #if _FIX_LOD_SEAM
                FixLODConnectSeam(v.positionOS, patch);
                #endif

                #if _DEBUG_PATCH
                float3 worldPos = v.positionOS * 0.98 * float3(blockInfo.VertexScale, 1, blockInfo.VertexScale) + float3(patch._wpos.x, 0, patch._wpos.y);
                #else
                float3 worldPos = v.positionOS * float3(blockInfo.VertexScale, 1, blockInfo.VertexScale) + float3(
                    patch._wpos.x, 0, patch._wpos.y);
                #endif

                worldPos.y = _HeightMapRT.Load(float3(worldPos.xz, 0)).y * _Max_Height;
                o.uv.xy = worldPos.xz / float2(_TerrainSize, _TerrainSize);
                o.uv.zw = o.uv * unity_LightmapST.xy + unity_LightmapST.zw;
                o.positionWS = worldPos;
                o.clipPos = TransformWorldToHClip(worldPos);
                half3 viewDirWS = GetWorldSpaceNormalizeViewDir(worldPos);
                float4 vertexTangent = float4(cross(float3(0, 0, 1), v.normalOS), 1.0);
                VertexNormalInputs normalInput = GetVertexNormalInputs(v.normalOS, vertexTangent);
                o.vertexSH = SampleSH(v.normalOS);
                o.normal = half4(normalInput.normalWS, viewDirWS.x);
                o.tangent = half4(normalInput.tangentWS, viewDirWS.y);
                o.bitangent = half4(normalInput.bitangentWS, viewDirWS.z);
                o.fogFactor = ComputeFogFactor(o.clipPos.z);
                #if _DEBUG_LOD
                o.color = _debugColor[patch._wpos.z];
                #endif
                #if _DEBUG_MIP
                o.color = GetMipColor(patch._wpos.w);
                #endif
                return o;
            }
片段着色器
MipLevel的算法跟我们C#写的一样
这里我把法线直接写成了float3(0, 1, 0),想看有法线的效果,只要你们GPU支持Geometry Shader自己改下咯
half4 frag2(v2f i) : SV_Target
{
    InputData inputData = (InputData)0;
    half3 nrm = 0;
    real3 albedo = 0;
    // real3 albedo = SAMPLE_TEXTURE2D_ARRAY(_MainTex, samplerLinearClamp, i.uv.xy, i.rtIndex);
    // half3 nrm = UnpackNormal(
    //     SAMPLE_TEXTURE2D_ARRAY(_NormapTex, samplerNormalLinearClamp, i.uv.xy, i.rtIndex));
    uint absMax = max(abs((int)_CurrentSectorXY.x - (int)(i.uv.x * _SectorCountX)),
                       abs((int)_CurrentSectorXY.y - (int)(i.uv.y * _SectorCountY)));
    int mipLevelSign = (int)floor((-2.0f * _MipInitial - _MipDifference +
            sqrt(8.0f * _MipDifference * absMax +
                (2.0f * _MipInitial - _MipDifference) *
                (2.0f * _MipInitial - _MipDifference)))
        / (2.0f * _MipDifference)) + 1;
    uint mipLevel = clamp(mipLevelSign, 0, _MipLevelMax);
    albedo = samplePageMipLevelTable(i.uv.xy, mipLevel);

    half3 normalTS = normalize(nrm.xyz);
    half3 viewDirWS = half3(i.normal.w, i.tangent.w, i.bitangent.w);
    inputData.tangentToWorld = half3x3(-i.tangent.xyz, i.bitangent.xyz, i.normal.xyz);
    // inputData.normalWS = TransformTangentToWorld(normalTS, inputData.tangentToWorld);
    // inputData.normalWS = NormalizeNormalPerPixel(inputData.normalWS);
    inputData.normalWS = float3(0, 1, 0);
    inputData.viewDirectionWS = viewDirWS;
    inputData.fogCoord = InitializeInputDataFog(float4(i.positionWS, 1.0), i.fogFactor);
    inputData.normalizedScreenSpaceUV = GetNormalizedScreenSpaceUV(i.clipPos);
    // inputData.bakedGI = SAMPLE_GI(i.uv.wz, i.vertexSH, inputData.normalWS);
    inputData.positionWS = i.positionWS;
    inputData.positionCS = i.clipPos;

    half4 color = UniversalFragmentPBR(inputData, albedo, 0, 0, 0, 1, 0, 1);
    color.rgb *= color.a;
    color.rgb = MixFog(color.rgb, inputData.fogCoord);
    #if  _DEBUG_COLOR
    color.rgb = i.color;
    #endif
    return half4(color.rgb, 1.0);
}
采样IndirectMap
uv * mipLevelSize 算出真实sectorXZ
uint3(uv * mipLevelSize % _IndirectSize, mipLevel)映射到_IndirectSize
拿到phyId直接采样就完成了
这里Mips的lod我这里直接乘以的1 << 9,否则会发现效果不对
            int CalcLod(float2 uv)
            {
                float2 dx = ddx(uv);
                float2 dy = ddy(uv);
                float rho = max(sqrt(dot(dx, dx)), sqrt(dot(dy, dy)));
                float lambda = log2(rho);
                return max(int(lambda + 0.5), 0);
            }
不知道有哪位大佬看看为啥直接用uv算不出真实Mips
lod = clamp(lod, 0, 6)然后映射到0-6之间,为啥呢,无他效果好看些嘿嘿
            float4 samplePageMipLevelTable(float2 uv, uint mipLevel)
            {
                int mipLevelSize = _MipLevelList[mipLevel].x;
                float4 indirectTalble = _IndirectMap[uint3(uv * mipLevelSize % _IndirectSize, mipLevel)];
                int phyId = (int)(indirectTalble.z);
                if (indirectTalble.w == 0)
                {
                    mipLevel = mipLevel + 1;
                    mipLevelSize = _MipLevelList[mipLevel].x;
                }
                float3 uvNew = float3(
                    (uv.x - indirectTalble.x) * mipLevelSize,
                    (uv.y - indirectTalble.y) * mipLevelSize,
                    phyId);
                int lod = CalcLod(uvNew.xy * (1 << 9));
                lod = clamp(lod, 0, 6);
                float4 result = SAMPLE_TEXTURE2D_ARRAY_LOD(_MixedDiffuseTex, samplerLinearClamp, uvNew.xy, uvNew.z, lod);
                return result;
            }
后续优化
1.相机位置改变,遍历整个sector在我电脑上需要100多毫秒左右,这个后续用jobSystem来优化
2.MipLevel的计算不太好,它计算的相机四周,并且最后一级的范围太大,需要优化
3.TextureArray的GenerateMips会把所有的纹理数组全算一次,效率很低,不知道是否还有好的算法
4.如果地形大于2k,我们只想显示2k,需要做滑动窗口
5.后续还需加上Decal的处理
本人精力和能力有限,如果不足,欢迎指出交流讨论
项目源码
https://github.com/wujuju/UnityTerrain/tree/RVT
https://github.com/ACskyline/PVTUT


 386
386


 被折叠的 条评论
为什么被折叠?
被折叠的 条评论
为什么被折叠?
 到【灌水乐园】发言


