


1.源码思路
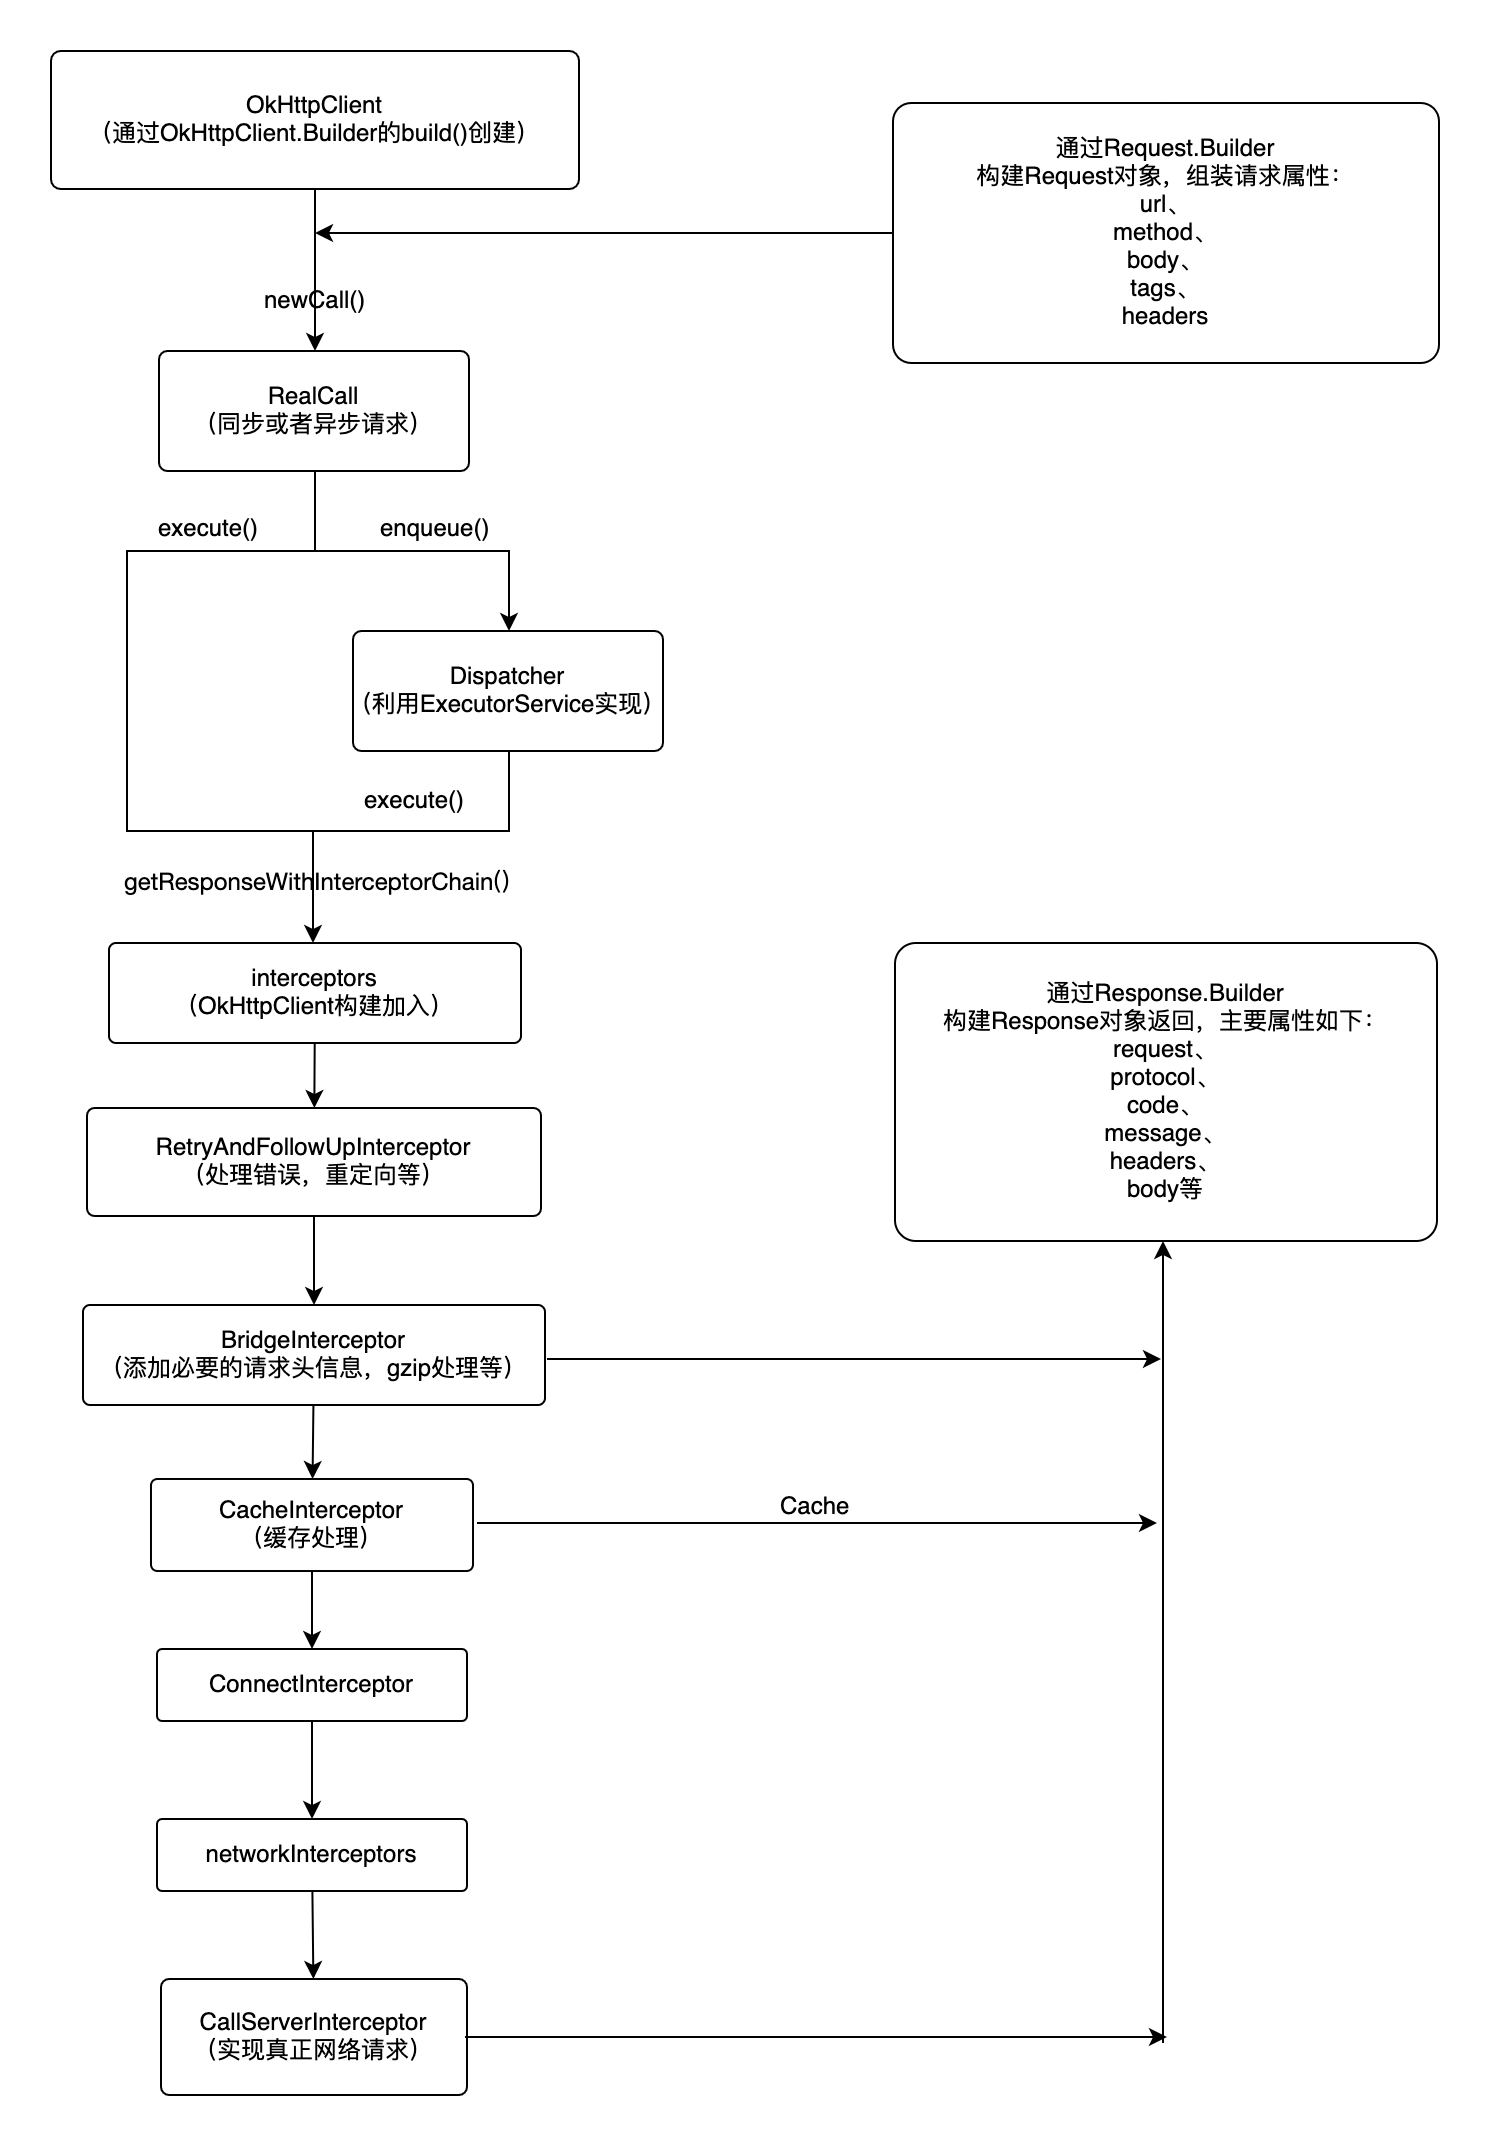
本文主要分析OkHttp3中的主干逻辑,不做详尽的解说。OkHttp3有以下几个核心类OkHttpClitent、Request、Response、RealCall、Interceptor、RealInterceptorChain。通过OkHttpClient.Builder类构建OkHttpClitent对象,OkHttpClitent对象中使用RealCall类和传入的Request对象进行同步或异步请求,请求发出前通过一系列拦截器Interceptor处理(重点),最后通过Response对象返回网络请求结果。
2.OkHttpClient
OkHttpClient是整个OkHttp框架的核心管理类,所有内部的逻辑都由OkHttpClient管理,通过Builder构造器创建,我们大概了解一下里面的属性。
public Builder() {
    // dispatch。负责分配处理异步任务
    this.dispatcher = new Dispatcher();
    // 支持的协议,默认支持http2和http1.1
    this.protocols = OkHttpClient.DEFAULT_PROTOCOLS;
    // 指定socket链接配置。默认:MODERN_TLS和CLEARTEXT
    this.connectionSpecs = OkHttpClient.DEFAULT_CONNECTION_SPECS;
    // 监听http请求过程中涉及的各种事件。包括:开始请求、dns解析开始/结束、链接开始等等。默认是的Listener
    this.eventListenerFactory = EventListener.factory(EventListener.NONE);
    // 设置代理
    this.proxySelector = ProxySelector.getDefault();
    // 设置cookie
    this.cookieJar = CookieJar.NO_COOKIES;
    // 设置创建Socket链接的Factory
    this.socketFactory = SocketFactory.getDefault();
    // 验证域名和证书的域名是否匹配
    this.hostnameVerifier = OkHostnameVerifier.INSTANCE;
    // 设置信任的证书,不信任之外的证书,默认是空的
    this.certificatePinner = CertificatePinner.DEFAULT;
    // 与身份认证有关。详见:https://square.github.io/okhttp/3.x/okhttp/okhttp3/Authenticator.html
    this.proxyAuthenticator = Authenticator.NONE;
    // 与身份认证有关。详见:https://square.github.io/okhttp/3.x/okhttp/okhttp3/Authenticator.html
    this.authenticator = Authenticator.NONE;
    // 连接池-缓存链接和清理空闲的连接
    this.connectionPool = new ConnectionPool();
    // 域名解析
    this.dns = Dns.SYSTEM;
    // 是否支持ssl重定向
    this.followSslRedirects = true;
    // 是否支持重定向
    this.followRedirects = true;
    // 失败后是否重试
    this.retryOnConnectionFailure = true;
    // 链接超时时间
    this.connectTimeout = 10000;
    // 读超时时间
    this.readTimeout = 10000;
    // 写超时时间
    this.writeTimeout = 10000;
    // ping的时间间隔。如果使用WebSocket请求设置pingInterval,以保活
    this.pingInterval = 0;
}
这些属性大概了解一下就行,我们继续往后分析
3.Request和Response
Request和Response对象都是通过Builder创建,Request是我们发送请求封装类,内部有url, header , method,body等常见的参数,Response是请求的结果,包含code, message, header,body ;这两个类的定义是完全符合Http协议所定义的请求内容和响应内容。下面是这两个类对应的属性,了解一下。
  Request(Builder builder) {
    this.url = builder.url;
    this.method = builder.method;
    this.headers = builder.headers.build();
    this.body = builder.body;
    this.tags = Util.immutableMap(builder.tags);
  }
Response(Builder builder) {
this.request = builder.request;
this.protocol = builder.protocol;
this.code = builder.code;
this.message = builder.message;
this.handshake = builder.handshake;
this.headers = builder.headers.build();
this.body = builder.body;
this.networkResponse = builder.networkResponse;
this.cacheResponse = builder.cacheResponse;
this.priorResponse = builder.priorResponse;
this.sentRequestAtMillis = builder.sentRequestAtMillis;
this.receivedResponseAtMillis = builder.receivedResponseAtMillis;
}4.RealCall
RealCall负责请求的调度(同步的话走当前线程发送请求,异步的话则使用OkHttp内部利用ExecutorService实现的线程池进行);同时负责构造内部逻辑责任链,并执行责任链相关的逻辑,直到获取结果。虽然OkHttpClient是整个OkHttp的核心管理类,但是真正发出请求并且组织逻辑的是RealCall类,它同时肩负了调度和责任链组织的两大重任,接下来我们来着重分析下RealCall类的逻辑(重点getResponseWithInterceptorChain()方法)
  @Override
  public Response execute() throws IOException {
    synchronized (this) {
      if (executed) throw new IllegalStateException("Already Executed");
      executed = true;
    }
    captureCallStackTrace();
    eventListener.callStart(this);
    try {
      client.dispatcher().executed(this);
      Response result = getResponseWithInterceptorChain();
      if (result == null) throw new IOException("Canceled");
      return result;
    } catch (IOException e) {
      eventListener.callFailed(this, e);
      throw e;
    } finally {
      client.dispatcher().finished(this);
    }
  }

  @Override
  public void enqueue(Callback responseCallback) {
    synchronized (this) {
      if (executed) throw new IllegalStateException("Already Executed");
      executed = true;
    }
    captureCallStackTrace();
    eventListener.callStart(this);
    // 此处实际上调用的也是execute()方法
    client.dispatcher().enqueue(new AsyncCall(responseCallback));
  }

  // 重点分析
  Response getResponseWithInterceptorChain() throws IOException {
    // Build a full stack of interceptors.
    List<Interceptor> interceptors = new ArrayList<>();
    interceptors.addAll(client.interceptors());
    interceptors.add(retryAndFollowUpInterceptor);
    interceptors.add(new BridgeInterceptor(client.cookieJar()));
    interceptors.add(new CacheInterceptor(client.internalCache()));
    interceptors.add(new ConnectInterceptor(client));
    if (!forWebSocket) {
      interceptors.addAll(client.networkInterceptors());
    }
    interceptors.add(new CallServerInterceptor(forWebSocket));

    Interceptor.Chain chain = new RealInterceptorChain(interceptors, null, null, null, 0,
        originalRequest, this, eventListener, client.connectTimeoutMillis(),
        client.readTimeoutMillis(), client.writeTimeoutMillis());

    return chain.proceed(originalRequest);
  }
RealCall类并不复杂,有两个最重要的方法,execute() 和 enqueue(),一个是处理同步请求,一个是处理异步请求。跟进enqueue的源码后发现,它只是通过异步线程和callback做了一个异步调用的封装,最终逻辑还是会调用到execute()这个方法,然后调用了getResponseWithInterceptorChain()获得请求结果。
看来是 getResponseWithInterceptorChain() 方法承载了整个请求的核心逻辑,那么只需要把这个方法分析清楚了,整个OkHttp的请求流程就大体搞明白了,从源码可以看到,即使是 getResponseWithInterceptorChain() 方法的逻辑其实也很简单,它生成了一个Interceptors拦截器的List列表,然后创建了一个叫RealInterceptorChain的类,最后的Response就是通过chain.proceed获取到的(重点chain.proceed方法)。
5.Interceptor
上面分析到拦截器,Interceptors拦截器List加入顺序依次是:
1.client.Interceptors ------ 应用拦截器,OkHttpClient.Builder构建时候添加的拦截器列表。不需要担心中间过程的响应,如重定向和重试;总是只调用一次,即使HTTP响应是从缓存中获取;观察应用程序的初衷. 不关心OkHttp注入的头信息如: If-None-Match;允许短路而不调用 Chain.proceed(),即中止调用;允许重试,使 Chain.proceed()调用多次。
2.RetryAndFollowUpInterceptor ------ 负责okhttp请求失败的恢复和重定向
3.BridgeInterceptor ------ 添加必要的请求头部信息,gzip处理等
4.CacheInterceptor ------ 负责缓存的逻辑
5.ConnectInterceptor ------ 连接服务,负责和服务器建立连接 这里才是真正的请求网络
6.client.networkInterceptors ------ 网络拦截器,OkHttpClient.Builder构建时候添加的拦截器列表。能够操作中间过程的响应,如重定向和重试;当网络短路而返回缓存响应时不被调用;只观察在网络上传输的数据;携带请求来访问连接。
7.CallServerInterceptor ------ 执行流操作(写出请求体、获得响应数据) 负责向服务器发送请求数据、从服务器读取响应数据 进行http请求报文的封装与请求报文的解析,CalllServerInterceptor是最后一个拦截器,前面的拦截器已经完成了socket连接和tls连接,那么这一步就是传输http的头部和body数据了。
6.RealInterceptorChain
通过前面的分析可知,RealCall将Interceptors一个一个添加到List之后 ,就构造生成了一个RealInterceptorChain对象,并调用chain.proceed获得响应结果。那么就来分析下chain.proceed这个方法到底干了啥。
  @Override
  public Response proceed(Request request) throws IOException {
    return proceed(request, streamAllocation, httpCodec, connection);
  }

  public Response proceed(Request request, StreamAllocation streamAllocation, HttpCodec httpCodec,
      RealConnection connection) throws IOException {
    if (index >= interceptors.size()) throw new AssertionError();

    calls++;

    // If we already have a stream, confirm that the incoming request will use it.
    if (this.httpCodec != null && !this.connection.supportsUrl(request.url())) {
      throw new IllegalStateException("network interceptor " + interceptors.get(index - 1)
          + " must retain the same host and port");
    }

    // If we already have a stream, confirm that this is the only call to chain.proceed().
    if (this.httpCodec != null && calls > 1) {
      throw new IllegalStateException("network interceptor " + interceptors.get(index - 1)
          + " must call proceed() exactly once");
    }

    // Call the next interceptor in the chain.
    RealInterceptorChain next = new RealInterceptorChain(interceptors, streamAllocation, httpCodec,
        connection, index + 1, request, call, eventListener, connectTimeout, readTimeout,
        writeTimeout);
    Interceptor interceptor = interceptors.get(index);
    Response response = interceptor.intercept(next);

    // Confirm that the next interceptor made its required call to chain.proceed().
    if (httpCodec != null && index + 1 < interceptors.size() && next.calls != 1) {
      throw new IllegalStateException("network interceptor " + interceptor
          + " must call proceed() exactly once");
    }

    // Confirm that the intercepted response isn't null.
    if (response == null) {
      throw new NullPointerException("interceptor " + interceptor + " returned null");
    }

    if (response.body() == null) {
      throw new IllegalStateException(
          "interceptor " + interceptor + " returned a response with no body");
    }

    return response;
  }
通过进一步分析RealInterceptorChain和Interceptors,我们得到了一个结论,OkHttp将整个请求的复杂逻辑切成了一个一个的独立模块并命名为拦截器(Interceptor),通过责任链的设计模式串联到了一起,最终完成请求获取响应结果。
7.流程图


 6万+
6万+


 被折叠的 条评论
为什么被折叠?
被折叠的 条评论
为什么被折叠?
 到【灌水乐园】发言


