


目录
背景
目前,后端java项目的开发,很多都是用SpringBoot框架进行快速开发,SpringBoot也提供了一系列的Starter来简化配置。以前在开发时,我们会开发很多jar包来封装一些和三方组件或者应用的一些功能,以便进行复用。但是当使用springboot时,我们会发现去自定义spring-boot-starter是一种更有趣更便利的方式,并且在这个过程中能更深入的理解springboot的思想,何乐而不为呢。那我们就一起尝试开发一个自己的spring-boot-starter吧。
探秘官网
外国人的文档结构和脑回路不太适合国人,官网探秘方式可以参照我的另一篇帖子官方spring-boot-starter查阅方式。
一、starter
Starters are a set of convenient dependency descriptors that you can include in your application. You get a one-stop shop for all the Spring and related technologies that you need without having to hunt through sample code and copy-paste loads of dependency descriptors. For example, if you want to get started using Spring and JPA for database access, include the spring-boot-starter-data-jpa dependency in your project.
引用一段官方的解释来描述一下starters,简单来说就是利用springboot的核心思想约定优于配置将与一些功能的集合封装在一个starter中做到开箱即用。
那么什么叫做约定优于配置?举个不太恰当的例子,狗哥时常会控制不住自己去买一些小玩意,总有被老婆发现的一天,当发现的时候,老婆一生气就说:‘你看着办吧’,狗哥只能无奈的拿着搓衣板去跪厕所了😳。言归正传,其实约定优于配置其用意是减少配置,避免程序员去解决因为手抖产生的无效bug,力求简化配置,如果没有配置则去按照默认配置去处理。那大家是不是就明白狗哥为啥不直接去打游戏了😏😏,要是真去打了游戏,那就是没有遵守规则,估计晚饭都没得吃了…
二、自定义starter的注意事项
我们接着来看官网对于自定义starter有什么要求。
1.Naming
All official starters follow a similar naming pattern; spring-boot-starter-*, where * is a particular type of application. This naming structure is intended to help when you need to find a starter. The Maven integration in many IDEs lets you search dependencies by name. For example, with the appropriate Eclipse or Spring Tools plugin installed, you can press ctrl-space in the POM editor and type “spring-boot-starter” for a complete list.
As explained in the “Creating Your Own Starter” section, third party starters should not start with spring-boot, as it is reserved for official Spring Boot artifacts. Rather, a third-party starter typically starts with the name of the project. For example, a third-party starter project called thirdpartyproject would typically be named thirdpartyproject-spring-boot-starter.
简要来说:
- 官方定义的starter命名是spring-boot-starter-*。
- 自定义starter命名约定是*-spring-boot-starter。
2.Configuration keys
If your starter provides configuration keys, use a unique namespace for them. In particular, do not include your keys in the namespaces that Spring Boot uses (such as server, management, spring, and so on). If you use the same namespace, we may modify these namespaces in the future in ways that break your modules. As a rule of thumb, prefix all your keys with a namespace that you own (for example acme).
简要来说:
- 在配置文件配置的关键字一定要唯一,不要和其他springboot已经使用的配置重复。
3.The “autoconfigure” Module
The autoconfigure module contains everything that is necessary to get started with the library. It may also contain configuration key definitions (such as @ConfigurationProperties) and any callback interface that can be used to further customize how the components are initialized.
<dependency>
    <groupId>org.springframework.boot</groupId>
    <artifactId>spring-boot-autoconfigure-processor</artifactId>
    <optional>true</optional>
</dependency>
简要来说:
- 这个模块必须依赖,无脑依赖,everything that is necessary
- 包含很多必要的回调接口、注解、帮助 components 初始化,字少事大,先引入为妙,后面再学习源码。
4.Starter Module
Do not make assumptions about the project in which your starter is added. If the library you are auto-configuring typically requires other starters, mention them as well. Providing a proper set of default dependencies may be hard if the number of optional dependencies is high, as you should avoid including dependencies that are unnecessary for a typical usage of the library. In other words, you should not include optional dependencies.
同时,我们看到官网还有个note
Either way, your starter must reference the core Spring Boot starter (spring-boot-starter) directly or indirectly (there is no need to add it if your starter relies on another starter). If a project is created with only your custom starter, Spring Boot’s core features will be honoured by the presence of the core starter.
简要来说:
- 尽量避免引入不确定的依赖
- 需要间接或者直接的依赖spring-boot-starter
5.Creating Your Own Auto-configuration
这里不得不提的还有Auto-configuration。同样参照一下官方文档。这里描述太多直接截图。

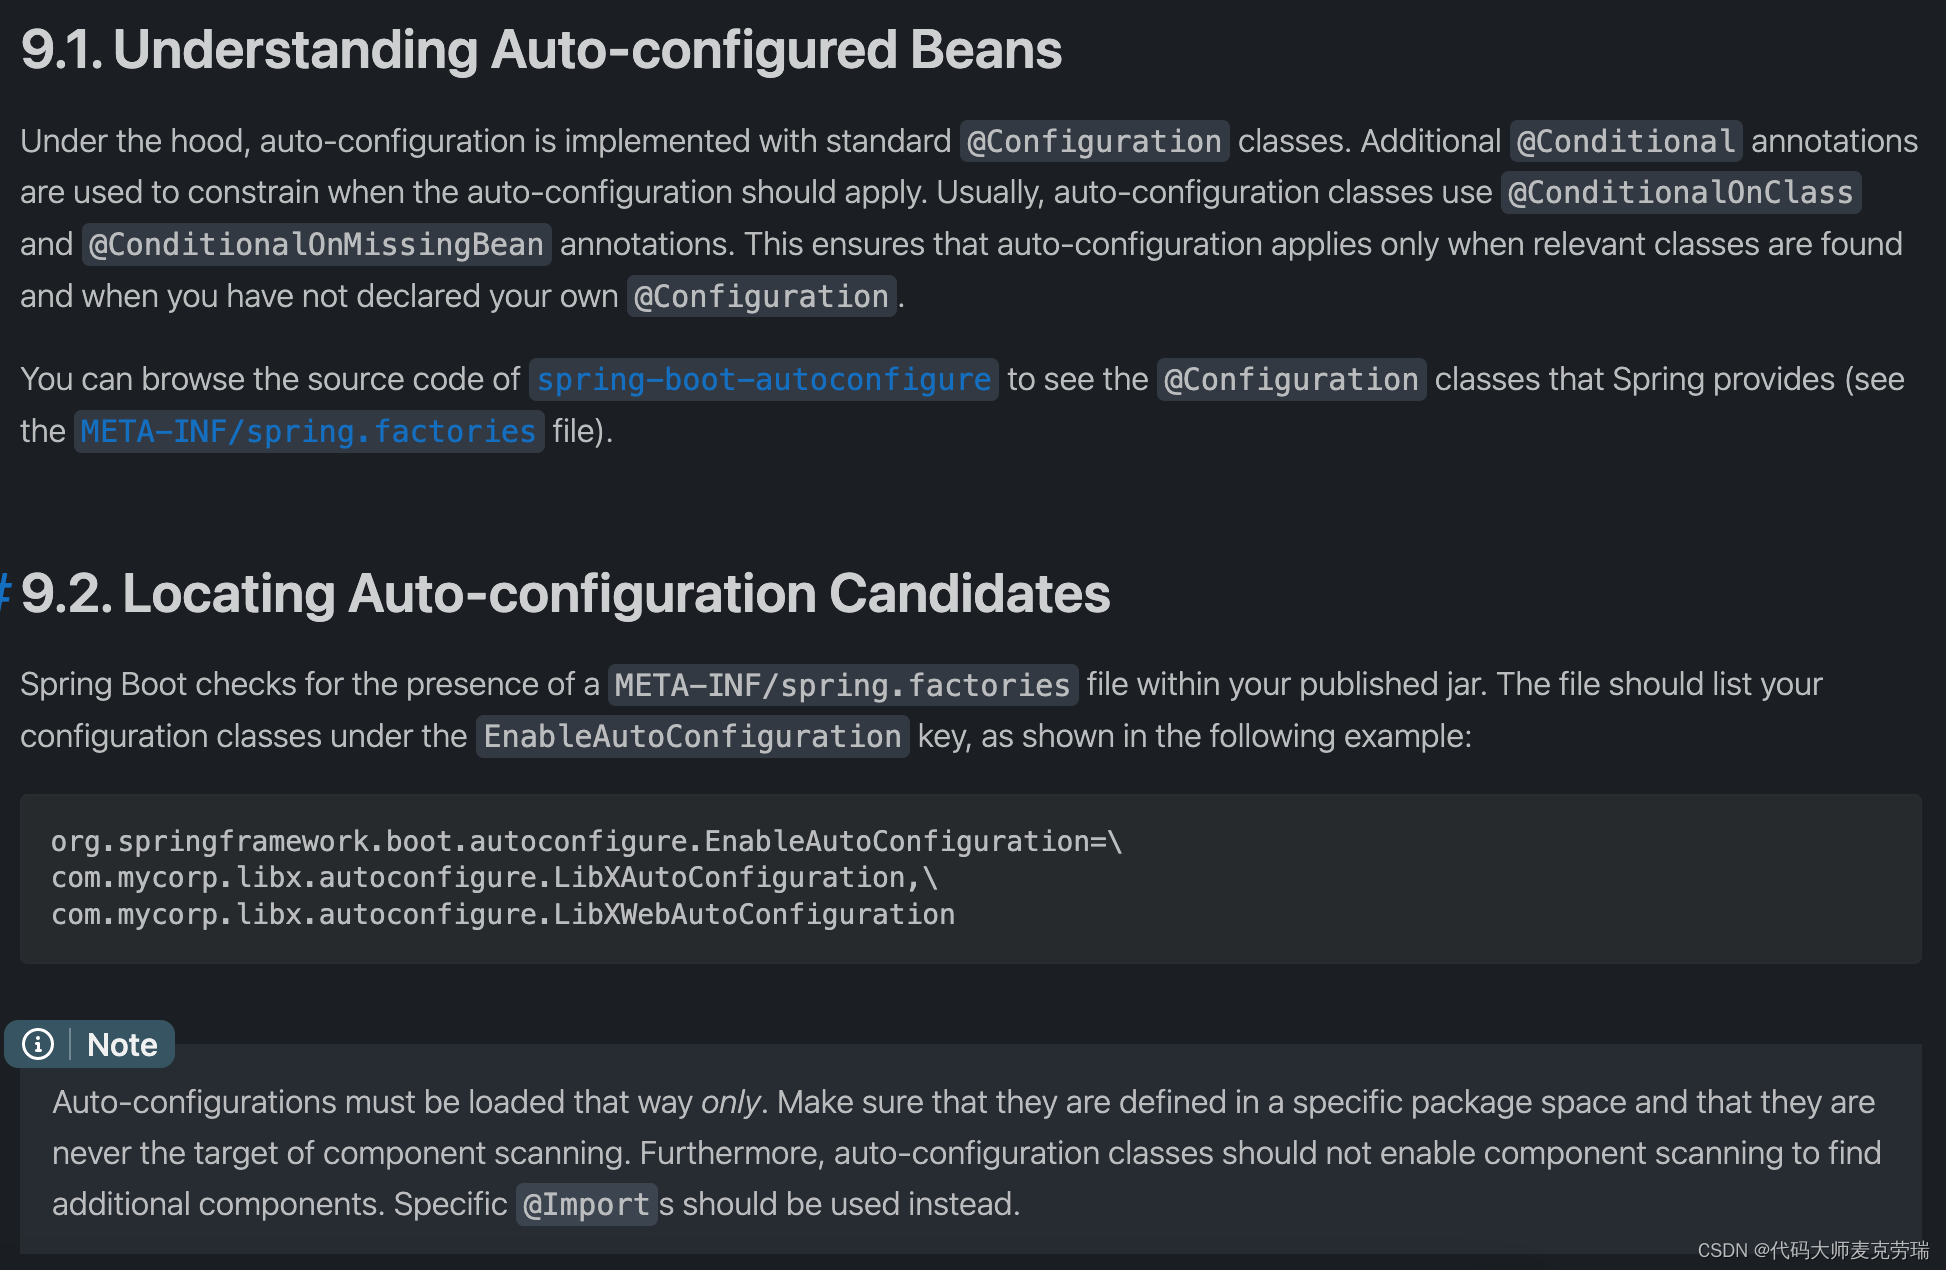
简要来说:
- AutoConfiguration可以帮助你的jar包中组件被外部依赖的spring容器所管理。
- 教你如何定位你的AutoConfiguration
6.Condition Annotations
这个东西同样也很重要。
You almost always want to include one or more @Conditional annotations on your auto-configuration class. The @ConditionalOnMissingBean annotation is one common example that is used to allow developers to override auto-configuration if they are not happy with your defaults.
简要来说:
- 条件注解提供了很多种不同的注解类型,可以帮助你来判定诸如一些默认配置、加载条件等,更好的帮助你构建你的starter。
- 这里不得不画重点,具体可以看下我的另一篇帖子Condition注解的妙用,里面基本对每种类型都做了解释和代码验证,先自吹一波,还是值得一看的。
三、开始定义自己的starter
铺垫了这么多,基本已经简述了spring-boot-starter自定义过程中使用到的注解、配置文件的注意事项、命名规范等等。开始动手,封装一个对象存储的starter,talk is cheap, show me the code!
1.创建maven工程
引入相关依赖
 <groupId>com.xjdx</groupId>
    <artifactId>xjdx-minio-spring-boot-starter</artifactId>
    <version>1.0</version>

    <properties>
        <maven.compiler.source>8</maven.compiler.source>
        <maven.compiler.target>8</maven.compiler.target>
    </properties>
    <dependencies>
        <dependency>
            <groupId>org.springframework.boot</groupId>
            <artifactId>spring-boot-configuration-processor</artifactId>
            <version>2.3.1.RELEASE</version>
            <optional>true</optional>
        </dependency>
        <dependency>
            <groupId>org.springframework.boot</groupId>
            <artifactId>spring-boot-autoconfigure</artifactId>
            <version>2.3.1.RELEASE</version>
            <optional>true</optional>
        </dependency>
        <dependency>
            <groupId>org.springframework.boot</groupId>
            <artifactId>spring-boot-starter-web</artifactId>
            <version>2.3.1.RELEASE</version>
            <optional>true</optional>
        </dependency>
        <dependency>
            <groupId>org.projectlombok</groupId>
            <artifactId>lombok</artifactId>
            <version>1.18.16</version>
            <optional>true</optional>
        </dependency>
        <dependency>
            <groupId>io.minio</groupId>
            <artifactId>minio</artifactId>
            <version>8.3.0</version>
        </dependency>
    </dependencies>
这里也做简要说明:
- spring-boot-configuration-processor 给配置生成元数据
- spring-boot-autoconfigure上文中提到过的AutoConfiguration
- spring-boot-starter-web 必要配置
- lombok 偷懒依赖
- minio 正主,这是对象存储的依赖包
2.定义配置类
package com.xjdx;

import lombok.Data;
import lombok.extern.slf4j.Slf4j;
import org.springframework.boot.context.properties.ConfigurationProperties;
import org.springframework.stereotype.Component;

/**
 * @ClassName MinioProperties
 * @Author scott
 * @Date 2022/4/20
 * @Version V1.0
 **/
@Slf4j
@Data
@Component
@ConfigurationProperties(prefix = "xjdx.minio")
public class MinioProperties {

    private String endpoint;
    private String access;
    private String secret;
    private String bucket;

}
使用过对象存储的朋友都知道,他的默认配置格如下
minio:
  access: ttttt
  endpoint: http://127.0.0.1:19000/
  secret: secret123
  bucket: buckettest
因此,我按照上文中的约定,使用了唯一配置的key标定配置文件前缀为xjdx.minio。
3.定义工具类
这里也就是要定义一个使用方使用的类,那么这个类我们需要交给依赖我们starter的工程去管理,我们这里需要提供初始化的方法,提供一个简单的API供他们去调用测试。这里需要注意的是,我们要将类交给spring的IOC去管理,那么就需要加上注解让spring去接纳它,这里我加上了@Component注解。
package com.xjdx;

import io.minio.MinioClient;
import io.minio.StatObjectArgs;
import io.minio.errors.ErrorResponseException;
import lombok.extern.slf4j.Slf4j;
import org.springframework.stereotype.Component;

/**
 * @ClassName MinioUtil
 * @Author scott
 * @Date 2022/4/20
 * @Version V1.0
 **/
@Slf4j
@Component
public class MinioUtil {


    private String endpoint;
    private String access;
    private String secret;
    private String bucket;
    private MinioClient minioClient;

    public MinioUtil(String endpoint, String access, String secret, String bucket) {
        this.endpoint = endpoint;
        this.access = access;
        this.secret = secret;
        this.bucket = bucket;
        this.init();
    }

    private void init() {
        this.minioClient = MinioClient.builder()
                .endpoint(this.endpoint)
                .credentials(this.access, this.secret)
                .build();
    }


    public boolean existsFolder(String path) {
        try {
            this.minioClient.statObject(StatObjectArgs.builder()
                    .bucket(this.bucket)
                    .object(path + "/")
                    .build());
        } catch (ErrorResponseException e) {
            if (e.response().code() == 404) {
                return false;
            } else {
                e.printStackTrace();
            }
        } catch (Exception ex) {
            ex.printStackTrace();
        }
        return true;
    }
}
4.定义自动装配类
package com.xjdx;

import org.springframework.boot.autoconfigure.condition.ConditionalOnProperty;
import org.springframework.boot.context.properties.EnableConfigurationProperties;
import org.springframework.context.annotation.Bean;

import javax.annotation.Resource;

/**
 * @ClassName MinioAutoConfiguration
 * @Author scott
 * @Date 2022/4/20
 * @Version V1.0
 **/
@EnableConfigurationProperties(value = MinioProperties.class)
public class MinioAutoConfiguration {

    @Resource
    private MinioProperties properties;

    @Bean
    @ConditionalOnProperty(prefix = "xjdx.minio",name="endpoint",matchIfMissing = false)
    public MinioUtil initMinioUtil(){
        MinioUtil util = new MinioUtil(properties.getEndpoint(), properties.getAccess(),
                properties.getSecret(),properties.getBucket());
        return util;
    }
}
这里也做简要说明:
- 这个类通过@EnableConfigurationProperties注解标记允许使用自动配置加载配置文件。
- 通过@ConditionalOnProperty条件判断是否将MinioUtil实例化并交给spring容器管理。一旦条件成立,我们的工具类就将拿到的配置进行加载,并且初始化后托管给spring,这时依赖我们starter的工程就可以通过依赖注入来使用我们的工具类实例😆😆😆
别高兴的太早了,还记得狗哥为什么去跪搓衣板么,我们还差关键的一步。我们还需要在resources目录下META-INF中创建spring.factories文件,利用SPI机制来完成和springboot的约定。
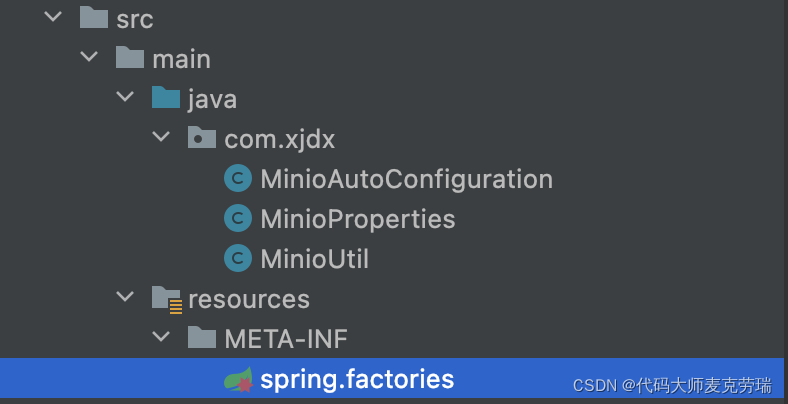
org.springframework.boot.autoconfigure.EnableAutoConfiguration=\
com.xjdx.MinioAutoConfiguration
通过键值对的方式来告诉spring需要将哪些项目外的bean交给spring容器去管理。到此我们自定义的starter就结束了。
5.测试
a.执行maven编译打包命令
mvn clean install -DskipTests
b.将jar包上传至本地maven仓库
mvn install:install-file -DgroupId=com.xjdx -DartifactId=xjdx-minio-spring-boot-starter -Dversion=1.0 -Dfile=./target/xjdx-minio-spring-boot-starter-1.0.jar -Dpackaging=jar
c.然后我们新建一个工程引入jar包。
 		<dependency>
            <groupId>com.xjdx</groupId>
            <artifactId>xjdx-minio-spring-boot-starter</artifactId>
            <version>1.0</version>
        </dependency>
d.增加配置文件
xjdx:
  minio:
    access: ttttt
    endpoint: http://127.0.0.1:19000/
    secret: secret123
    bucket: buckettest
e.编写代码进行测试
这里直接注入工具类调用方法
package com.test;

import com.xjdx.MinioUtil;
import org.springframework.boot.CommandLineRunner;
import org.springframework.boot.SpringApplication;
import org.springframework.boot.autoconfigure.SpringBootApplication;

import javax.annotation.Resource;


@SpringBootApplication
public class SpringBootBaseApplication implements CommandLineRunner {

    @Resource
    private MinioUtil util;

    public static void main(String[] args) {
        SpringApplication.run(SpringBootBaseApplication.class,args);
    }

    @Override
    public void run(String... args) throws Exception {
        boolean ttt = util.existsFolder("ttt");
        System.out.println(ttt);

    }
}

执行成功。至此,我们自定义的starter已经完成了全部的使命。
点赞收藏,富婆包养!!!谢谢各位


 2216
2216

 被折叠的 条评论
为什么被折叠?
被折叠的 条评论
为什么被折叠?
 到【灌水乐园】发言


