QLineEdit控件时PyQt编程中GUI界面设计举足轻重的控件之一,用于进行人机交互的文字显示和输入。
一、QLineEdit常用方法
1.设置回显模式setEchoMode(EchoMode)
通过设置回显模式实现不同不同的显示模式设置。
qlineedit.setEchoMode(EchoMode)回显模式类型由枚举类EchoMode设置,由四种样式:
枚举 | 值 | 说明 |
NoEcho | 1 | 不显示任何东西。这可能适用于连密码长度都应该保密的密码。 |
Normal | 0 | 显示输入的字符。这是默认值。 |
Password | 2 | 显示平台相关的密码掩码字符,而不是实际输入的字符。 |
PasswordEchoOnEdit | 3 | 在编辑时显示输入的字符,之后显示与密码相同的字符。 |
示例:
# _*_ coding:utf-8 _*_

import sys
from PyQt6.QtWidgets import QApplication
from PyQt6.QtWidgets import QMainWindow
from PyQt6.QtWidgets import QWidget
from PyQt6.QtWidgets import QLabel
from PyQt6.QtWidgets import QLineEdit
from PyQt6.QtWidgets import QFormLayout
from PyQt6.QtGui import QIcon
from PyQt6.QtCore import Qt


class QLineEditDemo(QMainWindow):
    """ QLineEdit控件使用示例 """

    def __init__(self) -> None:
        """ 构造函数 """
        super().__init__()

        self.init_ui()
        self.setcenter()

    def init_ui(self):
        """ 初始化ui """

        self.setWindowTitle("QLineEditDemo")
        self.resize(400,500)
        self.setMinimumHeight(300)
        self.setMinimumWidth(300)

        # 设置中央控件
        self.mainwidget = QWidget(self)
        self.setCentralWidget(self.mainwidget)

        # 设置布局
        self.flayout_main = QFormLayout(self)
        self.mainwidget.setLayout(self.flayout_main)

        # 常规显示
        self.ledit_normal = QLineEdit(self)
        self.ledit_normal.setEchoMode(QLineEdit.EchoMode.Normal)
        self.flayout_main.addRow("EchoMode.Normal", self.ledit_normal)

        # NoEcho
        self.ledit_noecho = QLineEdit(self)
        self.ledit_noecho.setEchoMode(QLineEdit.EchoMode.NoEcho)
        self.flayout_main.addRow("EchoMode.NoEcho", self.ledit_noecho)

        # Password
        self.ledit_password = QLineEdit(self)
        self.ledit_password.setEchoMode(QLineEdit.EchoMode.Password)
        self.ledit_password.setStyleSheet(
            'lineedit-password-character: 42')       # 设置输入隐藏密码用字符吗,ASCII码
        self.flayout_main.addRow("EchoMode.Password", self.ledit_password)

        # PasswordEchoOnEdit
        self.ledit_passwordechoonedit = QLineEdit(self)
        self.ledit_passwordechoonedit.setEchoMode(
            QLineEdit.EchoMode.PasswordEchoOnEdit)
        self.flayout_main.addRow(
            "EchoMode.PasswordEchoOnEdit", self.ledit_passwordechoonedit)


    def setcenter(self):
        """ 设置窗体居中 """

        main_rect = self.frameGeometry()      # 获取窗体矩形
        screen_rect = self.screen().availableGeometry().center()        # 获取屏幕中心点
        main_rect.moveCenter(screen_rect)       # 窗体矩形移动到屏幕中心点
        self.move(main_rect.topLeft())        # 移动窗体与窗体矩形重合


if __name__ == "__main__":
    """ 主程序运行 """

    app = QApplication(sys.argv)
    main_window = QLineEditDemo()
    main_window.show()
    sys.exit(app.exec())
结果:
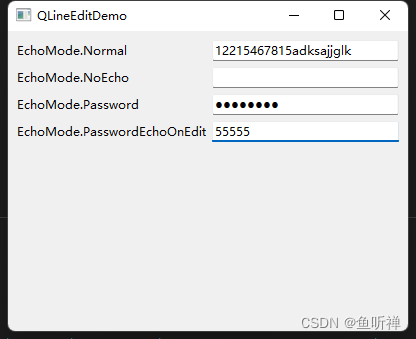
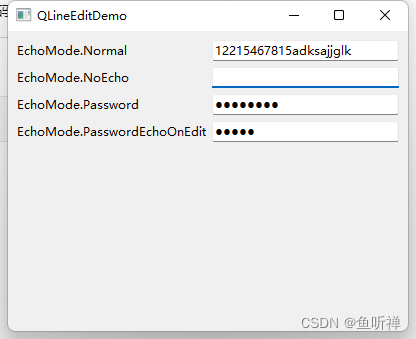
Normal模式:输入什么字符就显示什么字符
NoEcho模式:不显示任何字符
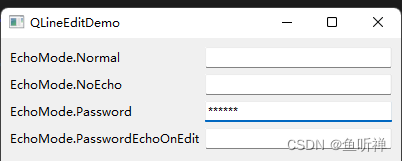
Password模式:显示掩码字符
PasswordEchoOnEdit模式:输入是显示字符串,输入完成后显示掩码
输入时:
输入完成后:
修改密码字符为“*”之后:
2.设置输入校验器setValidator(QValidator)
通过设置输入校验器可以限制输入的数据。
设置校验器之后,只有在输入数据验证通过后才会触发 returnPressed and editingFinished信号。
PyQt6.QtGui.QValidator有几个子类分别用于限制不同的数据类型:
QDoubleValidator:限制浮点型数据
QIntValidator:限制整型数据
QRegularExpressionValidator:使用正则表达式限制字符串
示例:
# _*_ coding:utf-8 _*_

import sys
from PyQt6.QtWidgets import QApplication
from PyQt6.QtWidgets import QMainWindow
from PyQt6.QtWidgets import QWidget
from PyQt6.QtWidgets import QLineEdit
from PyQt6.QtWidgets import QLabel
from PyQt6.QtWidgets import QFormLayout
from PyQt6.QtGui import QIntValidator
from PyQt6.QtGui import QDoubleValidator
from PyQt6.QtGui import QRegularExpressionValidator
from PyQt6.QtGui import QIcon
from PyQt6.QtCore import Qt
from PyQt6.QtCore import QRegularExpression

class QValiatorDemo(QMainWindow):
    """ 校验器模型 """

    def __init__(self) -> None:
        """ 构造函数 """
        super().__init__()

        self.init_ui()
        self.setcenter()

    def init_ui(self):
        """ 初始化ui """

        self.setWindowTitle("QValiatorDemo")
        self.setWindowIcon(QIcon("./res/263.png"))
        self.resize(400, 200)
        self.setMinimumHeight(100)
        self.setMinimumWidth(300)

        # 设置中央控件
        self.mainwidget = QWidget(self)
        self.setCentralWidget(self.mainwidget)

        # 设置布局
        self.flayout_main = QFormLayout(self)
        self.mainwidget.setLayout(self.flayout_main)

        # 整型IntValidator
        self.ledit_int = QLineEdit(self)
        self.ledit_int.setPlaceholderText("整型数据")
        self.setToolTip("Place input value in 0-100.")
        validator_int = QIntValidator(self)
        validator_int.setRange(0, 100)  # 设置数字范围
        self.ledit_int.setValidator(validator_int)
        self.flayout_main.addRow("IntValidator", self.ledit_int)

        # 浮点
        self.ledit_double = QLineEdit(self)
        self.ledit_double.setPlaceholderText("浮点型数据")
        self.setToolTip("Place input double value in -100.00 - 100.00.")
        validator_double = QDoubleValidator(self)
        validator_double.setRange(-100, 100)  # 设置范围范围
        validator_double.setNotation(QDoubleValidator.Notation.StandardNotation)        # 标准数字显示
        validator_double.setDecimals(2)         # 设置精度为两位小数
        self.ledit_double.setValidator(validator_double)
        self.flayout_main.addRow("QDoubleValidator", self.ledit_double)

        # 正则:字母和数字
        self.ledit_regx = QLineEdit(self)
        self.ledit_regx.setPlaceholderText("字母或数字")
        self.setToolTip("Place input value in a-z or A-Z or 0-9")
        regexp = QRegularExpression("[a-zA-z0-9]+")         # 创建正则表达式匹配项
        validator_regx = QRegularExpressionValidator(self)      # 创建校验器
        validator_regx.setRegularExpression(regexp)         # 设置校验器正则表达式
        self.ledit_regx.setValidator(validator_regx)        # 设置校验器
        self.flayout_main.addRow("QRegularExpressionValidator", self.ledit_regx)


    def setcenter(self):
        """ 设置窗体居中 """

        main_rect = self.frameGeometry()      # 获取窗体矩形
        point_screencenter = self.screen().availableGeometry().center()        # 获取屏幕中心点
        main_rect.moveCenter(point_screencenter)       # 窗体矩形移动到屏幕中心点
        self.move(main_rect.topLeft())        # 移动窗体与窗体矩形重合


if __name__ == "__main__":
    """ 主程序运行 """

    app = QApplication(sys.argv)
    main_window = QValiatorDemo()
    main_window.show()
    sys.exit(app.exec())
结果:
界面:
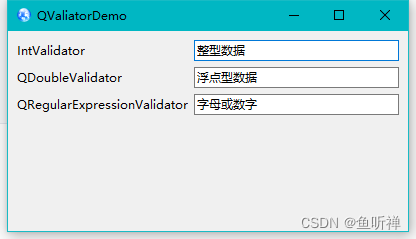
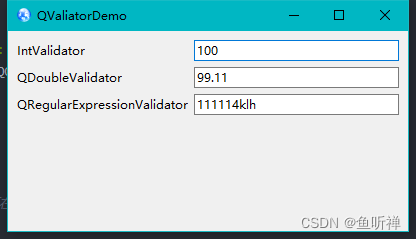
注意:
数值范围限定后,位数会被限制,但是仍然可以输入超出范围的数据,无法自动校正数据,需要另外再做校正(待定)
3.使用掩码限制输入setInputMask(str)
通过设置掩码进行限制用户输入的数据。
格式如下:
"掩码字符串;占位字符"掩码字符串:掩码字符与符号一起组成的格式字符串;
分隔符:用来分隔掩码字符串和默认字符;
占位字符:字符尚未输入时用来占位显示掩码位置的字符;
注意:掩码设置后没有输入时该位置会被占位符替代,默认是空格" "。
掩码字符表:
字符 | 说明 |
A | ASCII字母字符(A-Z、a-z) 是必须输入的 |
a | ASCII字母字符(A-Z、a-z) 是允许输入的,但不是必需输入的 |
N | ASCII字母字符(A-Z、a-z、0-9)是必须输入的 |
n | ASCII字母字符(A-Z、a-z、0-9)是允许输入的,但不是必需输入的 |
X | 任何字符都是必须输入的 |
x | 任何字符都是允许输入的,但不是必需输入的 |
9 | ASCII数字字符(0-9)是必须输入的 |
0 | ASCII数字字符(0-9)是允许输入的,但不是必需输入的 |
D | ASCII数字字符(1-9)是必须输入的 |
d | ASCII数字字符(1-9)是允许输入的,但不是必需输入的 |
# | ASCI数字字符或加减符号是允许输入的,但不是必需输入的 |
H | 十六进制格式字符(A-F、a-f、0-9) 是必须输入的 |
h | 十六进制格式字符(A-F、a-f、0-9) 是允许输入的,但不是必需输入的 |
B | 二进制格式字符(0,1)是必须输入的 |
b | 二进制格式字符(0,1)是允许输入的,但不是必需输入的 |
> | 所有的字母字符都大写 |
< | 所有的字母字符都小写 |
! | 关闭大小写转换 |
\ | 使用"\"转义上面列出的字符 |
示例:
# _*_ coding:utf-8 _*_

import sys
from PyQt6.QtWidgets import QApplication
from PyQt6.QtWidgets import QWidget
from PyQt6.QtWidgets import QMainWindow
from PyQt6.QtWidgets import QLineEdit
from PyQt6.QtWidgets import QFormLayout
from PyQt6.QtGui import QIcon
from PyQt6.QtCore import Qt

class InputMarkDemo(QMainWindow):
    """ 输入掩码示例 """

    def __init__(self) -> None:
        """ 构造函数 """

        super().__init__()
        self.init_ui()
        self.setcenter()


    def init_ui(self):
        """ 初始化Ui """

        # 设置窗体属性
        self.setWindowTitle("InputMarkDemo")
        self.setWindowIcon(QIcon(r"./res/263.png"))
        self.resize(300,300)

        # 设置中心控件和布局
        self.widget_main = QWidget(self)
        self.setCentralWidget(self.widget_main)
        self.formlayout_main = QFormLayout(self)
        self.widget_main.setLayout(self.formlayout_main)

        # Phone number
        self.le_phone = QLineEdit()
        self.le_phone.setInputMask("999 9999 9999;0")
        self.formlayout_main.addRow("Phone number", self.le_phone)

        # Ip number
        self.le_ip = QLineEdit()
        self.le_ip.setInputMask("000.000.000.000;_")
        self.formlayout_main.addRow("Ip number", self.le_ip)

        # Mac number
        self.le_mac = QLineEdit()
        self.le_mac.setInputMask("HH:HH:HH:HH:HH:HH;")
        self.formlayout_main.addRow("Mac number", self.le_mac)

        # key number
        self.le_key = QLineEdit()
        self.le_key.setInputMask(">AAAA-AAAA-AAAA-AAAA-AAAA-AAAA;#")
        self.formlayout_main.addRow("Key number", self.le_key)

        # Date
        self.le_date = QLineEdit()
        self.le_date.setInputMask("0000-00-00")
        self.formlayout_main.addRow("Date", self.le_date)


    def setcenter(self):
        """ 居中显示 """

        win_rect = self.frameGeometry()          # 获取窗体矩形
        point_screencenter = self.screen().geometry().center()      # 获取屏幕中心点坐标
        win_rect.moveCenter(point_screencenter)                     # 居中显示
        self.move(win_rect.topLeft())                               # 窗体移动到与窗体矩形重合


if __name__ == "__main__":
    """ 主程序运行 """

    app = QApplication(sys.argv)
    window_main = InputMarkDemo()
    window_main.show()
    sys.exit(app.exec())
结果:
主界面:
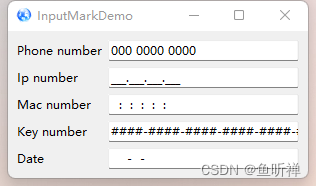
输入信息:
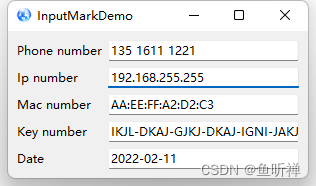


 342
342

 被折叠的 条评论
为什么被折叠?


