


在作业1基础上
1.添加引用,加载图层,输网址的地方再粘一遍链接,1个是街景图,一个是卫星图,并分别加一个ID,如下
<esri:ArcGISTiledMapServiceLayer Url="http://services.arcgisonline.com/arcgis/rest/services/ESRI_Imagery_World_2D/MapServer"  ID="imamap" />
<esri:ArcGISTiledMapServiceLayer Url="http://services.arcgisonline.com/arcgis/rest/services/ESRI_StreetMap_World_2D/MapServer" ID="streetmap" /> private void button1_Click(object sender, RoutedEventArgs e)
{
map1.Layers["streetmap"].Visible = true;
map1.Layers["imamap"].Visible = false;
}
private void button2_Click(object sender, RoutedEventArgs e)
{
map1.Layers["streetmap"].Visible = false;
map1.Layers["imamap"].Visible = true;
}<esri:Map Background="White" HorizontalAlignment="Left" <strong><span style="color:#3333ff;">Extent="60,60,130,13"</span></strong> Name="map1" VerticalAlignment="Top" WrapAround="True" Height="300" Width="388"></pre><pre code_snippet_id="623612" snippet_file_name="blog_20150319_4_9858641" name="code" class="csharp">4.点击运行
MainPage.xaml代码
<UserControl x:Class="ArcGisSilverlight.MainPage"
xmlns="http://schemas.microsoft.com/winfx/2006/xaml/presentation"
xmlns:x="http://schemas.microsoft.com/winfx/2006/xaml"
xmlns:d="http://schemas.microsoft.com/expression/blend/2008"
xmlns:mc="http://schemas.openxmlformats.org/markup-compatibility/2006"
mc:Ignorable="d"
xmlns:esri="clr-namespace:ESRI.ArcGIS.Client;assembly=ESRI.ArcGIS.Client"
xmlns:esriGeometry="clr-namespace:ESRI.ArcGIS.Client.Geometry;assembly=ESRI.ArcGIS.Client"
d:DesignHeight="300" d:DesignWidth="400">
<Grid x:Name="LayoutRoot" Background="White">
<esri:Map Background="White" HorizontalAlignment="Left" Extent="60,60,130,13" Name="map1" VerticalAlignment="Top" WrapAround="True" Height="300" Width="388">
<esri:Map.Layers>
<esri:LayerCollection>
<esri:ArcGISTiledMapServiceLayer Url="http://services.arcgisonline.com/arcgis/rest/services/ESRI_Imagery_World_2D/MapServer" ID="imamap" />
<esri:ArcGISTiledMapServiceLayer Url="http://services.arcgisonline.com/arcgis/rest/services/ESRI_StreetMap_World_2D/MapServer" ID="streetmap" />
</esri:LayerCollection>
</esri:Map.Layers>
</esri:Map>
<Button Content="街景图" Height="23" HorizontalAlignment="Left" Name="button1" VerticalAlignment="Top" Width="75" Click="button1_Click" />
<Button Content="影像图" Height="23" HorizontalAlignment="Left" Margin="81,0,0,0" Name="button2" VerticalAlignment="Top" Width="75" Click="button2_Click" />
</Grid>
</UserControl>
</pre><p>MainPage.xaml.cs代码</p><p></p><pre code_snippet_id="623612" snippet_file_name="blog_20150319_6_2262910" name="code" class="csharp">using System;
using System.Collections.Generic;
using System.Linq;
using System.Net;
using System.Windows;
using System.Windows.Controls;
using System.Windows.Documents;
using System.Windows.Input;
using System.Windows.Media;
using System.Windows.Media.Animation;
using System.Windows.Shapes;
namespace ArcGisSilverlight
{
public partial class MainPage : UserControl
{
public MainPage()
{
InitializeComponent();
}
 private void button1_Click(object sender, RoutedEventArgs e)
        {
            map1.Layers["streetmap"].Visible = true;
            map1.Layers["imamap"].Visible = false;
        }

        private void button2_Click(object sender, RoutedEventArgs e)
        {
             map1.Layers["streetmap"].Visible = false;
            map1.Layers["imamap"].Visible = true;
        }
}
}
效果如下:

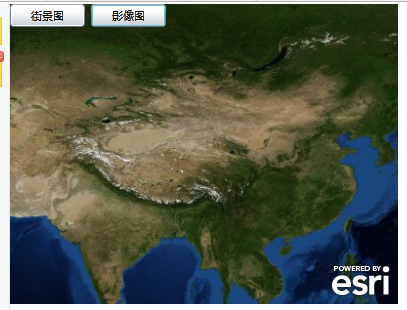
分别按下街景图,影像图可以自由切换。


 1万+
1万+


 被折叠的 条评论
为什么被折叠?
被折叠的 条评论
为什么被折叠?
 到【灌水乐园】发言


