


 本文详细介绍了U-Boot中SPI闪存(SPI Flash)驱动的实现过程,包括在uboot中的基本框架、配置步骤、命令实现以及关键函数的解析。内容涵盖DTS配置、SPI总线与SPI Flash设备的绑定、SF命令的代码实现、SPI Flash的初始化流程,以及读写、擦除等操作。通过对相关函数的分析,揭示了U-Boot DM(Device Model)如何管理SPI总线和SPI Flash设备。
0 基本框架
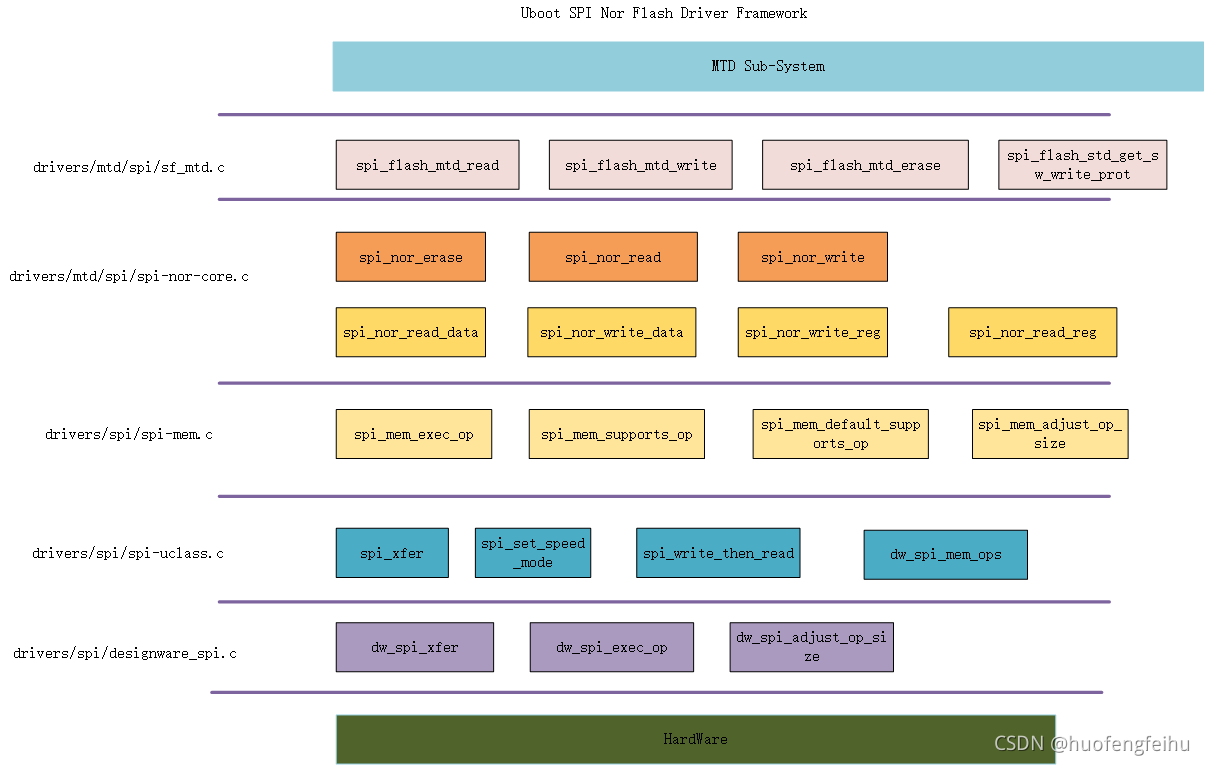
sf及mtd在uboot中的基本框架如上图所示,
sf及mtdparts命令就是以上述框架为基本的函数调用流程。
1 目标
可以使用sf*命令烧写QSPI
2 具体配置
2.1 SF命名开启相关的宏
#
# Device access commands
#
CONFIG_CMD_SF=y  #sf命令开启宏
CONFIG_CMD_SF_TEST #sf命令测试使能
# CONFIG_CMD_SPI is not set

#
# SPI Flash Support
#
CONFIG_DM_SPI_FLASH=y
CONFIG_SPI_FLASH=y
CONFIG_SF_DEFAULT_BUS=2
CONFIG_SF_DEFAULT_CS=0
CONFIG_SF_DEFAULT_MODE=0x0
CONFIG_SF_DEFAULT_SPEED=100000
#CONFIG_SPI_FLASH_BAR=y
#CONFIG_SPI_FLASH_UNLOCK_ALL=y
CONFIG_SPI_FLASH_USE_4K_SECTORS=y
CONFIG_SPI_FLASH_MICRO=y #自定义宏,用于添加镁光的Nor Flash

#
# SOC (System On Chip) specific Drivers
#
CONFIG_SPI=y
CONFIG_DM_SPI=y
CONFIG_SPI_MEM=y
CONFIG_DESIGNWARE_SPI=y

#
# dump dm info
#
CONFIG_CMD_DM=y #使能驱动框架调试命令
2.2 添加相关spi flash info
源码路径:u-boot\drivers\mtd\spi\spi-nor-ids.c
const struct flash_info spi_nor_ids[] = {
    CONFIG_SPI_FLASH_ATMEL

    ...

	#ifdef CONFIG_SPI_FLASH_MICRO
	/* MICRON (Micron Technology, Inc.) */
	{ INFO("MT25QU256A", 0x20BB19, 0, 64 * 1024, 512,
	SECT_4K | SPI_NOR_DUAL_READ | SPI_NOR_QUAD_READ |
	SPI_NOR_HAS_LOCK | SPI_NOR_HAS_TB)
	},
	#endif
}
2.3 DTS配置
&spi0 {
       status = "okay";
};
&spi1 {
       status = "okay";
};
&spi2 {
       status = "okay";
};
&spi3 {
       status = "okay";
};

spi0: spi@e0009000 {
		compatible = "snps,dw-apb-ssi-4.02a";
		reg = <0 0xe0009000 0x0 0x1000>;
		/*clocks = <&nb_periph_clk 7>;*/
		status = "disabled";
};

spi1: spi@e002a000 {
		compatible = "snps,dw-apb-ssi-4.02a";
		reg = <0 0xe002a000 0x0 0x1000>;
		/*clocks = <&nb_periph_clk 7>;*/
		status = "disabled";
};

spi2: spi@e002b000 {
		compatible = "snps,dw-apb-ssi-4.02a";
		reg = <0 0xe002b000 0x0 0x1000>;
		#address-cells = <1>;
		#size-cells = <1>;

		/*clocks = <&nb_periph_clk 7>;*/
		status = "disabled";

		flash: mt25qu256@0 {
				compatible = "jedec,spi-nor";
				spi-max-frequency = <100000>;
				reg = <0 0>;
		};
};

spi3: spi@e002c000 {
		compatible = "snps,dw-apb-ssi-4.02a";
		reg = <0 0xe002c000 0x0 0x1000>;
		/*clocks = <&nb_periph_clk 7>;*/
		status = "disabled";
};
3 SF命令代码实现
3.1 do_spi_flash
文件路径:u-boot\cmd\sf.c
3.1.1 U_BOOT_CMD
U_BOOT_CMD(
	sf, 5, 1, do_spi_flash,
	"SPI flash sub-system",
	"probe [[bus:]cs] [hz] [mode] - init flash device on given SPI bus\n"
	" and chip select\n"
	"sf read addr offset|partition len - read `len' bytes starting at\n"
	" `offset' or from start of mtd\n"
	" `partition'to memory at `addr'\n"
	"sf write addr offset|partition len - write `len' bytes from memory\n"
	" at `addr' to flash at `offset'\n"
	" or to start of mtd `partition'\n"
	"sf erase offset|partition [+]len - erase `len' bytes from `offset'\n"
	" or from start of mtd `partition'\n"
	" `+len' round up `len' to block size\n"
	"sf update addr offset|partition len - erase and write `len' bytes from memory\n"
	" at `addr' to flash at `offset'\n"
	" or to start of mtd `partition'\n"
	"sf protect lock/unlock sector len - protect/unprotect 'len' bytes starting\n"
	" at address 'sector'\n"
	SF_TEST_HELP
);
下面先来说明下U_BOOT_CMD
U_BOOT_CMD(name,maxargs,repeatable,command,"usage","help")
     各个参数的意义如下:
           name:命令名,非字符串,但在U_BOOT_CMD中用“#”符号转化为字符串
           maxargs:命令的最大参数个数
           repeatable:是否自动重复(按Enter键是否会重复执行)
           command:该命令对应的响应函数指针
           usage:简短的使用说明(字符串)
           help:较详细的使用说明(字符串)
U_BOOT_CMD宏在include/command.h中定义:
“##”与“#”都是预编译操作符,“##”有字符串连接的功能,“#”表示后面紧接着的是一个字符串。
#define U_BOOT_CMD(name,maxargs,rep,cmd,usage,help) \
        cmd_tbl_t __u_boot_cmd_##name Struct_Section = {#name, maxargs, rep, cmd, usage, help}
其中Struct_Section在include/command.h中定义如下:
凡是带有attribute ((unused,section (“.u_boot_cmd”))属性声明的变量都将被存放在”.u_boot_cmd”段中,并且即使该变量没有在代码中显式的使用编译器也不产生警告信息。
#define Struct_Section  __attribute__ ((unused,section (".u_boot_cmd")))
.u_boot_cmd段
在u-Boot连接脚本 u-boot.lds中定义了.u_boot_cmd段:
. = .;
__u_boot_cmd_start = .;          /*将 __u_boot_cmd_start指定为当前地址 */
.u_boot_cmd : { *(.u_boot_cmd) }
__u_boot_cmd_end = .;           /*  将__u_boot_cmd_end指定为当前地址  */
这表明带有“.u_boot_cmd”声明的函数或变量将存储在“u_boot_cmd”段。这样只要将u-boot所有命令对应的cmd_tbl_t变量加上“.u_boot_cmd”声明,编译器就会自动将其放在“u_boot_cmd”段,查找cmd_tbl_t变量时只要在 __u_boot_cmd_start 与 __u_boot_cmd_end 之间查找就可以了。
cmd_tbl_t自定义结构体
cmd_tbl_t在include/command.h中定义如下:
struct cmd_tbl_s {
	char        *name;        /* Command Name            */
	int          maxargs;    /* maximum number of arguments    */
	int          repeatable;    /* autorepeat allowed?        */
	/* Implementation function    */
	int        (*cmd)(struct cmd_tbl_s *, int, int, char * const []);
	char        *usage;        /* Usage message    (short)    */
#ifdef    CONFIG_SYS_LONGHELP
	char        *help;        /* Help  message    (long)    */
#endif
#ifdef CONFIG_AUTO_COMPLETE
	/* do auto completion on the arguments */
	int        (*complete)(int argc, char * const argv[], char last_char, int maxv, char *cmdv[]);
#endif
};
typedef struct cmd_tbl_s    cmd_tbl_t;
一个cmd_tbl_t结构体变量包含了调用一条命令的所需要的信息。在内存中所有cmd_tbl_t类型内存分布如下:
3.1.2 do_spi_flash
do_spi_flash
    >>>ret = do_spi_flash_probe(argc, argv); #初始化spi总线及spi flash
    >>>ret = do_spi_flash_read_write(argc, argv); #spi flash读写
    >>>ret = do_spi_protect(argc, argv); #
    >>>ret = do_spi_flash_test(argc, argv);# spi flash测试程序
下面分别对这几个函数进行说明。
3.2 probe
3.2.1 probe基本流程
>>>do_spi_flash_probe
   >>>spi_find_bus_and_cs
      >>>uclass_find_device_by_seq //根据bus number遍历spi总线对应的udevice设备(SPI控制器)
      >>>spi_find_chip_select  //根据spi总线udevice设备找到对应cs的子udevice 设备,由于在dts中我们已近将spi flash放到spi总线设备下,即在dts中指定了spi flash所属的spi总线,所以这里第一次就可以找到对应cs的子udevice
   >>>spi_flash_probe_bus_cs //根据bus/cs找到对应的spi slave device
          >>>spi_get_bus_and_cs
             >>>ret = uclass_first_device_by_seq(UCLASS_SPI, busnum, &bus); //根据uclass找到udevice bus
             >>>ret = spi_find_chip_select(bus, cs, &dev); //根据spi总线udevice设备找到对应cs的子udevice 设备,由于在dts中我们已近将spi flash放到spi总线设备下,即在dts中指定了spi flash所属的spi总线,所以这里第一次就可以找到对应cs的子udevice
             >>>device_probe(dev); //判断设备!device_active(dev)是否active,若未active,调用SPI FLASH的驱动active it
                   >>>spi_flash_std_probe //参考3.2.3小节
                      >>>spi_flash_probe_slave
                         >>>spi_flash_scan
                            >>>spi_flash_read_id
                >>>slave = dev_get_parent_priv(dev); //parent private数据即为spi_slave句柄??
                >>>slave->dev = dev; //spi slave挂在spi sub-bus udevice上
    >>>dev_get_uclass_priv
下面对可能用到的关键函数进行说明。要想完全搞明白整个SPI及SPI Flash驱动模型,还需要熟悉Uboot DM的基本知识,可以参考
https://blog.csdn.net/u010961173/article/details/119611819
3.2.2 spi_find_bus_and_cs
函数在spi-uclass中实现,默认参与编译
drivers/spi/Makefile:8:obj-y += spi-uclass.o函数功能:根据bus、cs查询是否对应的spi bus udevice及对应cs的udevice.
函数调用:
int spi_find_bus_and_cs(int busnum, int cs, struct udevice **busp,
			struct udevice **devp)
    >>>ret = uclass_find_device_by_seq(UCLASS_SPI, busnum, false, &bus);//通过序号找到spi bus对应的udevice
    >>>ret = spi_find_chip_select(bus, cs, &dev);//根据spi bus udevice及cs查询是否有对应cs的子udevice,第一次肯定是没有的,因为还没有建立spi/spi_flash之间的联系
    >>>*busp = bus; // spi bus udevice
    >>>*devp = dev; //对应cs的spi bus的子udevice
(1)uclass_find_device_by_seq
函数功能:按序号从uclass中找到对应的udevice,若序号匹配,则返回对应的udevice。
int uclass_find_device_by_seq(enum uclass_id id, int seq, struct udevice **devp)
    >>> ret = uclass_get(id, &uc); //获取uclass id对应的uclass对象
    >>> uclass_foreach_dev(dev, uc) { //遍历uclass下面所有的udevice,并找到对应seq的udvice对象
            if (dev->seq_ == seq)
                *devp = dev;
}具体来讲,就是通过调用uclass_get函数获取uclass id对应的uclass对象,获取到uclass对象之后,再使用uclass_foreach_dev函数对其下的udevice设备进行遍历,最后得到指定busnum的spi bus udevice(总线设备)。
=================================================================================================
在这里,我们需要说明的是,uclass、udevice对象的创建及其驱动的绑定在DM的初始化阶段已经完成,下面简单的梳理一下流程:
dts中的udevice配置,通过compatible识别 ---|
                                           |
udevice驱动U_BOOT_DRIVER(xxx) -------------|-----DM初始化-----lists_bind_fdt解析dts,并根据compatible遍历udevice driver table---->创建uclass、udevice并完成与driver\uclass_driver的绑定
                                           |
uclass驱动UCLASS_DRIVER(xxx) --------------|
首先,在dts中定义spi总线对象及spi flash对象
然后,在源码中分别声明uclass_driver及udeivce的driver
以spi驱动及spi flash驱动为例,需要声明的uclass_driver及udeivce的driver如下:
spi(总线)驱动:
spi总线uclass驱动:
文件:spi-uclass.c
UCLASS_DRIVER(spi) = {
	.id		= UCLASS_SPI,
	.name		= "spi",
	.flags		= DM_UC_FLAG_SEQ_ALIAS,
#if !CONFIG_IS_ENABLED(OF_PLATDATA)
	.post_bind	= dm_scan_fdt_dev,
#endif
	.post_probe	= spi_post_probe,
	.child_pre_probe = spi_child_pre_probe,
	.per_device_auto_alloc_size = sizeof(struct dm_spi_bus),
	.per_child_auto_alloc_size = sizeof(struct spi_slave),
	.per_child_platdata_auto_alloc_size =
			sizeof(struct dm_spi_slave_platdata),
#if !CONFIG_IS_ENABLED(OF_PLATDATA)
	.child_post_bind = spi_child_post_bind,
#endif
};

spi总线udevice驱动:
文件:designware_spi.c
U_BOOT_DRIVER(dw_spi) = {
	.name = "dw_spi",
	.id = UCLASS_SPI,
	.of_match = dw_spi_ids,
	.ops = &dw_spi_ops,
	.ofdata_to_platdata = dw_spi_ofdata_to_platdata,
	.platdata_auto_alloc_size = sizeof(struct dw_spi_platdata),
	.priv_auto_alloc_size = sizeof(struct dw_spi_priv),
	.probe = dw_spi_probe,
};
spi flash驱动:
spi flash uclass驱动:
文件:sf_uclass.c
UCLASS_DRIVER(spi_flash) = {
	.id		= UCLASS_SPI_FLASH,
	.name		= "spi_flash",
	.post_bind	= spi_flash_post_bind,
	.per_device_auto_alloc_size = sizeof(struct spi_flash),
};

spi flash udevice驱动:
文件:sf_probe.c
U_BOOT_DRIVER(spi_flash_std) = {
	.name		= "spi_flash_std",
	.id		= UCLASS_SPI_FLASH,
	.of_match	= spi_flash_std_ids,
	.probe		= spi_flash_std_probe,
	.priv_auto_alloc_size = sizeof(struct spi_flash),
	.ops		= &spi_flash_std_ops,
};
最后,uboot在初始化阶段会解析dtb,然后寻找dtb udevice对应的到driver,动态创建driver对应的uclass、udeivce实例对象,同时对相关的驱动进行绑定。要说明的一点是,并且不是所有uclass都会生成,有对应uclass driver并且被udevice匹配到的uclass才会生成。
=================================================================================================
(2)spi_find_chip_select
函数功能:根据spi bus device及片选,查找其下的子设备,若spi bus device 下面已经挂接了对应cs的udevice则将该udevice返回。
int spi_find_chip_select(struct udevice *bus, int cs, struct udevice **devp)
    >>>	for (device_find_first_child(bus, &dev); dev;
	         device_find_next_child(&dev)) { //遍历SPI总线设备下的子设备,寻找是否有对应不同CS的子设备udevice
		    plat = dev_get_parent_platdata(dev);
		    if (plat->cs == cs) { //由于在dts中我们已近将spi flash放到spi总线设备下,即在dts中指定了spi flash所属的spi总线,所以这里第一次就可以找到对应cs的子udevice
			    *devp = dev;
			    return 0;
		    }
        }
函数的实现的功能比较简单,但是我们要思考这么一个问题,spi bus udevice下面的子udevice(即对应cs的那个udevice对象)什么时间创建并被挂接到spi bus udevice的?spi总线和spi flash是怎样建立的联系?
我们这里的回答是在dts中,如下所示:
spi2: spi@e002b000 {
		compatible = "snps,dw-apb-ssi-4.02a";
		reg = <0 0xe002b000 0x0 0x1000>;
		#address-cells = <1>;
		#size-cells = <1>;

		/*clocks = <&nb_periph_clk 7>;*/
		status = "disabled";

		flash: mt25qu256@0 {
				compatible = "jedec,spi-nor";
				spi-max-frequency = <100000>;
				reg = <0 0>;
		};
};
由于在dts中我们已近将spi flash放到spi总线设备下,即在dts中指定了spi flash所属的spi总线,所以这里第一次也能够找到
3.2.3 spi_flash_probe_bus_cs
函数功能:建立SPI总线udevice及spi flash udevice之间的联系,根据spi bus 、cs获取spi slave设备,spi slave对应的udevice(作为spi bus udevice的子设备挂接到spi udevice上)。

函数调用
int spi_flash_probe_bus_cs(unsigned int busnum, unsigned int cs,
			   unsigned int max_hz, unsigned int spi_mode,
			   struct udevice **devp)
    >>>	ret = spi_get_bus_and_cs(busnum, cs, max_hz, spi_mode,
				  "spi_flash_std", str, &bus, &slave);
        >>>ret = uclass_get_device_by_seq(UCLASS_SPI, busnum, &bus); //根据spi bus num获取spi bus udevice
        >>>ret = spi_find_chip_select(bus, cs, &dev); //根据spi bus udevice及cs获取cs对应的udevice,由于在dts中我们已近将spi flash放到spi总线设备下,即在dts中指定了spi flash所属的spi总线,所以这里第一次也能够找到
        >>>若从设备没有active,进行激活操作
            if (!device_active(dev)) {
                ret = device_probe(dev); //下面具体说明
		        slave = dev_get_parent_priv(dev);//从这里可以看出,cs对应的udevice的priv存放的是spi slave对象指针,slave对象在初始化阶段根据UCLASS_DRIVER(spi).per_child_auto_alloc_size进行分配
		        slave->dev = dev;
	        }
        >>>plat = dev_get_parent_platdata(dev); //获取platdata数据,这里的platdata是在device_bind_common函数中在初始化阶段根据UCLASS_DRIVER(spi).per_child_platdata_auto_alloc_size进行分配的
        >>>ret = spi_set_speed_mode(bus, speed, mode); //调用bus udevice本身的回调,设置相关参数
        >>>*busp = bus; //返回spi bus udevice
        >>>*devp = dev_get_parent_priv(dev);//返回struct spi_slave对象
    >>>	*devp = slave->dev; //获取struct spi_slave所挂接的udecice(即CS对应的udevice)
spi_flash_probe_bus_cs函数调用了spi_get_bus_and_cs,根据bus number及cs number返回cs对应的udevice设备(该设备作为SPI bus udevice的子设备)及spi_slave从设备。具体来讲,根据uclass id获取bus udevice,通过调用spi_find_chip_select根据cs获取子总线设备sub-bus udevice。拿到cs对应的spi bus udeivce子udevice设备后,调用device_probe函数probe spi_slave设备。
device_probe函数是一个递归函数,完成以下功能:
(1)判断udevice是否已经active,否则,active it
(2)检查并active这个udevice相关的上游udevice,并完成probe
(3)执行udevice及其上游的驱动probe函数
函数执行完成后,相关的udevice及其驱动就会被激活active。
下面我们来细看一下device_probe函数的实现。
int device_probe(struct udevice *dev)
{
	const struct driver *drv;
	int ret;

	if (!dev)
		return -EINVAL;
    /* 判断当前device是否已经active,若已active,直接返回 */
	if (dev_get_flags(dev) & DM_FLAG_ACTIVATED)
		return 0;

    /* udevice对应的driver已经ready */
	drv = dev->driver;
	assert(drv);

    /* 将udevice相关的of配置同步都udevice的数据结构中 */
	ret = device_of_to_plat(dev);
	if (ret)
		goto fail;

	/* 确保所有的父设备均已active,否则,递归active */
	if (dev->parent) {
		ret = device_probe(dev->parent);
		if (ret)
			goto fail;

		/*
		 * The device might have already been probed during
		 * the call to device_probe() on its parent device
		 * (e.g. PCI bridge devices). Test the flags again
		 * so that we don't mess up the device.
		 */
		if (dev_get_flags(dev) & DM_FLAG_ACTIVATED)
			return 0;
	}

    /* 激活设备 */
	dev_or_flags(dev, DM_FLAG_ACTIVATED);

	/*
	 * Process pinctrl for everything except the root device, and
	 * continue regardless of the result of pinctrl. Don't process pinctrl
	 * settings for pinctrl devices since the device may not yet be
	 * probed.
	 *
	 * This call can produce some non-intuitive results. For example, on an
	 * x86 device where dev is the main PCI bus, the pinctrl device may be
	 * child or grandchild of that bus, meaning that the child will be
	 * probed here. If the child happens to be the P2SB and the pinctrl
	 * device is a child of that, then both the pinctrl and P2SB will be
	 * probed by this call. This works because the DM_FLAG_ACTIVATED flag
	 * is set just above. However, the PCI bus' probe() method and
	 * associated uclass methods have not yet been called.
	 */
	if (dev->parent && device_get_uclass_id(dev) != UCLASS_PINCTRL)
		pinctrl_select_state(dev, "default");

	if (CONFIG_IS_ENABLED(POWER_DOMAIN) && dev->parent &&
	    (device_get_uclass_id(dev) != UCLASS_POWER_DOMAIN) &&
	    !(drv->flags & DM_FLAG_DEFAULT_PD_CTRL_OFF)) {
		ret = dev_power_domain_on(dev);
		if (ret)
			goto fail;
	}

    /* ??? */
	ret = device_get_dma_constraints(dev);
	if (ret)
		goto fail;
    /* uclass probe前的预处理
        这里会执行
        (1)udevice对应的uclass驱动uclass_driver的pre_probe函数
        (2)父设备udevice对应uclass_drver的child_pre_probe函数
    */
	ret = uclass_pre_probe_device(dev);
	if (ret)
		goto fail;

	if (dev->parent && dev->parent->driver->child_pre_probe) {
		ret = dev->parent->driver->child_pre_probe(dev);
		if (ret)
			goto fail;
	}

	/* Only handle devices that have a valid ofnode */
	if (dev_has_ofnode(dev)) {
		/*
		 * Process 'assigned-{clocks/clock-parents/clock-rates}'
		 * properties
		 */
		ret = clk_set_defaults(dev, 0);
		if (ret)
			goto fail;
	}

    /* 执行驱动本身的probe函数,再定义驱动时指定,U_BOOT_DRIVER(jedec_spi_nor).probe */
	if (drv->probe) {
		ret = drv->probe(dev);
		if (ret)
			goto fail;
	}

    /* uclass probe后的扫尾工作
        这里会执行
        (1) 父设备udevice对应uclass_drver的child_post_probe函数
        (2) udevice对应的uclass驱动uclass_driver的post_probe函数

    */
	ret = uclass_post_probe_device(dev);
	if (ret)
		goto fail_uclass;

	if (dev->parent && device_get_uclass_id(dev) == UCLASS_PINCTRL)
		pinctrl_select_state(dev, "default");

	return 0;
fail_uclass:
	if (device_remove(dev, DM_REMOVE_NORMAL)) {
		dm_warn("%s: Device '%s' failed to remove on error path\n",
			__func__, dev->name);
	}
fail:
	dev_bic_flags(dev, DM_FLAG_ACTIVATED);

	device_free(dev);

	return ret;
}
3.2.4 dev_get_uclass_priv
这个函数比较简单,直接返回设备对应uclass的priv数据,这个数据指向struct spi_flash对象。
void *dev_get_uclass_priv(const struct udevice *dev)
{
	if (!dev) {
		dm_warn("%s: null device\n", __func__);
		return NULL;
	}

	return dm_priv_to_rw(dev->uclass_priv_);
}

static inline void *dm_priv_to_rw(void *priv)
{
	return priv;
}
通过上面的配置可知,在DM初始化过程仅仅建立了uclass\uclass_driver\udevice\udevice driver之间的关系,但是还没有probe(active),probe的动作是通过device_probe来完成的,例如spi总线的probe、spi flash的probe。
3.4 spi 驱动及spi flash驱动
spi驱动和spi flash驱动均是由spi_flash_probe_bus_cs函数通过调用device_probe函数来完成的。下面列出具体的probe函数的实现。
3.4.1 spi 驱动
关于spi驱动的具体实现因每个厂家的IP实现不同而不同。
uclass spi 总线驱动
文件:spi-uclass.c
UCLASS_DRIVER(spi) = {
	.id		= UCLASS_SPI,
	.name		= "spi",
	.flags		= DM_UC_FLAG_SEQ_ALIAS,
#if !CONFIG_IS_ENABLED(OF_PLATDATA)
	.post_bind	= dm_scan_fdt_dev,
#endif
	.post_probe	= spi_post_probe,
	.child_pre_probe = spi_child_pre_probe,
	.per_device_auto_alloc_size = sizeof(struct dm_spi_bus), //每个spi bus相关配置参数占用的内存大小
	.per_child_auto_alloc_size = sizeof(struct spi_slave), //每个slave 对象实例大小
	.per_child_platdata_auto_alloc_size =
			sizeof(struct dm_spi_slave_platdata), //每个slave的与设备相关的配置数据
#if !CONFIG_IS_ENABLED(OF_PLATDATA)
	.child_post_bind = spi_child_post_bind,
#endif
};

udevice spi 总线驱动
文件:designeware_spi.c
U_BOOT_DRIVER(dw_spi) = {
	.name = "dw_spi",
	.id = UCLASS_SPI,
	.of_match = dw_spi_ids,
	.ops = &dw_spi_ops,
	.ofdata_to_platdata = dw_spi_ofdata_to_platdata,
	.platdata_auto_alloc_size = sizeof(struct dw_spi_platdata),
	.priv_auto_alloc_size = sizeof(struct dw_spi_priv),
	.probe = dw_spi_probe,
};

static const struct dm_spi_ops dw_spi_ops = {
	.xfer		= dw_spi_xfer,
	.set_speed	= dw_spi_set_speed,
	.set_mode	= dw_spi_set_mode,
	/*
	 * cs_info is not needed, since we require all chip selects to be
	 * in the device tree explicitly
	 */
};

static const struct udevice_id dw_spi_ids[] = {
	{ .compatible = "snps,dw-apb-ssi" },
	{ }
};
3.4.2 spi flash驱动
uclass spi flash驱动
文件:sf-uclass.c
UCLASS_DRIVER(spi_flash) = {
	.id		= UCLASS_SPI_FLASH,
	.name		= "spi_flash",
	.post_bind	= spi_flash_post_bind,
	.per_device_auto_alloc_size = sizeof(struct spi_flash),
};

udevice spi flash驱动
文件:sf_probe.c中
U_BOOT_DRIVER(jedec_spi_nor) = {
	.name		= "jedec_spi_nor",
	.id		= UCLASS_SPI_FLASH, //spi slave 的id 与uclass的id一致,所以在DM初始化过程中就已经和udevice绑定到一块了
	.of_match	= spi_flash_std_ids,
	.probe		= spi_flash_std_probe,
	.remove		= spi_flash_std_remove,
	.priv_auto	= sizeof(struct spi_nor),
	.ops		= &spi_flash_std_ops,
};

static const struct dm_spi_flash_ops spi_flash_std_ops = {
	.read = spi_flash_std_read,
	.write = spi_flash_std_write,
	.erase = spi_flash_std_erase,
	.get_sw_write_prot = spi_flash_std_get_sw_write_prot,
};

static const struct udevice_id spi_flash_std_ids[] = {
	{ .compatible = "jedec,spi-nor" },//dts中配置时需要遵循的compatiable
	{ }
};
3.4.2.1 spi flash驱动spi_flash_std_probe
//入参udevice是cs对应的udevice(挂在spi bus udevice上,作为其子设备而存在)
int spi_flash_std_probe(struct udevice *dev)
{
	struct spi_slave *slave = dev_get_parent_priv(dev); //获取struct spi_slave对象
	struct spi_flash *flash;

	flash = dev_get_uclass_priv(dev); //获取struct spi_flash对象
	flash->dev = dev;
	flash->spi = slave;
	return spi_flash_probe_slave(flash);
}
(1)dev_get_parent_priv函数
函数的作用是从udevice中获取parent_priv,变量中存放的是spi_slave的对象句柄。
这个对象是在spi总线在初始化的时候分配的,具体分配的大小由UCLASS_DRIVER(spi).per_child_auto = sizeof(struct spi_slave)指定
UCLASS_DRIVER(spi) = {
	.id		= UCLASS_SPI,
	.name		= "spi",
	.flags		= DM_UC_FLAG_SEQ_ALIAS,
#if CONFIG_IS_ENABLED(OF_CONTROL) && !CONFIG_IS_ENABLED(OF_PLATDATA)
	.post_bind	= dm_scan_fdt_dev,
#endif
	.post_probe	= spi_post_probe,
	.child_pre_probe = spi_child_pre_probe,
	.per_device_auto	= sizeof(struct dm_spi_bus),
	.per_child_auto	= sizeof(struct spi_slave), //每个slave使用的内存消耗
	.per_child_plat_auto	= sizeof(struct dm_spi_slave_plat),
#if !CONFIG_IS_ENABLED(OF_PLATDATA)
	.child_post_bind = spi_child_post_bind,
#endif
};
int device_probe(struct udevice *dev)
>>>ret = device_of_to_plat(dev); //这个也是一个递归函数
>>>ret = device_alloc_priv(dev); //分配设备要求的priv/plat数据
>>>分配驱动中要求的内存
>>>drv = dev->driver;
>>>ptr = alloc_priv(drv->priv_auto, drv->flags); //分配驱动中要求的priv数据
例如,分配U_BOOT_DRIVER(jedec_spi_nor).priv_auto = sizeof(struct spi_nor),也就是spi flash对象
>>>dev_set_priv(dev, ptr);
>>>分配uclass中要求的内存
>>>size = dev->uclass->uc_drv->per_device_auto;
>>>ptr = alloc_priv(size, dev->uclass->uc_drv->flags);
例如,分配UCLASS_DRIVER(spi).per_device_auto = sizeof(struct dm_spi_bus),也就是dm_spi_bus
>>>dev_set_uclass_priv(dev, ptr);
>>>分配parent中要求的内存
>>>分别检查parent udevice和parent uclass对每个子设备是否有内存分配的需求
>>>size = dev->parent->driver->per_child_auto; //parent驱动中要求的内存
>>>size = dev->parent->uclass->uc_drv->per_child_auto; //parent对应的uclass中要求的内存
例如,分配UCLASS_DRIVER(spi).per_child_auto = sizeof(struct spi_slave),也就是spi_slave对象
>>>ptr = alloc_priv(size, drv->flags);
>>>dev_set_parent_priv(dev, ptr);
(2)dev_get_uclass_priv
从udevice中获取uclass_priv,变量中存放的是spi_flash的对象句柄。
这个对象是在spi总线在初始化的时候分配的,具体分配的大小由U_BOOT_DRIVER(jedec_spi_nor).priv_auto = sizeof(struct spi_nor)指定.
(3)spi_flash_probe_slave
struct spi_flash对象包含了其所在的udevice信息及表述spi_slave的信息。
文件:sf_probe.c
static int spi_flash_probe_slave(struct spi_flash *flash)
>>>struct spi_slave *spi = flash->spi;
>>>ret = spi_claim_bus(spi); //spi-uclass.c
>>>dm_spi_claim_bus(slave->dev)
>>>int ret = spi_set_speed_mode(bus, speed, slave->mode);
>>>ret = spi_nor_scan(flash); //spi-nor-core.c
>>>nor相关的初始化
nor->reg_proto = SNOR_PROTO_1_1_1;
nor->read_proto = SNOR_PROTO_1_1_1;
nor->write_proto = SNOR_PROTO_1_1_1;
nor->read = spi_nor_read_data;
nor->write = spi_nor_write_data;
nor->read_reg = spi_nor_read_reg;
nor->write_reg = spi_nor_write_reg;
>>>info = spi_nor_read_id(nor);
将读出来的数据与spi_nor_ids数据表中的值进行比较,成功,则返回info
>>>ret = spi_nor_init_params(nor, info, ¶ms);
>>>mtd参数初始化
mtd->priv = nor;
mtd->type = MTD_NORFLASH;
mtd->writesize = 1;
mtd->flags = MTD_CAP_NORFLASH;
mtd->size = params.size;
mtd->_erase = spi_nor_erase;
mtd->_read = spi_nor_read;
mtd->_write = spi_nor_write;
>>> ret = spi_nor_setup(nor, info, ¶ms, &hwcaps);
>>> spi_nor_set_4byte_opcodes(nor, info);
>>> ret = spi_nor_init(nor);
3.5 read/write
do_spi_flash_read_write()
static int do_spi_flash_read_write(int argc, char *const argv[])
    >>>ret = spi_flash_update(flash, offset, len, buf);
    >>>ret = spi_flash_read(flash, offset, len, buf);
        >>>spi_flash_read_dm(flash->dev, offset, len, buf); //spi_flash.h
            >>>sf_get_ops(dev)->read(dev, offset, len, buf) //sf-uclass.c
                即 (struct dm_spi_flash_ops *)(dev)->driver->ops)
    >>>ret = spi_flash_write(flash, offset, len, buf);
        >>>spi_flash_write_dm(flash->dev, offset, len, buf); // //spi_flash.h
            >>>sf_get_ops(dev)->write(dev, offset, len, buf)  //sf-uclass.c
                即 (struct dm_spi_flash_ops *)(dev)->driver->ops)
3.6 erase
do_spi_flash_erase()
static int do_spi_flash_erase(int argc, char *const argv[])
    >>>ret = spi_flash_erase(flash, offset, size);
        >>>spi_flash_erase_dm(flash->dev, offset, len); //spi_flash.h
            >>>sf_get_ops(dev)->erase(dev, offset, len) //sf-uclass.c
               即 (struct dm_spi_flash_ops *)(dev)->driver->ops)
3.7 other
do_spi_protect()
do_spi_flash_test()


 512
512

 被折叠的 条评论
为什么被折叠?
被折叠的 条评论
为什么被折叠?
 到【灌水乐园】发言


