


本篇文章接上一篇文章 Android进阶系列4—从LayoutInflater到setContentView的LayoutInflater。本想把setContentView和LinearLayout在一篇文章中说完,奈何LayoutInflater篇幅较长,只能分做两篇。
本文的产生得益于 Android 源码解析 之 setContentView,Android应用setContentView与LayoutInflater加载解析机制源码分析以及setContentView源码分析等文章。
当我们用XML中写完一个布局文件,想在某个Activity中显示的时候,往往通过setContentView方法加载。在上一篇文章中,我们知道如何通过LayoutInflater将一个布局文件加载到指定的父布局中。如果Activity也提供一个布局,那将xml显示出来想必离不开LayoutInflater。
Activity–setContentView
Activity中调用setContentView的代码如下:
public void setContentView(int layoutResID) {
       getWindow().setContentView(layoutResID);
       initActionBar();
}
setContentView调用了getWindow方法里面的setContentView方法。
public Window getWindow() {
     return mWindow;
}
而mWindow初始化为了PhoneWindow的对象实例
mWindow = new PhoneWindow(this);我们知道,PhoneWindow是抽象类Window的实现类。所以Activity中的setContentView方法其实调用的是PhoneWindow类的setContentView。PhoneWindow属于framework层,PhoneWindow源码链接(需科学上网)。
PhoneWindow–setContentView
再看PhoneWindow中的setContentView方法
 @Override
    public void setContentView(int layoutResID) {
        if (mContentParent == null) {
            installDecor();
        } else {
            mContentParent.removeAllViews();
        }
        mLayoutInflater.inflate(layoutResID, mContentParent);
        final Callback cb = getCallback();
        if (cb != null && !isDestroyed()) {
            cb.onContentChanged();
        }
}找到关键了mLayoutInflater.inflate(layoutResID, mContentParent),设置的布局id,被添加到了mContentParent父布局中。是不是觉得setContentView的机制你已经清楚了呢?如果你清楚了LayoutInflater的加载机制,那setContentView你就清楚了一大半了。但是还有一点不明白,Activity的界面到底由哪些部分组成,mContentParent又是啥。我们接着把代码看完,想必心中就有谱了。
上述代码首先是对mContentParent判空,如果空就调用installDecor()。想必mContentParent的初始化就是在该方法体里面。
installDecor()
private void installDecor() {
     if (mDecor == null) {
          mDecor = generateDecor();
                 mDecor.setDescendantFocusability(ViewGroup.FOCUS_AFTER_DESCENDANTS);
            mDecor.setIsRootNamespace(true);
            if (!mInvalidatePanelMenuPosted && mInvalidatePanelMenuFeatures != 0) {
                mDecor.postOnAnimation(mInvalidatePanelMenuRunnable);
            }
        }
        if (mContentParent == null) {
            //根据窗口的风格修饰,选择对应的修饰布局文件,并且将id为content的FrameLayout赋值给mContentParent
            mContentParent = generateLayout(mDecor);
            //......
            //初始化一堆属性值
        }
    }
可以看到mContentParent的初始化借助了mDecor,mDecor在初始化mContentParent之前借助generateDecor()完成。mDecor是DecorView的对象,DecorView是FrameLayout的子类,如下代码所示。
    // This is the top-level view of the window, containing the window decor.
    private DecorView mDecor;
    //......
    private final class DecorView extends FrameLayout implements RootViewSurfaceTaker {
       //......
调用generateLayout创建mContentParent对象之后,就可以调用findViewById生成一些标题、ActionBar对象。那在generateLayout中应该进行了放入了一些布局控件等。打开源码瞅一瞅。
generateLayout
protected ViewGroup generateLayout(DecorView decor) {
    // Apply data from current theme.
    TypedArray a = getWindowStyle();
    //...Window_windowIsFloating,Window_windowNoTitle,Window_windowActionBar...
    //首先通过WindowStyle中设置的各种属性,对Window进行requestFeature或者setFlags
    if (a.getBoolean(com.android.internal.R.styleable.Window_windowNoTitle, false)) {
        requestFeature(FEATURE_NO_TITLE);
    }
    //...
    if (a.getBoolean(com.android.internal.R.styleable.Window_windowFullscreen, false)) {
        setFlags(FLAG_FULLSCREEN, FLAG_FULLSCREEN & (~getForcedWindowFlags()));
    }
    //...根据当前sdk的版本确定是否需要menukey
    WindowManager.LayoutParams params = getAttributes();
    //通过a中设置的属性,设置  params.softInputMode 软键盘的模式;
    //如果当前是浮动Activity,在params中设置FLAG_DIM_BEHIND并记录dimAmount的值。
    //以及在params.windowAnimations记录WindowAnimationStyle

    //Inflate the window decor.
    int layoutResource;//将要选择的窗口根部局
    int features = getLocalFeatures();
    // System.out.println("Features: 0x" + Integer.toHexString(features));
    /*是根据窗口的风格修饰类型为该窗口选择不同的窗口根布局文件*/
    if ((features & ((1 << FEATURE_LEFT_ICON) | (1 << FEATURE_RIGHT_ICON))) != 0) {
        if (mIsFloating) {
            TypedValue res = new TypedValue();
            getContext().getTheme().resolveAttribute(
                    com.android.internal.R.attr.dialogTitleIconsDecorLayout, res, true);
            layoutResource = res.resourceId;
        } else {
            layoutResource = com.android.internal.R.layout.screen_title_icons;
        }
        // XXX Remove this once action bar supports these features.
        removeFeature(FEATURE_ACTION_BAR);
        // System.out.println("Title Icons!");
    } else if ((features & ((1 << FEATURE_PROGRESS) | (1 << FEATURE_INDETERMINATE_PROGRESS))) != 0
            && (features & (1 << FEATURE_ACTION_BAR)) == 0) {
        // Special case for a window with only a progress bar (and title).
        // XXX Need to have a no-title version of embedded windows.
        layoutResource = com.android.internal.R.layout.screen_progress;
        // System.out.println("Progress!");
    } else if ((features & (1 << FEATURE_CUSTOM_TITLE)) != 0) {
        // Special case for a window with a custom title.
        // If the window is floating, we need a dialog layout
        if (mIsFloating) {
            TypedValue res = new TypedValue();
            getContext().getTheme().resolveAttribute(
                    com.android.internal.R.attr.dialogCustomTitleDecorLayout, res, true);
            layoutResource = res.resourceId;
        } else {
            layoutResource = com.android.internal.R.layout.screen_custom_title;
        }
        // XXX Remove this once action bar supports these features.
        removeFeature(FEATURE_ACTION_BAR);
    } else if ((features & (1 << FEATURE_NO_TITLE)) == 0) {
        // If no other features and not embedded, only need a title.
        // If the window is floating, we need a dialog layout
        if (mIsFloating) {
            TypedValue res = new TypedValue();
            getContext().getTheme().resolveAttribute(
                    com.android.internal.R.attr.dialogTitleDecorLayout, res, true);
            layoutResource = res.resourceId;
        } else if ((features & (1 << FEATURE_ACTION_BAR)) != 0) {
            layoutResource = com.android.internal.R.layout.screen_action_bar;
        } else {
            layoutResource = com.android.internal.R.layout.screen_title;
        }
        // System.out.println("Title!");
    } else if ((features & (1 << FEATURE_ACTION_MODE_OVERLAY)) != 0) {
        layoutResource = com.android.internal.R.layout.screen_simple_overlay_action_mode;
    } else {
        // Embedded, so no decoration is needed.
        layoutResource = com.android.internal.R.layout.screen_simple;
        // System.out.println("Simple!");
    }
    //根部局文件inflate到decor中
    View in = mLayoutInflater.inflate(layoutResource, null);
    decor.addView(in, new ViewGroup.LayoutParams(MATCH_PARENT, MATCH_PARENT));
    //加入mDecor(布局)中的id为content的View返回给contentParent
    ViewGroup contentParent = (ViewGroup)findViewById(ID_ANDROID_CONTENT);
    //...

    return contentParent;
     }
}
总的来说generateLayout流程就是,mDecor是一个FrameLayout(子类),根据theme选用系统布局文件(一般包含title,actionbar和id 为content的FrameLayout),并inflate为View,加入到mDecor中。而布局文件中包含的id为content的FrameLayout将返回给mContentParent。一旦我们有了mContentParent,就把我们setContentView的布局添加到mContentParent上了。
总结
经过上面的Activity setContentView调用到PhoneWindow setContentView;再利用PhoneWindow中的installDecor初始化mDecor,PhoneWindow的generatelayout完成mDecor对mContentParent的初始化。
给大家看一个例子
AndroidManifest.xml设置如下
<?xml version="1.0" encoding="utf-8"?>
<manifest xmlns:android="http://schemas.android.com/apk/res/android"
    package="com.yanbober.myapplication" >

    <application
        ......
        //主题设置为NoTitleBar
        android:theme="@android:style/Theme.Black.NoTitleBar" >
        ......
    </application>

</manifest>
generateLayout方法中的layoutResource变量值为R.layout.screen_simple,所以我们看下系统这个screen_simple.xml布局文件,如下:
<LinearLayout xmlns:android="http://schemas.android.com/apk/res/android"
    android:layout_width="match_parent"
    android:layout_height="match_parent"
    android:fitsSystemWindows="true"
    android:orientation="vertical">
    <ViewStub android:id="@+id/action_mode_bar_stub"
              android:inflatedId="@+id/action_mode_bar"
              android:layout="@layout/action_mode_bar"
              android:layout_width="match_parent"
              android:layout_height="wrap_content"
              android:theme="?attr/actionBarTheme" />
    <FrameLayout
         android:id="@android:id/content"
         android:layout_width="match_parent"
         android:layout_height="match_parent"
         android:foregroundInsidePadding="false"
         android:foregroundGravity="fill_horizontal|top"
         android:foreground="?android:attr/windowContentOverlay" />
</LinearLayout>
布局中,一般会包含ActionBar,TitleBar,和一个id为content的FrameLayout,这个布局是NoTitle的,所以在HierarchyViewer没有显现。
再来看下上面这个App的hierarchyviewer图谱,如下:
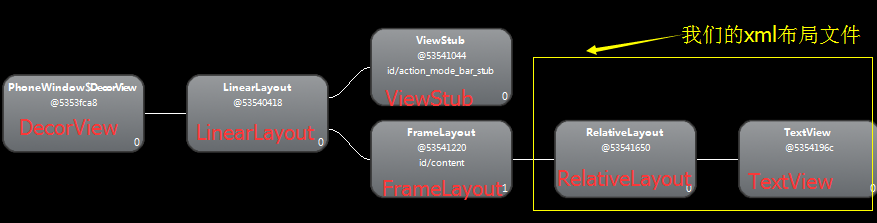
根部局是DecorView(FrameLayout子类),LinearLayout是根据Theme设置选择的系统布局文件,并添加到DecorView中,返回其中id为content的FrameLayout给mContentParent,用来承接setContentView传进来的布局文件。至此大家对setContentView的布局加载流程应该有了一个比较清楚的认识了。一个完整的Activity默认视图结构如图

大家可以在这里查看各种Theme下默认布局文件。
很惭愧,做了一点微小的贡献!


 1651
1651

 被折叠的 条评论
为什么被折叠?
被折叠的 条评论
为什么被折叠?
 到【灌水乐园】发言


