


导航蓝下移问题和安全区问题:https://www.swifty.cc/2081.htm
一.navigationController的实现原理:(网上搜索的,大部分都在这,没时间整合提取)
- UINavigationController默认显示一个根控制器,这个根视图必须指定(前面我们说过UINavigationController和UITabBarController类似仅仅作为导航容器,本身并不会显示视图),通过根控制器导航到其他下一级子视图。
- 在子视图中可以通过navigationController访问导航控制器,同时可以通过navigationController的childViewControllers获得当前栈中所有的子视图(注意每一个出栈的子视图都会被销毁)。
- UINavigationController导航是通过上方导航栏进行的(类似的UITabBarController是通过下方UITabBar进行导航),每个放到UINavigationController栈中的子视图都会显示一个导航栏,可以通过子控制器(包括根控制器)的navigationItem访问这个导航栏,修改其左右两边的按钮内容。
- 默认情况下除了根控制器之外的其他子控制器左侧都会在导航栏左侧显示返回按钮,点击可以返回上一级视图,同时按钮标题默认为上一级视图的标题,可以通过backBarButtonItem修改。下一级子视图左侧返回按钮上的标题的显示优先级为: 导航栏返回按钮backBarButtonItem的标题(注意不能直接给backBarButtonItem的标题赋值,只能重新给backBarButtonItem赋值)、导航栏navigationItem的标题,视图控制器标题。
=====================================
导航控制器管理一系列显示层次型信息的场景。它创建一个视图管理器"栈",栈底为根视图控制器,用户在场景间切换时,依次将试图控制器压入栈中,且当前场景的试图控制器位于栈顶。要返回上一级,导航控制器将弹出栈顶的控制器,从而回到它下面的控制器。
导航控制器还管理一个导航栏(UINavigationBar)。导航栏类似于工具栏,但它是使用导航项(UINavigationItem)实例填充的,该实例被加入到导航控制器管理的每个场景中。默认情况下,场景的导航项包含一个标题和一个Back按钮。Back按钮是以栏按钮项(UIBarButtonItem)的方式加入到导航项的。
导航项在Attributes inspector面板里有三个可设置属性:Title、Prompt和Back Button
Title -- 导航项的标题
Prompt -- 显示在标题上方的文本,向用户提供使用说明
Back Button -- 下一个场景的后退按钮的文本,假如没有设置,默认显示的文本是标题
在任何场景中,都可通过属性parentViewController来获取导航控制器。
导航控制器初始化的时候一般都有一个根视图控制器,导航控制器相当于一个栈,里面装的是视图控制器,最先进去的在最下面,最后进去的在最上面。在最上面的那个视图控制器的视图就是这个导航控制器对外展示的界面,也就是用户看到的界面。
(2)我们需要把导航控制器加载到APP中,需要把这个导航控制器设置为window的根视图控制器(都是控制器类,可以赋值),这样就相当于加载到了window里。
(3)我们要在栈中新增或者删除一个视图控制器,就需要得到导航控制器,一般在栈中得所有视图控制器都有一个self.navigationController,意思是我的导航控制器,也就是这个视图控制器所在的导航控制器,这样就拿到了导航控制器。
(4)栈中新增视图控制器用pushViewController,其实就是push进去一个,这样对于用户而言就是打开一个新界面了。
(5)栈中删除一个视图控制器用popViewControllerAnimated,当然这个pop只能pop最上面的那个,对于用户而言相当于从当前视图回到上一级视图。
(6)其实这个push和pop对于用户而言都是打开和跳转页面的一个操作。而pop由更多地操作方法,如一下子pop掉只剩下一个根视图控制器,那么就相当于从好几层直接回到最原始的主页面。也可以指定pop几个,以跳转到指定的页面。
//可以手动设置pop出栈,相当于删除这个页面,跳转到其他页面
26.//popViewControllerAnimated就是弹出,因为弹出只能弹出最上面的栈顶的那个,所以可以不用指定参数
27.//popToRootViewControllerAnimated-就是直接跳转到根视图控制图,如果只有两层,那么和popViewControllerAnimated并无区别,如果有很多层,那么其实就是相当于不仅把自己pop出去,还把所有除了根视图控制图之外的所有视图控制器都pop出去了,所以就相当于跳转到根视图控制器了
28.//popToViewController-就是跳转到指定的视图控制器xxx,这个xxx一定要在这个栈里面,即一定是在我们当前这个视图控制器的下面的,所以跳转也就是把自己和在xxx上面的所有视图控制器都pop出去,然后相当于直接跳转到xxx
29.//此处重点是这个xxx怎么获取,按照一般理解是用xxx再初始化一个视图控制器对象yyy,然后把这个对象yyy作为popToViewController参数
30.//但事实是,yyy是新初始化的,不在栈中,当然和在栈中的xxx初始化的那个对象也不是同一个对象,所以会报错(因为在栈中找不到啊)
31.//所以,self.navigationController.viewControllers出场,viewControllers是个数组,储存的时导航控制器栈中所有的视图控制器,最先push进去的时0,以此类推,最上面的肯定是数组的最后一个
32.//所以,那个xxx之前初始化的对象,可以用[self.navigationController.viewControllers objectAtIndex:0]表示,此处0就是根视图控制器
33.//所以,只要拿到navigationController,貌似能做很多事情
UIViewController的navigationItem属性
添加navigationItem是UIViewController的一个属性,这个属性是为UINavigationController服务的。这个属性包含以下几个界面元素:
leftBarButtonItem -- 左按钮
rightBarButtonItem -- 右按钮
backBarButtonItem -- 返回按钮
title -- 标题
prompt -- 提示

UIBarButtonItem *leftButton = [[UIBarButtonItem alloc] initWithTitle:@"LeftButton" style:UIBarButtonItemStylePlain target:self action:@selector(test1)];
firstVC.navigationItem.leftBarButtonItem = leftButton;

UIBarButtonItem *rightButton = [[UIBarButtonItem alloc] initWithTitle:@"RightButton" style:UIBarButtonItemStylePlain target:self action:@selector(test1)];
firstVC.navigationItem.rightBarButtonItem = rightButton;

UIBarButtonItem *backButton = [[UIBarButtonItem alloc] initWithTitle:@"BackButton" style:UIBarButtonItemStylePlain target:self action:@selector(test1)];
firstVC.navigationItem.backBarButtonItem = backButton;

firstVC.navigationItem.title = @"My Title";
//firstVC.navigationItem.titleView = [[UIView alloc] init];

firstVC.navigationItem.prompt = @"Just A Prompt";


leftBarButtonItem和rightBarButtonItem可以指定多个按钮,backButton只能指定一个按钮。
设定了prompt会增加NavigationBar的高度。
要进一步自定义title,可以通过titleView属性将title设置成一个自定义的UIView。
通过设定navigationItem.leftItemsSupplementBackButton = YES可以同时显示leftBarButtonItem和backBarButtonItem。
UIBarButtonItemStylePlain和UIBarButtonItemStyleDone的区别就是后者字体更粗而已。
UIViewController的edgesForExtendedLayout属性与extendedLayoutIncludesOpaqueBars属性
这也是两个与UINavigationController有关联的属性:
edgesForExtendedLayout — 这个属性属于UIExtendedEdge类型,它指定了视图的哪条边需要扩展开;默认值是UIRectEdgeAll(全部扩展),也可以通过UIRectEdgeLeft|UIRectEdgeRight这种方式设定部分扩展定、或设定为UIRectEdgeNone(全部不扩展)。
假如childVC有一个Y坐标为100的子控件,当edgesForExtendedLayout包含了UIRectEdgeTop时,它是从最顶端开始计算Y坐标;否则是从Navigationbar的offsetY开始计算Y坐标。
extendedLayoutIncludesOpaqueBars — 这个属性指定了当Navigationbar使用了不透明图片时,视图是否延伸至Bar所在区域,默认值时NO(不延伸)。当Navigationbar并未使用不透明图片做背景时,该属性无效。
当Navigationbar使用了不透明图片当背景时,各种情况如下:
1. edgesForExtendedLayout默认值(UIRectEdgeAll) && extendedLayoutIncludesOpaqueBars默认值(NO)
虽然edgesForExtendedLayout包含了UIRectEdgeTop,但由于是不透明图片做背景,并且extendedLayoutIncludesOpaqueBars设定了不延伸,这个时候子控件的Y坐标还是从Navigationbar的offsetY开始计算。当隐藏navigationBar时(navigationController.navigationBarHidden = YES),childVC会整体上移
2. edgesForExtendedLayout默认值(UIRectEdgeAll) && extendedLayoutIncludesOpaqueBars为YES
虽然是不透明图片做背景,但extendedLayoutIncludesOpaqueBars设定为延伸,这个时候子控件的Y坐标是从最顶端计算。当隐藏navigationBar时childVC不会改变位置。
可以通过下面的代码来验证这两个属性的各种搭配情况:
CGSize imageSize = CGSizeMake(1, 1);
UIGraphicsBeginImageContextWithOptions(imageSize, YES, 0);
[[UIColor greenColor] set];
UIBezierPath * path = [UIBezierPath bezierPathWithRect:CGRectMake(0, 0, imageSize.width, imageSize.height)];
[path fill];
UIImage *image = UIGraphicsGetImageFromCurrentImageContext ();
UIGraphicsEndImageContext();

[[UINavigationBar appearance] setBackgroundImage:image forBarMetrics:UIBarMetricsDefault];

firstVC.edgesForExtendedLayout = UIRectEdgeNone;

firstVC.extendedLayoutIncludesOpaqueBars = YES;
UINavigationController底部的ToolBar
UIBarButtonItem *one = [[UIBarButtonItem alloc] initWithBarButtonSystemItem:UIBarButtonSystemItemAdd target:nil action:nil];
UIBarButtonItem *two = [[UIBarButtonItem alloc] initWithBarButtonSystemItem:UIBarButtonSystemItemBookmarks target:nil action:nil];
UIBarButtonItem *three = [[UIBarButtonItem alloc] initWithBarButtonSystemItem:UIBarButtonSystemItemAction target:nil action:nil];

navigationController.toolbarHidden = NO;
[firstVC setToolbarItems:[NSArray arrayWithObjects:one, two, three, nil] animated:YES];
UINavigationControllerDelegate
该代理的两个主要方法如下,主要作用是在切换前对目标ViewController进行设置:
- (void)navigationController:(UINavigationController *)navigationController willShowViewController:(UIViewController *)viewController animated:(BOOL)animated
{
    NSLog(@"%@",viewController);
    viewController.view.backgroundColor = [UIColor greenColor];
    NSLog(@"willShowViewController");
}

- (void)navigationController:(UINavigationController *)navigationController didShowViewController:(UIViewController *)viewController animated:(BOOL)animated
{
    NSLog(@"%@",viewController);
    NSLog(@"didShowViewController");
}
如果导航上设置了后退按钮,那么手势切换控制器的功能就会消失;
如果滑动移除控制器的功能失效,清空代理(让导航控制器重新设置这个功能),设置入下:
  self.interactivePopGestureRecognizer.delegate = nil;//导航控制器中

从导航控制器push出来的控制器中:
  self.navigationController.interactivePopGestureRecognizer.delegate = nil;


返回手势有效
if ([self.navigationController respondsToSelector:@selector(interactivePopGestureRecognizer)]) {
        self.navigationController.interactivePopGestureRecognizer.enabled = YES;
    }
UINavigationController的topViewController与visibleViewController属性
topViewController — 获取顶层ViewController
visibleViewController — 获取当前显示的ViewController
绝大多数情况下,topViewController是等于visibleViewController的,对于在topViewController上通过presentViewController跳转到一个新的ViewController情况,topViewController是不等于visibleViewController的。
===========================================
//在appdeletegate中统一设置navigationBar的背景
[[UINavigationBar appearance]setBarTintColor:[UIColor grayColor]];
//在appdeletegate中统一设置navigationBar的标题的颜色。
[[UINavigationBar appearance]setTitleTextAttributes:@{NSForegroundColorAttributeName:[UIColor blueColor]}];
//在appdelegate中统一设置navigationBar上左右按钮的颜色(系统的按钮,不是自己定义的)
nav.navigationBar.tintColor = [UIColor whiteColor];
[[UIBarButtonItem appearance]setTintColor:[UIColor redColor]];
注意:如果设置了统一的navigationBar的背景颜色或者标题颜色后,要实现各自页面的navigationBar的背景或者颜色,需要在设置统一的设置以后设置才有效果。
//设置nav的navigationBar的背景颜色
LoginViewController *login=[[LoginViewController alloc]init];
UINavigationController *nav=[[UINavigationController alloc]initWithRootViewController:login];
nav.navigationBar.barTintColor = [UIColor greenColor];
//设置nav的navigationBar的标题颜色,
[nav.navigationBar setTitleTextAttributes:@{NSForegroundColorAttributeName : [UIColor whiteColor]}];
============================================================
导航控制器nav的根控制器vc1,下一个控制器nextVC,-3
nav是UItabBarController的一个子自控制器
设置导航标题的时候可以用:
vc1.title=@"首页";
vc1.navigationItem.title=@"首页";
[vc1.navigationItem setTitle:@“首页”];
设置tabBarItem.title的时候可以用:
nav.tabBarItem.title=@"首页";
如果用vc1.tabBarItem.title(不起作用)或者不设置tabBarItem.title时,并且用vc1.title时,tabBarItem.title会显示和vc1.title一样的标题;
如果vc1.tabBarItem.title(不起作用)或者不设置tabBarItem.title时,并且用[vc1.navigationItem setTitle:@"首页"]时,tabBarItem.title显示为空。
设置要跳转到的控制器的 navigationBar 隐藏,(场景:点击按钮push跳转到nextVC,在按钮中设置)
[nav setNavigationBarHidden:YES animated:YES];或者
[vc1.navigationController setNavigationBarHidden:YES animated:YES];//在跳转到下一个控制器之前设置跳转后的导航栏隐藏
场景:在根控制器view Did Load中,点击按钮之前设置隐藏,启动程序就隐藏
[nav1 setNavigationBarHidden:YES animated:YES];
//***********从tabBarController push出去后隐藏底部栏
-(id)init{
self = [super init];
if (self) {
self.hidesBottomBarWhenPushed = YES;//必须要在init方法中才有效果
}
return self;
}
****************************8
<strong><span style="color:#009926">//系统的</span>导航返回按钮的title就是上一级的navigationItem的title文字</strong> //我们也可以在子页中自定义一个返回按钮覆盖原先的"<back" UIBarButtonItem *barBtn5=[[UIBarButtonItem alloc]initWithTitle:@"回家" style:UIBarButtonItemStylePlain target:self action:@selector(backTo)]; self.navigationItem.leftBarButtonItem=barBtn5; 我们也可以在子页中自定义一个返回按钮覆盖原先的"<back" UIBarButtonItem *barBtn5=[[UIBarButtonItem alloc]initWithTitle:@"回家" style:UIBarButtonItemStylePlain target:self action:@selector(backTo)]; self.navigationItem.leftBarButtonItem=barBtn5; -(void)backTo{ [self.navigationController popToViewController:[self.navigationController.viewControllers objectAtIndex:0] animated:YES]; }backTo{ [self.navigationController popToViewController:[self.navigationController.viewControllers objectAtIndex:0] animated:YES]; }//navigationBar的模糊玻璃效果
<span style="color:#333333"><strong>===================</strong></span><span style="color:#333333"><strong>//设置导航右边的rightBarButtonItem</strong></span> UIButton *button = [UIButton buttonWithType:UIButtonTypeCustom];
[button setImage:[UIImage imageNamed:iconName] forState:UIControlStateNormal];
[button setImage:[UIImage imageNamed:hightIconName] forState:UIControlStateHighlighted];
// 图片多大, 显示多大
//currentImage --> 可以获取按钮当前的图像
button.size = button.currentImage.size;
[button addTarget:target action:action forControlEvents:UIControlEventTouchUpInside];
// 返回自定义视图的BarButtonItem
UIBarButtonItem *searchItem = [[UIBarButtonItem alloc] initWithCustomView:button];
mapItem.customView.width=50;//按钮的自定义视图的宽度
//间隔
UIBarButtonItem *flex=[[UIBarButtonItem alloc]initWithBarButtonSystemItem:UIBarButtonSystemItemFixedSpace target:nil action:nil];
flex.width=50;
UIBarButtonItem *mapItem = [[UIBarButtonItem alloc] initWithCustomView:button2];
self.navigationItem.rightBarButtonItems = @[mapItem,flex,searchItem];
========================================
//获取导航控制器的第一个控制器
UINavigationController *nav=[[UINAvigationConller alloc]initWithRootViewController:vc];
UIVIewController *vc=nav.topViewController
===========设置导航栏透明的方法:这几个方法本质是一样的
将导航栏设置为半透明,
self.navigationController.navigationBar.translucent = YES; //设置这个属性后视图的坐标会上移到导航栏的上面,
**********方法一:
先做一张全透明的图片1*1的像素就行,作为UINavigationBar的背景色,然后将barStyle设置成通道就可以了。
[self.navigationBar setBackgroundImage:[UIImage imageNamed:@"clear.png"]forBarMetrics:UIBarMetricsDefault];
self.navigationBar.barStyle = UIBarStyleBlack;//隐藏横线
********方法二:
clear是透明的图片
[self.navigationBar setBackgroundImage:[UIImage imageNamed:@"clear"] forBarMetrics:UIBarMetricsDefault];
[self.navigationBar setShadowImage:[UIImage new]];//去掉那一条横线
或者
[self.navigationBar setBackgroundImage:[UIImage new] forBarMetrics:UIBarMetricsDefault];
//去掉导航栏底部的黑线
self.navigationBar.shadowImage = [UIImage new];
=====去掉导航栏的底部横线,其实就是shadowimage===
[self.navigationController.navigationBar setBackgroundImage:[UIImage new] forBarMetrics:UIBarMetricsDefault];
[self.navigationController.navigationBar setShadowImage:[UIImage new]];
方法三:
//首先封装了一个方法,用来生成背景图片
- (UIImage *) imageWithFrame:(CGRect)frame alphe:(CGFloat)alphe {
frame = CGRectMake(0, 0, frame.size.width, frame.size.height);
UIColor *redColor = [UIColor colorWithRed:0 green:0 blue:0 alpha:alphe];
UIGraphicsBeginImageContext(frame.size);
CGContextRef context = UIGraphicsGetCurrentContext();
CGContextSetFillColorWithColor(context, [redColor CGColor]);
CGContextFillRect(context, frame);
UIImage *theImage = UIGraphicsGetImageFromCurrentImageContext();
UIGraphicsEndImageContext();
return theImage;
}
//设置背景图片(这里alpha=1.0)
-(void)settansparentNav{
UINavigationBar * bar = self.navigationBar;
UIImage *bgImage = [self imageWithFrame:CGRectMake(0, 0, [UIScreen mainScreen].bounds.size.width, 64) alphe:0];//可以调节透明度
[bar setShadowImage:[UIImage new]];
[bar setBackgroundImage:bgImage forBarMetrics:UIBarMetricsDefault];
}
++++++++++++++++++++++++++++++++++++++++++++++++++++++
总结下上面讲到的属性使用方法
//设置导航栏的背影色,ios6和ios7要区别对待,设置为透明色(clearColor)时无效,为黑色背影
if ([[[UIDevice currentDevice] systemVersion] floatValue] >= 7.0) {
// iOS 7 code
self.navigationController.navigationBar.barTintColor = [UIColor clearColor];
}
else {
// iOS 6.x code
self.navigationController.navigationBar.tintColor = [UIColor clearColor];
}
//设置导航栏title字体的样式
NSDictionary *dict = @{UITextAttributeTextColor: [UIColor colorWithRed:27.0/255 green:125.0/255blue:197.0/255 alpha:1],
UITextAttributeTextShadowColor: [UIColor whiteColor]};
self.navigationController.navigationBar.titleTextAttributes = dict;
//设置导航栏的背影图片,可以设置成透明效果。
[self.navigationController.navigationBar setBackgroundImage:[UIImage imageNamed:@"nav_bg.png"]forBarMetrics:UIBarMetricsDefault];
//设置导航栏的样式
self.navigationController.navigationBar.barStyle = UIBarStyleBlackTranslucent;
//门置导航栏为半透明效果,同时视图坐标上移。
self.navigationController.navigationBar.translucent = YES;
注意,上面设置和修改的属性都是全局的,设置后在当前这个UINavigationController中的导航栏都将改变。
如果想在局部的视图中修改导航的属性设置怎么办呢,可通过实现UINavigationControllerDelegate来实现。
例如:
@interface PicturePreviewViewController : UIViewController<<span style="color: #ff2500">UINavigationControllerDelegate>
将代理方法指向当前的类
self.navigationController.delegate = self;
在实现类中加入这个代理的方法及具体操作如下:
- (void) navigationController:(UINavigationController *)navigationController willShowViewController:(UIViewController *)viewController animated:(BOOL)animated {
// 如果进入的是当前视图控制器
if (viewController == self) {
//可在这里设置当前视图导航栏的效果
[self.navigationController.navigationBar setBackgroundImage:[UIImage imageNamed:@"nav_bg.png"]forBarMetrics:UIBarMetricsDefault];
// 背景设置为黑色
self.navigationController.navigationBar.tintColor = [UIColor colorWithRed:0.000 green:0.000blue:0.000 alpha:1.000];
// 设置为半透明
self.navigationController.navigationBar.translucent = YES;
}
else {
//进入其他视图控制器,需要恢复之前的设置效果
[self.navigationController.navigationBar setBackgroundImage:nilforBarMetrics:UIBarMetricsDefault];
// 背景颜色设置为系统默认颜色
self.navigationController.navigationBar.tintColor = nil;
// 设置为半透明为NO
self.navigationController.navigationBar.translucent = NO;
}
}
================navigationBar详解=========
-(void)setNav{
//translucent为YES 时,UIVisualEffectViewBackdropView和UIVisualEffectFilterView才会显示,会出现半透明的效果;translucent为NO时,无半透明效果。
[self.navigationController.navigationBar setBackgroundColor:[UIColor yellowColor]];//translucent为NO时,UIBarBackground(白色)把setbackgroundcolor遮挡了,不会显现backgroundColor;transluent设置为YES时,UIVisualEffectViewBackdropView(如果设置了self.view.background就显示view的背景色,否则显示window的颜色)的黑色会挡住setbackgroundcolor;setBackgroundColor只有与setBacgroundImage配合使用,才能起作用;
self.navigationController.navigationBar.translucent=YES;//默认YES,效果层(UIVisualEffectView,其中的UIVisualEffectViewBackdropView如果设置了self.view.background就显示view的背景色,否则显示window的颜色(默认黑色),UIVisualEffectFilterView为灰色半透明)显示----前提是没有设置setbackgroundImage。
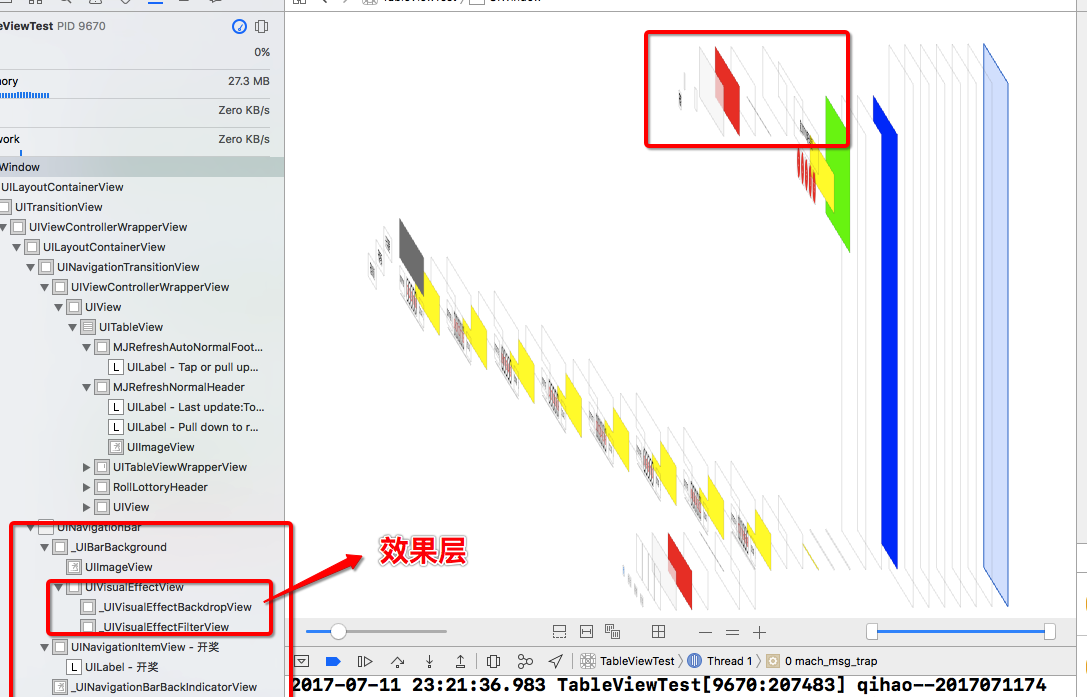
trnsluent为NO时,效果层不显示,UIBarBackground为白色。
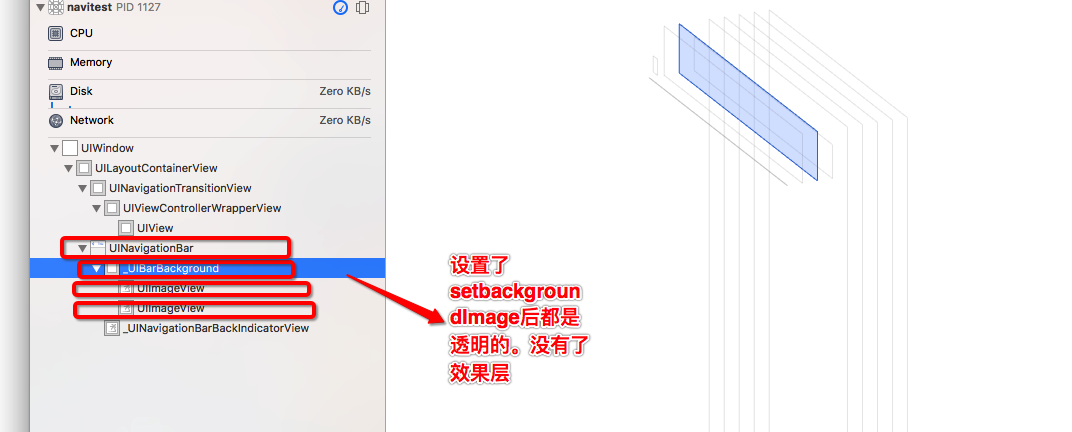
// [self.navigationController.navigationBar setBackgroundImage:[UIImage imageNamed:@"pay_weixin"] forBarMetrics:UIBarMetricsDefault];//设置了setBackgroundImage,transluent不管是YES还是NO,效果层(UIVisualEffectView,其中的UIVisualEffectViewBackdropView如果设置了self.view.background就显示view的背景色,否则显示window的颜色(默认黑色),UIVisualEffectFilterView为灰色半透明)都不显示;transluent为yes时,UIBarBackground为透明的;最终总体颜色显示的是window的颜色(默认黑色)。 transluent为NO时,(UIBarBackground)显示白色,最终显示总体的颜色为白色。
// [self.navigationController.navigationBar setTintColor:[UIColor yellowColor]];//设置系统原生的文字和图片颜色,比如系统的返回按钮
// [self.navigationController.navigationBar setBarTintColor:[UIColor yellowColor]];//transluent为YES时,是在效果层(UIVisualEffectView)上面添加了有添加了一层新的UIVisualEffectView(显示的是bartintcolor的颜色),这时UIVisualEffectFilterView为透明(只有在transluent为YES时才有效) ,UIVisualEffectViewBackdropView为白色,UIBarBAckground为白色;在setBackground之上显示;transluent为NO时,没有效果层;UIbarbackground显示的颜色就是BarTintColor的颜色。

总结:只有transluent为YES,并且没有设置setyBackgroundImage时才会出现效果层(灰色半透明效果);


=====
1、UINavigationController使用流程
UINavigationController为导航控制器,在iOS里经常用到。
我们看看它的如何使用:
下面的图显示了导航控制器的流程。最左侧是根视图,当用户点击其中的General项时 ,General视图会滑入屏幕;当用户继续点击Auto-Lock项时,Auto-Lock视图将滑入屏幕。相应地,在对象管理上,导航控制器使用了导航堆栈。根视图控制器在堆栈最底层,接下来入栈的是General视图控制器和Auto-Lock视图控制器。可以调用pushViewControllerAnimated:方法将视图控制器推入栈顶,也可以调用popViewControllerAnimated:方法将视图控制器弹出堆栈。

2、UINavigationController的结构组成
看下图,UINavigationController有Navigation bar ,Navigation View ,Navigation toobar等组成。

3;
控制视图推进推出的主要方法如下:
pushViewController:viewController animated:BOOL
(加载视图控制器)
– 添加指定的视图控制器并予以显示
popViewControllerAnimated:BOOL
(推出当前视图控制器)
– 弹出并向左显示前一个视图
popToViewController:viewController animated:BOOL
(推到指定视图控制器)
– 回到指定视图控制器, 也就是不只弹出一个
popToRootViewControllerAnimated:BOOL
退到根视图控制器
setNavigationBarHidden:BOOL animated:BOOL
设置导航栏是否显示
4、navigationItem
我们都知道navigationItem是UIViewController的一个属性,这个属性是为UINavigationController服务的。文档中是这么解释的“The navigation item used to represent the view controller in a parent’s navigation bar. (read-only)”,即navigation item在navigation Bar代表一个viewController,具体一点儿来说就是每一个加到navigationController的viewController都会有一个对应的navigationItem,该对象由viewController以懒加载的方式创建,稍后我们可以在对象中堆navigationItem进行配置,可以设置leftBarButtonItem, rightBarButtonItem, backBarButtonItem, title以及prompt等属性。前三个每一个都是一个UIBarButtonItem对象,最后两个属性是一个NSString类型描述,注意添加该描述以后NavigationBar的高度会增加30,总的高度会变成74(不管当前方向是Portrait还是Landscape,此模式下navgationbar都使用高度44加上prompt30的方式进行显示)。当然如果觉得只是设置文字的title不够爽,你还可以通过titleview属性指定一个定制的titleview,这样你就可以随心所欲了,当然注意指定的titleview的frame大小,不要显示出界。
a、添加UIBarButtonItem,
初始化UIBarButtonItem的方法有以下几种方法:
- (id)initWithImage:(UIImage *)image style:(UIBarButtonItemStyle)style target:(id)target action:(SEL)action;
- (id)initWithTitle:(NSString *)title style:(UIBarButtonItemStyle)style target:(id)target action:(SEL)action;
- (id)initWithBarButtonSystemItem:(UIBarButtonSystemItem)systemItem target:(id)target action:(SEL)action;
- (id)initWithCustomView:(UIView *)customView; //这个方法可以用来自定UIBarButtonItem
=======================
5、Toolbar
在前面我们讲了UINavigationController有Navigation bar ,Navigation View ,Navigation toolbar等组成,下面就讲解一下toolbar的使用,
toolbar在UINavigationController默认是隐藏的,可通过下面的代码显示出来。
self.navigationController.toolbarHidden = NO;
或
[self.navigationController setToolbarHidden:NO animated:YES];
在ToolBar上添加UIBarButtonItem,新建几个UIBarButtonItem,然后以数组的形式添加到Toolbar中
{
[super viewDidLoad];
self.navigationController.toolbarHidden = NO;
UIBarButtonItem*one=[[UIBarButtonItem alloc]initWithBarButtonSystemItem:UIBarButtonSystemItemAdd
target:nil
action:nil];
UIBarButtonItem*two=[[UIBarButtonItem alloc]initWithBarButtonSystemItem:UIBarButtonSystemItemBookmarks
target:nil
action:nil];
UIBarButtonItem*three=[[UIBarButtonItem alloc]initWithBarButtonSystemItem:UIBarButtonSystemItemAction
target:nil
action:nil];
UIBarButtonItem*four=[[UIBarButtonItem alloc]initWithBarButtonSystemItem:UIBarButtonSystemItemEdit
target:nil
action:nil];
UIBarButtonItem*flexItem=[[UIBarButtonItem alloc]initWithBarButtonSystemItem:UIBarButtonSystemItemFlexibleSpace
target:nil
action:nil];
[self setToolbarItems:@[flexItem,one,flexItem,two,flexItem,three,flexItem,four,flexItem]];
}
注意:用[self.navigationController.toolbar setItems:(NSArray *) animated:(BOOL)]这个方法添加item是不起效果的
调用这个方法后所有UINavigationController中的viewController都会显示出toolbar
所以为了不出现这种情况可以不用UINavigationController中的toolbar、需重写toolbar来实现。这样在返回上级视图时就不会出现本来隐藏着的toolbar,代码如下:
- (void)viewDidLoad
{
[super viewDidLoad];
UIBarButtonItem*one=[[UIBarButtonItem alloc]initWithBarButtonSystemItem:UIBarButtonSystemItemAdd
target:nil
action:nil];
UIBarButtonItem*two=[[UIBarButtonItem alloc]initWithBarButtonSystemItem:UIBarButtonSystemItemBookmarks
target:nil
action:nil];
UIBarButtonItem*three=[[UIBarButtonItem alloc]initWithBarButtonSystemItem:UIBarButtonSystemItemAction
target:nil
action:nil];
UIBarButtonItem*four=[[UIBarButtonItem alloc]initWithBarButtonSystemItem:UIBarButtonSystemItemEdit
target:nil
action:nil];
UIBarButtonItem*flexItem=[[UIBarButtonItem alloc]initWithBarButtonSystemItem:UIBarButtonSystemItemFlexibleSpace
target:nil
action:nil];
UIToolbar *toolBar = [[UIToolbar alloc] initWithFrame:CGRectMake(0, self.view.frame.size.height - 44,self.view.frame.size.width, 44)];
[toolBar setBarStyle:UIBarStyleBlack];
toolBar.autoresizingMask = UIViewAutoresizingFlexibleTopMargin;
[toolBar setItems:@[flexItem,one,flexItem,two,flexItem,three,flexItem,four,flexItem] animated:YES];
[self.view addSubview:toolBar];
}
============
b、自定义backBarButtonItem
导航的返回按钮要在上一级页面设置
在项目中使用UINavigationController导航,当第一级页面的title较长,在进入第二级页面后返回按钮backBarButtonItem的title就会变得很长,于是使用代码对leftButtonItem的title文本进行修改,无论是设置self.navigationItem.leftBarButtonItem.title = @"返回";还是self.navigationItem.backBarButtonItem.title = @"返回";都没有效果,title始终不会发生变化,要怎第才能修改返回按扭的title呢?
原来使用pushViewController切换到下一个视图时,navigationController按照以下3条顺序更改导航栏的左侧按钮。
1)、如果B视图有一个自定义的左侧按钮(leftBarButtonItem),则会显示这个自定义按钮;
2)、如果B没有自定义按钮,但是A视图的backBarButtonItem属性有自定义项,则显示这个自定义项;
3)、如果前2条都没有,则默认显示一个后退按钮,后退按钮的标题是A视图的标题。
按照这个解释,我把UIBarButtonItem *backItem……这段代码放在A视图的pushViewController语句之前。
- (void)tableView:(UITableView *)tableView didSelectRowAtIndexPath:(NSIndexPath *)indexPath{
if (indexPath.row == 0) {
ItemOneViewController *itemOne = [[ItemOneViewController alloc] init];
itemOne.title = @"addItem";
[self.navigationController pushViewController:itemOne animated:YES];
itemOne = nil;
}
else{
ItemTwoViewController *itemTwo = [[ItemTwoViewController alloc] init];
itemTwo.title = @"setBackItemTItle";
UIBarButtonItem *back = [[UIBarButtonItem alloc] initWithTitle:@"返回"
style:UIBarButtonItemStyleBordered
target:nil
action:nil];
self.navigationItem.backBarButtonItem = back;
back = nil;
[self.navigationController pushViewController:itemTwo animated:YES];
itemTwo = nil;
}
}
OK问题解决了,B视图的后退按钮的标题变成“返回“了,也可以使用自定义的返回按扭。
===========
c、自定义titleView,
UINavigationController的title可以用别的view替代,比如用UIview、 UIButton、 segmentedController、UILable等,在下面的代码我用UIButton来演示.代码如下
- (void)viewDidLoad
{
[super viewDidLoad];
UIButton *button = [[UIButton alloc] initWithFrame:CGRectMake(0, 0, 90, 35)];
button.backgroundColor = [UIColor blueColor];
[button setTitle:@"自定义titleView" forState:UIControlStateNormal];
self.navigationItem.titleView = button;
}
注意:view的大小不要大小导航栏的大小,要不在就会显示不下
——————————————————————————————————————————————————————————————————————————————————————————————————————
+++++++++++++++++++++++++++++++++++++++++++++++++++++++++++++++++++
这一部分是引用别人的 (1)navigationBar导航条可以看做是self.navigationController导航控制器的一个属性,可以直接用点来表示self.navigationController.navigationBar,当然navigationBar自己还有很多属性,比如样式barStyle、背景backgroundColor、frame属性(可以获取宽高这些信息),还可以用setBackgroundImage方法设置背景图片,当然图片多了可以使用clipsToBounds剪裁。
(2)但,navigationBar是否隐藏和显示这个需要它爸也就是self.navigationController来控制,有直接.navigationBarHidden设置为YES/NO,也可以用方法setNavigationBarHidden,都能实现效果。
(3)另一个重要的知识是对navigationItem的设置,这个属性和navigationController是平级的,所以直接可以用self.navigationItem使用。当然可用的有设置导航条标题的方法setTitle,当然你也可以直接把文字换成一个视图,即所谓的标题视图放在导航条的中间,用得方法是setTitleView,很多游戏的导航条中间貌似是一个图片,可以用这个。
(4)最重要的可能是给navigationItem设置左右两边的按钮,一般默认的在左边有“返回”,在右边的有“摄像头”(如微信朋友圈)。步骤就是创建一个UIBarButtonItem对象,然后直接把这个对象赋值给self.navigationItem.leftBarButtonItem或者右边的。当然也可以一次创建很多个UIBarButtonItem组成一个数组,然后把这个数组赋值给self.navigationItem.leftBarButtonItems,注意后面这个和前面这个相比,多了一个“s”,有很多个。也要注意一下有多个按钮时的排列顺序。
(5)我们创建的这些导航条按钮有很多种形式,有的是由文字的,有的时图片,有的时系统自带的如摄像头或者Reply这些icon,有的完全是自己定义的视图。我们当然也可以利用自己创建的导航条按钮来覆盖原来导航控制器产生的默认的按钮,如“<Back”。
=========================================================================
<span style="color:#333333">下面是示例:</span> 创建两个视图控制器(ViewController根视图控制器,SecondViewController子视图控制器),然后放在导航控制器栈中。并且在AppDelegate.m中进行把导航控制器赋值给self.window.rootViewController。
在ViewController.m中:
#import "ViewController.h"
#import "SecondViewController.h"

@interface ViewController ()

@end

@implementation ViewController

- (void)viewDidLoad {
  //创建一个按钮,点击后进入子视图控制器,相当于进入子页面
  UIButton *btn1=[UIButton buttonWithType:UIButtonTypeRoundedRect];
  btn1.frame=CGRectMake(38, 100, 300, 30);
  [btn1 setTitle:@"jump to secondviewcontroller" forState:UIControlStateNormal];
  btn1.backgroundColor=[UIColor whiteColor];
  self.view.backgroundColor=[UIColor redColor];
  [btn1 addTarget:self action:@selector(jumpTo) forControlEvents:UIControlEventTouchUpInside];
  [self.view addSubview:btn1];
  //设置导航条样式
  //默认的时白色半透明(有点灰的感觉),UIBarStyleBlack,UIBarStyleBlackTranslucent,UIBarStyleBlackOpaque都是黑色半透明,其实它们有的时不透明有的时透明有的时半透明,但不知为何无效果
  self.navigationController.navigationBar.barStyle=UIBarStyleDefault;
#import "SecondViewController.h"

@interface ViewController ()

@end

@implementation ViewController

- (void)viewDidLoad {
  //创建一个按钮,点击后进入子视图控制器,相当于进入子页面
  UIButton *btn1=[UIButton buttonWithType:UIButtonTypeRoundedRect];
  btn1.frame=CGRectMake(38, 100, 300, 30);
  [btn1 setTitle:@"jump to secondviewcontroller" forState:UIControlStateNormal];
  btn1.backgroundColor=[UIColor whiteColor];
  self.view.backgroundColor=[UIColor redColor];
  [btn1 addTarget:self action:@selector(jumpTo) forControlEvents:UIControlEventTouchUpInside];
  [self.view addSubview:btn1];
  //设置导航条样式
  //默认的时白色半透明(有点灰的感觉),UIBarStyleBlack,UIBarStyleBlackTranslucent,UIBarStyleBlackOpaque都是黑色半透明,其实它们有的时不透明有的时透明有的时半透明,但不知为何无效果
self.navigationController.navigationBar.barStyle=UIBarStyleDefault;//设置导航条玻璃模糊效果self.navigationController.navigationBar.barStyle=UIBarStyleBlackTranslucent;.navigationController.navigationBar.barStyle=UIBarStyleBlackTranslucent; //设置导航条背景颜色,也是半透明玻璃状的颜色效果
self.navigationController.navigationBar.backgroundColor=[UIColor orangeColor];
//可以用self.navigationController.navigationBar.frame.size获得高宽,还有self.navigationController.navigationBar.frame.origin获得x和y
//高44,宽375,如果是Retina屏幕,那么宽和高@2x即可分别是750和88
//x是0很明显,y是20,其中上面20就是留给状态栏的高度
NSLog(@"%f",self.navigationController.navigationBar.frame.origin.y);
//隐藏导航条,由此点击进入其他视图时导航条也会被隐藏,默认是NO
//以下一个直接给navigationBarHidden赋值,一个调用方法,都是一样的,下面一个多了一个动画选项而已
self.navigationController.navigationBarHidden=NO;
[self.navigationController setNavigationBarHidden:NO animated:YES];//设置导航条背景颜色,也是半透明玻璃状的颜色效果
self.navigationController.navigationBar.backgroundColor=[UIColor orangeColor];
//可以用self.navigationController.navigationBar.frame.size获得高宽,还有self.navigationController.navigationBar.frame.origin获得x和y
//高44,宽375,如果是Retina屏幕,那么宽和高@2x即可分别是750和88
//x是0很明显,y是20,其中上面20就是留给状态栏的高度
NSLog(@"%f",self.navigationController.navigationBar.frame.origin.y);
//隐藏导航条,由此点击进入其他视图时导航条也会被隐藏,默认是NO
//以下一个直接给navigationBarHidden赋值,一个调用方法,都是一样的,下面一个多了一个动画选项而已
self.navigationController.navigationBarHidden=NO;
[self.navigationController setNavigationBarHidden:NO animated:YES];
  //给导航条增加背景图片,其中forBarMetrics有点类似于按钮的for state状态,即什么状态下显示
  //UIBarMetricsDefault-竖屏横屏都有,横屏导航条变宽,则自动repeat图片
  //UIBarMetricsCompact-竖屏没有,横屏有,相当于之前老iOS版本里地UIBarMetricsLandscapePhone
  //UIBarMetricsCompactPrompt和UIBarMetricsDefaultPrompt暂时不知道用处,官方解释是Applicable only in bars with the prompt property, such as UINavigationBar and UISearchBar,以后遇到时再细说  //给导航条增加背景图片,其中forBarMetrics有点类似于按钮的for state状态,即什么状态下显示
  //UIBarMetricsDefault-竖屏横屏都有,横屏导航条变宽,则自动repeat图片
  //UIBarMetricsCompact-竖屏没有,横屏有,相当于之前老iOS版本里地UIBarMetricsLandscapePhone
  //UIBarMetricsCompactPrompt和UIBarMetricsDefaultPrompt暂时不知道用处,官方解释是Applicable only in bars with the prompt property, such as UINavigationBar and UISearchBar,以后遇到时再细说
  [self.navigationController.navigationBar setBackgroundImage:[UIImage imageNamed:@"big2.png"] forBarMetrics:UIBarMetricsDefault];
  //如果图片太大会向上扩展侵占状态栏的位置,在状态栏下方显示
  //clipsToBounds就是把多余的图片裁剪掉
  self.navigationController.navigationBar.clipsToBounds=YES;

  //设置导航标题
  [self.navigationItem setTitle:@"主页"];

  //设置导航标题视图,就是这一块可以加载任意一种视图
  //视图的x和y无效,视图上下左右居中显示在标题的位置
  UIView *textView1=[[UIView alloc]initWithFrame:CGRectMake(10, 10, 50, 30)];
  textView1.backgroundColor=[UIColor whiteColor];
  [self.navigationItem setTitleView:textView1];

  //设置导航条的左右按钮
  //先实例化创建一个UIBarButtonItem,然后把这个按钮赋值给self.navigationItem.leftBarButtonItem即可
  //初始化文字的按钮类型有UIBarButtonItemStylePlain和UIBarButtonItemStyleDone两种类型,区别貌似不大
  UIBarButtonItem *barBtn1=[[UIBarButtonItem alloc]initWithTitle:@"左边" style:UIBarButtonItemStylePlain target:self action:@selector(changeColor)];
  self.navigationItem.leftBarButtonItem=barBtn1;

  //我们还可以在左边和右边加不止一个按钮,,且可以添加任意视图,以右边为例
  //添加多个其实就是rightBarButtonItems属性,注意还有一个rightBarButtonItem,前者是赋予一个UIBarButtonItem对象数组,所以可以显示多个。后者被赋值一个UIBarButtonItem对象,所以只能显示一个
  //显示顺序,左边:按数组顺序从左向右;右边:按数组顺序从右向左
  //可以初始化成系统自带的一些barButton,比如UIBarButtonSystemItemCamera是摄像机,还有Done,Reply等等,会显示成一个icon图标
  //还可以initWithImage初始化成图片
  //还可以自定义,可以是任意一个UIView
  UIBarButtonItem *barBtn2=[[UIBarButtonItem alloc]initWithBarButtonSystemItem:UIBarButtonSystemItemCamera target:self action:@selector(changeColor2)];
  UIBarButtonItem *barBtn3=[[UIBarButtonItem alloc]initWithImage:[UIImage imageNamed:@"logo-40@2x.png"] style:UIBarButtonItemStylePlain target:self action:@selector(changeColor3)];
  UIView *view4=[[UIView alloc]initWithFrame:CGRectMake(10, 10, 20, 20)];
  view4.backgroundColor=[UIColor blackColor];
  UIBarButtonItem *barBtn4=[[UIBarButtonItem alloc]initWithCustomView:view4];
  NSArray *arr1=[[NSArray alloc]initWithObjects:barBtn2,barBtn3,barBtn4, nil];
  self.navigationItem.rightBarButtonItems=arr1;
  [super viewDidLoad];
  // Do any additional setup after loading the view, typically from a nib.
}

-(void)changeColor{
  self.view.backgroundColor=[UIColor purpleColor];
}
-(void)changeColor2{
  self.view.backgroundColor=[UIColor whiteColor];
}
-(void)changeColor3{
  self.view.backgroundColor=[UIColor orangeColor];
}

-(void)jumpTo{  [self.navigationController.navigationBar setBackgroundImage:[UIImage imageNamed:@"big2.png"] forBarMetrics:UIBarMetricsDefault];
  //如果图片太大会向上扩展侵占状态栏的位置,在状态栏下方显示
  //clipsToBounds就是把多余的图片裁剪掉
  self.navigationController.navigationBar.clipsToBounds=YES;

  //设置导航标题
  [self.navigationItem setTitle:@"主页"];

  //设置导航标题视图,就是这一块可以加载任意一种视图
  //视图的x和y无效,视图上下左右居中显示在标题的位置
  UIView *textView1=[[UIView alloc]initWithFrame:CGRectMake(10, 10, 50, 30)];
  textView1.backgroundColor=[UIColor whiteColor];
  [self.navigationItem setTitleView:textView1];

  //设置导航条的左右按钮
  //先实例化创建一个UIBarButtonItem,然后把这个按钮赋值给self.navigationItem.leftBarButtonItem即可
  //初始化文字的按钮类型有UIBarButtonItemStylePlain和UIBarButtonItemStyleDone两种类型,区别貌似不大
  UIBarButtonItem *barBtn1=[[UIBarButtonItem alloc]initWithTitle:@"左边" style:UIBarButtonItemStylePlain target:self action:@selector(changeColor)];
  self.navigationItem.leftBarButtonItem=barBtn1;

  //我们还可以在左边和右边加不止一个按钮,,且可以添加任意视图,以右边为例
  //添加多个其实就是rightBarButtonItems属性,注意还有一个rightBarButtonItem,前者是赋予一个UIBarButtonItem对象数组,所以可以显示多个。后者被赋值一个UIBarButtonItem对象,所以只能显示一个
  //显示顺序,左边:按数组顺序从左向右;右边:按数组顺序从右向左
  //可以初始化成系统自带的一些barButton,比如UIBarButtonSystemItemCamera是摄像机,还有Done,Reply等等,会显示成一个icon图标
  //还可以initWithImage初始化成图片
  //还可以自定义,可以是任意一个UIView
  UIBarButtonItem *barBtn2=[[UIBarButtonItem alloc]initWithBarButtonSystemItem:UIBarButtonSystemItemCamera target:self action:@selector(changeColor2)];
  UIBarButtonItem *barBtn3=[[UIBarButtonItem alloc]initWithImage:[UIImage imageNamed:@"logo-40@2x.png"] style:UIBarButtonItemStylePlain target:self action:@selector(changeColor3)];
  UIView *view4=[[UIView alloc]initWithFrame:CGRectMake(10, 10, 20, 20)];
  view4.backgroundColor=[UIColor blackColor];
  UIBarButtonItem *barBtn4=[[UIBarButtonItem alloc]initWithCustomView:view4];
  NSArray *arr1=[[NSArray alloc]initWithObjects:barBtn2,barBtn3,barBtn4, nil];
  self.navigationItem.rightBarButtonItems=arr1;
  [super viewDidLoad];
  // Do any additional setup after loading the view, typically from a nib.
}

-(void)changeColor{
  self.view.backgroundColor=[UIColor purpleColor];
}
-(void)changeColor2{
  self.view.backgroundColor=[UIColor whiteColor];
}
-(void)changeColor3{
  self.view.backgroundColor=[UIColor orangeColor];
}

-(void)jumpTo{
  //这里面核心的有两个,所谓跳转,其实就是往导航控制器栈中PUSH或者POP一个视图控制器,这样在最上面的视图控制器就变了,这样视图也跟着变了,因为只显示在栈顶得那个视图控制器的视图
  //所以(1)控制所谓的跳转,其实是导航控制器在控制,在里面的元素都可以通过navigationController属性获取到它们所在的导航控制器
  //所以(2)获取到导航控制器之后,使用Push的那个方法,往栈里面放一个视图控制器senCon1,这个新放入的在栈顶,就显示它的视图,所以用户改变页面跳转了  //这里面核心的有两个,所谓跳转,其实就是往导航控制器栈中PUSH或者POP一个视图控制器,这样在最上面的视图控制器就变了,这样视图也跟着变了,因为只显示在栈顶得那个视图控制器的视图
  //所以(1)控制所谓的跳转,其实是导航控制器在控制,在里面的元素都可以通过navigationController属性获取到它们所在的导航控制器
  //所以(2)获取到导航控制器之后,使用Push的那个方法,往栈里面放一个视图控制器senCon1,这个新放入的在栈顶,就显示它的视图,所以用户改变页面跳转了
  SecondViewController *senCon1=[[SecondViewController alloc]init];
  [self.navigationController pushViewController:senCon1 animated:YES];
}

@end  SecondViewController *senCon1=[[SecondViewController alloc]init];
  [self.navigationController pushViewController:senCon1 animated:YES];
}

@end
在SecondViewControllor.m中:
#import "SecondViewController.h"

@interface SecondViewController ()

@end

@implementation SecondViewController

- (void)viewDidLoad {
  UILabel *label1=[[UILabel alloc]init];
  label1.frame=CGRectMake(38, 80, 300, 30);
  label1.backgroundColor=[UIColor whiteColor];
  label1.text=@"This is secondviewcontroller";
  [self.view addSubview:label1];

  UIButton *btn2=[UIButton buttonWithType:UIButtonTypeRoundedRect];
  btn2.frame=CGRectMake(38, 120, 300, 30);
  [btn2 setTitle:@"backTo" forState:UIControlStateNormal];
  btn2.backgroundColor=[UIColor orangeColor];
  [self.view addSubview:btn2];
  [btn2 addTarget:self action:@selector(backTo) forControlEvents:UIControlEventTouchUpInside];

  //设置导航标题,这个时候的返回按钮的title就是上一级的navigationItem的title文字
  [self.navigationItem setTitle:@"子页"];

  //我们也可以在子页中自定义一个返回按钮覆盖原先的"<back"
  UIBarButtonItem *barBtn5=[[UIBarButtonItem alloc]initWithTitle:@"回家" style:UIBarButtonItemStylePlain target:self action:@selector(backTo)];
  self.navigationItem.leftBarButtonItem=barBtn5;

  [super viewDidLoad];
  // Do any additional setup after loading the view.
}

-(void)backTo{
  [self.navigationController popToViewController:[self.navigationController.viewControllers objectAtIndex:0] animated:YES];
}

@end  UIBarButtonItem *barBtn5=[[UIBarButtonItem alloc]initWithTitle:@"回家" style:UIBarButtonItemStylePlain target:self action:@selector(backTo)];
  self.navigationItem.leftBarButtonItem=barBtn5;

  [super viewDidLoad];
  // Do any additional setup after loading the view.
}

-(void)backTo{
  [self.navigationController popToViewController:[self.navigationController.viewControllers objectAtIndex:0] animated:YES];
}

@end
================隐藏导航栏的通用做法:方法一
- (void)viewWillAppear:(BOOL)animated {
[super viewWillAppear:animated];
[self.navigationController setNavigationBarHidden:YES animated:animated];
}
- (void)viewWillDisappear:(BOOL)animated {
[super viewWillDisappear:animated];
[self.navigationController setNavigationBarHidden:NO animated:animated];
}
方法二:
设置self为导航控制器的代理,实现代理方法,在将要显示控制器中设置导航栏隐藏和显示,使用这种方式不仅完美切合滑动返回手势,同时也解决了切换tabBar的时候,导航栏动态隐藏的问题.
@interface MyController () <UINavigationControllerDelegate>
@end
@implementation WLHomePageController
#pragma mark - lifeCycle
- (void)viewDidLoad {
[super viewDidLoad];
// 设置导航控制器的代理为self
self.navigationController.delegate =self;
}
// 将要显示控制器
- (void)navigationController:(UINavigationController *)navigationController willShowViewController:(UIViewController *)viewController animated:(BOOL)animated {
// 判断要显示的控制器是否是自己
BOOL isMYself = [viewController isKindOfClass:[self class]];
[self.navigationController setNavigationBarHidden:isMYself animated:YES];
}
*pop到navigation指定控制器:http://blog.csdn.net/u011146511/article/details/78221865
pop 到指定控制器:
方法一:
for (UIViewController *controllerin self.navigationController.viewControllers) {
if ([controllerisKindOfClass:[GetMoneyVCclass]]) {
GetMoneyVC *revise =(GetMoneyVC *)controller;
[self.navigationControllerpopToViewController:reviseanimated:YES];
}
}
方法二:
rootViewcontroller是数组中的第0个元素;下一级就是第一个元素,一次类推
UIViewController *viewCtl = self.navigationController.viewControllers[1];
[self.navigationController popToViewController:viewCtl animated:YES];
=========
iOS 11 后导航的层级===========


 717
717

 被折叠的 条评论
为什么被折叠?
被折叠的 条评论
为什么被折叠?
 到【灌水乐园】发言


