


 Picasso 是 Square 公司为 Android 设计的一款强大的图片加载库,它提供了内存和硬盘缓存、图形转换、自动取消下载等特性。通过 Picasso.with(context) 创建单例,并能自定义下载器、线程池等。图片加载通过 into(ImageView target) 方法完成,涉及内存检查、线程池执行、回调响应等一系列复杂流程。
picasso是Square公司开源的一个Android图形缓存库
主要有以下一些特性:
在adapter中回收和取消当前的下载;
使用最少的内存完成复杂的图形转换操作;
自动的内存和硬盘缓存;
图形转换操作,如变换大小,旋转等,提供了接口来让用户可以自定义转换操作;
加载载网络或本地资源;
Picasso.class
他有一个内部类,一般是通过他来创建实例的:
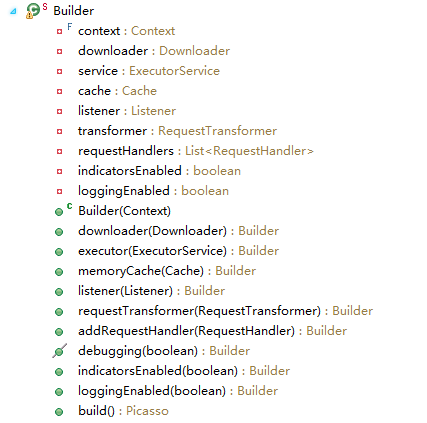
downloader(Downloader downloader) :
容许使用自定义的下载器,可以用okhttp或者volley,必须实现Downloader接口。
executor(ExecutorService executorService):
容许使用自己的线程池来进行下载
memoryCache(Cache memoryCache):
容许使用自己的缓存类,必须实现Cache接口。
requestTransformer(RequestTransformer transformer):
listener(Listener listener):
addRequestHandler(RequestHandler requestHandler):
indicatorsEnabled(boolean enabled):设置图片来源的指示器。
loggingEnabled(boolean enabled):
再来看build()方法:
 /** Create the {@link Picasso} instance. */
    public Picasso build() {
      Context context = this.context;

      if (downloader == null) {
        downloader = Utils.createDefaultDownloader(context);
      }
      if (cache == null) {
        cache = new LruCache(context);
      }
      if (service == null) {
        service = new PicassoExecutorService();
      }
      if (transformer == null) {
        transformer = RequestTransformer.IDENTITY;
      }

      Stats stats = new Stats(cache);

      Dispatcher dispatcher = new Dispatcher(context, service, HANDLER, downloader, cache, stats);

      return new Picasso(context, dispatcher, cache, listener, transformer,
          requestHandlers, stats, indicatorsEnabled, loggingEnabled);
}一般情况下,如果不需要自定义bulid里的这些方法,可以使用Picasso.with(context)默认方法来获得单例对象:
public static Picasso with(Context context) {
    if (singleton == null) {
      synchronized (Picasso.class) {
        if (singleton == null) {
          singleton = new Builder(context).build();
        }
      }
    }
    return singleton;
}public class SamplePicassoFactory {
private static Picasso sPicasso;
public static Picasso getPicasso(Context context) {
if (sPicasso == null) {
sPicasso = new Picasso.Builder(context)
.downloader(new OkHttpDownloader(context, ConfigConstants.MAX_DISK_CACHE_SIZE))
.memoryCache(new LruCache(ConfigConstants.MAX_MEMORY_CACHE_SIZE))
.build();
}
return sPicasso;
}
}如果通过以上方法获得对象后,还可以通过Picasso.setSingletonInstance(Picasso picasso)方法设置对象到Picasso中,这样以后还是通过Picasso.with(context)来调用。
接着就可以通过以下方式设置加载源:
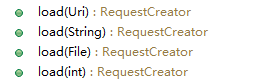
可以是uri地址,file文件,res资源drawable。
最终都是通过以下方法来创建一个RequestCreator对象:
public RequestCreator load(Uri uri) {
    return new RequestCreator(this, uri, 0);
  }
RequestCreator(Picasso picasso, Uri uri, int resourceId) {
if (picasso.shutdown) {
throw new IllegalStateException(
"Picasso instance already shut down. Cannot submit new requests.");
}
this.picasso = picasso;
this.data = new Request.Builder(uri, resourceId);
}
noPlaceholder():设置没有加载等待图片
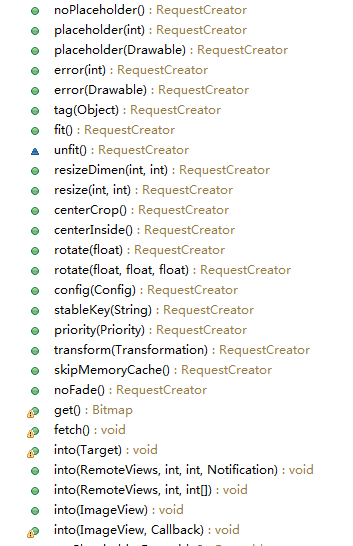
placeholder(int placeholderResId):设置加载等待图片
placeholder(Drawable placeholderDrawable):设置加载等待图片
error(int errorResId):设置加载出错的图片。
error(Drawable errorDrawable):设置加载出错的图片。
tag(Object tag):设置标记
fit():自适应,下载的图片有多少像素就显示多少像素
resizeDimen(int targetWidthResId, int targetHeightResId):设置图片显示的像素。
resize(int targetWidth, int targetHeight):设置图片显示的像素。
centerCrop():设置ImageView的ScaleType属性.
centerInside():设置ImageView的ScaleType属性.
rotate(float degrees):设置旋转角度。
rotate(float degrees, float pivotX, float pivotY):设置以某个中心点设置某个旋转角度。
config(Bitmap.Config config):设置Bitmap的Config属性
priority(Priority priority):设置请求的优先级。
transform(Transformation transformation):
skipMemoryCache():跳过内存缓存
memoryPolicy(MemoryPolicy policy, MemoryPolicy... additional):
networkPolicy(NetworkPolicy policy, NetworkPolicy... additional):
noFade():没有淡入淡出效果
get():获得bitmap对象
fetch():
设置完以上一系列属性之后,最关键的就是into方法,现在以into(ImageView target)举例:
public void into(ImageView target) {
    into(target, null);
} public void into(ImageView target, Callback callback) {
long started = System.nanoTime();
checkMain();
if (target  最低0.47元/天 解锁文章


 3970
3970

 被折叠的 条评论
为什么被折叠?
被折叠的 条评论
为什么被折叠?
 到【灌水乐园】发言


