


最近在学习android的view部分,于是动手实现了一个类似ViewPager的可上下或者左右拖动的ViewGroup,中间遇到了一些问题(例如touchEvent在onInterceptTouchEvent和onTouchEvent之间的传递流程),现在将我的实现过程记录下来。
首先,要实现一个ViewGroup,必须至少重写onLayout()方法(当然还有构造方法啦:))。onLayout()主要是用来安排子View在我们这个ViewGroup中的摆放位置的。除了onLayout()方法之外往往还需要重写onMeasure()方法,用于测算我们所需要占用的空间。
首先,我们来重写onMeasure()方法:(先只考虑水平方向)
@Override
protected void onMeasure(int widthMeasureSpec, int heightMeasureSpec) {
	// 计算所有child view 要占用的空间
	desireWidth = 0;
	desireHeight = 0;
	int count = getChildCount();
	for (int i = 0; i < count; ++i) {
		View v = getChildAt(i);
		if (v.getVisibility() != View.GONE) {
			measureChild(v, widthMeasureSpec,
					heightMeasureSpec);
			desireWidth += v.getMeasuredWidth();
			desireHeight = Math
					.max(desireHeight, v.getMeasuredHeight());
		}
	}

	// count with padding
	desireWidth += getPaddingLeft() + getPaddingRight();
	desireHeight += getPaddingTop() + getPaddingBottom();

	// see if the size is big enough
	desireWidth = Math.max(desireWidth, getSuggestedMinimumWidth());
	desireHeight = Math.max(desireHeight, getSuggestedMinimumHeight());

	setMeasuredDimension(resolveSize(desireWidth, widthMeasureSpec),
			resolveSize(desireHeight, heightMeasureSpec));
}onLayout():
@Override
protected void onLayout(boolean changed, int l, int t, int r, int b) {
	final int parentLeft = getPaddingLeft();
	final int parentRight = r - l - getPaddingRight();
	final int parentTop = getPaddingTop();
	final int parentBottom = b - t - getPaddingBottom();

	if (BuildConfig.DEBUG)
		Log.d("onlayout", "parentleft: " + parentLeft + "   parenttop: "
				+ parentTop + "   parentright: " + parentRight
				+ "   parentbottom: " + parentBottom);

	int left = parentLeft;
	int top = parentTop;

	int count = getChildCount();
	for (int i = 0; i < count; ++i) {
		View v = getChildAt(i);
		if (v.getVisibility() != View.GONE) {
			final int childWidth = v.getMeasuredWidth();
			final int childHeight = v.getMeasuredHeight();
				v.layout(left, top, left + childWidth, top + childHeight);
				left += childWidth;
		}
	}
}
上面的layout方法写的比较简单,就是简单的计算出每个子View的left值,然后调用view的layout方法即可。
现在我们加上xml布局文件,来看一下效果:
<LinearLayout xmlns:android="http://schemas.android.com/apk/res/android"
    android:layout_width="match_parent"
    android:layout_height="match_parent"
    android:orientation="vertical" >

    <com.example.testslidelistview.SlideGroup
        android:id="@+id/sl"
        android:layout_width="match_parent"
        android:layout_height="500dp"
        android:layout_marginTop="50dp"
        android:background="#FFFF00" >

        <ImageView
            android:id="@+id/iv1"
            android:layout_width="150dp"
            android:layout_height="300dp"
            android:scaleType="fitXY"
            android:src="@drawable/lead_page_1" />

        <ImageView
            android:layout_width="150dp"
            android:layout_height="300dp"
            android:scaleType="fitXY"
            android:src="@drawable/lead_page_2" />

        <ImageView
            android:layout_width="150dp"
            android:layout_height="300dp"
            android:scaleType="fitXY"
            android:src="@drawable/lead_page_3" />
    </com.example.testslidelistview.SlideGroup>

</LinearLayout>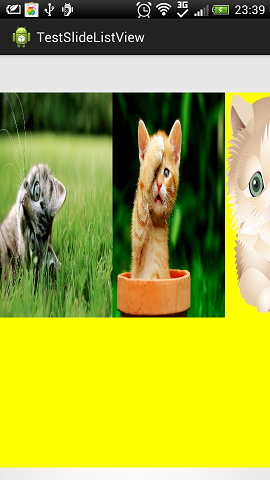
从效果图中我们看到,3个小图连在一起(因为现在不支持margin),然后我们也没办法让他们垂直居中(因为现在还不支持gravity)。
现在我们首先为咱们的ViewGroup增加一个支持margin和gravity的LayoutParams。
@Override
	protected android.view.ViewGroup.LayoutParams generateDefaultLayoutParams() {
		return new LayoutParams(ViewGroup.LayoutParams.MATCH_PARENT,
				ViewGroup.LayoutParams.MATCH_PARENT);
	}

	@Override
	public android.view.ViewGroup.LayoutParams generateLayoutParams(
			AttributeSet attrs) {
		return new LayoutParams(getContext(), attrs);
	}

	@Override
	protected android.view.ViewGroup.LayoutParams generateLayoutParams(
			android.view.ViewGroup.LayoutParams p) {
		return new LayoutParams(p);
	}

	public static class LayoutParams extends MarginLayoutParams {
		public int gravity = -1;

		public LayoutParams(Context c, AttributeSet attrs) {
			super(c, attrs);

			TypedArray ta = c.obtainStyledAttributes(attrs,
					R.styleable.SlideGroup);

			gravity = ta.getInt(R.styleable.SlideGroup_layout_gravity, -1);

			ta.recycle();
		}

		public LayoutParams(int width, int height) {
			this(width, height, -1);
		}

		public LayoutParams(int width, int height, int gravity) {
			super(width, height);
			this.gravity = gravity;
		}

		public LayoutParams(android.view.ViewGroup.LayoutParams source) {
			super(source);
		}

		public LayoutParams(MarginLayoutParams source) {
			super(source);
		}
	}
xml的自定义属性如下:
<?xml version="1.0" encoding="utf-8"?>
<resources>
    <attr name="layout_gravity">
        <!-- Push object to the top of its container, not changing its size. -->
        <flag name="top" value="0x30" />
        <!-- Push object to the bottom of its container, not changing its size. -->
        <flag name="bottom" value="0x50" />
        <!-- Push object to the left of its container, not changing its size. -->
        <flag name="left" value="0x03" />
        <!-- Push object to the right of its container, not changing its size. -->
        <flag name="right" value="0x05" />
        <!-- Place object in the vertical center of its container, not changing its size. -->
        <flag name="center_vertical" value="0x10" />
        <!-- Place object in the horizontal center of its container, not changing its size. -->
        <flag name="center_horizontal" value="0x01" />
    </attr>

    <declare-styleable name="SlideGroup">
        <attr name="layout_gravity" />
    </declare-styleable>
</resources>
现在基本的准备工作差不多了,然后需要修改一下onMeasure()和onLayout()。
onMeasure():(上一个版本,我们在计算最大宽度和高度时忽略了margin)
@Override
protected void onMeasure(int widthMeasureSpec, int heightMeasureSpec) {
	// 计算所有child view 要占用的空间
	desireWidth = 0;
	desireHeight = 0;
	int count = getChildCount();
	for (int i = 0; i < count; ++i) {
		View v = getChildAt(i);
		if (v.getVisibility() != View.GONE) {

			LayoutParams lp = (LayoutParams) v.getLayoutParams();
			//将measureChild改为measureChildWithMargin
			measureChildWithMargins(v, widthMeasureSpec, 0,
					heightMeasureSpec, 0);
			//这里在计算宽度时加上margin
			desireWidth += v.getMeasuredWidth() + lp.leftMargin + lp.rightMargin;
			desireHeight = Math
					.max(desireHeight, v.getMeasuredHeight() + lp.topMargin + lp.bottomMargin);
		}
	}

	// count with padding
	desireWidth += getPaddingLeft() + getPaddingRight();
	desireHeight += getPaddingTop() + getPaddingBottom();

	// see if the size is big enough
	desireWidth = Math.max(desireWidth, getSuggestedMinimumWidth());
	desireHeight = Math.max(desireHeight, getSuggestedMinimumHeight());

	setMeasuredDimension(resolveSize(desireWidth, widthMeasureSpec),
			resolveSize(desireHeight, heightMeasureSpec));
}
onLayout()(加上margin和gravity)
@Override
protected void onLayout(boolean changed, int l, int t, int r, int b) {
final int parentLeft = getPaddingLeft();
final int parentRight = r - l - getPaddingRight();
final int parentTop = getPaddingTop();
final int parentBottom = b - t - getPaddingBottom();
if (BuildConfig.DEBUG)
Log.d("onlayout", "parentleft: " + parentLeft + " parenttop: "
+ parentTop + " parentright: " + parentRight
+ " parentbottom: " + parentBottom);
int left = parentLeft;
int top = parentTop;
int count = getChildCount();
for (int i = 0; i < count; ++i) {
View v = getChildAt(i);
if (v.getVisibility() != View.GONE) {
LayoutParams lp = (LayoutParams) v.getLayoutParams();
final int childWidth = v.getMeasuredWidth();
final int childHeight = v.getMeasuredHeight();
final int gravity = lp.gravity;
final int horizontalGravity = gravity
& Gravity.HORIZONTAL_GRAVITY_MASK;
final int verticalGravity = gravity
& Gravity.VERTICAL_GRAVITY_MASK;
left += lp.leftMargin;
top = parentTop + lp.topMargin;
if (gravity != -1) {
switch (verticalGravity) {
case Gravity.TOP:
break;
case Gravity.CENTER_VERTICAL:
top = parentTop
+ (parentBottom - parentTop - childHeight)
/ 2 + lp.topMargin - lp.bottomMargin;
break;
case Gravity.BOTTOM:
top = parentBottom - childHeight - lp.bottomMargin;
break;
}
}
if (BuildConfig.DEBUG) {
Log.d("onlayout", "child[width: " + childWidth
+ ", height: " + childHeight + "]");
Log.d("onlayout", "child[left: " + left + ", top: "
+ top + ", right: " + (left + childWidth)
+ ", bottom: " + (top + childHeight));
}
v.layout(left, top, left + childWidth, top + childHeight);
left += childWidth + lp.rightMargin;
}
}
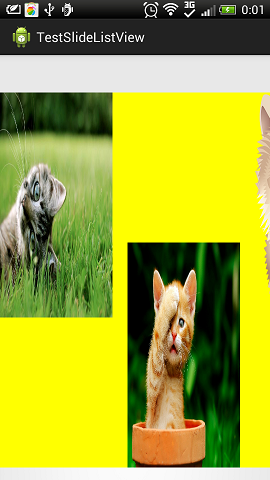
}现在修改一下xml布局文件,加上例如xmlns:ly="http://schemas.android.com/apk/res-auto",的xml命名空间,来引用我们设置的layout_gravity属性。(这里的“res-auto”其实还可以使用res/com/example/testslidelistview来代替,但是前一种方法相对简单,尤其是当你将某个ui组件作为library来使用的时候)
现在的效果图如下:有了margin,有了gravity。
其实在这个基础上,我们可以很容易的添加一个方向属性,使得它可以通过设置一个xml属性或者一个java api调用来实现垂直排列。
下面我们增加一个用于表示方向的枚举类型:
public static enum Orientation {
		HORIZONTAL(0), VERTICAL(1);

		private int value;
		private Orientation(int i) {
			value = i;
		}
		public int value() {
			return value;
		}
		public static Orientation valueOf(int i) {
			switch (i) {
			case 0:
				return HORIZONTAL;
			case 1:
				return VERTICAL;
			default:
				throw new RuntimeException("[0->HORIZONTAL, 1->VERTICAL]");
			}
		}
	}
然后我们需要改变onMeasure(),来正确的根据方向计算需要的最大宽度和高度。
@Override
	protected void onMeasure(int widthMeasureSpec, int heightMeasureSpec) {
		// 计算所有child view 要占用的空间
		desireWidth = 0;
		desireHeight = 0;
		int count = getChildCount();
		for (int i = 0; i < count; ++i) {
			View v = getChildAt(i);
			if (v.getVisibility() != View.GONE) {
				LayoutParams lp = (LayoutParams) v.getLayoutParams();
				measureChildWithMargins(v, widthMeasureSpec, 0,
						heightMeasureSpec, 0);

				//只是在这里增加了垂直或者水平方向的判断
				if (orientation == Orientation.HORIZONTAL) {
					desireWidth += v.getMeasuredWidth() + lp.leftMargin
							+ lp.rightMargin;
					desireHeight = Math.max(desireHeight, v.getMeasuredHeight()
							+ lp.topMargin + lp.bottomMargin);
				} else {
					desireWidth = Math.max(desireWidth, v.getMeasuredWidth()
							+ lp.leftMargin + lp.rightMargin);
					desireHeight += v.getMeasuredHeight() + lp.topMargin
							+ lp.bottomMargin;
				}
			}
		}

		// count with padding
		desireWidth += getPaddingLeft() + getPaddingRight();
		desireHeight += getPaddingTop() + getPaddingBottom();

		// see if the size is big enough
		desireWidth = Math.max(desireWidth, getSuggestedMinimumWidth());
		desireHeight = Math.max(desireHeight, getSuggestedMinimumHeight());

		setMeasuredDimension(resolveSize(desireWidth, widthMeasureSpec),
				resolveSize(desireHeight, heightMeasureSpec));
	}
onLayout():
@Override
	protected void onLayout(boolean changed, int l, int t, int r, int b) {
		final int parentLeft = getPaddingLeft();
		final int parentRight = r - l - getPaddingRight();
		final int parentTop = getPaddingTop();
		final int parentBottom = b - t - getPaddingBottom();

		if (BuildConfig.DEBUG)
			Log.d("onlayout", "parentleft: " + parentLeft + "   parenttop: "
					+ parentTop + "   parentright: " + parentRight
					+ "   parentbottom: " + parentBottom);

		int left = parentLeft;
		int top = parentTop;

		int count = getChildCount();
		for (int i = 0; i < count; ++i) {
			View v = getChildAt(i);
			if (v.getVisibility() != View.GONE) {
				LayoutParams lp = (LayoutParams) v.getLayoutParams();
				final int childWidth = v.getMeasuredWidth();
				final int childHeight = v.getMeasuredHeight();
				final int gravity = lp.gravity;
				final int horizontalGravity = gravity
						& Gravity.HORIZONTAL_GRAVITY_MASK;
				final int verticalGravity = gravity
						& Gravity.VERTICAL_GRAVITY_MASK;

				if (orientation == Orientation.HORIZONTAL) {
					// layout horizontally, and only consider vertical gravity

					left += lp.leftMargin;
					top = parentTop + lp.topMargin;
					if (gravity != -1) {
						switch (verticalGravity) {
						case Gravity.TOP:
							break;
						case Gravity.CENTER_VERTICAL:
							top = parentTop
									+ (parentBottom - parentTop - childHeight)
									/ 2 + lp.topMargin - lp.bottomMargin;
							break;
						case Gravity.BOTTOM:
							top = parentBottom - childHeight - lp.bottomMargin;
							break;
						}
					}

					if (BuildConfig.DEBUG) {
						Log.d("onlayout", "child[width: " + childWidth
								+ ", height: " + childHeight + "]");
						Log.d("onlayout", "child[left: " + left + ", top: "
								+ top + ", right: " + (left + childWidth)
								+ ", bottom: " + (top + childHeight));
					}
					v.layout(left, top, left + childWidth, top + childHeight);
					left += childWidth + lp.rightMargin;
				} else {
					// layout vertical, and only consider horizontal gravity

					left = parentLeft;
					top += lp.topMargin;
					switch (horizontalGravity) {
					case Gravity.LEFT:
						break;
					case Gravity.CENTER_HORIZONTAL:
						left = parentLeft
								+ (parentRight - parentLeft - childWidth) / 2
								+ lp.leftMargin - lp.rightMargin;
						break;
					case Gravity.RIGHT:
						left = parentRight - childWidth - lp.rightMargin;
						break;
					}
					v.layout(left, top, left + childWidth, top + childHeight);
					top += childHeight + lp.bottomMargin;
				}
			}
		}
	}
现在我们可以增加一个xml属性:
<attr name="orientation">
            <enum name="horizontal" value="0" />
            <enum name="vertical" value="1" />
</attr>
现在就可以在布局文件中加入ly:orientation="vertical"来实现垂直排列了(ly是自定义的xml命名空间)
布局文件如下:
<LinearLayout xmlns:android="http://schemas.android.com/apk/res/android"
    android:layout_width="match_parent"
    android:layout_height="match_parent"
    android:orientation="vertical" >

    <com.example.testslidelistview.SlideGroup
        xmlns:gs="http://schemas.android.com/apk/res-auto"
        android:id="@+id/sl"
        android:layout_width="match_parent"
        android:layout_height="match_parent"
        android:layout_marginTop="50dp"
        android:background="#FFFF00" >

        <ImageView
            android:id="@+id/iv1"
            android:layout_width="300dp"
            android:layout_height="200dp"
            android:layout_marginBottom="20dp"
            gs:layout_gravity="left"
            android:scaleType="fitXY"
            android:src="@drawable/lead_page_1" />

        <ImageView
            android:layout_width="300dp"
            android:layout_height="200dp"
            android:layout_marginBottom="20dp"
            gs:layout_gravity="center_horizontal"
            android:scaleType="fitXY"
            android:src="@drawable/lead_page_2" />

        <ImageView
            android:layout_width="300dp"
            android:layout_height="200dp"
            android:layout_marginBottom="20dp"
            gs:layout_gravity="right"
            android:scaleType="fitXY"
            android:src="@drawable/lead_page_3" />
    </com.example.testslidelistview.SlideGroup>

</LinearLayout>
现在效果图如下:
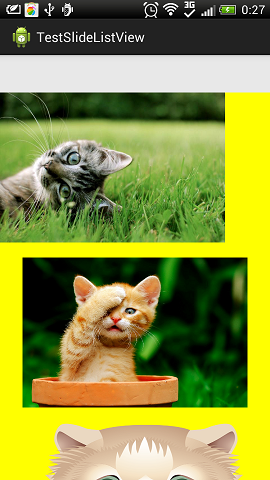
现在基本上是实现了一个简单的基于ViewGroup的layout,但是从上面的图中可以看出,第三张都没有显示完整,那么为了能够显示更多的内容,我们需要支持滑动,那就涉及到onTouchEvent(),以及Scroller的使用,这些就在下一篇中记录吧。。。(自定义ViewGroup (2)支持滑动,并处理多指触摸可能产生的跳动问题)


 329
329

 被折叠的 条评论
为什么被折叠?
被折叠的 条评论
为什么被折叠?
 到【灌水乐园】发言


